Search the Community
Showing results for tags 'graphics'.
-

Version 1.0.0
266 downloads
English Version NEW VERSION: GataFumada_NewCrest_Noir_+Dark 🌚🎬 I’ve added a new version to the original preset for those looking for a more "cinematic" and dramatic touch in their game. This +Dark edition is more intense but fully complementary—ideal for storytelling or simply giving your save a raw, realistic vibe. What you’ll notice: True Black & White: It removes the game's flat colors, giving buildings, streets, and interiors a classic film look. Intense Contrast: Shadows are deeper and lights pop more. It works beautifully during the day for a melancholic feel and is spectacular at night for high-drama scenes. Rich Detail: It brings out textures in walls, roads, and objects that usually go unnoticed. Optimized & Lightweight: It’s super optimized and has zero impact on performance. You won’t even notice it’s running, but you’ll forget what the original game looked like once you see it! Check the previews: In the attached photos, you can see the preset in action during the day and night, and how it blends perfectly with the UI, interiors, and Sims. And of course, don’t miss the video recorded entirely with this preset! Watch it in action here: 👇 English Dialogues in the video. Pro Tip: Download both versions! You can swap between the original and the +Dark edition in the ReShade menu (Home key). Pro tip: set a shortcut for each preset and switch them with a single click to match the "vibe" of your scene. If you like my work, show some love! ❤️ Subscribe to my channel, follow me, and hit that like button. It helps a lot! ------------------------------------------------------------------------------------------------------------------------------------------------------------------------------------------------- Versión en Español NUEVA VERSIÓN: GataFumada_NewCrest_Noir_+Dark 🌚🎬 He añadido una nueva versión al preset original para los que buscan un toque más "cinematográfico" y dramático en su juego. Esta edición +Dark es más intensa que la anterior pero totalmente complementaria, ideal para contar historias o simplemente cambiar de aires en tu partida con un estilo más crudo y real. Lo que vas a notar: Blanco y Negro real: Quita los colores planos del juego, dando a los edificios, calles e interiores un aspecto de cine clásico. Contraste Intenso: Las sombras son más profundas y las luces resaltan más. Funciona genial de día para un estilo melancólico y es espectacular de noche para escenas de mucho drama. Más detalle: Resalta texturas en paredes, suelos y objetos que normalmente pasan desapercibidas. Optimizado y Ligero: Está súper optimizado y no pesa nada. No notarás que lo tienes puesto por el rendimiento, pero te olvidarás de cómo se veía el juego original de lo bien que luce. Echa un ojo a las fotos: En las imágenes puedes ver cómo queda el preset de día, de noche y cómo se integra con la interfaz (UI), los interiores y los Sims. Y por supuesto, no te pierdas el vídeo grabado íntegramente con este preset. Míralo en acción aquí: 👇 Diálogos en Español. Consejo: ¡Descarga ambas versiones! Puedes alternar entre la original y la +Dark desde el menú de ReShade (tecla Inicio/Home). Crea un atajo para cada preset e intercámbialos con un click según la escena que estés jugando o la "vibra" que te apetezca. ¡Si te gusta mi trabajo, dale amor! ❤️ Suscríbete al canal, sígueme en mis redes y dale a like. ¡Me ayuda muchísimo a seguir creando! -
New Preset GF-New Crest-Noir +DARK View File English Version NEW VERSION: GataFumada_NewCrest_Noir_+Dark 🌚🎬 I’ve added a new version to the original preset for those looking for a more "cinematic" and dramatic touch in their game. This +Dark edition is more intense but fully complementary—ideal for storytelling or simply giving your save a raw, realistic vibe. What you’ll notice: True Black & White: It removes the game's flat colors, giving buildings, streets, and interiors a classic film look. Intense Contrast: Shadows are deeper and lights pop more. It works beautifully during the day for a melancholic feel and is spectacular at night for high-drama scenes. Rich Detail: It brings out textures in walls, roads, and objects that usually go unnoticed. Optimized & Lightweight: It’s super optimized and has zero impact on performance. You won’t even notice it’s running, but you’ll forget what the original game looked like once you see it! Check the previews: In the attached photos, you can see the preset in action during the day and night, and how it blends perfectly with the UI, interiors, and Sims. And of course, don’t miss the video recorded entirely with this preset! Watch it in action here: 👇 English Dialogues in the video. Pro Tip: Download both versions! You can swap between the original and the +Dark edition in the ReShade menu (Home key). Pro tip: set a shortcut for each preset and switch them with a single click to match the "vibe" of your scene. If you like my work, show some love! ❤️ Subscribe to my channel, follow me, and hit that like button. It helps a lot! ------------------------------------------------------------------------------------------------------------------------------------------------------------------------------------------------- Versión en Español NUEVA VERSIÓN: GataFumada_NewCrest_Noir_+Dark 🌚🎬 He añadido una nueva versión al preset original para los que buscan un toque más "cinematográfico" y dramático en su juego. Esta edición +Dark es más intensa que la anterior pero totalmente complementaria, ideal para contar historias o simplemente cambiar de aires en tu partida con un estilo más crudo y real. Lo que vas a notar: Blanco y Negro real: Quita los colores planos del juego, dando a los edificios, calles e interiores un aspecto de cine clásico. Contraste Intenso: Las sombras son más profundas y las luces resaltan más. Funciona genial de día para un estilo melancólico y es espectacular de noche para escenas de mucho drama. Más detalle: Resalta texturas en paredes, suelos y objetos que normalmente pasan desapercibidas. Optimizado y Ligero: Está súper optimizado y no pesa nada. No notarás que lo tienes puesto por el rendimiento, pero te olvidarás de cómo se veía el juego original de lo bien que luce. Echa un ojo a las fotos: En las imágenes puedes ver cómo queda el preset de día, de noche y cómo se integra con la interfaz (UI), los interiores y los Sims. Y por supuesto, no te pierdas el vídeo grabado íntegramente con este preset. Míralo en acción aquí: 👇 Diálogos en Español. Consejo: ¡Descarga ambas versiones! Puedes alternar entre la original y la +Dark desde el menú de ReShade (tecla Inicio/Home). Crea un atajo para cada preset e intercámbialos con un click según la escena que estés jugando o la "vibra" que te apetezca. ¡Si te gusta mi trabajo, dale amor! ❤️ Suscríbete al canal, sígueme en mis redes y dale a like. ¡Me ayuda muchísimo a seguir creando! Submitter gatafumeta Submitted 05/02/26 Category Other Requirements
-
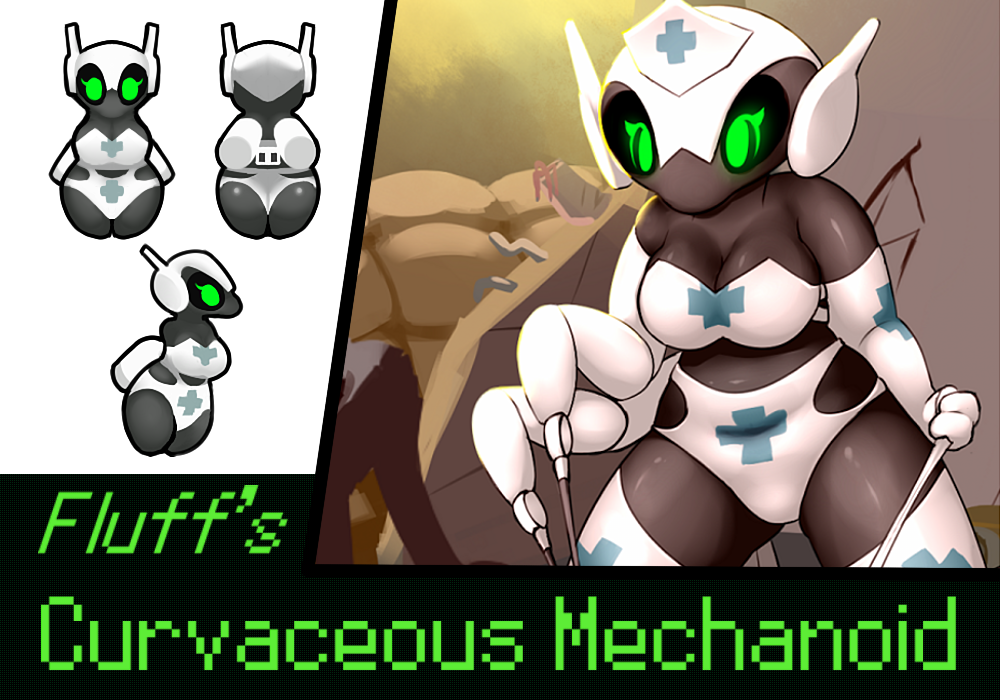
 View File Fluff's Curvaceous Underarmored Mechanoids continued to 1.6 The truth is that I recently regained interest in rjw but I didn't see that there were many modifications for games played as mechanists and I searched and I found this mod made by @FluffiestX And I thought it was incredible art, all due respect, but he hasn't updated it, so he decided to re-upload his incredible mod updated to 1.6. I didn't update the Race Mechanist mod from the patch because it's not yet ready for 1.6 and I don't think they'll upload it, anyway. All credit to @FluffiestX and if you ask me to remove the mod I will do it. " You want beautiful machines to do your heavy lifting! Well, look no further. You can have it all and more by simply drilling into yourself and implanting a chip in your brain. Typical of life in Rimworld, right?" 📦 Description This mod continues the legacy of [original mod name if applicable], updating it for RimWorld 1.6. It introduces curvaceous, underarmored mechanoid variants while preserving compatibility with [other mods if applicable]. Fully modular and patched for 1.6 No texture renaming or function fusion Editorial blindaje respected at every step 🔧 Requirements RimWorld 1.6 🧩 Installation Download the file from the “Files” tab. Extract into your Mods folder. Enable it in RimWorld’s mod menu. 🧪 Compatibility Compatible with , alpha mechanoids : https://steamcommunity.com/workshop/filedetails/?id=2973169158 Not compatible with : I have not found any incompatibility and it is protected against future errors, if they arise, so for example if a graphic does not load or generates a conflict, I ignore it and use the vanilla graphic, thus avoiding you having to close the game after those 3 hours of loading :D...... :,D 📝 Changelog v1.6.0 Updated defNames for RimWorld 1.6 compatibility XML error corrections without altering original structure 🧠 Credits Original mod by @FluffiestX Continuation and patching by @Puck-UWU(editorial blindaje and modularity guaranteed) This is my first time modifying mods, I usually translate them into Spanish but I already tested the mod and it works, any complaints or things let me know and this is a mod that is from 1.4 or 1.5 and I don't know how updated it is so it's normal that not all the mech are without new graphics, but only the most recent ones, please if you have any way to convince the artist to resume the modification, do it, I loved his art. Original mod : loverslab.com/topic/215823-mod-fluffs-curvaceous-underarmored-mechanoids/?do=findComment&comment=4149605 Submitter Puck-UWU Submitted 09/15/2025 Category Rimworld
 -
Lately pcexpress fcked up with our graphics card and lost it when they switched shops. Now they gave me back a 3,000PHP worth gift certificate for their shop. This is the available list. ASUS GT630 2GB DDR3 128BIT (GT630-2GD3) - 2,950PHP MSI GT630 2GB DDR3 128BIT (N630GT-MD2GD3) - 2,850PHP POWERCOLOR HD6570 2GB DDR3 128BIT (AX6570 2GBK3-H) - 2,700PHP ASUS GT420 2GB DDR3 128BIT (GT420-2GD3-DI) - 2,050PHP POWERCOLOR HD5570 2GB DDR3 128BIT (AX5570 2GBK3-HV3) - 2,400PHP Which should i go for? Thanks
-

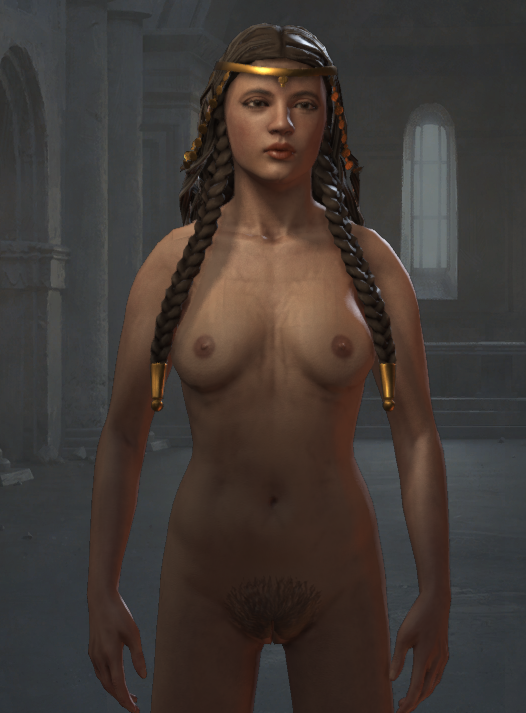
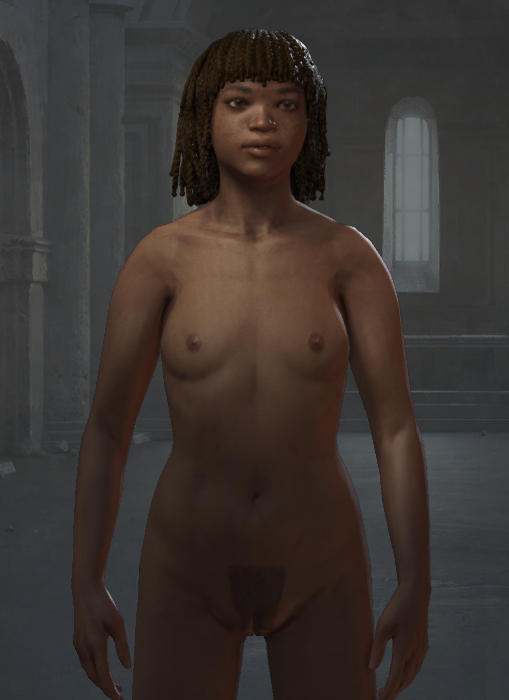
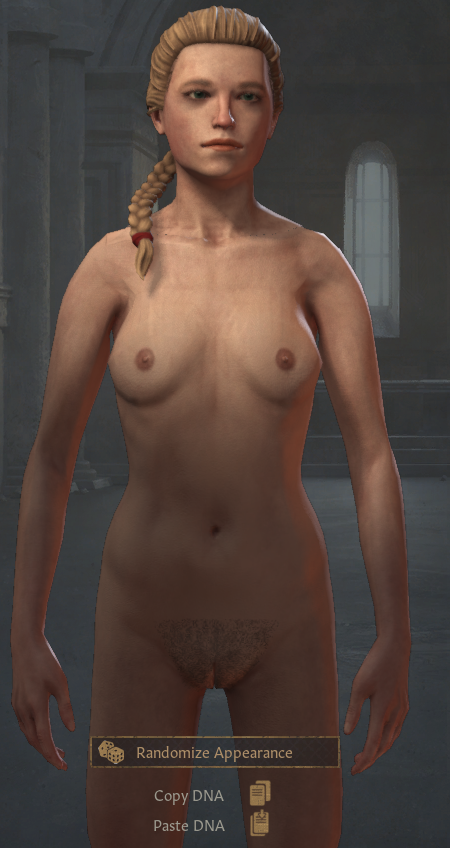
mod [mod] Complex Slits - Dynamic Pubic hair for women
gemaped462 posted a topic in Crusader Kings 3
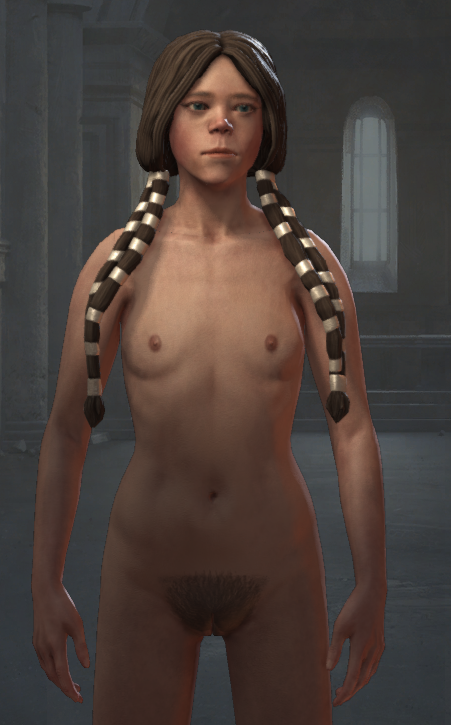
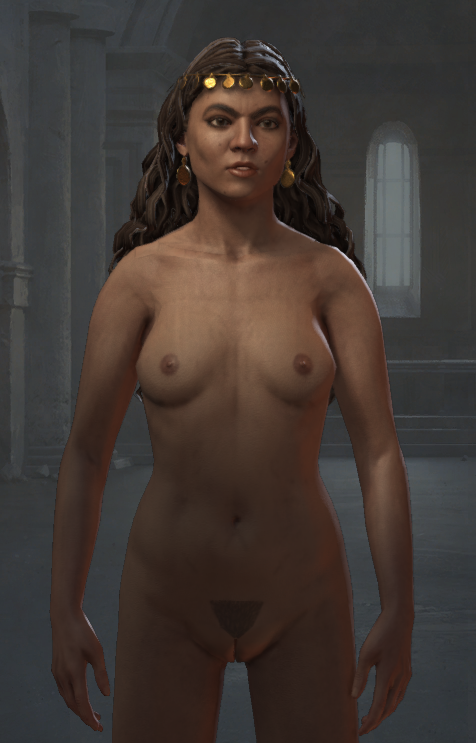
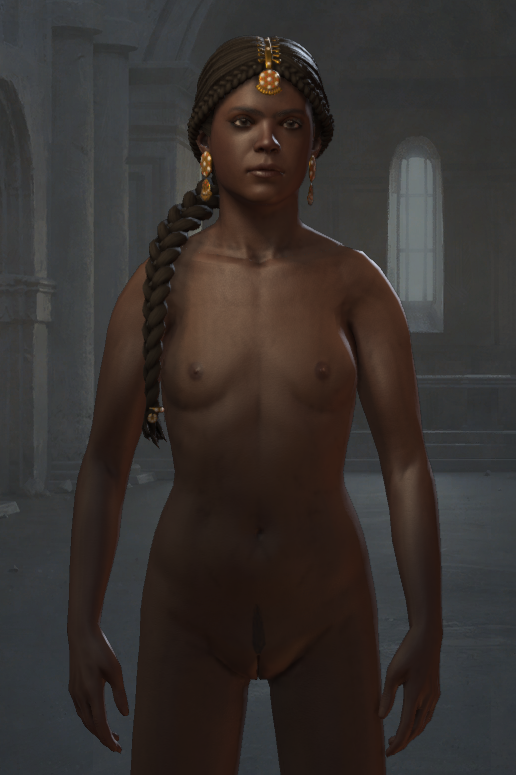
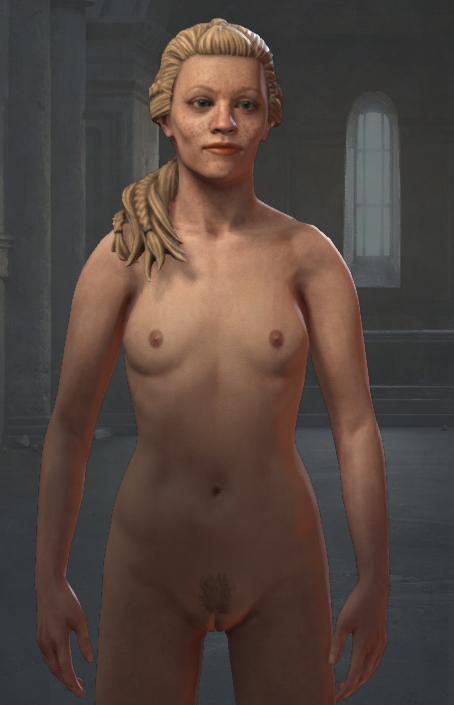
Hi All, I have made a mod that expands on 'Simple Slits' by WaffleIron as well as the other mod that added a pubic hair diffuse, by adding a dynamic pubic hair generation via decals. There's a custom gene with 9 different options looking at 8 different decals (with a bit of dynamic generation based on gene strenght) + no pubic hair for women. Some Screenshots: If you wish to install this mod, you should enable it and disable 'Simple Slits' by WaffleIron This is still an experimental version so please leave a comment, let me know if you have any feedback, suggestions or if you run into any issues running this mod. Complex Slits 1.1.7z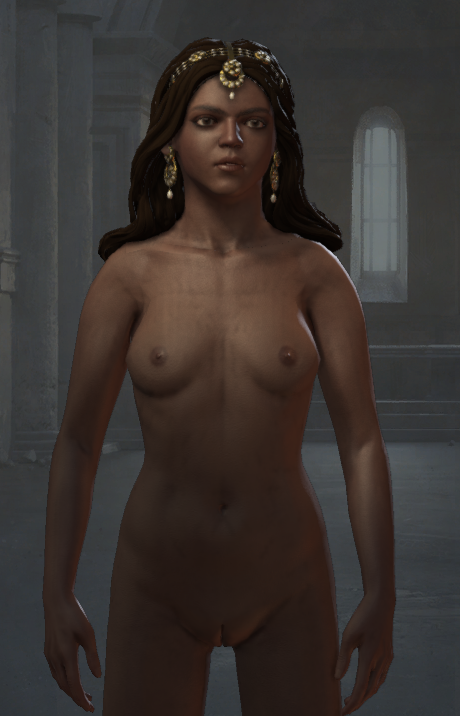

-
 The Elder Scrolls V Skyrim Special Edition 2021.07.29 - 05.45.12.01-1.mp4 Hey guys as you can see I'm having this terrible gltich after spending a week carefully moding my game, I tried all possible ways to figure it out but i have no idea what I'm doing wrong.. I need serious help as I'm getting very desperate , and I've had a pretty rough time in couple past of months , I lost my mother ,, I just want to play skyrim for while to relax.. and make peace with myself. I'm willing to pay someone who can help sort out my game, and investigate my load order and mods so I can make it run smoothly, Thank you very much guys. I'm getting 2 kinds of glitches one with H2135's Armor mods, and the other with Dint's Armor mods. I attached video and screenshot for glitches, none of my hdt armors are working. I really need this guys.. thanks.
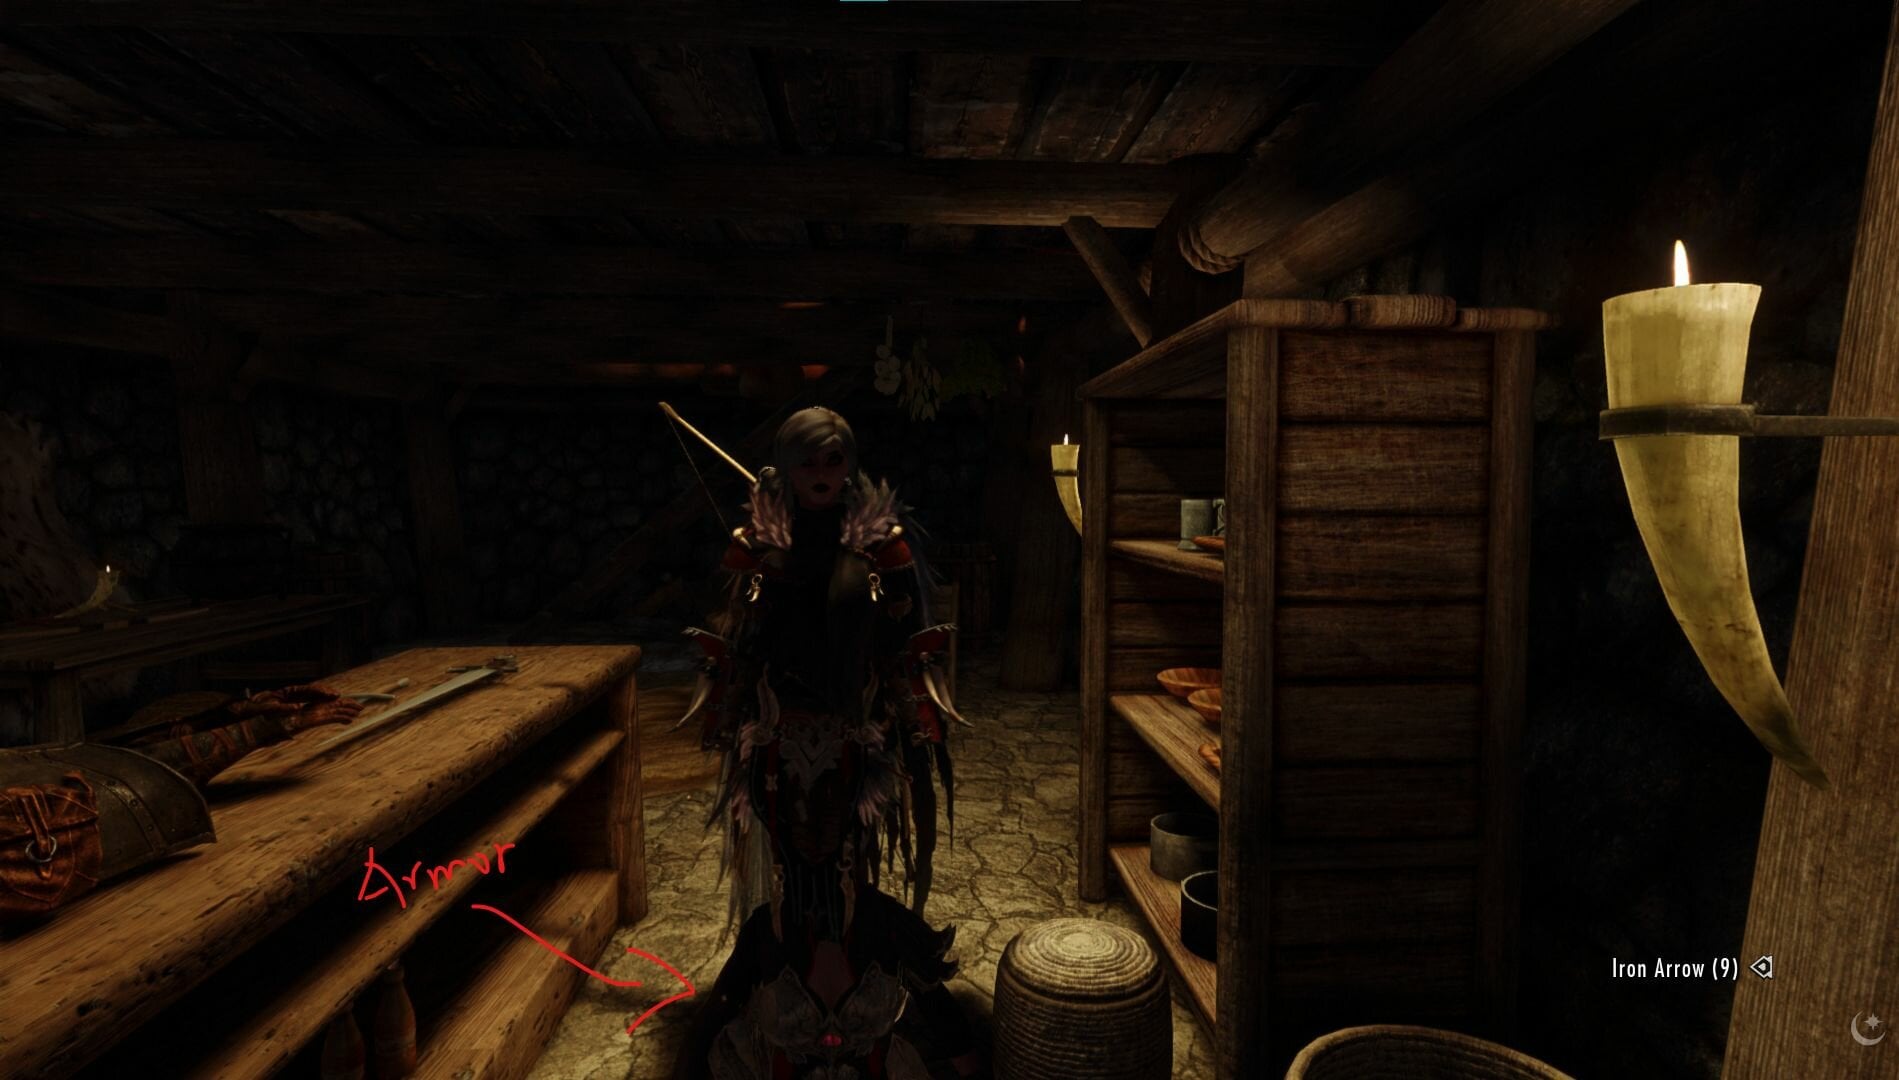
-
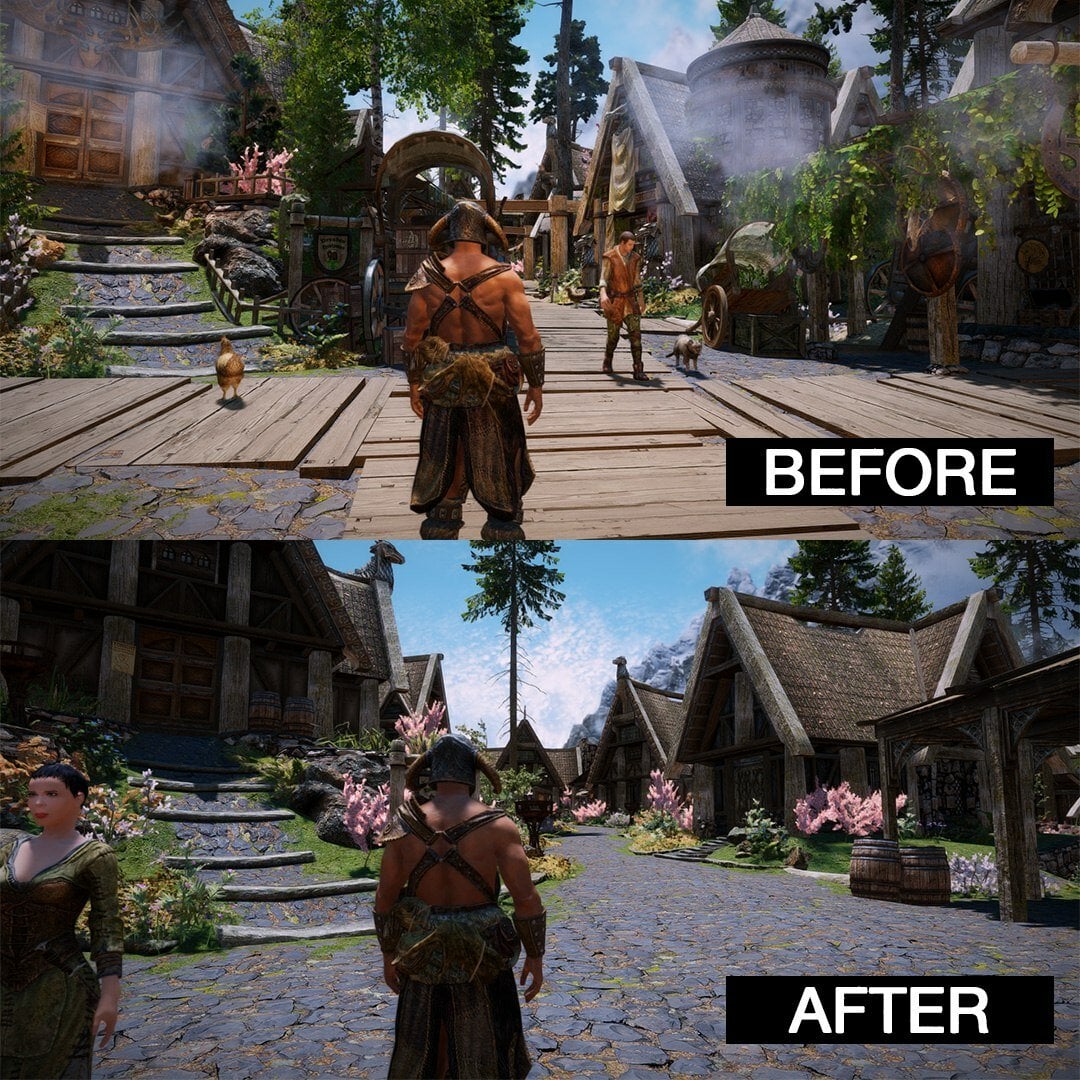
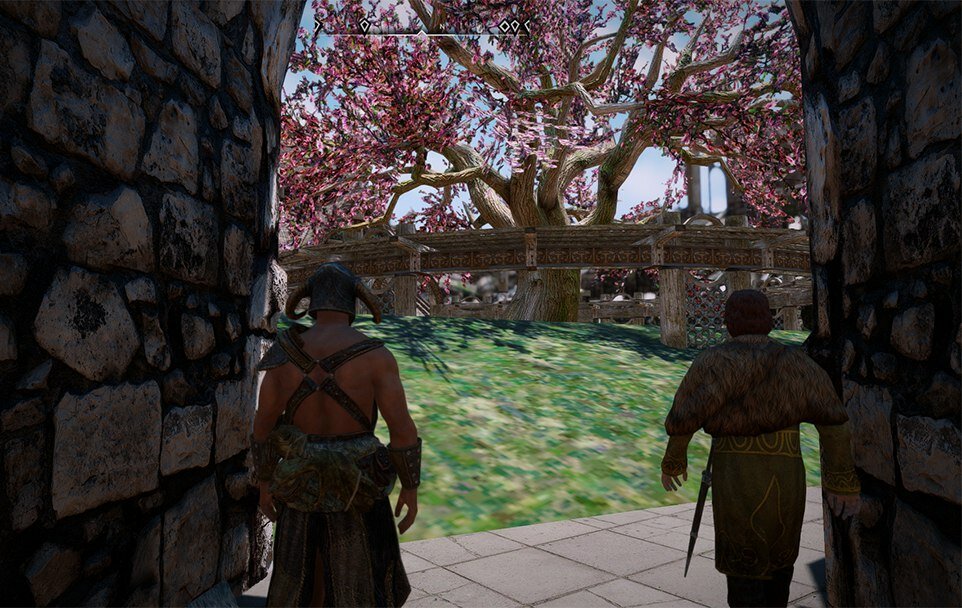
Minou's Supreme Graphic Overhaul + ENB
Minoumimi posted a topic in Downloads - Skyrim Non Adult Mods
View File This is my complete version ENB + graphic overhaul Comes with improved textures and meshes for Trees,plants,grass,water,rocks and much more Improved Shaders Improved Sweetfx Everything is improved!!! Warning Requires a good machine this version is very heavy and proper directx Installation I doubt it would work with nmm but MAYBE but i suggest to simply drag/extract and merge to your skyrim folder i will have optional presets soon for better performance and of course i will make a glossy version of this enb i really don't have time to start taking pictures and didnt have time to make a proper ENB showcase video yet So for now Enjoy this dance lolol http://www.nekomods.com/modshowcase/skyrim-dance-11-no-life-queen-hdt-hair-wigs-new-colors-hdt-breasts-kawaii-dance http://www.nekomods.com/modshowcase/skyrim-dance-10-pai-rangers-minous-devil-armor-hdt-hair-wigs-hdt-breasts-kawaii-dance Heres how the glossy fantasy looks like https://www.youtube.com/watch?v=y62dhn6kX3c Thats how it looks no Gloss with fantasy preset https://www.youtube.com/watch?v=D0FcCGc5q24 explaining the folders http://www.nekomods.com/modshowcase/minous-supreme-graphic-overhaul-enbs-explaining-enb-folder Submitter Minoumimi Submitted 08/30/2014 Category Other Requires Special Edition Compatible -
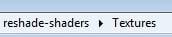
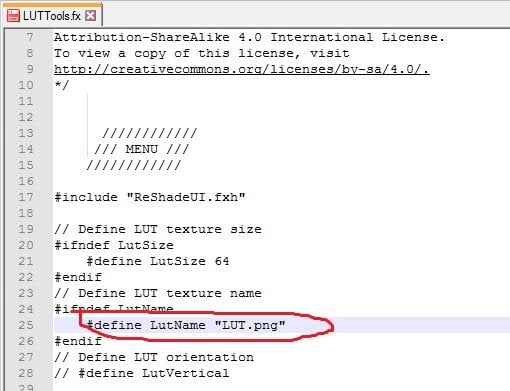
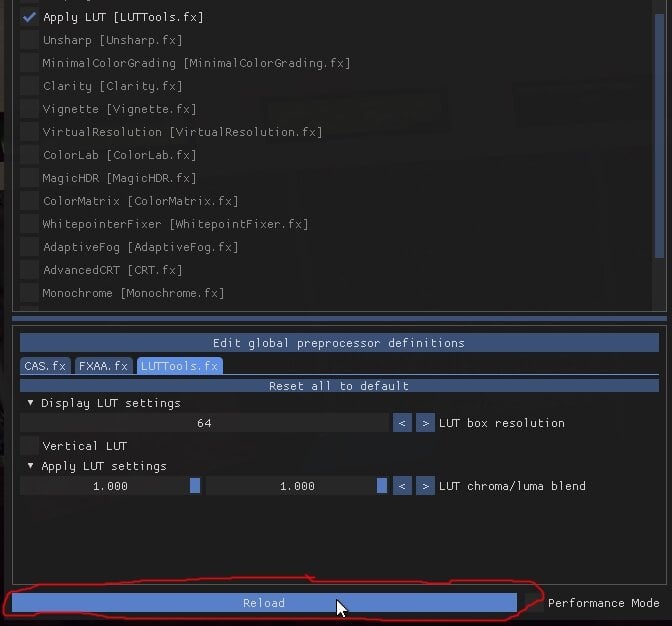
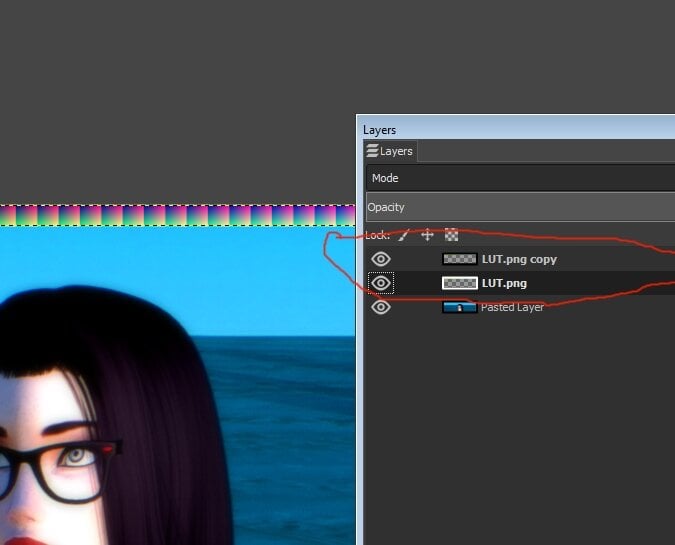
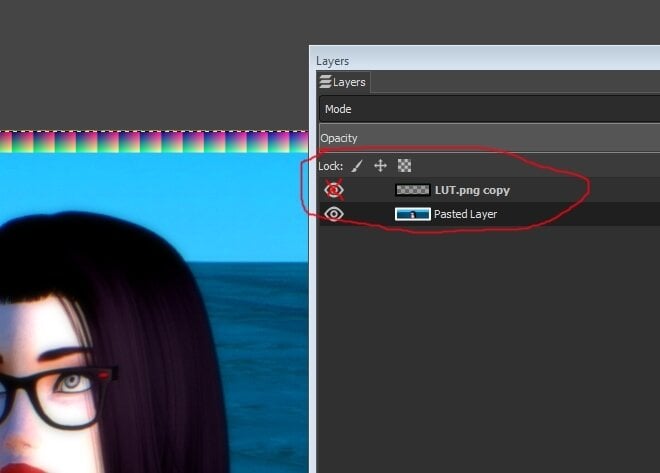
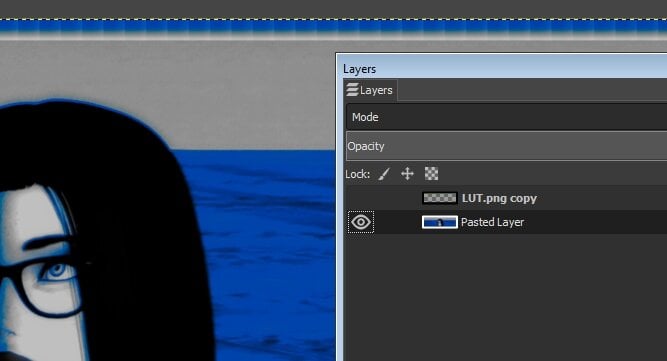
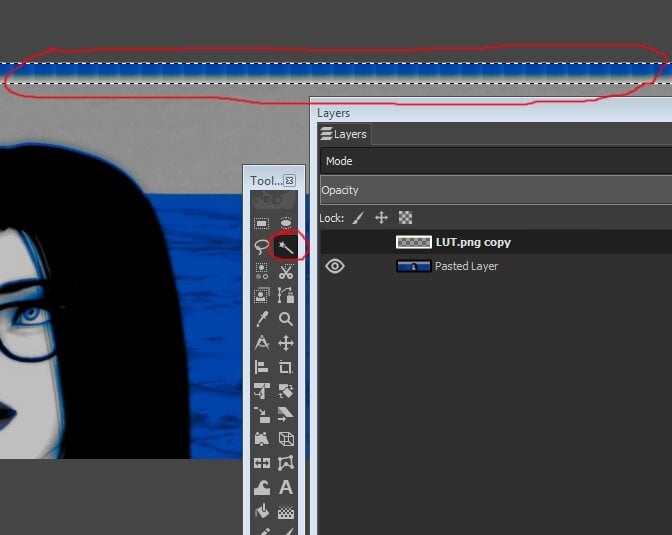
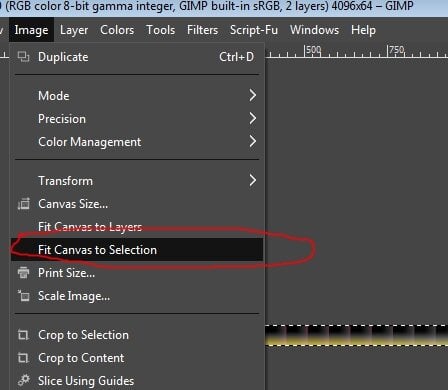
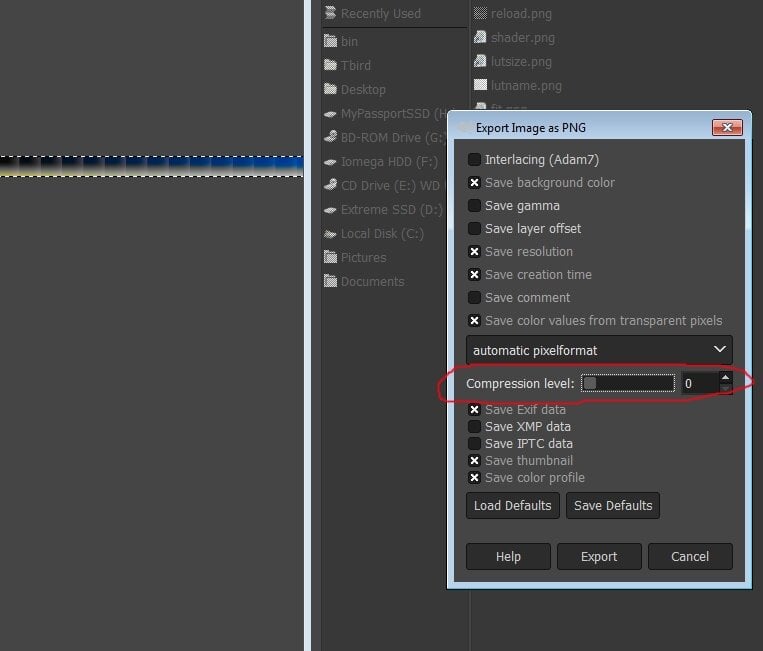
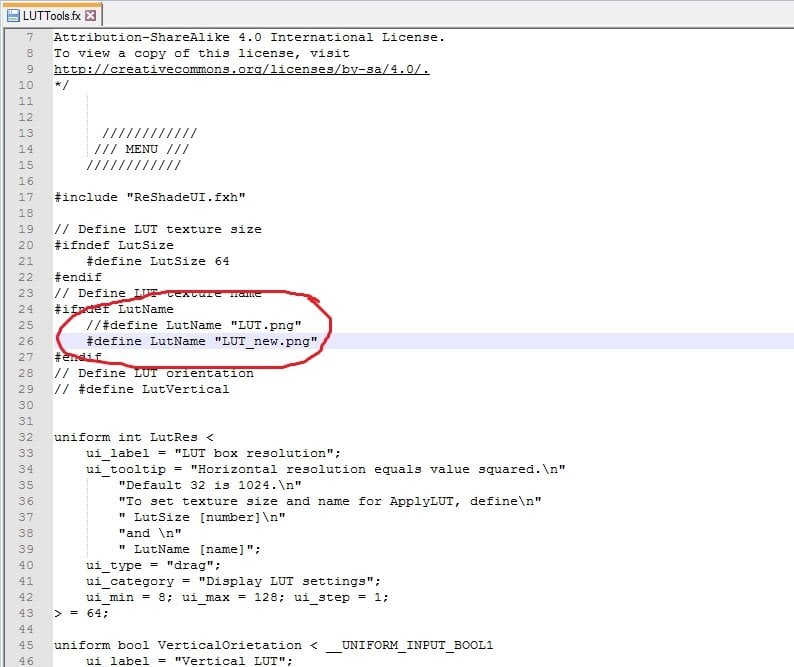
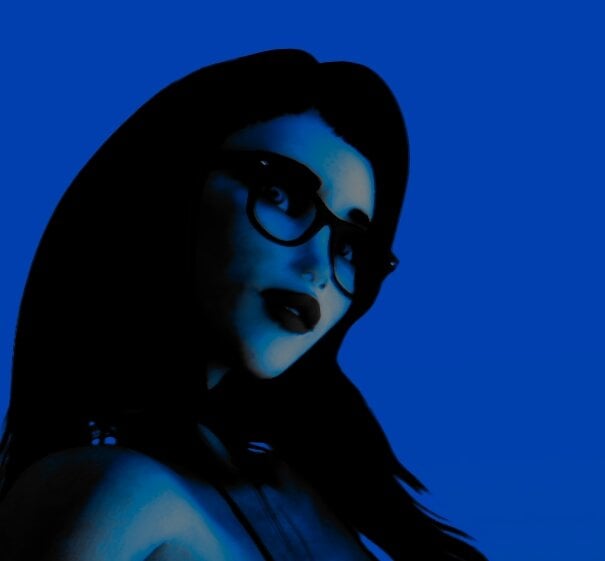
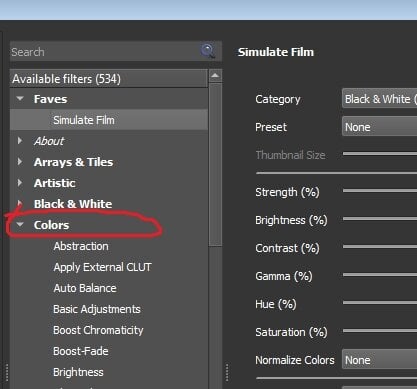
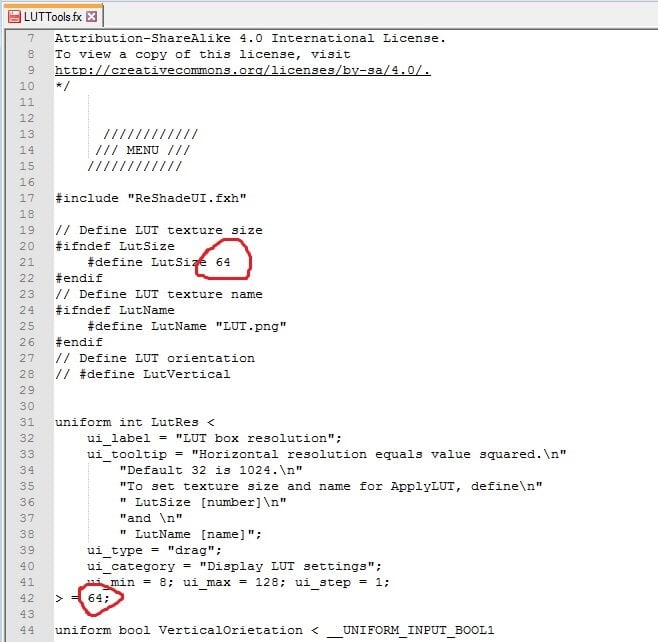
 Custom LUT creation with ReShade and Gimp 4.10 By arse22 on Oct 30,2020 Intro First I will cover some basics, for those who don’t know what a LUT is and why you would want to use it as part of your Hook/ReShade setup. A LUT is a .png file which contains color information used by the game. Using a ReShade shader we can change the default and override with our own settings, creating changes we want in-game without any cost to FPS. In fact, the strain on your system is greatly reduced on account of the fact that only the color itself is changed and color-related shaders do not need to be loaded at all. You can of course, load some to make further tweaks, but personally I prefer to make such edits afterwards and in another program. Why would you want to do this? Besides saving you FPS, the power it offers you is easy to underestimate. In truth, everything is color, even shadow and light are created by color and modify color that produces any image. The color changes that can be made are fairly complex and remain uniform, saving you time to have to mess with the settings in-game. Essentially you will create a ‘preset’ of color in your favorite image or photo editing software and apply it directly in game, while giving you performance boost. Pre-Requisite -Image/Photo editing software such as GIMP or Photoshop. I am using Gimp 4.10. -Latest Hook and ReShade installed and working. I am using H5free and ReShade 4.8.1. Basic LUT LUTs can come in different configurations and sizes, but the most common is 32x 32x32. That is 32 tiles of 32x32 pixels. For this tutorial I will provide and use 64x 64x64 LUT and show how to configure the shader to use it. Here is the default LUT we will be using. I don’t know the technical details but 64 creates a nice 4k LUT and I read that any higher is supposedly ineffective in current games. This is a basic LUT, when you enable the shader that applies it, no change will be made because it’s the default colors. It is a good idea to test this in your game. So, download LUT.png above and place it into your reshade-shaders/Textures folder. Make sure the LUT you downloaded is 4096x64 dimensions. Backup and overwrite the existing one if you already have one in there. Then, make sure that in your reshade-shaders/Shaders folder, you have a shader named “LUTTools.fx” and if you don't have such a shader, search the Shaders folder that ReShade installed and move it in. This puts it into the active shaders to be loaded by the game and this is the shader we will be using. In my version, it was originally installed into a sub-folder called Fubax. If you still can’t find it, you can probably download it through Google, directly from the author. Open the file LUTTools with a good text editor like Notepad++, because it’s hard to see in Notepad. This is the changes we need to make, so that the shader reads our LUT file as 64 tiles. Change the name and both instance of 32 to 64. After you made these changes, save the file. You are ready to load the game. Loading LUT with ReShade Once it is loaded, hit F5 or whatever you have configured your ReShade window key-binding to be. Then create a new ReShade preset or just turn everything off in your current one if you don’t care about it. You will see two options for [LUTTools.fx] : ‘Display LUT [LUTTools.fx]’ and ‘Apply LUT [LUTTools.fx]’ You can safely ignore ‘Display LUT’ because that is used to create LUTs through the shader and this tutorial uses a different method and we will not be using it at all. Enable ‘Apply LUT [LUTTools.fx]’ instead. You won’t see any change and that’s good, as I previously explained, the LUT provided is a ‘default’ one that you will want to make a backup of if you don’t want to rename the one you will apply into game. I prefer to name my LUTs different things and change the name inside LUTTools.fx. When you make changes to the shader .fx in this way in text, all you have to do to apply the changes in-game is hit reload at the bottom of the ReShade window. Finally, what you want to do is take a picture or two with ReShade shaders turned off, just some screencaps of your game with just your basic Hook settings and no other shaders, as we will be using it to create a new LUT in the next section. Creating a New LUT Open the screenshot in your favorite image editor in its own layer and place the LUT.png you downloaded earlier into another layer. Adjust the screenshot so the LUT is at the top if you want (I did this in the pictures,) but it doesn’t matter, whatever is convenient for you. Then make a copy of the LUT layer. Now merge the LUT layer with your screenshot and hide the copy. You are ready to make changes to your LUT and you will use the screenshot as reference. Remember, only COLOR changes can be made, that means no blurring or outlines or any other such effects will work and may potentially mess up the LUT. So, only change colors and saturation and settings of the sort until the picture looks good to you or what you want to achieve with your LUT. Now that the LUT has been changed, we are ready to crop it out. In GIMP I used Magic Tool on the hidden copied layer to get the exact size and then selected “Image->Fit Canvas To Selection” Finally, you are ready to “File->Export” the LUT and name it. When you are exporting you want to make sure you export as .PNG and that there is NO compression of any kind. Name it “LUT_new.png” and export into the reshade-shaders/Textures folder. Make sure the LUT is 4096x64 png and in the proper location. Here is the LUT that I created in the pictures of this tutorial: Loading the New LUT Just in case, here again is where you would change the name in the LUTTools.fx to have the shader load it, instead of the one we changed it to in the beginning of this tutorial. When you apply the new LUT, your UI will change color too, this is normal. And here is an example of how it looks applied in-game. It is never 100% exact for me, I’m not a pro, because the LUT is very sensitive and applies every change and even the slightest changes by the saving process or something like that. The changes the coloring of the LUT are relative to the image used, so any difference between the screenshot and the game will be reflected in the applied LUT. In the case of the example picture, the lighting I used is darker, the actual LUT worked perfectly because I only did some basic steps to turn everything blue. This aside, we can see the potential power of using this method to apply LUT. Graphical changes straight from your GIMP or image editing program, directly into game through only color. Tips Not every LUT needs to be as dramatic as the one in this tutorial. I only did this to make things more clear. When you use a screenshot to compare while you color the LUT like we did in this tutorial, it's good idea to use a collage of multiple screenshots, preferably from various settings and Hook lighting setups. Hook and backgrounds can add color too, so it has to be taken account. The more extreme the LUT, the more likely it will not work in every scene, causing color errors and if you have multiple picture for reference while you’re making changes and be able to detect the problem. In particular I would try to use as many different shades of color that are usually in your most used settings, to try to adjust the LUT to fit as many of them as you can. This is not really a requirement, it’s just something to experiment with. In general though, I would say it depends on what you are trying to achieve. Some LUTs can be used to create a nighttime effect, another for a de-saturated “mech” setting and yet another can be more general and work with most scenes, or an old photograph, or maybe you like the particular color errors you found and want a “glitched-out” effect for some pictures. Ideally you have a LUT for every job, they allow your pictures to look uniform and unique in appearance without having to guess by hand every time since the color adjustments are applied with code. Which brings me to the last thing: Another powerful tool for GIMP is a filter suite called G’MIC, which can be downloaded free : https://gmic.eu/ It also includes a filter called “Simulate Film” which actually allows you to apply exact color presets from a wide variety of cameras, consumer to pro, rather than making changes by hand using this method. You can find the filter in G’MIC under Colors section, once you have it installed. The LUTs you create with it will give your screenshots a more professional quality. Also it has other color-related filters, including various “color transfer” effects which allows mimicking the specific color scheme of any photo, screenshot or painting to some degree. Things to Remember When customizing a LUT, make sure to only use color settings and filters, many experienced users only use ‘Levels’ to make their LUTs and nothing else, but anything color-related is ok. The LUT is PNG color data, it cannot record and interpret code of things like blur. Color changes made to the LUT are relative, so if you change your screenshot a lot before using it as reference to the LUT, you may get unexpected results, without those exact settings in-game. Rooms can have unique Hook lighting that apply color and potentially not work with a LUT if you didn’t use it as reference. Other things like ReShade settings, such as ones that change color. As long as you are using it in the reference screenshot, you can make sure the LUT will work, but depending on the changes you made, it may not work that well without. When creating a collage of screenshots to use for reference in creating new LUT, it is a good idea to include a variety of colors, lighting and maybe even shaders that you want to test out. This allows you to more easily see where the LUT can be best utilized and where it will have problems or won’t look good. If you made a new LUT, don’t forget to change the name in the shader .fx file and hit reload in the ReShade window if you already opened the game. Conclusion I created this tutorial because I noticed that a lot of Hook presets do not have this shader included or any LUT shaders for that matter. There is a way to do it through H5 as well, but I prefer to use Reshade since that is the settings I work with most, I never touch my H5 settings at all. Hopefully it was helpful to someone who may not be familiar with the power of such a common and IMHO fundamental method of graphic enhancement.


-
You have questions about Hook 5? Start Here. The following is the Hook 5 Readme Pervo provides witht he game files. I figured most people don't read this but good place to start before asking questions on installation. _HOOK5_README.TXT
-
Custom LUT creation with ReShade and Gimp 4.10 By arse22 on Oct 30,2020 Intro First I will cover some basics, for those who don’t know what a LUT is and why you would want to use it as part of your Hook/ReShade setup. A LUT is a .png file which contains color information used by the game. Using a ReShade shader we can change the default and override with our own settings, creating changes we want in-game without any cost to FPS. In fact, the strain on your system is greatly reduced on account of the fact that only the color itself is changed and color-related shaders do not need to be loaded at all. You can of course, load some to make further tweaks, but personally I prefer to make such edits afterwards and in another program. Why would you want to do this? Besides saving you FPS, the power it offers you is easy to underestimate. In truth, everything is color, even shadow and light are created by color and modify color that produces any image. The color changes that can be made are fairly complex and remain uniform, saving you time to have to mess with the settings in-game. Essentially you will create a ‘preset’ of color in your favorite image or photo editing software and apply it directly in game, while giving you performance boost. Pre-Requisite -Image/Photo editing software such as GIMP or Photoshop. I am using Gimp 4.10. -Latest Hook and ReShade installed and working. I am using H5free and ReShade 4.8.1. Basic LUT LUTs can come in different configurations and sizes, but the most common is 32x 32x32. That is 32 tiles of 32x32 pixels. For this tutorial I will provide and use 64x 64x64 LUT and show how to configure the shader to use it. Here is the default LUT we will be using. I don’t know the technical details but 64 creates a nice 4k LUT and I read that any higher is supposedly ineffective in current games. This is a basic LUT, when you enable the shader that applies it, no change will be made because it’s the default colors. It is a good idea to test this in your game. So, download LUT.png above and place it into your reshade-shaders/Textures folder. Make sure the LUT you downloaded is 4096x64 dimensions. Backup and overwrite the existing one if you already have one in there. Then, make sure that in your reshade-shaders/Shaders folder, you have a shader named “LUTTools.fx” and if you don't have such a shader, search the Shaders folder that ReShade installed and move it in. This puts it into the active shaders to be loaded by the game and this is the shader we will be using. In my version, it was originally installed into a sub-folder called Fubax. If you still can’t find it, you can probably download it through Google, directly from the author. Open the file LUTTools with a good text editor like Notepad++, because it’s hard to see in Notepad. This is the changes we need to make, so that the shader reads our LUT file as 64 tiles. Change the name and both instance of 32 to 64. After you made these changes, save the file. You are ready to load the game. Loading LUT with ReShade Once it is loaded, hit F5 or whatever you have configured your ReShade window key-binding to be. Then create a new ReShade preset or just turn everything off in your current one if you don’t care about it. You will see two options for [LUTTools.fx] : ‘Display LUT [LUTTools.fx]’ and ‘Apply LUT [LUTTools.fx]’ You can safely ignore ‘Display LUT’ because that is used to create LUTs through the shader and this tutorial uses a different method and we will not be using it at all. Enable ‘Apply LUT [LUTTools.fx]’ instead. You won’t see any change and that’s good, as I previously explained, the LUT provided is a ‘default’ one that you will want to make a backup of if you don’t want to rename the one you will apply into game. I prefer to name my LUTs different things and change the name inside LUTTools.fx. When you make changes to the shader .fx in this way in text, all you have to do to apply the changes in-game is hit reload at the bottom of the ReShade window. Finally, what you want to do is take a picture or two with ReShade shaders turned off, just some screencaps of your game with just your basic Hook settings and no other shaders, as we will be using it to create a new LUT in the next section. Creating a New LUT Open the screenshot in your favorite image editor in its own layer and place the LUT.png you downloaded earlier into another layer. Adjust the screenshot so the LUT is at the top if you want (I did this in the pictures,) but it doesn’t matter, whatever is convenient for you. Then make a copy of the LUT layer. Now merge the LUT layer with your screenshot and hide the copy. You are ready to make changes to your LUT and you will use the screenshot as reference. Remember, only COLOR changes can be made, that means no blurring or outlines or any other such effects will work and may potentially mess up the LUT. So, only change colors and saturation and settings of the sort until the picture looks good to you or what you want to achieve with your LUT. Now that the LUT has been changed, we are ready to crop it out. In GIMP I used Magic Tool on the hidden copied layer to get the exact size and then selected “Image->Fit Canvas To Selection” Finally, you are ready to “File->Export” the LUT and name it. When you are exporting you want to make sure you export as .PNG and that there is NO compression of any kind. Name it “LUT_new.png” and export into the reshade-shaders/Textures folder. Make sure the LUT is 4096x64 png and in the proper location. Here is the LUT that I created in the pictures of this tutorial: Loading the New LUT Just in case, here again is where you would change the name in the LUTTools.fx to have the shader load it, instead of the one we changed it to in the beginning of this tutorial. When you apply the new LUT, your UI will change color too, this is normal. And here is an example of how it looks applied in-game. It is never 100% exact for me, I’m not a pro, because the LUT is very sensitive and applies every change and even the slightest changes by the saving process or something like that. The changes the coloring of the LUT are relative to the image used, so any difference between the screenshot and the game will be reflected in the applied LUT. In the case of the example picture, the lighting I used is darker, the actual LUT worked perfectly because I only did some basic steps to turn everything blue. This aside, we can see the potential power of using this method to apply LUT. Graphical changes straight from your GIMP or image editing program, directly into game through only color. Tips Not every LUT needs to be as dramatic as the one in this tutorial. I only did this to make things more clear. When you use a screenshot to compare while you color the LUT like we did in this tutorial, it's good idea to use a collage of multiple screenshots, preferably from various settings and Hook lighting setups. Hook and backgrounds can add color too, so it has to be taken account. The more extreme the LUT, the more likely it will not work in every scene, causing color errors and if you have multiple picture for reference while you’re making changes and be able to detect the problem. In particular I would try to use as many different shades of color that are usually in your most used settings, to try to adjust the LUT to fit as many of them as you can. This is not really a requirement, it’s just something to experiment with. In general though, I would say it depends on what you are trying to achieve. Some LUTs can be used to create a nighttime effect, another for a de-saturated “mech” setting and yet another can be more general and work with most scenes, or an old photograph, or maybe you like the particular color errors you found and want a “glitched-out” effect for some pictures. Ideally you have a LUT for every job, they allow your pictures to look uniform and unique in appearance without having to guess by hand every time since the color adjustments are applied with code. Which brings me to the last thing: Another powerful tool for GIMP is a filter suite called G’MIC, which can be downloaded free : https://gmic.eu/ It also includes a filter called “Simulate Film” which actually allows you to apply exact color presets from a wide variety of cameras, consumer to pro, rather than making changes by hand using this method. You can find the filter in G’MIC under Colors section, once you have it installed. The LUTs you create with it will give your screenshots a more professional quality. Also it has other color-related filters, including various “color transfer” effects which allows mimicking the specific color scheme of any photo, screenshot or painting to some degree. Things to Remember When customizing a LUT, make sure to only use color settings and filters, many experienced users only use ‘Levels’ to make their LUTs and nothing else, but anything color-related is ok. The LUT is PNG color data, it cannot record and interpret code of things like blur. Color changes made to the LUT are relative, so if you change your screenshot a lot before using it as reference to the LUT, you may get unexpected results, without those exact settings in-game. Rooms can have unique Hook lighting that apply color and potentially not work with a LUT if you didn’t use it as reference. Other things like ReShade settings, such as ones that change color. As long as you are using it in the reference screenshot, you can make sure the LUT will work, but depending on the changes you made, it may not work that well without. When creating a collage of screenshots to use for reference in creating new LUT, it is a good idea to include a variety of colors, lighting and maybe even shaders that you want to test out. This allows you to more easily see where the LUT can be best utilized and where it will have problems or won’t look good. If you made a new LUT, don’t forget to change the name in the shader .fx file and hit reload in the ReShade window if you already opened the game. Conclusion I created this tutorial because I noticed that a lot of Hook presets do not have this shader included or any LUT shaders for that matter. There is a way to do it through H5 as well, but I prefer to use Reshade since that is the settings I work with most, I never touch my H5 settings at all. Hopefully it was helpful to someone who may not be familiar with the power of such a common and IMHO fundamental method of graphic enhancement.
-
The truth is that I recently regained interest in rjw but I didn't see that there were many modifications for games played as mechanists and I searched and I found this mod made by @FluffiestX And I decided to update it to the 1.6 Pro, which were excellent models that had everything I was looking for, so I've uploaded the updated version here. Below, I've left the original. And I thought it was incredible art, all due respect, but he hasn't updated it, so he decided to re-upload his incredible mod updated to 1.6. I didn't update the Race Mechanist mod from the patch because it's not yet ready for 1.6 and I don't think they'll upload it, anyway. All credit to @FluffiestX and if you ask me to remove the mod I will do it This is my first time modifying mods, I usually translate them into Spanish but I already tested the mod and it works, any complaints or things let me know and this is a mod that is from 1.4 or 1.5 and I don't know how updated it is so it's normal that not all the mech are without new graphics, but only the most recent ones, please if you have any way to convince the artist to resume the modification, do it, I loved his art. Original mod :
-
View File Pregnancy Stage Graphics This mod adds a graphical display of the stages of pregnancy of the female pawn. Works only when the pawn is not wearing clothes that hide the torso. The latest version is always on Gitgub Submitter Akiya82 Submitted 01/29/2022 Category Rimworld
-
 Should you use enb or not? If your gameplay consists mostly of taking screenshots then I'd say yes. It can look much better than the vanilla game if tweaked correctly and since the major downside to enb is decreased fps, it won't matter in photos. If you want to play the game normally with an enb then it really depends on your machine and your tolerance for low fps. I'm running a Radeon 5600xt and play at 144fps with a 144hz monitor. People will tell you running at greater than 60fps is pointless but I can attest it's not. That is, so long as you have a monitor with a high enough refresh rate to actually display it. If you're used to/don't mind 60 fps then that just means you won't need as much hardware to run an enb cleanly! I normally don't run enb but I've been playing around with it again recently and find that I lose a solid 50fps. Normally I run 144fps in interiors and 90 outdoors, this drops to 90 and 40 respectively with enb enabled. 40 fps shouldn't be acceptable for anyone, especially if you're used to a solid 90+ at all times. This is why I don't use enb, the loss of fidelity is simply not worth it for the stunning still/closeup moments. Mind you, I'm losing 50fps on average, this doesn't even account for actual fps heavy scenes where I've seen it drop to 30 or less while enb is enabled. I'd say if you want to play at 60 fps with enb, then you should first be getting at least 120fps at all times outdoors without enb. If you play on 144 like me you'll probably need to be able to push 150 at all times outdoors. Of course fps is subjective and some people don't care about it at all, go you! I, however, can not go back from 144 to anything less. The smoothness of motion, the heightened control, the sheer immersion is worth more to me than textures and shadows. In order to unlock your framerate you will need to add bLockFrameRate=0 under [Display] in your Skyrim.ini (documents/mygames/skyrim) I highly recommend using Bethini for editing your ini files. The next thing is to set fMaxTime=x under [Havok] where x equals 1 divided by your desired framerate. So fMaxTime=0.00833333 for 120fps or fMaxTime=0.00694444 for 144fps etc. In bethini, this setting is simply labeled as fps and you can set it to the literal fps number you want and it'll do the math automatically. If you need something to track your fps, you can use something like MSI Afterburner, enb itself if you have it installed and press numpad *, or from steam>settings>in game there is an option to show fps counter there. Skyrim has this weird thing where it doesn't run higher than 60fps even if your ini settings are changed, I always have to alt+tab out and back in to the game for my ini cap to actually take effect. I usually do it on the main menu before I load my game and when I don't, I can immediately tell something isn't right. Movement of the camera, motion, everything is just choppy at 60fps. I've made some videos in an attempt to show the difference between 60fps and beyond. My capture software only allows recording of 120fps so I can't capture the full glory of 144fps but I have set the playback to 50% and 25% so you can see the differences and they really do add up to a cleaner look in fast motion. ENB on/off comparison: 120fps capture 50% speed (60fps) 25% speed (30fps) its the same exact scene, one side with enb off (shift+f12) and the other side with it flipped on. fpstest.mp4 You can see how the left side has smoother motion whereas the right side is constantly stuttering because of the lowered fps. Note that her looks under enb shouldn't be indicative of an optimized enb appearance as she was made to look good in vanilla, not enb. Sex test: 120fps capture 50% speed (60fps) 25% speed (30fps) the number in the video is the fps the game is effectively running at. Its the same scene shot one after the other, the right was taken first without tabbing and the left was taken after simply alt+tabbing out and back into the game, thus enabling my full 144 framerate. sextest.mp4 Again you can see, particularly at 25% speed, how much smoother the image is at >60fps Gameplay test: 120fps capture (90fps effectively) 25% speed (30fps) l loaded up an old save right before a giant encounter. Again same thing, one is capped at 60fps and the other is uncapped but I only get about 90fps outdoors. gametest.mp4 This is a scenario where your fps will be at its lowest, I suspect enb would've made this unplayable. The differences here are hardly noticable, but if you skip to 0:40 you can see the left side make a quick turn that is surprisingly smooth compared to the one the right makes at 1:02. I've found that these quick movements with higher fps makes a difference between your eyes becoming completely unfocused during the turn, or a more immersive feeling like you're actually there. Theoretically, the higher the fps the faster you could swing the camera without being played a slideshow. Hopefully you can now see why fps matters and can make a more educated decision about whether or not to use mods which significantly lower it given the promise of increased visuals. Note also that there's no reason to push higher than 60fps if your monitor can't display it i.e. 60hz monitor or if your computer settings are not set to utilize greater refresh rates (right click desktop/display settings/advanced display settings/adapter properties/monitor)
 -
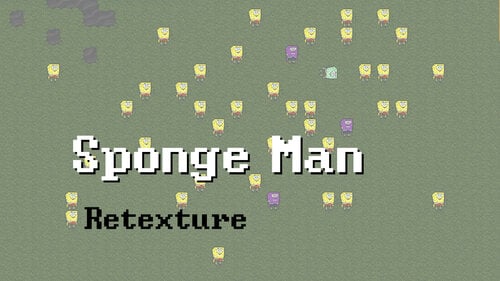
View File Spongeman Retexture Sponge Man graphics replacement for Dwarf Fortress. This was meant to be a cheap April fools mod for the workshop, sadly uploading mods there seems to be broken for me. Submitter Skömer Submitted 04/05/2023 Category Misc Requires Dwarf Fortress (Steam Edition)
-
View File Robo-Boobs A simple mod to do a simple thing. Give the standard robot portraits a pair of synthetic milkjugs. Nothing more, nothing less. Submitter SluttySnowcraft Submitted 12/05/2022 Category Stellaris Requires
-
I had some mods environmental installed on my game like dawn of skyrim, capital whiterun and breezhouse When I play new saves all the mods are gone but they are all enabled in vortex Weird thing is when I load a old save wich I was in whiterun I see all the mods but even there if I fast travel game goes to its vanilla form There are some broken textures too Last texture mod I installed was vigilant hi res don't know if its relevant or not but even when I disabled it this was still happening Whats the real problem and can I fix that?
-
My game was running fine my ENB and mods all working great, then I installed the Dark Desires Club Mod and the mods needed for that mod to work. Since doing that all NPCs have a black face? Their bodies and hands etc. are all the correct complexion but the faces for some reason are like a slider for complexion has been moved all the way to dark black? Does anyone know how I can fix this or had a similar problem? Any help is much appreciated!
-
Nudity Laws View File Ok so what is this? Simple its a small mod that adds a section during faith creation where you can decide who in your religion is naked and who not. There are four options: -female nudity (all women are naked) -male nudity (all men are naked) -full nudity (everyone is naked) -no nudity (no one is naked) Compatability: this mod will not work with any mod that modifies the should_be_naked_trigger trigger. But why did you create this its hardly a big mod or anything just a small modification? Basically because I wanted to. Also I kind of wanted the title of first ck3 lewd mod not sure I was fast enough tough I don't think I will expand this any further. It does what it says, tough if there are special wishes I might add them. I will also try to fix any bugs or issues if they occur. If you want to talk about the mod or need help with your own mod you can reach me on the House Irae discord. So have fun with this. Submitter tarin Submitted 09/01/2020 Category Crusader Kings 2 Requires
-
Hello please i have a problem with my ENB. After instaling the latest version ENB v0.494 i have a weird graphics bug, please do anyone know how to solve this problem ? I have SE version, not AE and all ENB do the same thing like Rudy and PI.CHO.

-
View File [Discontinued] Ultimate Nudity I stopped playing Crusader Kings III and maintaining my mods. Everybody is free to use its code to develop their own mods. Ultimate Nudity is a one-for-all mod, because as it offers any way to introduce nudity into the game, I know. I developed 8 different nudity doctrines. Also, I adapted the nudist traditions from Nudist Kings by Neo5niper and the nudity decisions from Nudity Toggle by bokomaroko. I asked them for permission, but only received an answer from Neo5niper, so I guess it’s okay. Furthermore, I added a nudist trait. Description Ultimate Nudity introduces a new group of religious doctrines named View on Nudity. You’ll find it in the clergy section of your faith’s window. This group includes the doctrines: Vested Adherents (which serves to deactivate any other nudity doctrine) Vested Priesthood (which serves to deactivate any other nudity doctrine for priests) Nude Priests Nude Priestesses Nude Priesthood (which is the relocated special doctrine Naked Priests) Nude Men Nude Women Nude Adherents The nudity doctrines are incompatible with the natural primitivism tenet. And you can’t choose the nude priests’ doctrine or the nude men’s doctrine as long as the culture of your head of faith follows the nudist females’ tradition and vice versa. The adapted cultural traditions are: Nudist Males Nudist Females Nudist People They are located in the societal cultural traditions. The included nudity decisions are: General Nudity Male Nudity Female Nudity No Nudity All these denominations are self explaining, I guess. For all these kinds of nudity there is an age limit, because humans of a certain age (which is 60) easily get cold and need to wear clothings (Okay, you might as well say, they look a sight). I made some exceptions from this restriction. Of course for the player, its consorts and also for independent rulers and immortals. And for marshals and knights, I cancelled nudity during times of war, because nothing looks more ridiculous, than a nude fighter during battle. For all those, who don’t share my special kind of humour, I made a version without these limits. Just download ultimate_nudity_#-#-#_unlimited.zip. If you are looking for an unlimited and/or individual approach to nudity, you’ll find two friendly actions in the interaction menu. First Nudism, by which you can acquire for any character the Nudist trait. Together with this trait, the character will gain some character modifiers, by which they will receive a bonus to attraction opinion and – depending on if they are a ruler and/or a priest – a bonus to monthly prestige and/piety gain. Furthermore, you’ll find in the interaction menu for any character within diplomatic range the friendly actions Undress Character and Dress Character. The different approaches to nudity don’t interfere with each other in that way, that deactivating one won’t switch off any others. So a priest of a faith with the nude priests’ doctrine, and belonging to a culture with the nudist males’ tradition, won’t enrobe himself after giving up the nude priests’ doctrine. NOTE: In version 1.4.1 the “Undress Character” interaction and the “Nudity” decisions added the same character modifiers to the character as the Nudist trait. That has been changed with version 1.4.2, but the modifier will still be valid until the character is dressed again or the nudity decision is toggled off. I also spiced up the descriptions and explanations, to increase the immersion. This mod contains an English and a German localization. For all other standard languages, I added a localization using the English language. Compatibility The backbone of this mod is the should_be_naked_trigger in the zzz_ultimate_nudity_clothing_triggers_overwrites.txt, that overwrites the vanilla trigger in 00_clothing_triggers.txt. Therefore, every other mod, that overwrites the should_be_naked_trigger too, is incompatibly with this mod. The good news is, that the Community Flavor Pack doesn’t use this trigger and therefore doesn’t cause problems AFAIK. Unfortunately, the Ethnicities and Portraits Expanded (EPE) mod includes this trigger. But as far as I can judge, my should_be_naked_trigger will overwrite it without problems, because it’s the same trigger as in vanilla and in a file also named 00_clothing_triggers.txt. Furthermore, the should_be_naked_trigger of this mod contains every parameter, provided by the same trigger from the Carnalitas-framework. Because of its name, the zzz_ultimate_nudity_clothing_triggers_overwrites.txt overwrites its zzz_carn_00_clothing_triggers_overwrites.txt. Therefore, Ultimate Nudity mod is compatible with the Carnalitas-framework. You can play any saved game with this mod and deactivate it anytime without getting problems, because my should_be_naked_trigger only refers to functions, included in this mod. Therefore, after deactivating this mod, none of its features should be missed. Moreover, the relocation of the special doctrine Naked Priests shouldn’t cause any problems with existing save games. I didn’t change its name special_doctrine_naked_priests, just the localization files. So, if you already added it to your faith, it’s still valid, but moved from the special section to the clergy section. This mod is only compatible with ironman, but not with achievements. Submitter GeniusMind Submitted 08/28/2022 Category Crusader Kings 3 Requires
-
 I know there's 3D body hair options for penises and vaginas, but are there any 3D body hair mods for chest, leg and back hair, and possibly armpits and eyebrows? I tried googling but didn't find anything. Is that even possible in Skyrims engine? Or is the body hair limited to textures?
 -
Asking for a friend on this site: his higher end rig with Nvidia 3080Ti is crashing frequently in virtually any game played. See pics. In them you'll see a black mass obliterating a lot of the screen. It may be his card overheating. But his fairly new PC had a liquid coolant leak a couple of months back and the shop rebuilt it for him. They tested it. It worked fine for a while, then increasing random CTDs/power downs have been occurring. Today he has this huge black patch on his screen. You can see the pixel edges, and some jumbled text. I think the video card is overheating, but monitoring software seems to show it is not. We'd be grateful for any ideas from the community to help him move to a solution. Thank you!

-
878 downloads
This is my complete version ENB + graphic overhaul Comes with improved textures and meshes for Trees,plants,grass,water,rocks and much more Improved Shaders Improved Sweetfx Everything is improved!!! Warning Requires a good machine this version is very heavy and proper directx Installation I doubt it would work with nmm but MAYBE but i suggest to simply drag/extract and merge to your skyrim folder i will have optional presets soon for better performance and of course i will make a glossy version of this enb i really don't have time to start taking pictures and didnt have time to make a proper ENB showcase video yet So for now Enjoy this dance lolol http://www.nekomods.com/modshowcase/skyrim-dance-11-no-life-queen-hdt-hair-wigs-new-colors-hdt-breasts-kawaii-dance http://www.nekomods.com/modshowcase/skyrim-dance-10-pai-rangers-minous-devil-armor-hdt-hair-wigs-hdt-breasts-kawaii-dance Heres how the glossy fantasy looks like https://www.youtube.com/watch?v=y62dhn6kX3c Thats how it looks no Gloss with fantasy preset https://www.youtube.com/watch?v=D0FcCGc5q24 explaining the folders http://www.nekomods.com/modshowcase/minous-supreme-graphic-overhaul-enbs-explaining-enb-folder -
Version 1.0.0
15 downloads
Sponge Man graphics replacement for Dwarf Fortress. This was meant to be a cheap April fools mod for the workshop, sadly uploading mods there seems to be broken for me. -
Version 1.0.0 (solid)
4238 downloads
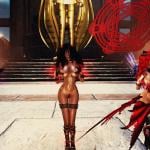
SE CANCELA TODO ALL CANCEL THE ORIGINAL AUTOR UPLOAD THIS MOD IN HIS STEAM ACCOUNT , HERS THE LINK https://steamcommunity.com/sharedfiles/filedetails/?id=3013205187 The truth is that I recently regained interest in rjw but I didn't see that there were many modifications for games played as mechanists and I searched and I found this mod made by @FluffiestX And I thought it was incredible art, all due respect, but he hasn't updated it, so he decided to re-upload his incredible mod updated to 1.6. I didn't update the Race Mechanist mod from the patch because it's not yet ready for 1.6 and I don't think they'll upload it, anyway. All credit to @FluffiestX and if you ask me to remove the mod I will do it. " You want beautiful machines to do your heavy lifting! Well, look no further. You can have it all and more by simply drilling into yourself and implanting a chip in your brain. Typical of life in Rimworld, right?" 📦 Description This mod continues the legacy of [original mod name if applicable], updating it for RimWorld 1.6. It introduces curvaceous, underarmored mechanoid variants while preserving compatibility with [other mods if applicable]. Fully modular and patched for 1.6 No texture renaming or function fusion Editorial blindaje respected at every step 🔧 Requirements RimWorld 1.6 🧩 Installation Download the file from the “Files” tab. Extract into your Mods folder. Enable it in RimWorld’s mod menu. 🧪 Compatibility Compatible with , alpha mechanoids : https://steamcommunity.com/workshop/filedetails/?id=2973169158 Not compatible with : I have not found any incompatibility and it is protected against future errors, if they arise, so for example if a graphic does not load or generates a conflict, I ignore it and use the vanilla graphic, thus avoiding you having to close the game after those 3 hours of loading :D...... :,D 📝 Changelog v1.6.0 Updated defNames for RimWorld 1.6 compatibility XML error corrections without altering original structure 🧠 Credits Original mod by @FluffiestX Continuation and patching by @Puck-UWU(editorial blindaje and modularity guaranteed) This is my first time modifying mods, I usually translate them into Spanish but I already tested the mod and it works, any complaints or things let me know and this is a mod that is from 1.4 or 1.5 and I don't know how updated it is so it's normal that not all the mech are without new graphics, but only the most recent ones, please if you have any way to convince the artist to resume the modification, do it, I loved his art. Original mod : loverslab.com/topic/215823-mod-fluffs-curvaceous-underarmored-mechanoids/?do=findComment&comment=4149605


.thumb.jpg.1bf068df9e8154d4235f04f65da4b016.jpg)