Search the Community
Showing results for tags 'reshade'.
Found 20 results
-

Version 1.0.0
266 downloads
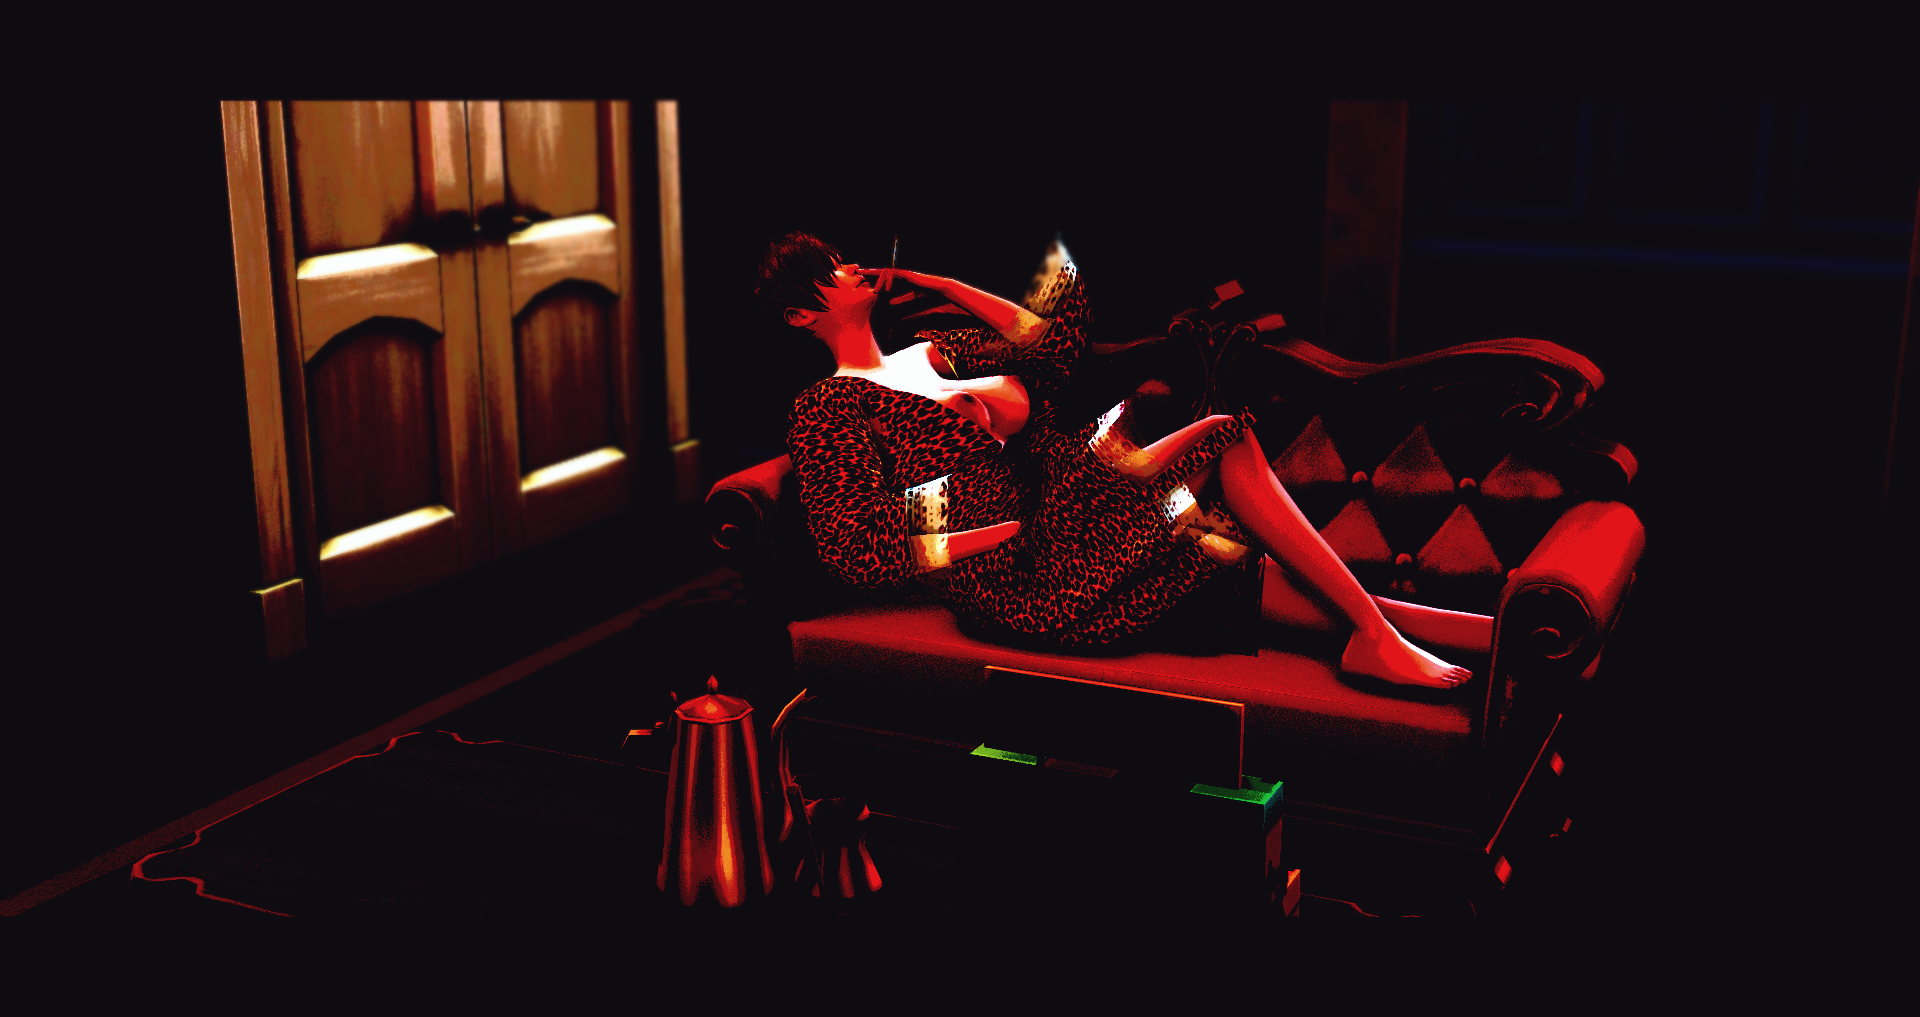
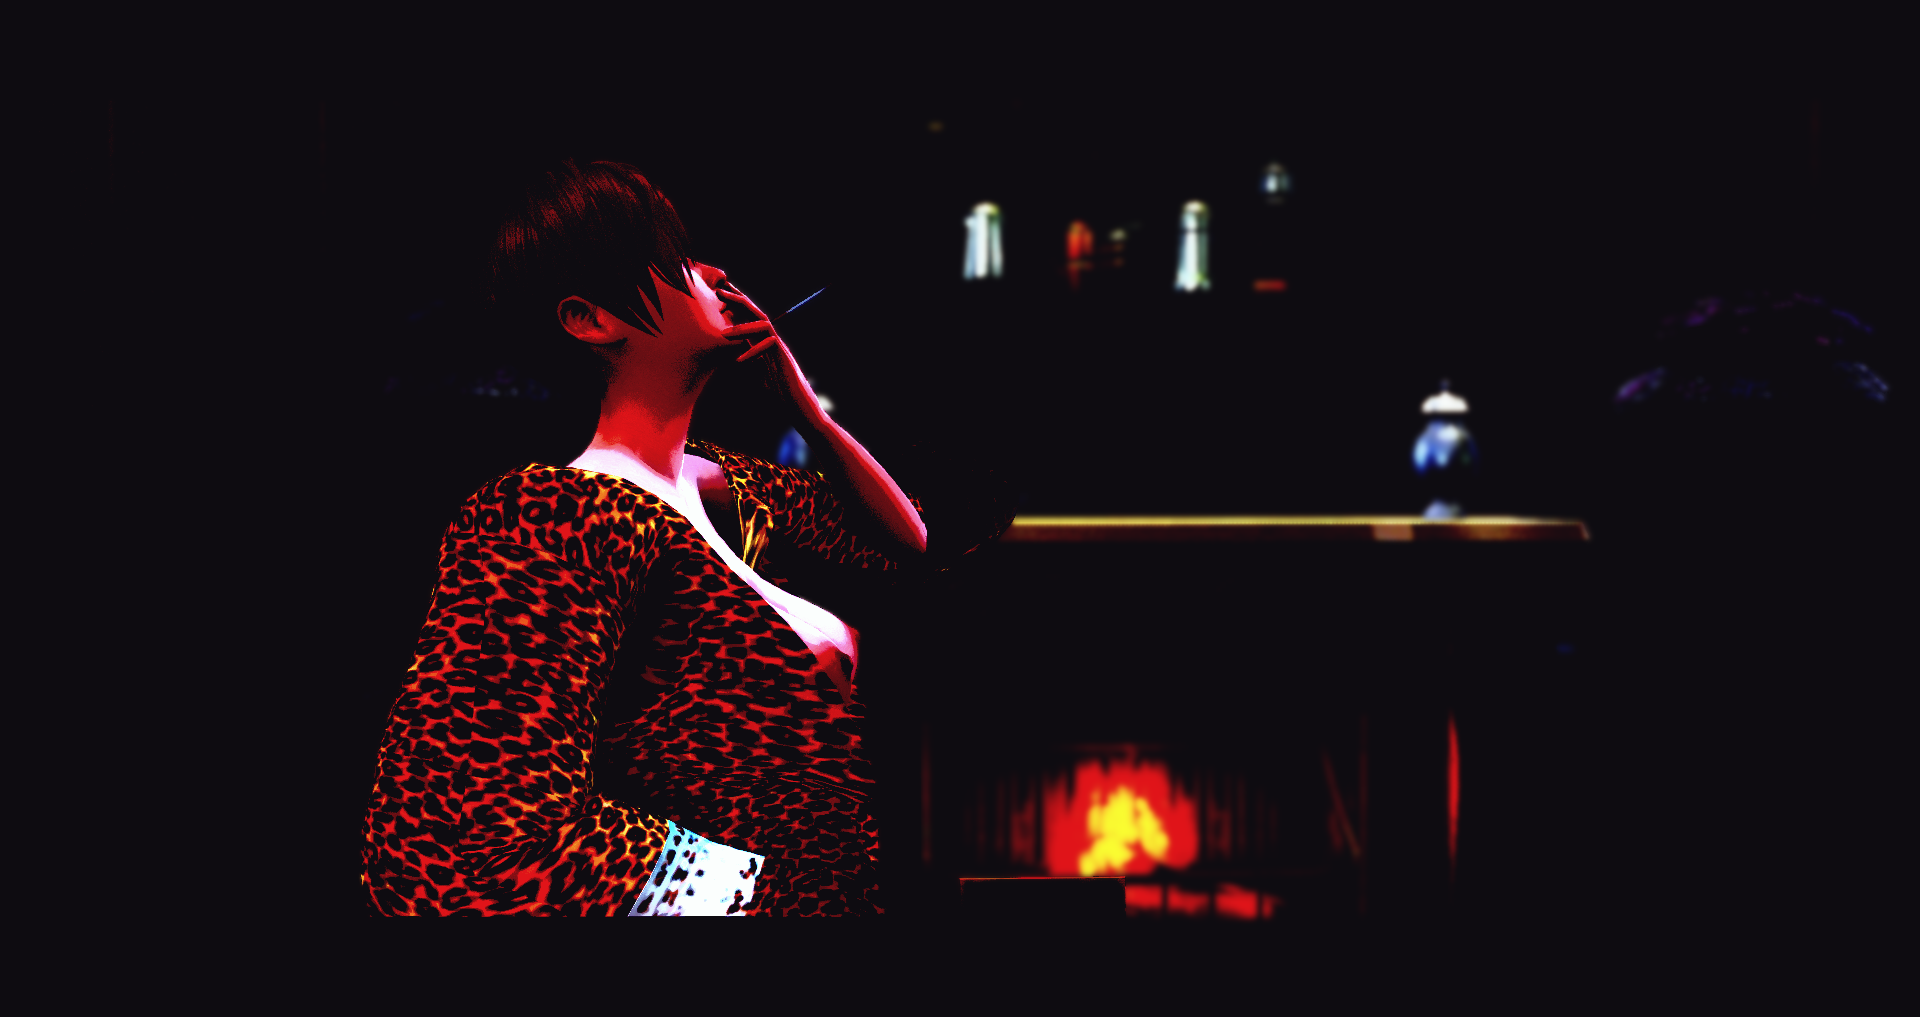
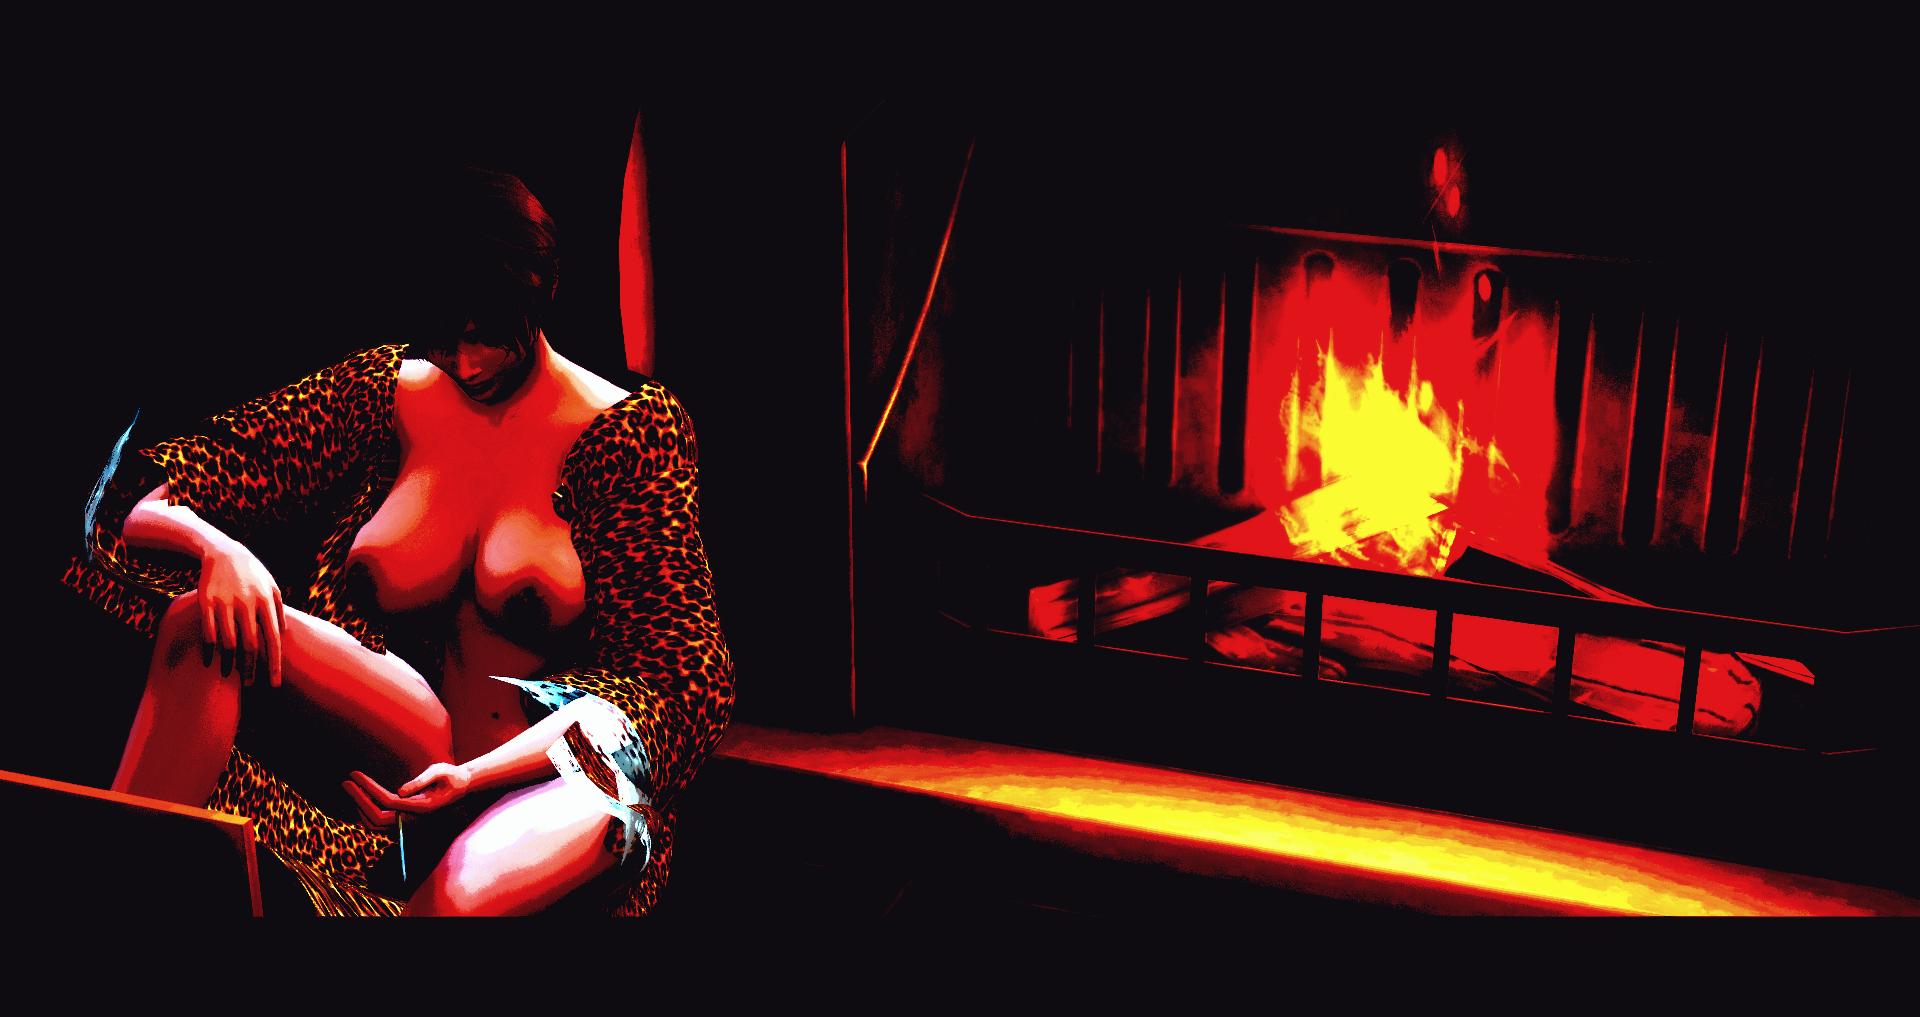
English Version NEW VERSION: GataFumada_NewCrest_Noir_+Dark 🌚🎬 I’ve added a new version to the original preset for those looking for a more "cinematic" and dramatic touch in their game. This +Dark edition is more intense but fully complementary—ideal for storytelling or simply giving your save a raw, realistic vibe. What you’ll notice: True Black & White: It removes the game's flat colors, giving buildings, streets, and interiors a classic film look. Intense Contrast: Shadows are deeper and lights pop more. It works beautifully during the day for a melancholic feel and is spectacular at night for high-drama scenes. Rich Detail: It brings out textures in walls, roads, and objects that usually go unnoticed. Optimized & Lightweight: It’s super optimized and has zero impact on performance. You won’t even notice it’s running, but you’ll forget what the original game looked like once you see it! Check the previews: In the attached photos, you can see the preset in action during the day and night, and how it blends perfectly with the UI, interiors, and Sims. And of course, don’t miss the video recorded entirely with this preset! Watch it in action here: 👇 English Dialogues in the video. Pro Tip: Download both versions! You can swap between the original and the +Dark edition in the ReShade menu (Home key). Pro tip: set a shortcut for each preset and switch them with a single click to match the "vibe" of your scene. If you like my work, show some love! ❤️ Subscribe to my channel, follow me, and hit that like button. It helps a lot! ------------------------------------------------------------------------------------------------------------------------------------------------------------------------------------------------- Versión en Español NUEVA VERSIÓN: GataFumada_NewCrest_Noir_+Dark 🌚🎬 He añadido una nueva versión al preset original para los que buscan un toque más "cinematográfico" y dramático en su juego. Esta edición +Dark es más intensa que la anterior pero totalmente complementaria, ideal para contar historias o simplemente cambiar de aires en tu partida con un estilo más crudo y real. Lo que vas a notar: Blanco y Negro real: Quita los colores planos del juego, dando a los edificios, calles e interiores un aspecto de cine clásico. Contraste Intenso: Las sombras son más profundas y las luces resaltan más. Funciona genial de día para un estilo melancólico y es espectacular de noche para escenas de mucho drama. Más detalle: Resalta texturas en paredes, suelos y objetos que normalmente pasan desapercibidas. Optimizado y Ligero: Está súper optimizado y no pesa nada. No notarás que lo tienes puesto por el rendimiento, pero te olvidarás de cómo se veía el juego original de lo bien que luce. Echa un ojo a las fotos: En las imágenes puedes ver cómo queda el preset de día, de noche y cómo se integra con la interfaz (UI), los interiores y los Sims. Y por supuesto, no te pierdas el vídeo grabado íntegramente con este preset. Míralo en acción aquí: 👇 Diálogos en Español. Consejo: ¡Descarga ambas versiones! Puedes alternar entre la original y la +Dark desde el menú de ReShade (tecla Inicio/Home). Crea un atajo para cada preset e intercámbialos con un click según la escena que estés jugando o la "vibra" que te apetezca. ¡Si te gusta mi trabajo, dale amor! ❤️ Suscríbete al canal, sígueme en mis redes y dale a like. ¡Me ayuda muchísimo a seguir creando! -
New Preset GF-New Crest-Noir +DARK View File English Version NEW VERSION: GataFumada_NewCrest_Noir_+Dark 🌚🎬 I’ve added a new version to the original preset for those looking for a more "cinematic" and dramatic touch in their game. This +Dark edition is more intense but fully complementary—ideal for storytelling or simply giving your save a raw, realistic vibe. What you’ll notice: True Black & White: It removes the game's flat colors, giving buildings, streets, and interiors a classic film look. Intense Contrast: Shadows are deeper and lights pop more. It works beautifully during the day for a melancholic feel and is spectacular at night for high-drama scenes. Rich Detail: It brings out textures in walls, roads, and objects that usually go unnoticed. Optimized & Lightweight: It’s super optimized and has zero impact on performance. You won’t even notice it’s running, but you’ll forget what the original game looked like once you see it! Check the previews: In the attached photos, you can see the preset in action during the day and night, and how it blends perfectly with the UI, interiors, and Sims. And of course, don’t miss the video recorded entirely with this preset! Watch it in action here: 👇 English Dialogues in the video. Pro Tip: Download both versions! You can swap between the original and the +Dark edition in the ReShade menu (Home key). Pro tip: set a shortcut for each preset and switch them with a single click to match the "vibe" of your scene. If you like my work, show some love! ❤️ Subscribe to my channel, follow me, and hit that like button. It helps a lot! ------------------------------------------------------------------------------------------------------------------------------------------------------------------------------------------------- Versión en Español NUEVA VERSIÓN: GataFumada_NewCrest_Noir_+Dark 🌚🎬 He añadido una nueva versión al preset original para los que buscan un toque más "cinematográfico" y dramático en su juego. Esta edición +Dark es más intensa que la anterior pero totalmente complementaria, ideal para contar historias o simplemente cambiar de aires en tu partida con un estilo más crudo y real. Lo que vas a notar: Blanco y Negro real: Quita los colores planos del juego, dando a los edificios, calles e interiores un aspecto de cine clásico. Contraste Intenso: Las sombras son más profundas y las luces resaltan más. Funciona genial de día para un estilo melancólico y es espectacular de noche para escenas de mucho drama. Más detalle: Resalta texturas en paredes, suelos y objetos que normalmente pasan desapercibidas. Optimizado y Ligero: Está súper optimizado y no pesa nada. No notarás que lo tienes puesto por el rendimiento, pero te olvidarás de cómo se veía el juego original de lo bien que luce. Echa un ojo a las fotos: En las imágenes puedes ver cómo queda el preset de día, de noche y cómo se integra con la interfaz (UI), los interiores y los Sims. Y por supuesto, no te pierdas el vídeo grabado íntegramente con este preset. Míralo en acción aquí: 👇 Diálogos en Español. Consejo: ¡Descarga ambas versiones! Puedes alternar entre la original y la +Dark desde el menú de ReShade (tecla Inicio/Home). Crea un atajo para cada preset e intercámbialos con un click según la escena que estés jugando o la "vibra" que te apetezca. ¡Si te gusta mi trabajo, dale amor! ❤️ Suscríbete al canal, sígueme en mis redes y dale a like. ¡Me ayuda muchísimo a seguir creando! Submitter gatafumeta Submitted 05/02/26 Category Other Requirements
-
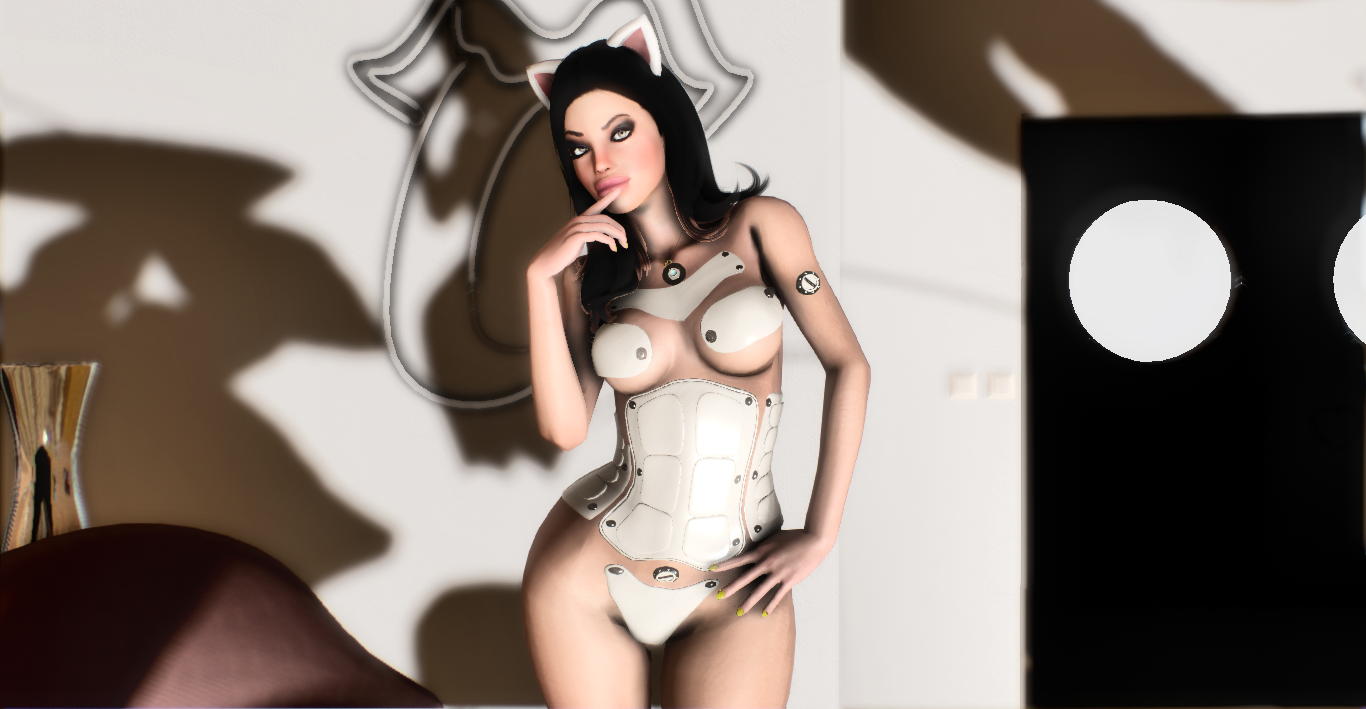
so i will split this into 3 categories so its easier to understand Good news - you dont need level definition to get this results -works on free version of hook 5 basic - runs decently if not turn down the DOF effects in the settings using f4 hook5 what you will need -reshade 4.9.1 but you can use any of the latest one try that -a decent enough pc not high end but medium will do - you will need the hook 5 data files that i have i have included that in the zip so no problemo -my main fx too is included for similar results -make sure you go to your intel graphics panel or whatever you use, if you use nvidia and intel go for intel and set your saturation in color settings to 30. USE L for lighting make sure to back up your files before anything okay?? Note the rooms in the picture show were reshade works best this one specifically only mostly works well in those rooms. all done. files goes up to 170 mb after extraction. i will be releasing this female model and others soon. MIR reshade.rar
-
[Repost from Tumblr] I made my personal set up for ENB and ReShade for Skyrim available on GitHub more as a backup than to share it, but if anyone wants to use it, go ahead. It hasn't been really tested yet so I can't promise it will work, but I am happy with the results so far. I have been developing it to give Skyrim a rougher, grimier look. The atmosphere I have in mind is that of Hellblade, Vikings, Heilung and nicely summarized by this unofficial video (I included three screen-grabs from Vikings videos as a reference). I started with a combination of these two ENB setups as a base, but I deviated enough from either of them to start calling this setup my own. It provides a fast Depth of Field effect for distant landscapes, a weather based configuration on top of global settings, and a good balance between a desaturated atmosphere in rainy weather and a colorful one in sunny weather. VandB ENB Nature Rudy ENB The ReShade layer is there to add touches I wasn't able to accomplish with the ENB layer (tilt shift effect on the edges, a better HDR glow, a more balanced saturation control and sharpness effect, and a cinematic color grading). Read more on Github for instructions and configuration details.
-
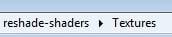
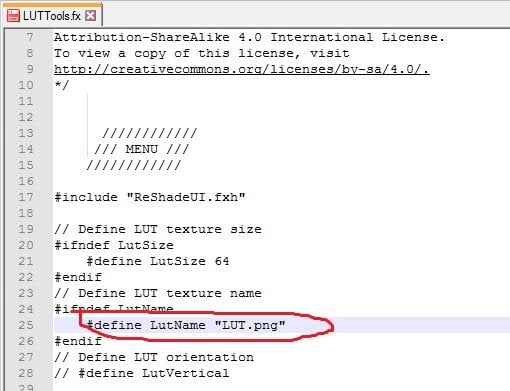
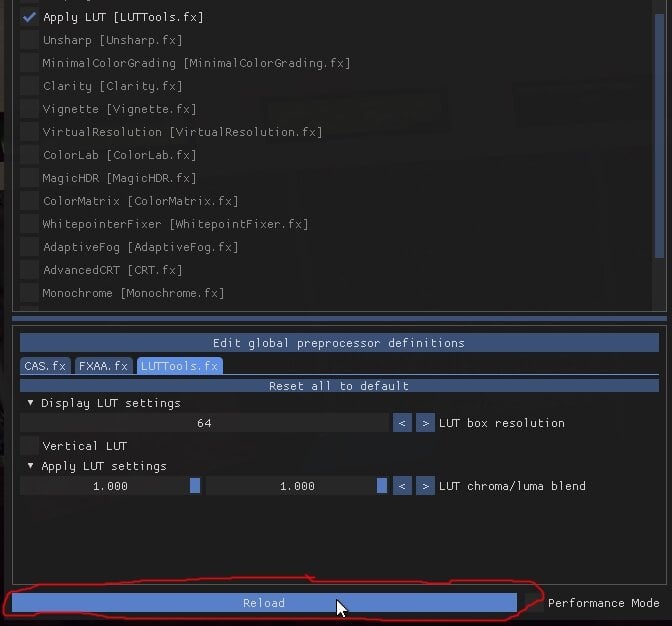
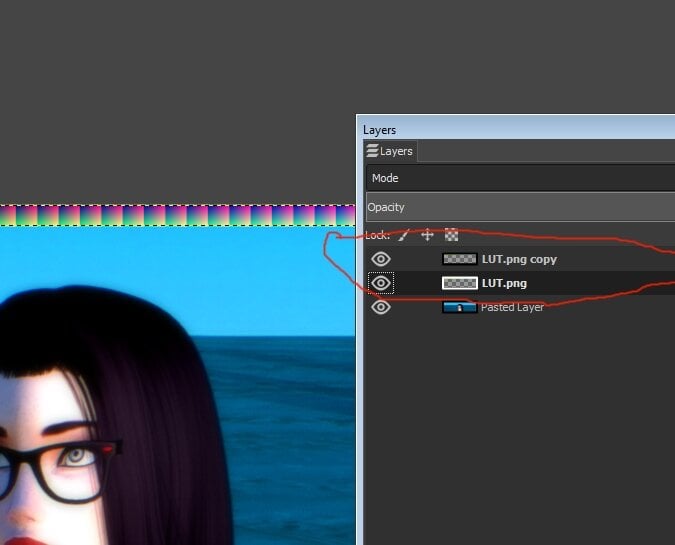
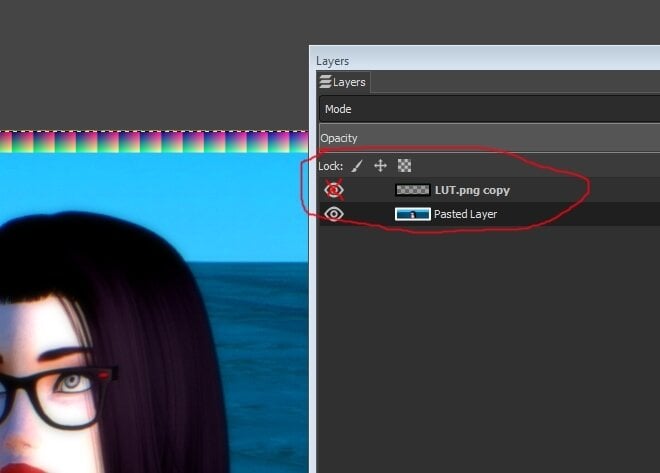
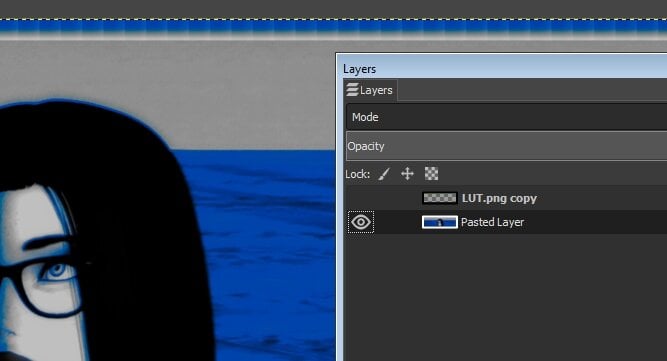
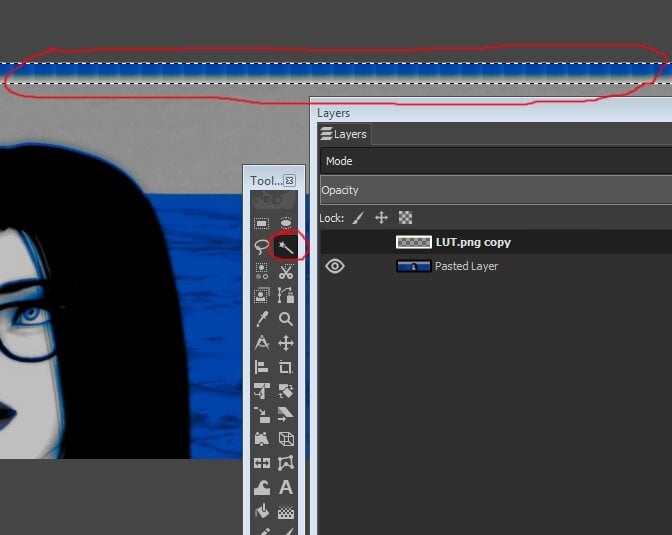
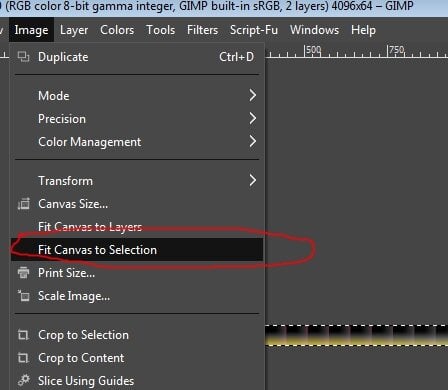
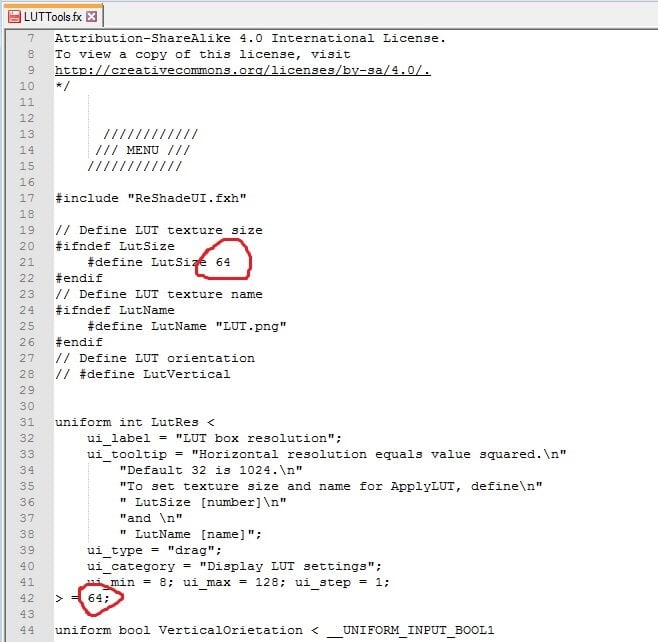
 Custom LUT creation with ReShade and Gimp 4.10 By arse22 on Oct 30,2020 Intro First I will cover some basics, for those who don’t know what a LUT is and why you would want to use it as part of your Hook/ReShade setup. A LUT is a .png file which contains color information used by the game. Using a ReShade shader we can change the default and override with our own settings, creating changes we want in-game without any cost to FPS. In fact, the strain on your system is greatly reduced on account of the fact that only the color itself is changed and color-related shaders do not need to be loaded at all. You can of course, load some to make further tweaks, but personally I prefer to make such edits afterwards and in another program. Why would you want to do this? Besides saving you FPS, the power it offers you is easy to underestimate. In truth, everything is color, even shadow and light are created by color and modify color that produces any image. The color changes that can be made are fairly complex and remain uniform, saving you time to have to mess with the settings in-game. Essentially you will create a ‘preset’ of color in your favorite image or photo editing software and apply it directly in game, while giving you performance boost. Pre-Requisite -Image/Photo editing software such as GIMP or Photoshop. I am using Gimp 4.10. -Latest Hook and ReShade installed and working. I am using H5free and ReShade 4.8.1. Basic LUT LUTs can come in different configurations and sizes, but the most common is 32x 32x32. That is 32 tiles of 32x32 pixels. For this tutorial I will provide and use 64x 64x64 LUT and show how to configure the shader to use it. Here is the default LUT we will be using. I don’t know the technical details but 64 creates a nice 4k LUT and I read that any higher is supposedly ineffective in current games. This is a basic LUT, when you enable the shader that applies it, no change will be made because it’s the default colors. It is a good idea to test this in your game. So, download LUT.png above and place it into your reshade-shaders/Textures folder. Make sure the LUT you downloaded is 4096x64 dimensions. Backup and overwrite the existing one if you already have one in there. Then, make sure that in your reshade-shaders/Shaders folder, you have a shader named “LUTTools.fx” and if you don't have such a shader, search the Shaders folder that ReShade installed and move it in. This puts it into the active shaders to be loaded by the game and this is the shader we will be using. In my version, it was originally installed into a sub-folder called Fubax. If you still can’t find it, you can probably download it through Google, directly from the author. Open the file LUTTools with a good text editor like Notepad++, because it’s hard to see in Notepad. This is the changes we need to make, so that the shader reads our LUT file as 64 tiles. Change the name and both instance of 32 to 64. After you made these changes, save the file. You are ready to load the game. Loading LUT with ReShade Once it is loaded, hit F5 or whatever you have configured your ReShade window key-binding to be. Then create a new ReShade preset or just turn everything off in your current one if you don’t care about it. You will see two options for [LUTTools.fx] : ‘Display LUT [LUTTools.fx]’ and ‘Apply LUT [LUTTools.fx]’ You can safely ignore ‘Display LUT’ because that is used to create LUTs through the shader and this tutorial uses a different method and we will not be using it at all. Enable ‘Apply LUT [LUTTools.fx]’ instead. You won’t see any change and that’s good, as I previously explained, the LUT provided is a ‘default’ one that you will want to make a backup of if you don’t want to rename the one you will apply into game. I prefer to name my LUTs different things and change the name inside LUTTools.fx. When you make changes to the shader .fx in this way in text, all you have to do to apply the changes in-game is hit reload at the bottom of the ReShade window. Finally, what you want to do is take a picture or two with ReShade shaders turned off, just some screencaps of your game with just your basic Hook settings and no other shaders, as we will be using it to create a new LUT in the next section. Creating a New LUT Open the screenshot in your favorite image editor in its own layer and place the LUT.png you downloaded earlier into another layer. Adjust the screenshot so the LUT is at the top if you want (I did this in the pictures,) but it doesn’t matter, whatever is convenient for you. Then make a copy of the LUT layer. Now merge the LUT layer with your screenshot and hide the copy. You are ready to make changes to your LUT and you will use the screenshot as reference. Remember, only COLOR changes can be made, that means no blurring or outlines or any other such effects will work and may potentially mess up the LUT. So, only change colors and saturation and settings of the sort until the picture looks good to you or what you want to achieve with your LUT. Now that the LUT has been changed, we are ready to crop it out. In GIMP I used Magic Tool on the hidden copied layer to get the exact size and then selected “Image->Fit Canvas To Selection” Finally, you are ready to “File->Export” the LUT and name it. When you are exporting you want to make sure you export as .PNG and that there is NO compression of any kind. Name it “LUT_new.png” and export into the reshade-shaders/Textures folder. Make sure the LUT is 4096x64 png and in the proper location. Here is the LUT that I created in the pictures of this tutorial: Loading the New LUT Just in case, here again is where you would change the name in the LUTTools.fx to have the shader load it, instead of the one we changed it to in the beginning of this tutorial. When you apply the new LUT, your UI will change color too, this is normal. And here is an example of how it looks applied in-game. It is never 100% exact for me, I’m not a pro, because the LUT is very sensitive and applies every change and even the slightest changes by the saving process or something like that. The changes the coloring of the LUT are relative to the image used, so any difference between the screenshot and the game will be reflected in the applied LUT. In the case of the example picture, the lighting I used is darker, the actual LUT worked perfectly because I only did some basic steps to turn everything blue. This aside, we can see the potential power of using this method to apply LUT. Graphical changes straight from your GIMP or image editing program, directly into game through only color. Tips Not every LUT needs to be as dramatic as the one in this tutorial. I only did this to make things more clear. When you use a screenshot to compare while you color the LUT like we did in this tutorial, it's good idea to use a collage of multiple screenshots, preferably from various settings and Hook lighting setups. Hook and backgrounds can add color too, so it has to be taken account. The more extreme the LUT, the more likely it will not work in every scene, causing color errors and if you have multiple picture for reference while you’re making changes and be able to detect the problem. In particular I would try to use as many different shades of color that are usually in your most used settings, to try to adjust the LUT to fit as many of them as you can. This is not really a requirement, it’s just something to experiment with. In general though, I would say it depends on what you are trying to achieve. Some LUTs can be used to create a nighttime effect, another for a de-saturated “mech” setting and yet another can be more general and work with most scenes, or an old photograph, or maybe you like the particular color errors you found and want a “glitched-out” effect for some pictures. Ideally you have a LUT for every job, they allow your pictures to look uniform and unique in appearance without having to guess by hand every time since the color adjustments are applied with code. Which brings me to the last thing: Another powerful tool for GIMP is a filter suite called G’MIC, which can be downloaded free : https://gmic.eu/ It also includes a filter called “Simulate Film” which actually allows you to apply exact color presets from a wide variety of cameras, consumer to pro, rather than making changes by hand using this method. You can find the filter in G’MIC under Colors section, once you have it installed. The LUTs you create with it will give your screenshots a more professional quality. Also it has other color-related filters, including various “color transfer” effects which allows mimicking the specific color scheme of any photo, screenshot or painting to some degree. Things to Remember When customizing a LUT, make sure to only use color settings and filters, many experienced users only use ‘Levels’ to make their LUTs and nothing else, but anything color-related is ok. The LUT is PNG color data, it cannot record and interpret code of things like blur. Color changes made to the LUT are relative, so if you change your screenshot a lot before using it as reference to the LUT, you may get unexpected results, without those exact settings in-game. Rooms can have unique Hook lighting that apply color and potentially not work with a LUT if you didn’t use it as reference. Other things like ReShade settings, such as ones that change color. As long as you are using it in the reference screenshot, you can make sure the LUT will work, but depending on the changes you made, it may not work that well without. When creating a collage of screenshots to use for reference in creating new LUT, it is a good idea to include a variety of colors, lighting and maybe even shaders that you want to test out. This allows you to more easily see where the LUT can be best utilized and where it will have problems or won’t look good. If you made a new LUT, don’t forget to change the name in the shader .fx file and hit reload in the ReShade window if you already opened the game. Conclusion I created this tutorial because I noticed that a lot of Hook presets do not have this shader included or any LUT shaders for that matter. There is a way to do it through H5 as well, but I prefer to use Reshade since that is the settings I work with most, I never touch my H5 settings at all. Hopefully it was helpful to someone who may not be familiar with the power of such a common and IMHO fundamental method of graphic enhancement.


-
Custom LUT creation with ReShade and Gimp 4.10 By arse22 on Oct 30,2020 Intro First I will cover some basics, for those who don’t know what a LUT is and why you would want to use it as part of your Hook/ReShade setup. A LUT is a .png file which contains color information used by the game. Using a ReShade shader we can change the default and override with our own settings, creating changes we want in-game without any cost to FPS. In fact, the strain on your system is greatly reduced on account of the fact that only the color itself is changed and color-related shaders do not need to be loaded at all. You can of course, load some to make further tweaks, but personally I prefer to make such edits afterwards and in another program. Why would you want to do this? Besides saving you FPS, the power it offers you is easy to underestimate. In truth, everything is color, even shadow and light are created by color and modify color that produces any image. The color changes that can be made are fairly complex and remain uniform, saving you time to have to mess with the settings in-game. Essentially you will create a ‘preset’ of color in your favorite image or photo editing software and apply it directly in game, while giving you performance boost. Pre-Requisite -Image/Photo editing software such as GIMP or Photoshop. I am using Gimp 4.10. -Latest Hook and ReShade installed and working. I am using H5free and ReShade 4.8.1. Basic LUT LUTs can come in different configurations and sizes, but the most common is 32x 32x32. That is 32 tiles of 32x32 pixels. For this tutorial I will provide and use 64x 64x64 LUT and show how to configure the shader to use it. Here is the default LUT we will be using. I don’t know the technical details but 64 creates a nice 4k LUT and I read that any higher is supposedly ineffective in current games. This is a basic LUT, when you enable the shader that applies it, no change will be made because it’s the default colors. It is a good idea to test this in your game. So, download LUT.png above and place it into your reshade-shaders/Textures folder. Make sure the LUT you downloaded is 4096x64 dimensions. Backup and overwrite the existing one if you already have one in there. Then, make sure that in your reshade-shaders/Shaders folder, you have a shader named “LUTTools.fx” and if you don't have such a shader, search the Shaders folder that ReShade installed and move it in. This puts it into the active shaders to be loaded by the game and this is the shader we will be using. In my version, it was originally installed into a sub-folder called Fubax. If you still can’t find it, you can probably download it through Google, directly from the author. Open the file LUTTools with a good text editor like Notepad++, because it’s hard to see in Notepad. This is the changes we need to make, so that the shader reads our LUT file as 64 tiles. Change the name and both instance of 32 to 64. After you made these changes, save the file. You are ready to load the game. Loading LUT with ReShade Once it is loaded, hit F5 or whatever you have configured your ReShade window key-binding to be. Then create a new ReShade preset or just turn everything off in your current one if you don’t care about it. You will see two options for [LUTTools.fx] : ‘Display LUT [LUTTools.fx]’ and ‘Apply LUT [LUTTools.fx]’ You can safely ignore ‘Display LUT’ because that is used to create LUTs through the shader and this tutorial uses a different method and we will not be using it at all. Enable ‘Apply LUT [LUTTools.fx]’ instead. You won’t see any change and that’s good, as I previously explained, the LUT provided is a ‘default’ one that you will want to make a backup of if you don’t want to rename the one you will apply into game. I prefer to name my LUTs different things and change the name inside LUTTools.fx. When you make changes to the shader .fx in this way in text, all you have to do to apply the changes in-game is hit reload at the bottom of the ReShade window. Finally, what you want to do is take a picture or two with ReShade shaders turned off, just some screencaps of your game with just your basic Hook settings and no other shaders, as we will be using it to create a new LUT in the next section. Creating a New LUT Open the screenshot in your favorite image editor in its own layer and place the LUT.png you downloaded earlier into another layer. Adjust the screenshot so the LUT is at the top if you want (I did this in the pictures,) but it doesn’t matter, whatever is convenient for you. Then make a copy of the LUT layer. Now merge the LUT layer with your screenshot and hide the copy. You are ready to make changes to your LUT and you will use the screenshot as reference. Remember, only COLOR changes can be made, that means no blurring or outlines or any other such effects will work and may potentially mess up the LUT. So, only change colors and saturation and settings of the sort until the picture looks good to you or what you want to achieve with your LUT. Now that the LUT has been changed, we are ready to crop it out. In GIMP I used Magic Tool on the hidden copied layer to get the exact size and then selected “Image->Fit Canvas To Selection” Finally, you are ready to “File->Export” the LUT and name it. When you are exporting you want to make sure you export as .PNG and that there is NO compression of any kind. Name it “LUT_new.png” and export into the reshade-shaders/Textures folder. Make sure the LUT is 4096x64 png and in the proper location. Here is the LUT that I created in the pictures of this tutorial: Loading the New LUT Just in case, here again is where you would change the name in the LUTTools.fx to have the shader load it, instead of the one we changed it to in the beginning of this tutorial. When you apply the new LUT, your UI will change color too, this is normal. And here is an example of how it looks applied in-game. It is never 100% exact for me, I’m not a pro, because the LUT is very sensitive and applies every change and even the slightest changes by the saving process or something like that. The changes the coloring of the LUT are relative to the image used, so any difference between the screenshot and the game will be reflected in the applied LUT. In the case of the example picture, the lighting I used is darker, the actual LUT worked perfectly because I only did some basic steps to turn everything blue. This aside, we can see the potential power of using this method to apply LUT. Graphical changes straight from your GIMP or image editing program, directly into game through only color. Tips Not every LUT needs to be as dramatic as the one in this tutorial. I only did this to make things more clear. When you use a screenshot to compare while you color the LUT like we did in this tutorial, it's good idea to use a collage of multiple screenshots, preferably from various settings and Hook lighting setups. Hook and backgrounds can add color too, so it has to be taken account. The more extreme the LUT, the more likely it will not work in every scene, causing color errors and if you have multiple picture for reference while you’re making changes and be able to detect the problem. In particular I would try to use as many different shades of color that are usually in your most used settings, to try to adjust the LUT to fit as many of them as you can. This is not really a requirement, it’s just something to experiment with. In general though, I would say it depends on what you are trying to achieve. Some LUTs can be used to create a nighttime effect, another for a de-saturated “mech” setting and yet another can be more general and work with most scenes, or an old photograph, or maybe you like the particular color errors you found and want a “glitched-out” effect for some pictures. Ideally you have a LUT for every job, they allow your pictures to look uniform and unique in appearance without having to guess by hand every time since the color adjustments are applied with code. Which brings me to the last thing: Another powerful tool for GIMP is a filter suite called G’MIC, which can be downloaded free : https://gmic.eu/ It also includes a filter called “Simulate Film” which actually allows you to apply exact color presets from a wide variety of cameras, consumer to pro, rather than making changes by hand using this method. You can find the filter in G’MIC under Colors section, once you have it installed. The LUTs you create with it will give your screenshots a more professional quality. Also it has other color-related filters, including various “color transfer” effects which allows mimicking the specific color scheme of any photo, screenshot or painting to some degree. Things to Remember When customizing a LUT, make sure to only use color settings and filters, many experienced users only use ‘Levels’ to make their LUTs and nothing else, but anything color-related is ok. The LUT is PNG color data, it cannot record and interpret code of things like blur. Color changes made to the LUT are relative, so if you change your screenshot a lot before using it as reference to the LUT, you may get unexpected results, without those exact settings in-game. Rooms can have unique Hook lighting that apply color and potentially not work with a LUT if you didn’t use it as reference. Other things like ReShade settings, such as ones that change color. As long as you are using it in the reference screenshot, you can make sure the LUT will work, but depending on the changes you made, it may not work that well without. When creating a collage of screenshots to use for reference in creating new LUT, it is a good idea to include a variety of colors, lighting and maybe even shaders that you want to test out. This allows you to more easily see where the LUT can be best utilized and where it will have problems or won’t look good. If you made a new LUT, don’t forget to change the name in the shader .fx file and hit reload in the ReShade window if you already opened the game. Conclusion I created this tutorial because I noticed that a lot of Hook presets do not have this shader included or any LUT shaders for that matter. There is a way to do it through H5 as well, but I prefer to use Reshade since that is the settings I work with most, I never touch my H5 settings at all. Hopefully it was helpful to someone who may not be familiar with the power of such a common and IMHO fundamental method of graphic enhancement.
-
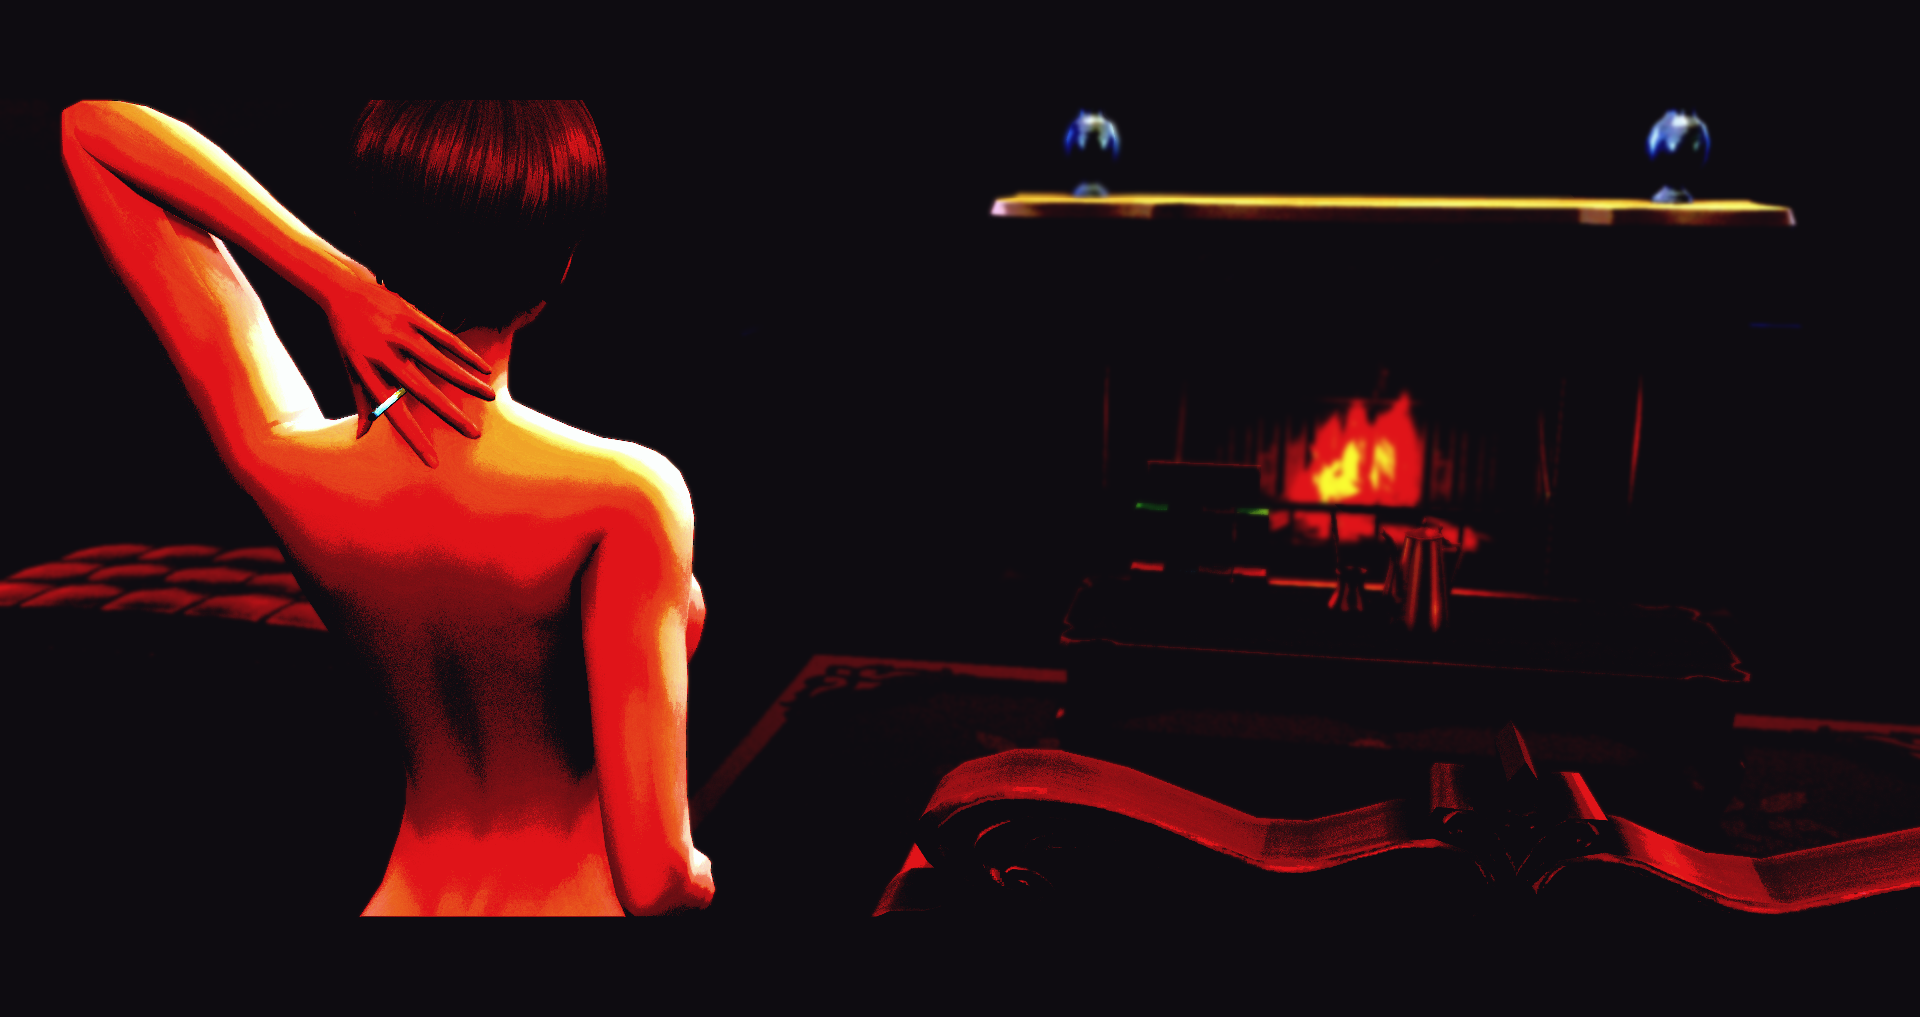
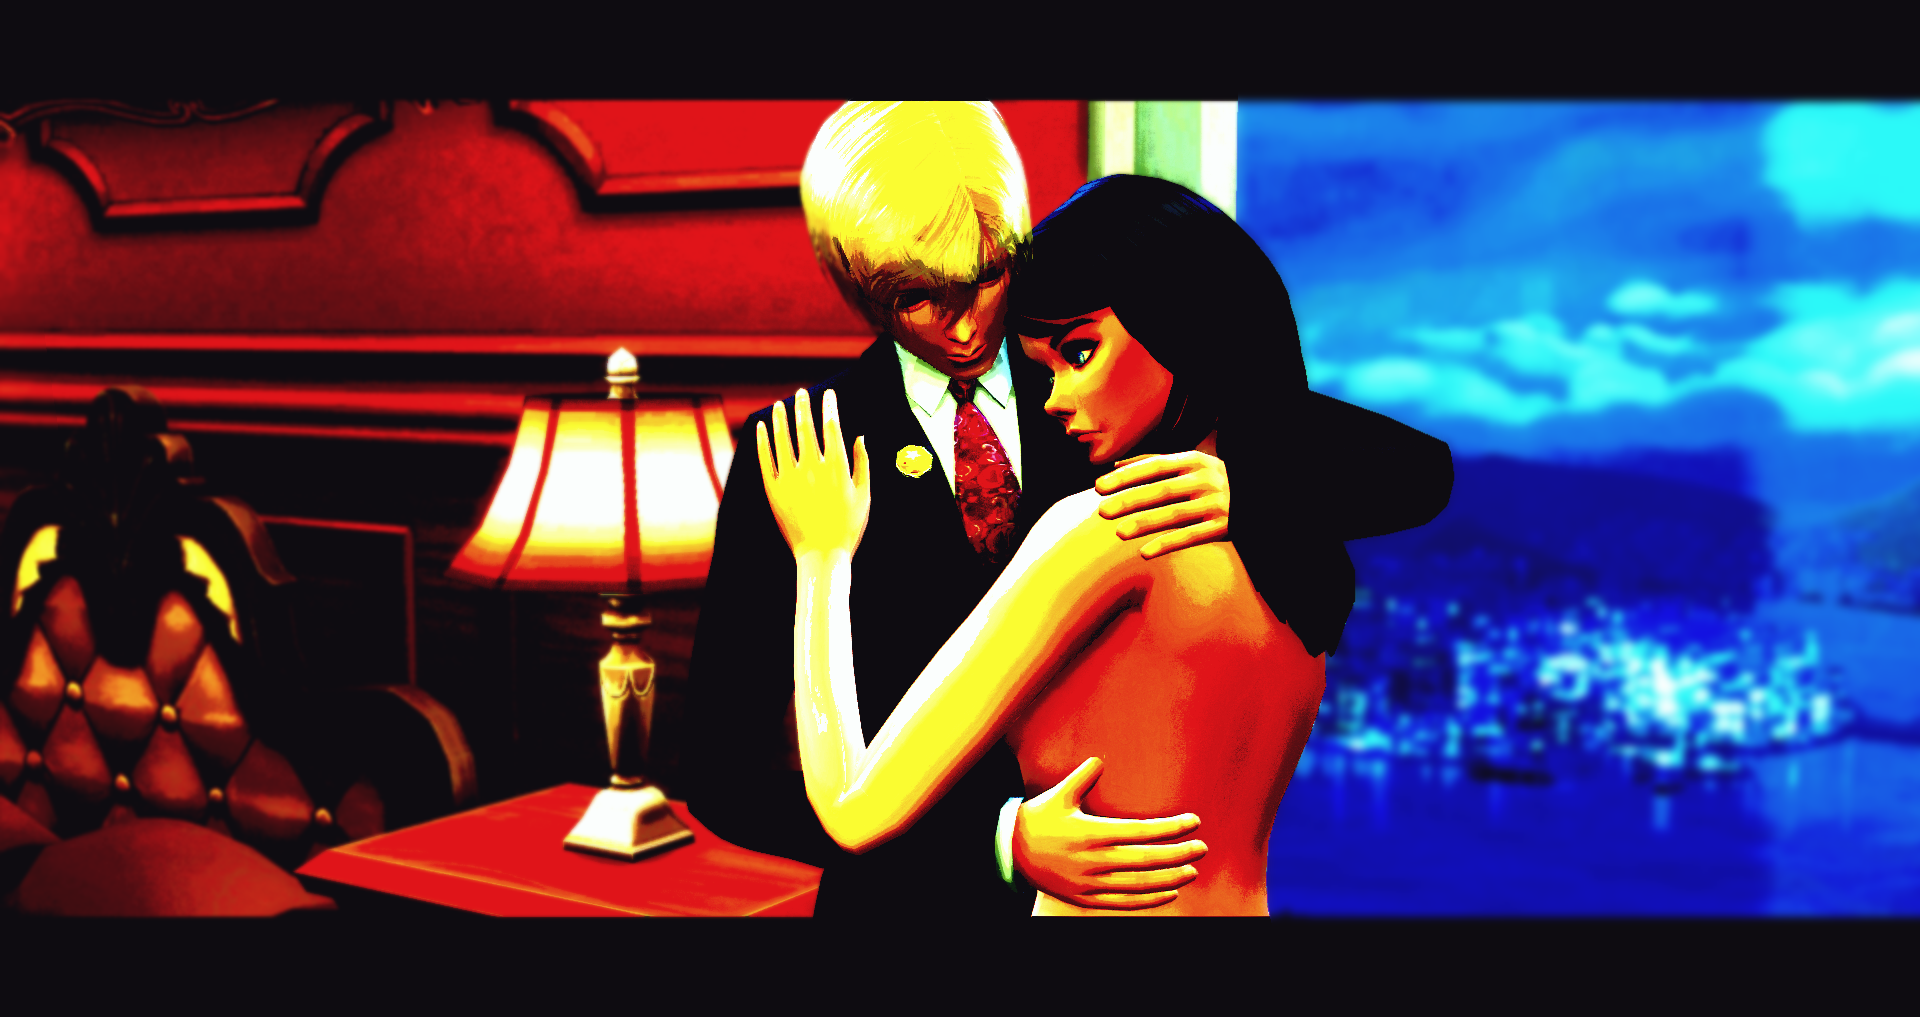
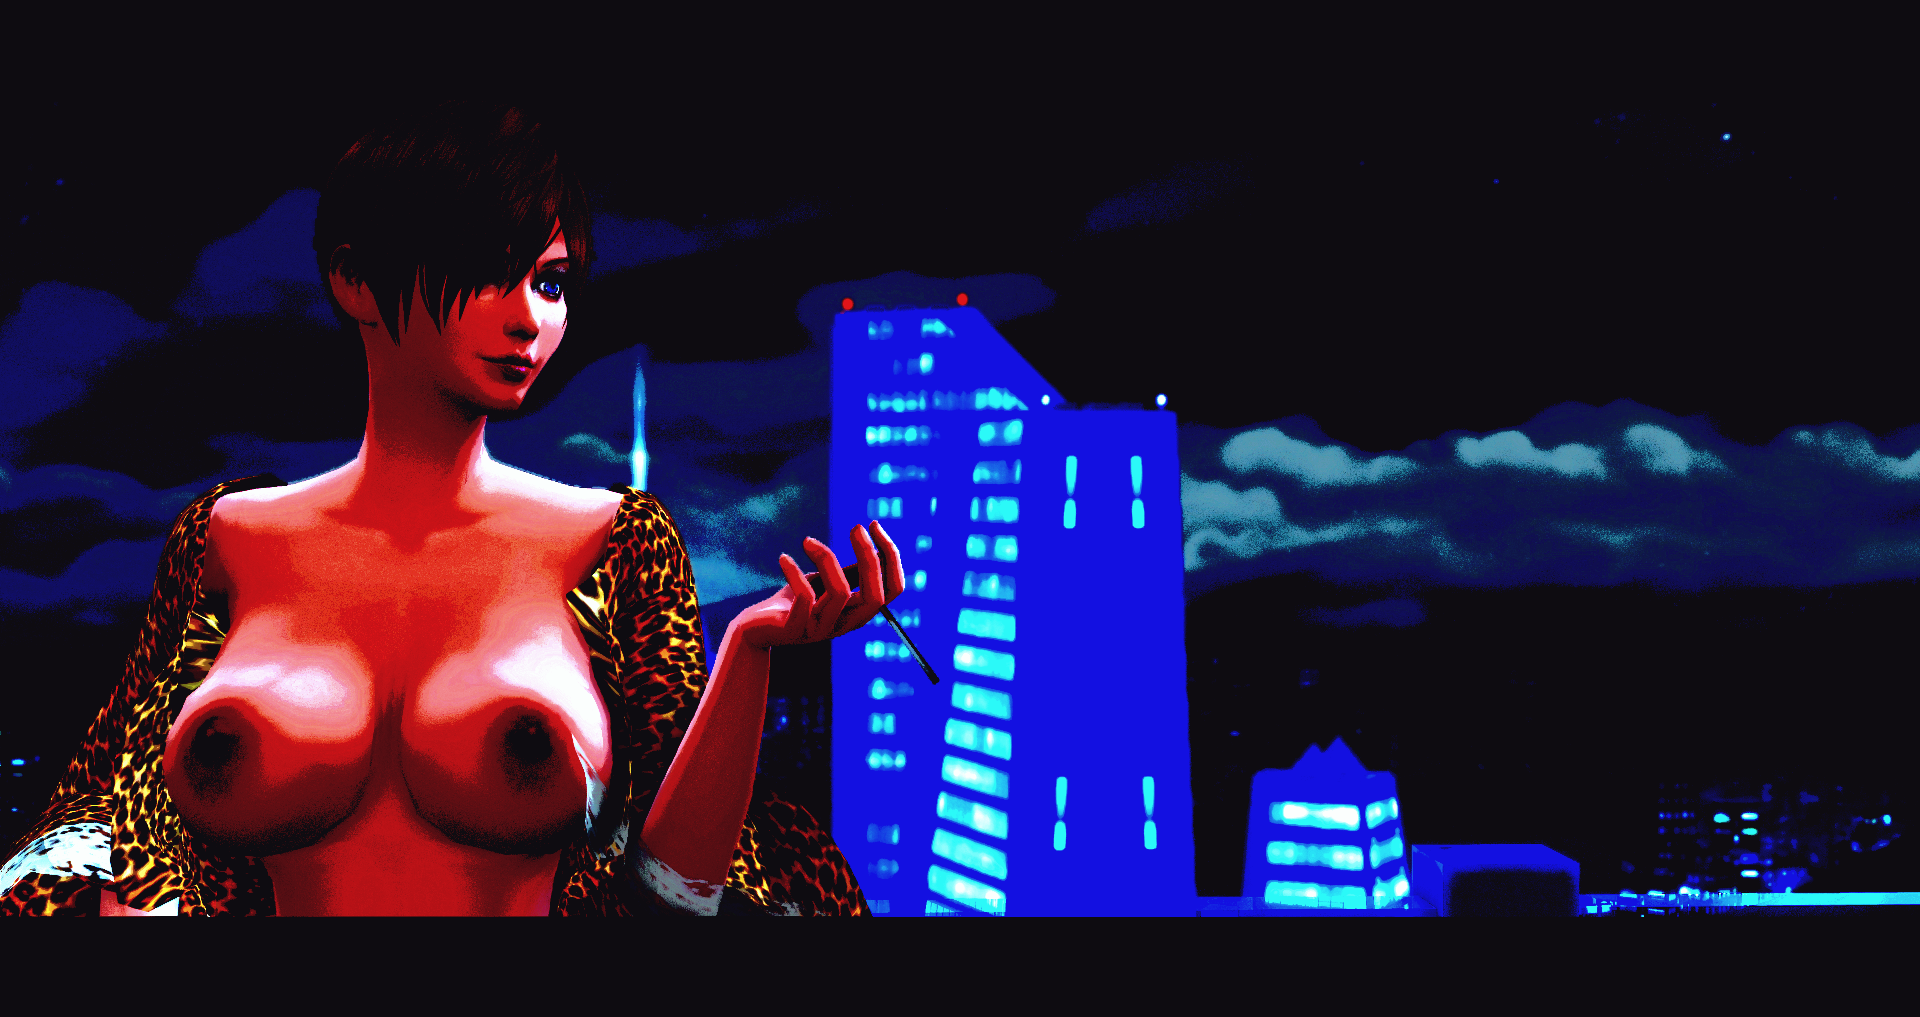
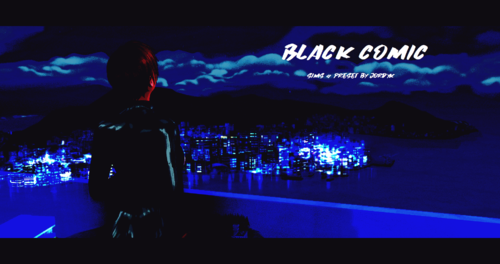
Black comic (reshade preset) View File Hi ! This mod is a preset for Reshade that I created ! (It's the first one I created in fact) It's not properly an adult mod, but this preset can make scenes sexier ! Look at the screenshots to have an example (I'm an artist). Just to warm you, this preset was originally thought for screenshots, so it is hardly playeable. You can try to play with it by removing the borders, if you know how to do. You'll need the latest version of Reshade to make it work. Just launch Reshade and import the ini. I just seen that modders had make presets similar to this one before me. I excuse in advance, but I copied anyone ! I just wanted to have the exact preset I imagined (and I saw those presets AFTER I created mine). Don't hesitate to send me your screenshots made with my preset And, please... Don't claim this preset for yourself (or I'll be very angry ! And I bite ! ? ) And don't forget to quote me whan you use it Hope you'll like it ! The reshade installer (needed to make the mod work) : ReShade_Setup_4.8.2.exe Submitter JordyKRowling Submitted 11/22/2020 Category Other Requires Reshade version 4.8.2 or higher
-
? (Reshade link) ? View File Hey! This old one's gone, but you can get Reshade from https://reshade.me/ (example w images) (few might also need DirectX 2010! https://www.microsoft.com/en-us/download/details.aspx?id=8109 >extract anywhere, like Desktop, then another .exe!) Haven't played sims in a long time, and someone let me know this was broken, so at least changing it to working links. Some presets from Gshade https://github.com/Mortalitas/GShade might look nice with this game. Hope everyone is holding on, to a bit of happiness. Submitter Cul Submitted 01/07/2019 Category Uncategorized Requires (Some PCs) DirectX RT 2010 in link!

-
CrispAndClear Reshade Preset View File Tired of all the blurry and haziness in game? I was so I decided to improve it. I had to downsize images to fit the 2 MB max so they actually look better in game but it should give you a fairly good idea of the changes. Depending on your system you may notice a fps hit. I also uploaded an alternate version that is a bit lighter. If you don't like something, you can change it to your preferred tastes using the ingame ReShade menu. INSTALLATION: Download the latest ReSahde release at reshade.me and follow the installation instructions. Unzip the CrispAndClear.ini and place it in your game folder (where fallout4.exe is located). In game open the Reshade menu and select CrispAndClear.ini from the dropdown menu. If you have any questions or issues let me know, I'll do my best to help. CrispAndClear.7z CrispAndClear(Light).7z Submitter Sandman525 Submitted 06/28/2018 Category Other Requires ReShade
-
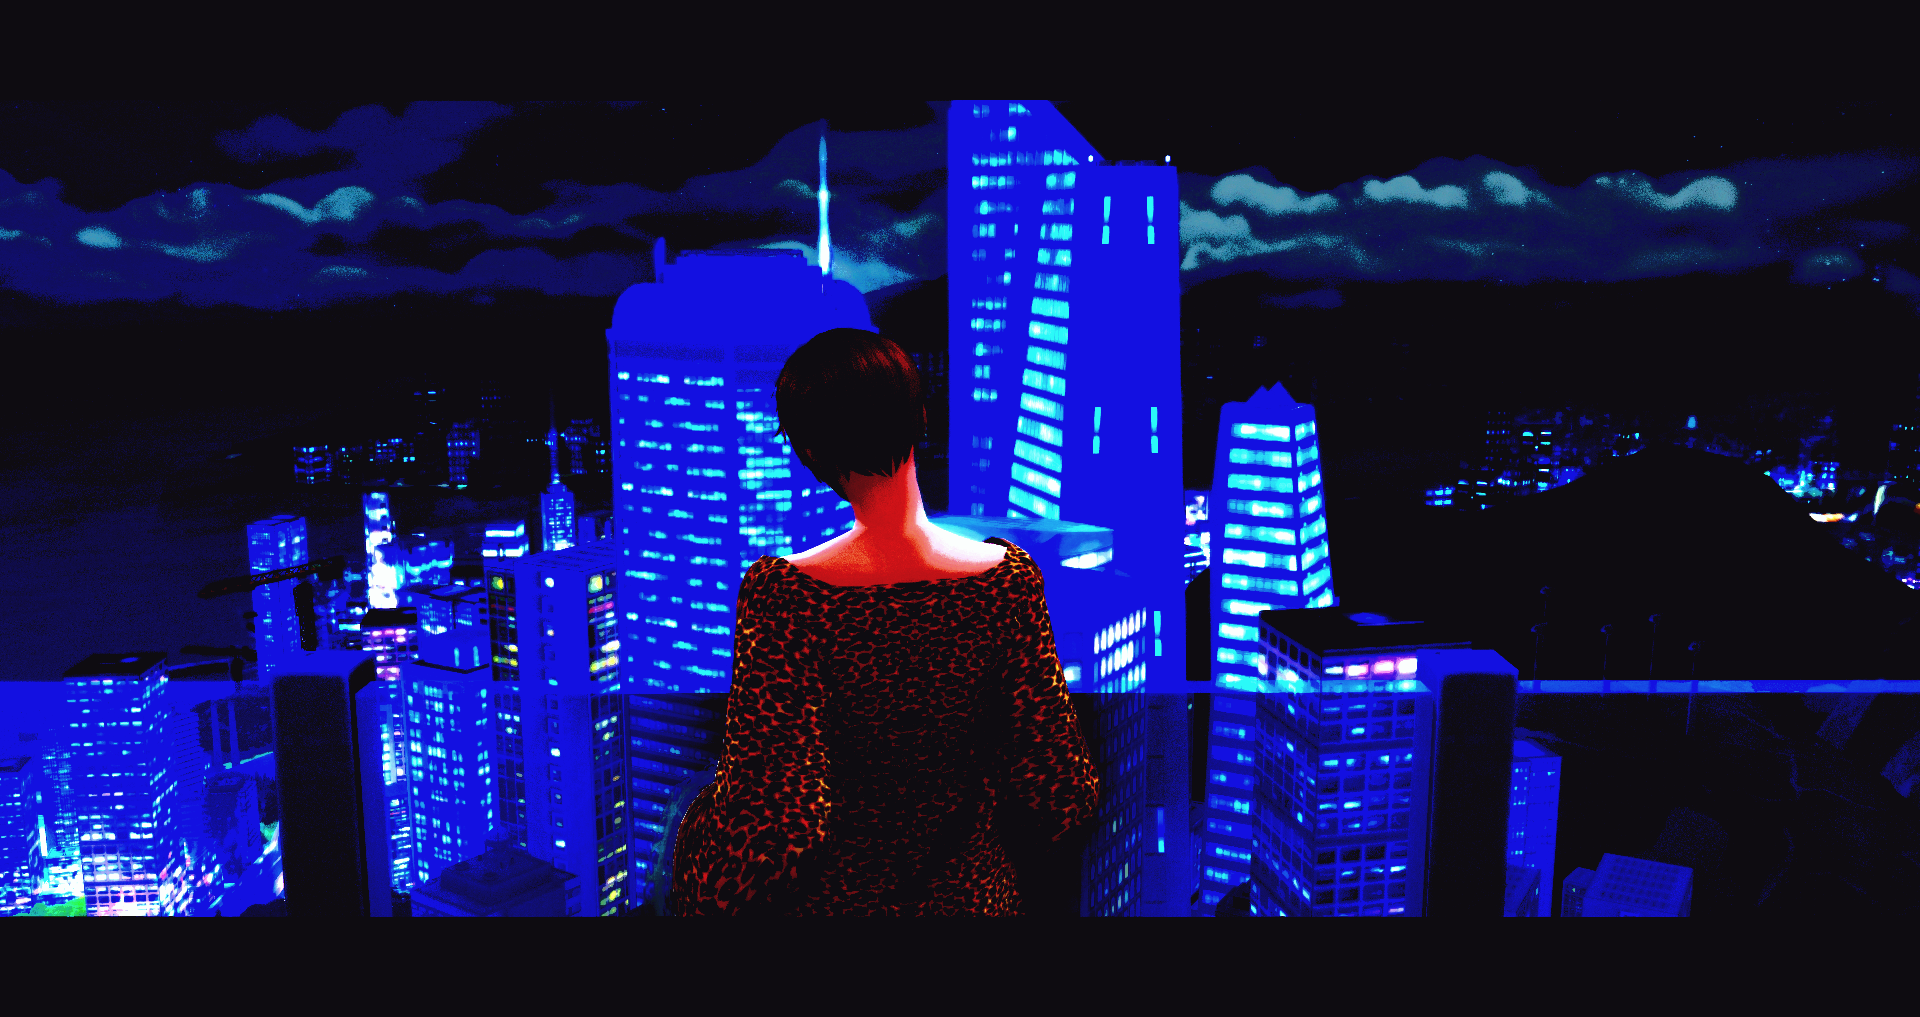
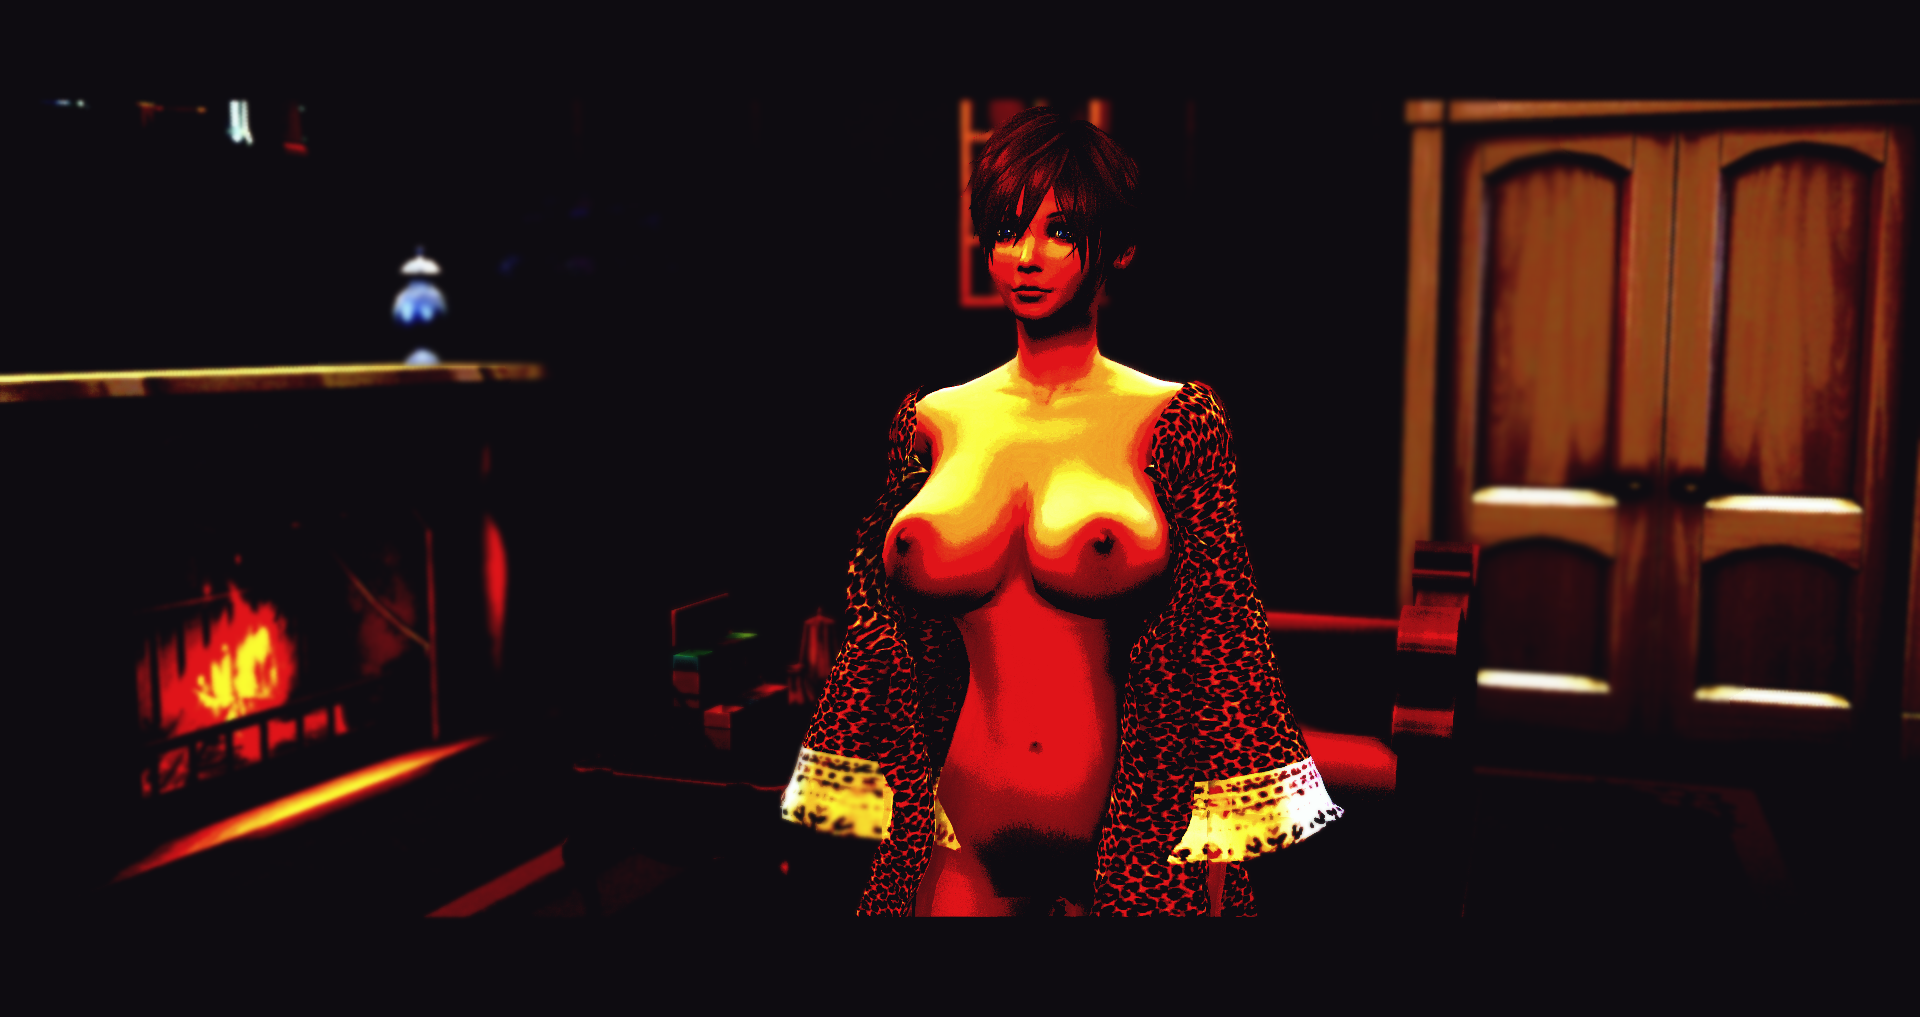
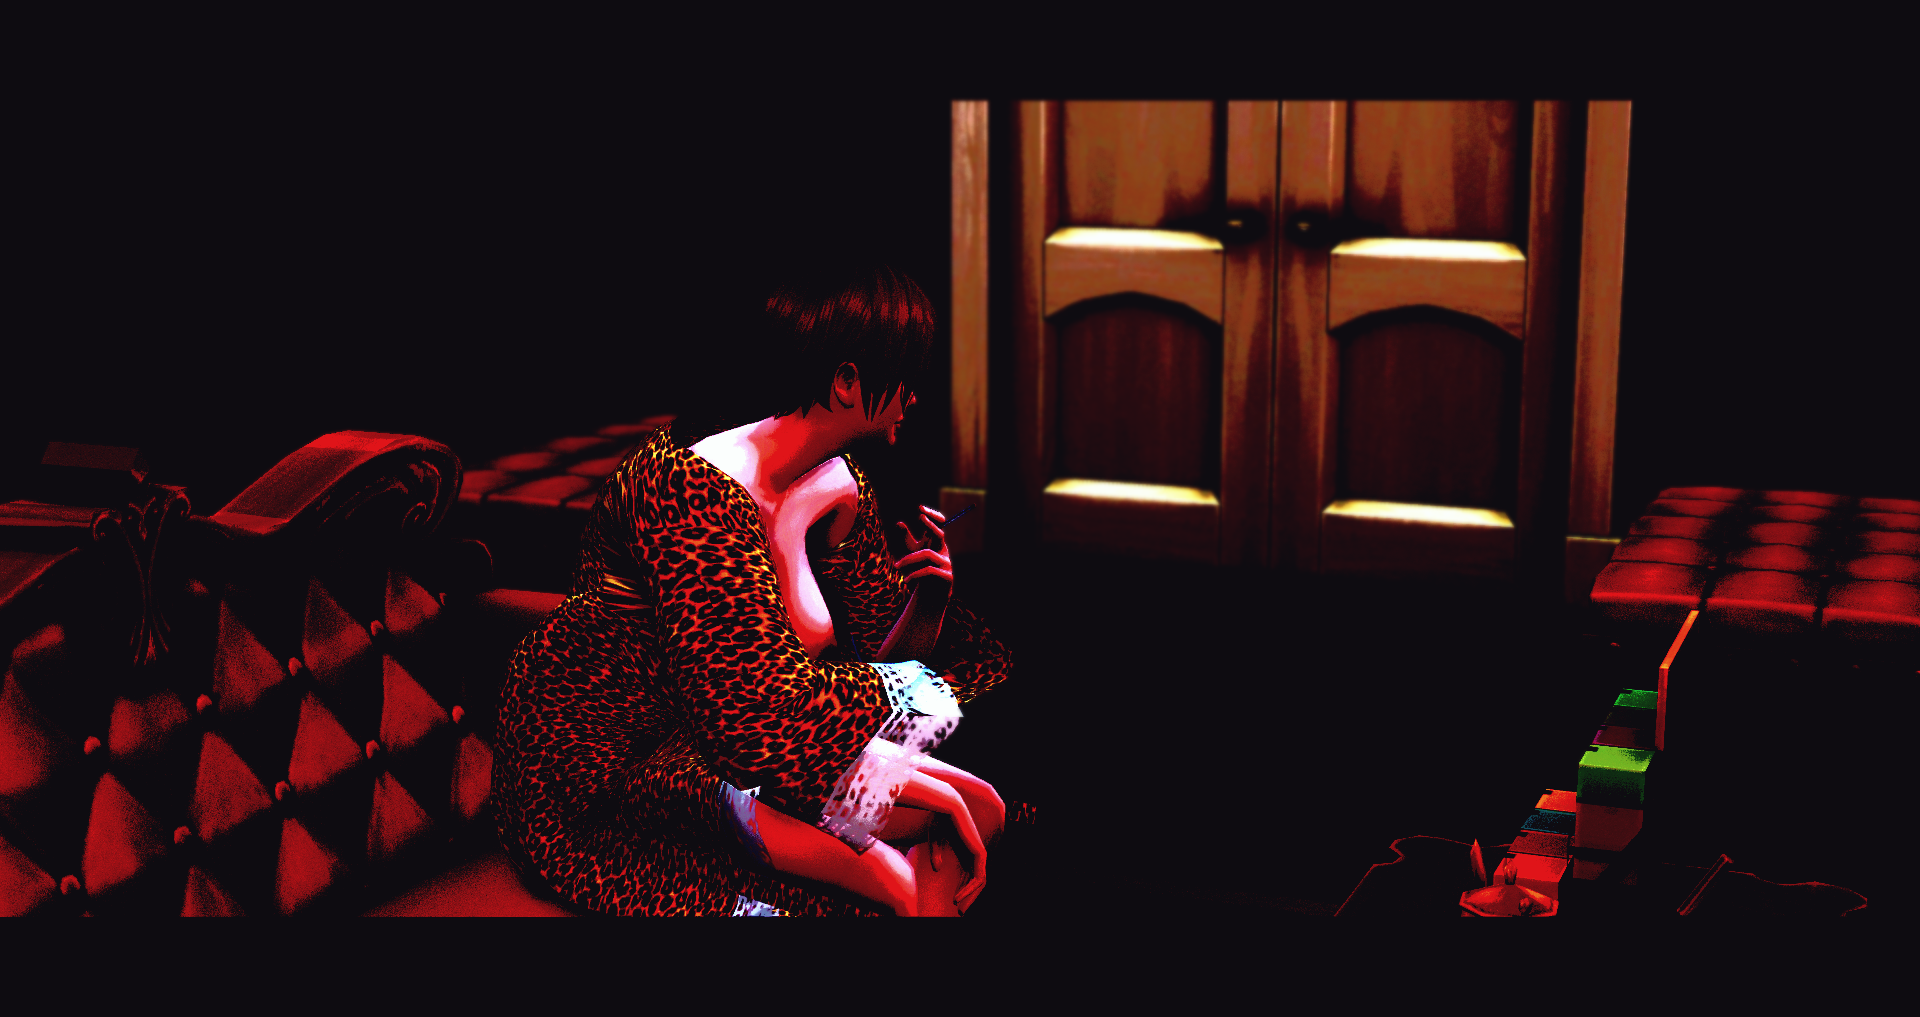
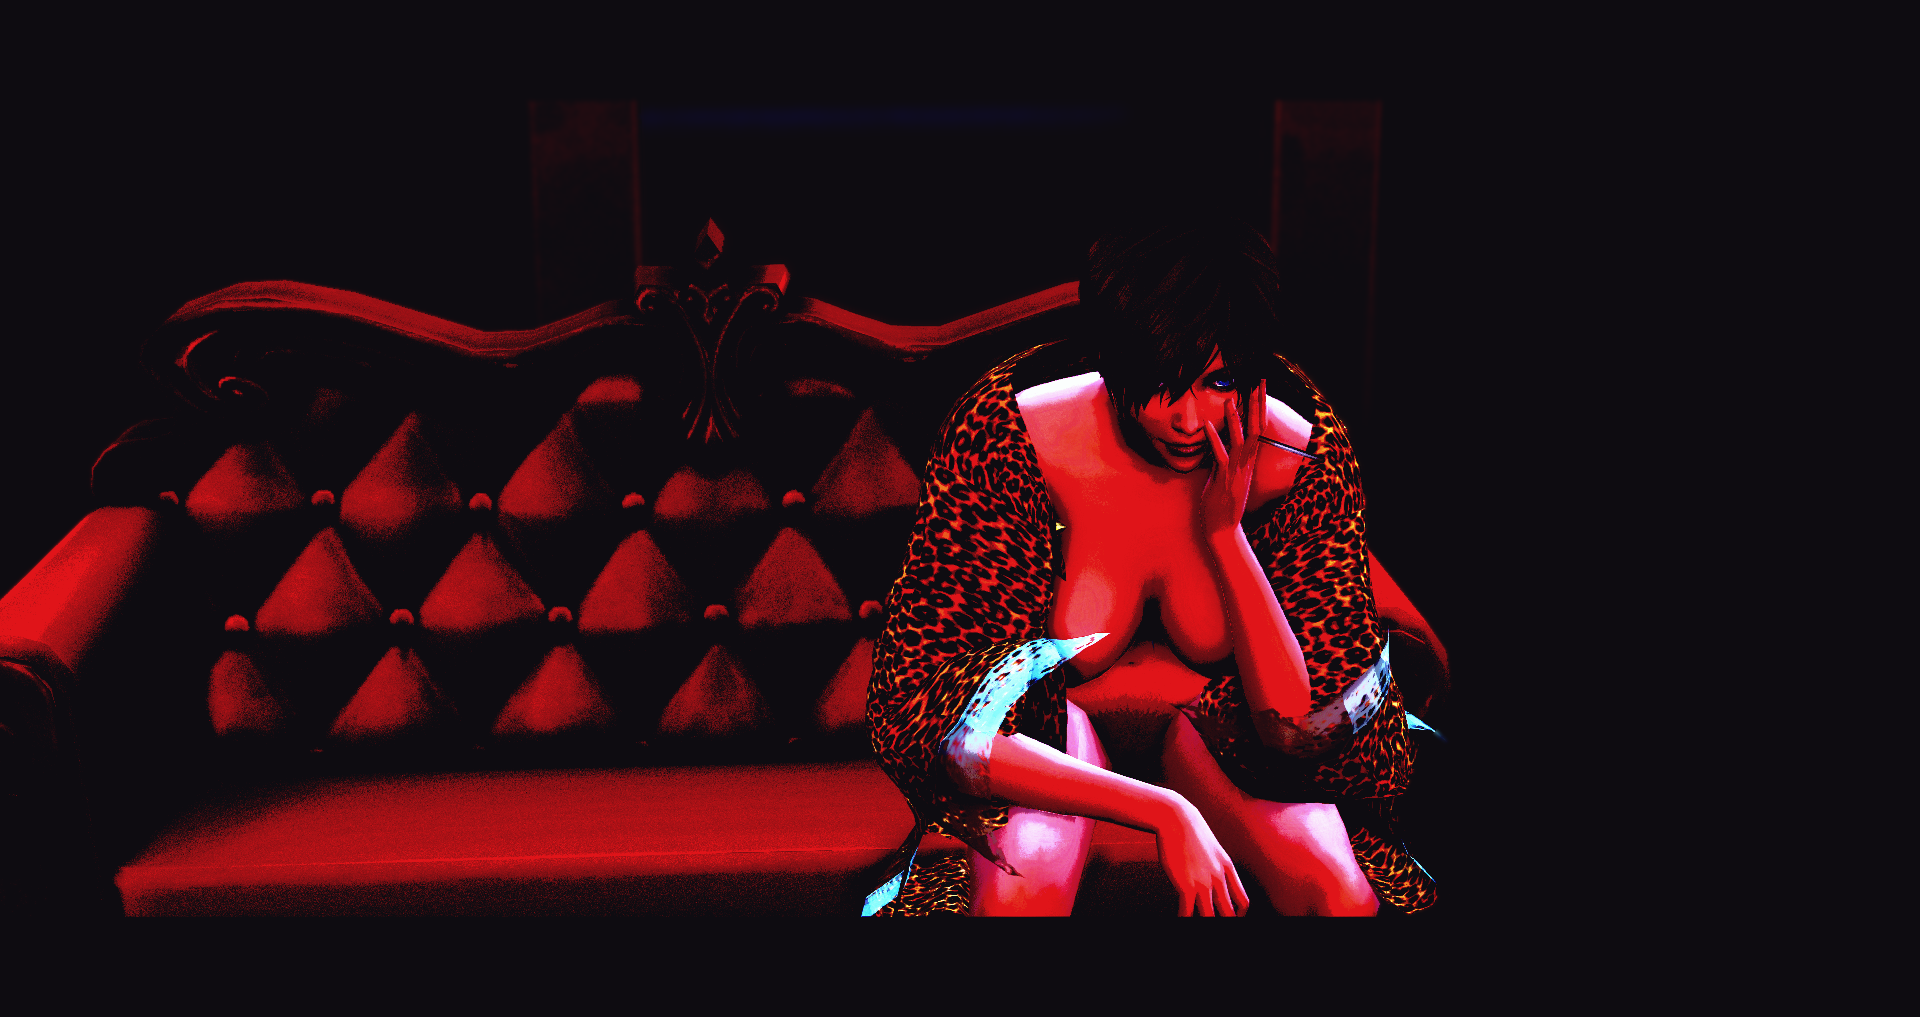
 Preset ReShade TS4 - Cinematográfico y Realista /New Crest Noir Edition View File Versión en inglés a continuación – desplácese hacia abajo para ver el español Versión en español más abajo – baja para leer en tu idioma 🎥 GF New Crest Noir – Ajuste preestablecido de ReShade cinematográfico y realista para TS4 ¿Cansado de que tu New Crest se vea plano y sin alma? Conviértelo en una ciudad noir viviente: charcos, sombras y cielos con profundidad. Este ajuste cinematográfico mejora tus imágenes sin matar el rendimiento o la inmersión. 🖤 Inspirado y elaborado específicamente para New Crest (con sede en Vancouver), este ajuste preestablecido resalta la estética postindustrial, arenosa y lluviosa sin caer en grises apagados. Parte de una colección exclusiva y en crecimiento: cada mundo TS4 tendrá su propio ajuste preestablecido personalizado, ajustado a su historia, clima y estilo visual. Esto es solo el comienzo. 💡 ¿Qué cambia visualmente? Lluvia realista y charcos con reflejos naturales Cielos auténticos, de día y de noche (no es necesario un mod "No Blue") Sims con profundidad y presencia, independientemente de las máscaras alfa o maxis-match Interiores que se sienten vivos: pisos, muebles, decoración con más definición Iluminación equilibrada y localizada: sin sobreexposición ni escenas planas, solo calidez, textura y sombra 🎯 ¿Para quién es este ajuste preestablecido? Creadores y narradores de Machinima Jugadores que anhelan mundos inmersivos Simmers que odian el cielo azul cegador de EA Cualquiera que ame el cine y quiera esa vibra en su juego 🖼️ Capturas de pantalla y comparación Las imágenes de comparación en paralelo están disponibles aquí mismo en esta página. Se tomaron directamente en el juego, sin posedición, mostrando verdaderas diferencias entre las imágenes de vainilla y el ajuste preestablecido aplicado. También abrí un canal de YouTube donde subí videos de juegos que muestran el ajuste preestablecido en movimiento. En este momento, es solo material de comparación, pero pronto, se lanzará el primer episodio de mi historia de New Crest. Quédate si te gusta el humor atrevido, hermanos con secretos oscuros y una ciudad rota que se abre camino a través del neón y los escombros. 🎬 📦 ¿Qué hay dentro del archivo .ZIP? Una carpeta con el archivo del ajuste preestablecido.ini Una carpeta que contiene un archivo de juego vacío requerido (esto es obligatorio para cargar el ajuste preestablecido en CurseForge).save 💥 Bonificación: Dos Sims hechos a medida (¡sin CC!)—Escudo de chico nuevo y escudo de chica nueva. Combinan con la estética arenosa de esta versión de New Crest y son tuyos para conservarlos o eliminarlos. 🧬 Acerca de este archivo guardado Esta es una salvación básica: sin construcciones, sin lotes, sin construcción. Solo los dos hermanos aparecieron en el juego, perfectos para comenzar de nuevo o agregar tu propio toque. Pero eso es solo la punta del iceberg... 🧠 Estoy trabajando en la adaptación de mi guardado real de New Crest: completamente construido, con mucha historia y cargado de contenido personalizado. Es enorme, así que planeo lanzar una versión más ligera y amigable para el público en el futuro. ¿Está salvada? Solo el comienzo. 🔧 Mods opcionales para mejorar aún más el preset: Iluminación: Sunblind de Softerhaze Reemplazos de cielos y terrenos: por Khippie Luna más realista: por Zerbu Sistema meteorológico inmersivo: No12 - Mod de clima realista (No incluido, búscalos en sus canales oficiales). 📌 Nota adicional: Este ajuste preestablecido se cargó originalmente como un archivo independiente. Sin embargo, CurseForge requiere un or para alojarlo correctamente, por lo que he agregado un guardado limpio para cumplir con sus pautas..save.package Mi objetivo a largo plazo es compartir mi mundo completo de New Crest, con su historia de fondo, personajes y construcciones, pero hasta entonces, estoy sentando las bases con esta versión simplificada. 🎬 ¿Listo para convertir tu New Crest en algo digno de la pantalla grande? Descárgalo, pruébalo... y deja que comience tu historia. 🖤 ¿Te gusta? Entonces no te lo hagas con calma... Muestra un poco de amor, compártelo con tu equipo de hervidos a fuego lento y quédate. Esto es solo el comienzo. Más ajustes preestablecidos, más mundos, más deterioro visual están en camino. ¿Usaste el ajuste preestablecido? Una ver. Quiero ver cómo llueve en tu juego. New Crest no está solo. 🔥 por Gata Fumada ---------------------------------------------------- ---------------------------------------------------------- Y ahora en inglés: 🎥 GF New Crest Noir – Preset Cinemático Realista para TS4 ¿Cansado de que tu New Crest luzca plana y sin alma? Transfórmala en una ciudad noir viva, con charcos, sombras y cielos realistas. Este preset cinematográfico mejora visualmente tu juego sin sacrificar rendimiento ni inmersión. 🖤 Inspirado y adaptado para New Crest, una ciudad basada en Vancouver con clima lluvioso y atmósfera decadente, este preset resalta lo postindustrial, sucio y melancólico sin caer en lo gris ni triste. Forma parte de una colección exclusiva en expansión, donde cada ciudad de TS4 tendrá su propio preset, ajustado a su lore, clima y estilo. Este es el primero de muchos. 💡 ¿Qué cambia visualmente? Lluvias y charcos con reflejos naturales. Cielos realistas de día y de noche (sin necesidad de 'No Blue'). Sims con mayor profundidad y presencia, sin importar si usas skins alpha o maxis-match. Interiores mejor definidos: suelos, mobiliario y decoración cobran vida. Iluminación localizada y coherente: ni sobreexpuesta ni plana. Sombra, calidez, textura. 🎯 ¿Para quién es este preset? Creadores de historias o series (machinima) Jugadores que quieren ambientaciones más inmersivas Simmers que odian el cielo azul chillón Cualquiera que ame el cine y quiera llevarlo a su juego 🖼️ Capturas y comparativas Puedes ver las imágenes comparativas directamente en esta publicación. Están tomadas en el juego sin postproducción, con pantalla partida para comparar el preset con el juego base. Además, he creado un canal de YouTube donde he subido los videos comparativos en movimiento. De momento solo están esos videos en el canal, pero muy pronto compartiré el primer episodio de mi historia en New Crest... Quédate cerca si te va el humor, los hermanos con trapos sucios y una ciudad rota que intenta resurgir entre neones y ruinas. 🎬 📦 Contenido del archivo .ZIP Carpeta con el archivo del preset.ini Carpeta con un archivo de partida vacía (requerido por CurseForge para poder subir el preset ini).save ¡Con dos hermanos Sim creados sin CC como extra de regalo! Hechos con cariño y pensados para encajar con la estética decadente de esta versión de New Crest. 🧬 Sobre este Guardar Este save no incluye ningún solar ni construcción. Es una partida mínima, solo con los hermanos New Boy Crest y New Girl Crest, listos para que los uses como quieras o los borres si no te sirven. Pero atentos, esto no acaba aquí: 🧠 Estoy trabajando en adaptar mi verdadero save de New Crest, un monstruo lleno de lore y CC.Mi idea es compartir una versión más ligera en futuras actualizaciones, manteniendo el estilo, pero apta para descargar sin volverse loco con los archivos. Este save es el punto de partida. Volveré con más. 🔧 Recomendaciones opcionales para potenciar el preset: Iluminación: Sunblind de Softerhaze Cielos y terrenos: reemplazos visuales de Khippie Luna más realista: Zero Clima inmersivo: No12 – Realistic Weather Mod (No incluidos. Búscalos en sus respectivos canales oficiales.) 📌 Nota adicional: Este preset se publicó originalmente como un proyecto independiente. Para poder alojarlo correctamente en CurseForge, se ha incluido un archivo obligatorio. Mi objetivo a futuro es compartir mi propio New Crest completo (con lore y construcción), pero actualmente es tan pesado por el CC que he decidido crear una versión adaptada y ligera. Este save es solo el primer paso de ese camino..save ¿Listo para transformar tu New Crest en algo digno del cine? Descárgalo, pruébalo... y que comience tu historia. 🎬 🖤 ¿Te mola? Entonces no te hagas el misterioso... Dale amor, compártelo con tu banda de simmers y quédate cerca. Esto no se acaba aquí. Se vienen más presets, más mundos, más decadencia visual. ¿Usaste el preset? Enséñamelo. Quiero ver cómo llueve en tu partida. New Crest no está sola. 🔥 por Gata Fumada The New Crest Noir - Ajuste preestablecido de ReShade + Archivo guardado / Equipo de revisión del juego cinematográfico Submitter gatafumeta Submitted 08/20/2025 Category Other Requirements
 -
BlushPink Gshade Preset˚ ༘ ೀ⋆🍓。˚ View File This is the gshade i use for my game and to play plus make my sims. (Reshade Compatible) 💫 This preset adds bright deep cinematic tones, dreamy glow, noisy filter to your game, making everything look warmer, sharper, more vibrant. --------Perfect for: 💕 gameplay, storytelling, CAS💕 Step 1: Download GShade (If You Don’t Have It Yet): Gshade Run the installer and select The Sims 4 (TS4_x64.exe) as the game.---Choose DirectX 11 as the rendering API----Complete the installation and launch The Sims 4 to check if GShade is working. Thank you (ᴗ͈ˬᴗ͈)ꕤ.゚ If you're interested in supporting me, feel free to check out my creations on Patreon. Submitter BlushPink333 Submitted 02/08/2025 Category Other
-
Version 2.0
273 downloads
Tired of all the blurry and haziness in game? I was so I decided to improve it. I had to downsize images to fit the 2 MB max so they actually look better in game but it should give you a fairly good idea of the changes. Depending on your system you may notice a fps hit. I also uploaded an alternate version that is a bit lighter. If you don't like something, you can change it to your preferred tastes using the ingame ReShade menu. INSTALLATION: Download the latest ReSahde release at reshade.me and follow the installation instructions. Unzip the CrispAndClear.ini and place it in your game folder (where fallout4.exe is located). In game open the Reshade menu and select CrispAndClear.ini from the dropdown menu. If you have any questions or issues let me know, I'll do my best to help. CrispAndClear.7z CrispAndClear(Light).7z -

Version 1.0.0
342 downloads
This is the gshade i use for my game and to play plus make my sims. (Reshade Compatible) 💫 This preset adds bright deep cinematic tones, dreamy glow, noisy filter to your game, making everything look warmer, sharper, more vibrant. --------Perfect for: 💕 gameplay, storytelling, CAS💕 Step 1: Download GShade (If You Don’t Have It Yet): Gshade Run the installer and select The Sims 4 (TS4_x64.exe) as the game.---Choose DirectX 11 as the rendering API----Complete the installation and launch The Sims 4 to check if GShade is working. Thank you (ᴗ͈ˬᴗ͈)ꕤ.゚ If you're interested in supporting me, feel free to check out my creations on Patreon. -
Version 1.1.0
148 downloads
Hi ! This mod is a preset for Reshade that I created ! (It's the first one I created in fact) It's not properly an adult mod, but this preset can make scenes sexier ! Look at the screenshots to have an example (I'm an artist). Just to warm you, this preset was originally thought for screenshots, so it is hardly playeable. You can try to play with it by removing the borders, if you know how to do. You'll need the latest version of Reshade to make it work. Just launch Reshade and import the ini. I just seen that modders had make presets similar to this one before me. I excuse in advance, but I copied anyone ! I just wanted to have the exact preset I imagined (and I saw those presets AFTER I created mine). Don't hesitate to send me your screenshots made with my preset And, please... Don't claim this preset for yourself (or I'll be very angry ! And I bite ! ? ) And don't forget to quote me whan you use it Hope you'll like it ! The link to install Reshade (always use the last version) : https://reshade.me/ -
Version X
15292 downloads
Hey! This old one's gone, but you can get Reshade from https://reshade.me/ (example w images) (few might also need DirectX 2010! https://www.microsoft.com/en-us/download/details.aspx?id=8109 >extract anywhere, like Desktop, then another .exe!) Haven't played sims in a long time, and someone let me know this was broken, so at least changing it to working links. Some presets from Gshade https://github.com/Mortalitas/GShade might look nice with this game. Hope everyone is holding on, to a bit of happiness. -
Version 1.0.0
116 downloads
Versión en inglés a continuación – desplácese hacia abajo para ver el español Versión en español más abajo – baja para leer en tu idioma 🎥 GF New Crest Noir – Ajuste preestablecido de ReShade cinematográfico y realista para TS4 ¿Cansado de que tu New Crest se vea plano y sin alma? Conviértelo en una ciudad noir viviente: charcos, sombras y cielos con profundidad. Este ajuste cinematográfico mejora tus imágenes sin matar el rendimiento o la inmersión. 🖤 Inspirado y elaborado específicamente para New Crest (con sede en Vancouver), este ajuste preestablecido resalta la estética postindustrial, arenosa y lluviosa sin caer en grises apagados. Parte de una colección exclusiva y en crecimiento: cada mundo TS4 tendrá su propio ajuste preestablecido personalizado, ajustado a su historia, clima y estilo visual. Esto es solo el comienzo. 💡 ¿Qué cambia visualmente? Lluvia realista y charcos con reflejos naturales Cielos auténticos, de día y de noche (no es necesario un mod "No Blue") Sims con profundidad y presencia, independientemente de las máscaras alfa o maxis-match Interiores que se sienten vivos: pisos, muebles, decoración con más definición Iluminación equilibrada y localizada: sin sobreexposición ni escenas planas, solo calidez, textura y sombra 🎯 ¿Para quién es este ajuste preestablecido? Creadores y narradores de Machinima Jugadores que anhelan mundos inmersivos Simmers que odian el cielo azul cegador de EA Cualquiera que ame el cine y quiera esa vibra en su juego 🖼️ Capturas de pantalla y comparación Las imágenes de comparación en paralelo están disponibles aquí mismo en esta página. Se tomaron directamente en el juego, sin posedición, mostrando verdaderas diferencias entre las imágenes de vainilla y el ajuste preestablecido aplicado. También abrí un canal de YouTube donde subí videos de juegos que muestran el ajuste preestablecido en movimiento. En este momento, es solo material de comparación, pero pronto, se lanzará el primer episodio de mi historia de New Crest. Quédate si te gusta el humor atrevido, hermanos con secretos oscuros y una ciudad rota que se abre camino a través del neón y los escombros. 🎬 📦 ¿Qué hay dentro del archivo .ZIP? Una carpeta con el archivo del ajuste preestablecido.ini Una carpeta que contiene un archivo de juego vacío requerido (esto es obligatorio para cargar el ajuste preestablecido en CurseForge).save 💥 Bonificación: Dos Sims hechos a medida (¡sin CC!)—Escudo de chico nuevo y escudo de chica nueva. Combinan con la estética arenosa de esta versión de New Crest y son tuyos para conservarlos o eliminarlos. 🧬 Acerca de este archivo guardado Esta es una salvación básica: sin construcciones, sin lotes, sin construcción. Solo los dos hermanos aparecieron en el juego, perfectos para comenzar de nuevo o agregar tu propio toque. Pero eso es solo la punta del iceberg... 🧠 Estoy trabajando en la adaptación de mi guardado real de New Crest: completamente construido, con mucha historia y cargado de contenido personalizado. Es enorme, así que planeo lanzar una versión más ligera y amigable para el público en el futuro. ¿Está salvada? Solo el comienzo. 🔧 Mods opcionales para mejorar aún más el preset: Iluminación: Sunblind de Softerhaze Reemplazos de cielos y terrenos: por Khippie Luna más realista: por Zero Sistema meteorológico inmersivo: No12 - Mod de clima realista (No incluido, búscalos en sus canales oficiales). 📌 Nota adicional: Este ajuste preestablecido se cargó originalmente como un archivo independiente. Sin embargo, CurseForge requiere un or para alojarlo correctamente, por lo que he agregado un guardado limpio para cumplir con sus pautas..save.package Mi objetivo a largo plazo es compartir mi mundo completo de New Crest, con su historia de fondo, personajes y construcciones, pero hasta entonces, estoy sentando las bases con esta versión simplificada. 🎬 ¿Listo para convertir tu New Crest en algo digno de la pantalla grande? Descárgalo, pruébalo... y deja que comience tu historia. 🖤 ¿Te gusta? Entonces no te lo hagas con calma... Muestra un poco de amor, compártelo con tu equipo de hervidos a fuego lento y quédate. Esto es solo el comienzo. Más ajustes preestablecidos, más mundos, más deterioro visual están en camino. ¿Usaste el ajuste preestablecido? Una ver. Quiero ver cómo llueve en tu juego. New Crest no está solo. 🔥 por Gata Fumada ---------------------------------------------------- ---------------------------------------------------------- Y ahora en inglés: 🎥 GF New Crest Noir – Preset Cinemático Realista para TS4 ¿Cansado de que tu New Crest luzca plana y sin alma? Transfórmala en una ciudad noir viva, con charcos, sombras y cielos realistas. Este preset cinematográfico mejora visualmente tu juego sin sacrificar rendimiento ni inmersión. 🖤 Inspirado y adaptado para New Crest, una ciudad basada en Vancouver con clima lluvioso y atmósfera decadente, este preset resalta lo postindustrial, sucio y melancólico sin caer en lo gris ni triste. Forma parte de una colección exclusiva en expansión, donde cada ciudad de TS4 tendrá su propio preset, ajustado a su lore, clima y estilo. Este es el primero de muchos. 💡 ¿Qué cambia visualmente? Lluvias y charcos con reflejos naturales. Cielos realistas de día y de noche (sin necesidad de 'No Blue'). Sims con mayor profundidad y presencia, sin importar si usas skins alpha o maxis-match. Interiores mejor definidos: suelos, mobiliario y decoración cobran vida. Iluminación localizada y coherente: ni sobreexpuesta ni plana. Sombra, calidez, textura. 🎯 ¿Para quién es este preset? Creadores de historias o series (machinima) Jugadores que quieren ambientaciones más inmersivas Simmers que odian el cielo azul chillón Cualquiera que ame el cine y quiera llevarlo a su juego 🖼️ Capturas y comparativas Puedes ver las imágenes comparativas directamente en esta publicación. Están tomadas en el juego sin postproducción, con pantalla partida para comparar el preset con el juego base. Además, he creado un canal de YouTube donde he subido los videos comparativos en movimiento. De momento solo están esos videos en el canal, pero muy pronto compartiré el primer episodio de mi historia en New Crest... Quédate cerca si te va el humor, los hermanos con trapos sucios y una ciudad rota que intenta resurgir entre neones y ruinas. 🎬 📦 Contenido del archivo .ZIP Carpeta con el archivo del preset.ini Carpeta con un archivo de partida vacía (requerido por CurseForge para poder subir el preset ini).save ¡Con dos hermanos Sim creados sin CC como extra de regalo! Hechos con cariño y pensados para encajar con la estética decadente de esta versión de New Crest. 🧬 Sobre este Guardar Este save no incluye ningún solar ni construcción. Es una partida mínima, solo con los hermanos New Boy Crest y New Girl Crest, listos para que los uses como quieras o los borres si no te sirven. Pero atentos, esto no acaba aquí: 🧠 Estoy trabajando en adaptar mi verdadero save de New Crest, un monstruo lleno de lore y CC.Mi idea es compartir una versión más ligera en futuras actualizaciones, manteniendo el estilo, pero apta para descargar sin volverse loco con los archivos. Este save es el punto de partida. Volveré con más. 🔧 Recomendaciones opcionales para potenciar el preset: Iluminación: Sunblind de Softerhaze Cielos y terrenos: reemplazos visuales de Khippie Luna más realista: Zero Clima inmersivo: No12 – Realistic Weather Mod (No incluidos. Búscalos en sus respectivos canales oficiales.) 📌 Nota adicional: Este preset se publicó originalmente como un proyecto independiente. Para poder alojarlo correctamente en CurseForge, se ha incluido un archivo obligatorio. Mi objetivo a futuro es compartir mi propio New Crest completo (con lore y construcción), pero actualmente es tan pesado por el CC que he decidido crear una versión adaptada y ligera. Este save es solo el primer paso de ese camino..save ¿Listo para transformar tu New Crest en algo digno del cine? Descárgalo, pruébalo... y que comience tu historia. 🎬 🖤 ¿Te mola? Entonces no te hagas el misterioso... Dale amor, compártelo con tu banda de simmers y quédate cerca. Esto no se acaba aquí. Se vienen más presets, más mundos, más decadencia visual. ¿Usaste el preset? Enséñamelo. Quiero ver cómo llueve en tu partida. New Crest no está sola. 🔥 por Gata Fumada The New Crest Noir - Ajuste preestablecido de ReShade + Archivo guardado / Equipo de revisión del juego cinematográfico -
 Reshade 5.8+ addon to apply Reshade effects to render targets bound before specific, user-configurable, groups of shaders are encountered within a game's rendering pipeline. One such use is to prevent Reshade from targeting and affecting UI elements. The following comparisons uses DOAHDM's excellent Reshade preset (Link). Left would be original, and right would be after activating REST. Requirements: Reshade 5.8+ with full add-on support (Link) REST (Link) The ReshadeEffectShaderToggler.ini (ReshadeEffectShaderToggler.zip) This preset targets UI, Loading Screens, and Launcher. Installation: Make sure that you have Reshade with full add-on support Drop ReshadeEffectShaderToggler.addon64 and ReshadeEffectShaderToggler.ini into the same folder as Reshade .dll. Start the game and immediately enjoy the difference! You can try adding other hashes to filter out if you want. Refer to this tutorial (Link). The video uses Deep Rock Galactic, but should work with pretty much any Reshade compatible game. More Comparisons: Feel free to repost this to other sites (Discord, Steam guides, Reddit, etc.)

-
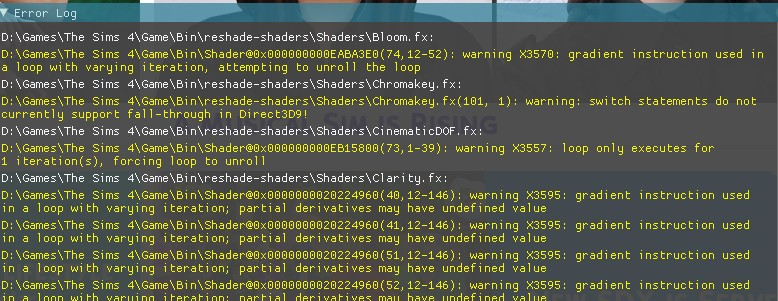
I never understood what is going on. It keep saying this error thing. How can I fix this?

-
 See picture. I run NAT iii and its ENB, Nolvus Reshade with Immerse Pro RTGI and a few extra shaders. And yes, I do have Dynamic Cube Maps on. I think I have tweaked and twiddled everything in the above (short of the television) to try and lose the horrible grey shadow in eyes. And these are all eyes, not just the player. I have decent eye mods, and I've been through the lot and cannot lose this shadow. Anyone got any ideas, please? Pic:
-
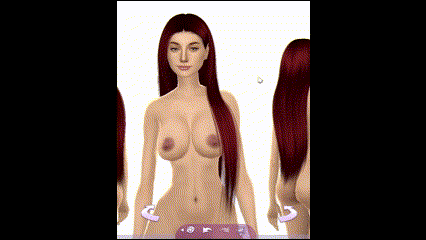
 I want to use this hair. But this dark spot is my downfall. Anyone know about geshade? How do I fix it? there's a gif with geshade on and off.