Search the Community
Showing results for tags 'xedit'.
Found 15 results
-
 Have you ever wished you could use more than one version of the same schlong simultaneously? Maybe you want one that uses SOSmale.hkx and one to use SOSfemale.hkx. Maybe you installed my ERF Horse Penis Redux mashups and want to use more than one version at the same time. Well, I'm going to show the way I do it. Do note though that as the title says, this is the quick and dirty way, which means we are only duplicating and changing the absolute minimum amount of things necessary to get a separate schlong addon to show in the MCM and for it to use its own mesh and textures. All the other things that make up a schlong addon, such as potions and code related to gender and race probabilities will be left untouched and shared with the parent schlong. Presumably this will fuck with SOS mechanics that distribute schlongs to NPCs, but since I do not use those mechanics, I don't care. If you DO care about such things, you are welcome to duplicate, rename and then painstakingly reassign EVERYTHING in the addon. Anyway, we'll be using XEdit. Hope you have it installed (google for information on how to do so.) For this example, I'll be using the .esp from TRX Futanari Addon. Once you load the esp, it should look like this: What we need to do is duplicate the correct records to get a separate schlong addon with its own mesh and textures, I will start with the textures: If we were being thorough, we would duplicate each of these records. But since we're all about doing things as quickly and lazily as possible, I will only duplicate the "Default" Texture Set since I only play as human characters anyway. If you play as other races, you might want to duplicate the texture sets relevant to you. Regardless, right click on a texture set you want to duplicate and select "Copy as new record into" XEdit will ask you to change the EditorId. I am making a schlong addon for a character named Ayirah, so I will simply replace "Default" with "Ayirah". Next you will be asked which of the loaded files you want to add this new record into. We will choose the schlong addon we have been working on. Congratulations! You have made a new texture set. Now to change the texture paths- my character will only need separate diffuse and normal maps from the regular addon, so those are the ones I will be editing. I'm going to place her textures in a folder named "Ayirah" inside the regular texture folder. You will notice that I'll do the same with the meshes too. Next, we will go take a look at the Armor Addon records. Much like before, if we were being thorough, we would duplicate all 9 AA records, but again, I'll only need to duplicate the Default one for my purposes. (Your situation may be different) Duplicate and rename the record(s) you need the same way you did with the Texture Sets before. Then change the "Female world model" record (if this is a male addon, you will obviously need to change the male one instead) to point to the location you have chosen for the new mesh. Like I said, I'm just placing new folders inside the ones already existing in the mod and keeping the existing .nif name. The reason for this is that this way you don't need to rename the schlong .nifs once you have built them in BodySlide, just build them into the overwrite folder and place them inside the new folder you made. You will also need to alter the Female Skin Texture record and select the Texture Set you made previously. Next up is the Armor Record. Just like before, copy the record and rename it. Then in the Armature section, select the Addon(s) you made in the previous step. Now, we move on to the Faction record. This is what gives the addon the name it will be listed under in the SOS MCM. Once again, copy and rename the record. Afterwards, alter the text field next to Full - Name and give your new addon whatever name you wish. Finally, we can tackle duplicating the SOS Addon quest. After you've done so, find the SOS_Addon_Faction and SOS_Addon_Genitals properties and change them to the Faction and Armor (Note: Armor, not ArmorAddon! Make sure it has the ARMO prefix) you made in previous steps. Finally, give the quest a new name, save the .esp and exit XEdit. You're done! Now to check if our new addon works in game... success!
 -
 I am using xedit. I went to Furniture > Conditions and in my object added a condition PlayerRef.GetInCurrentLoc(ThatSettlementLoc) = 1 but i still can build that thing in every settlement, not only in that specific one; why? Or there are other ways?
 -
Version 1.2.0
1822 downloads
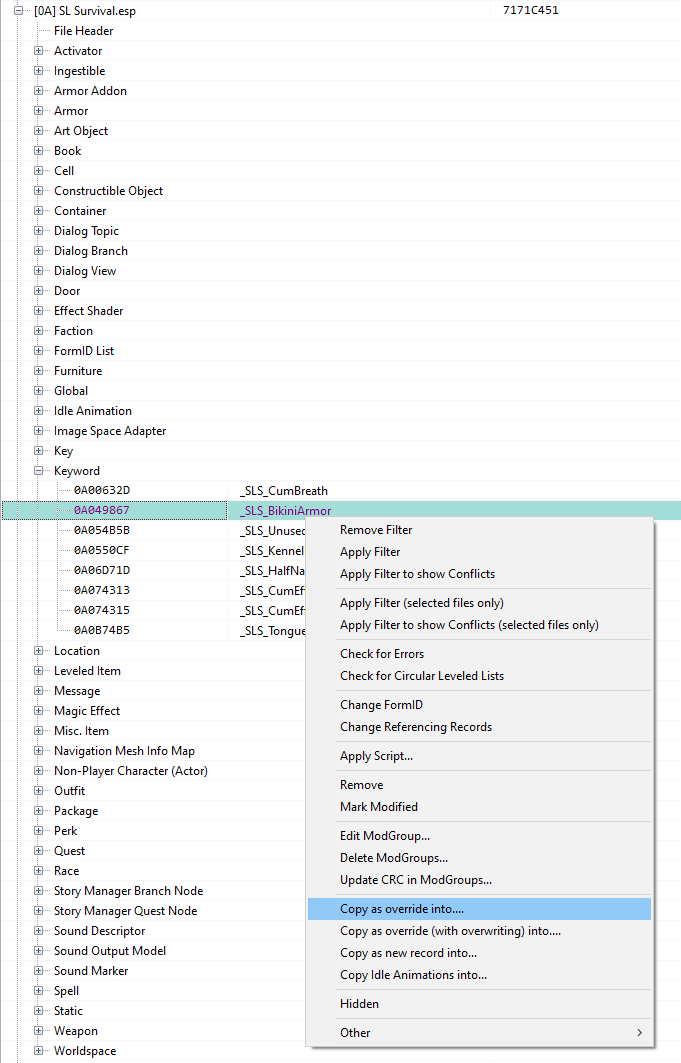
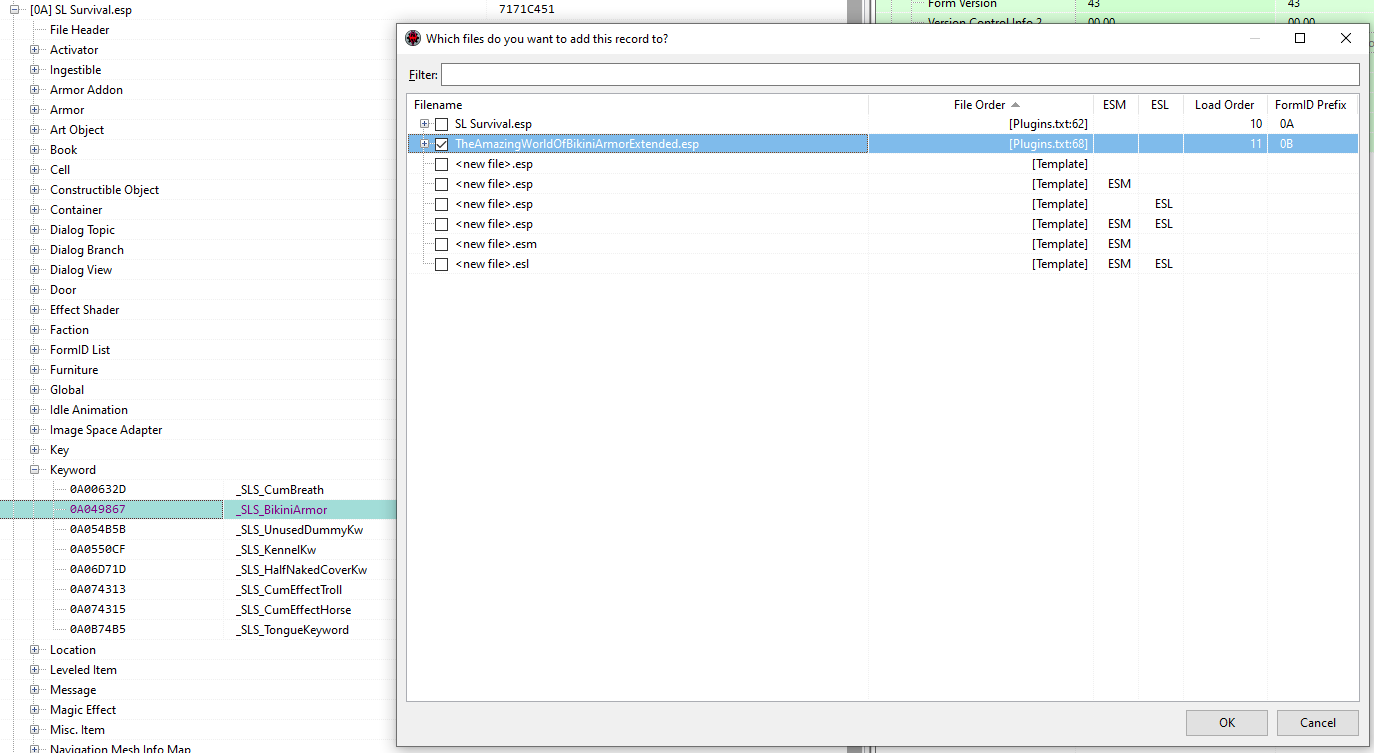
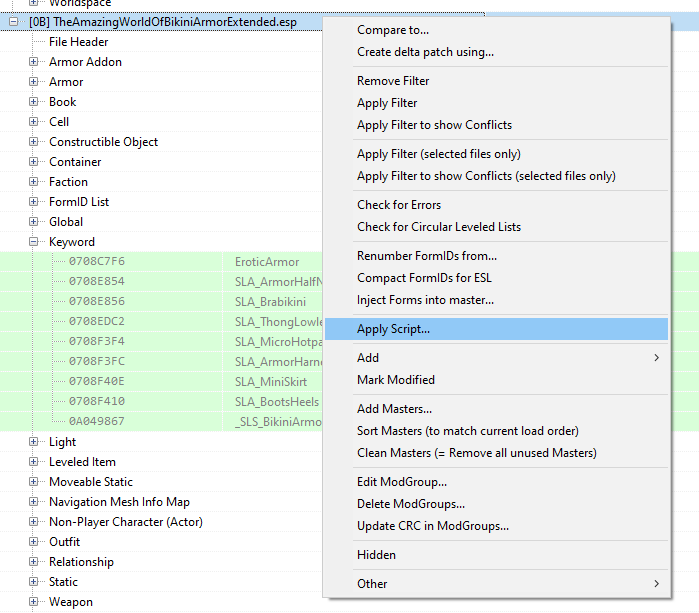
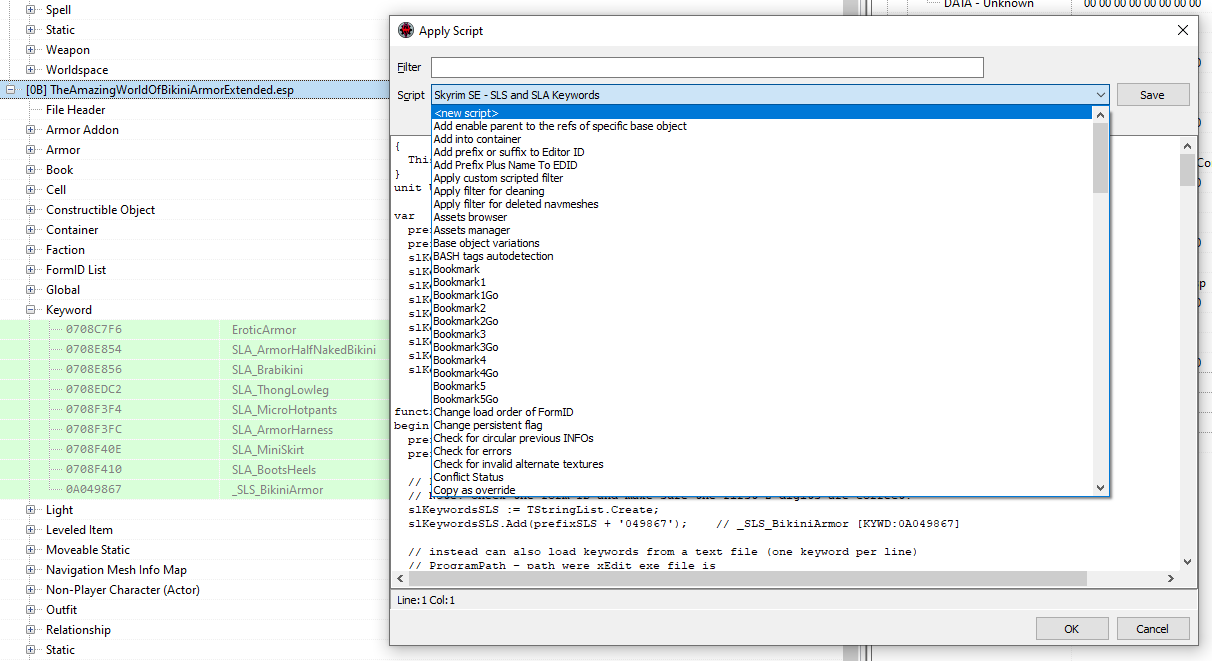
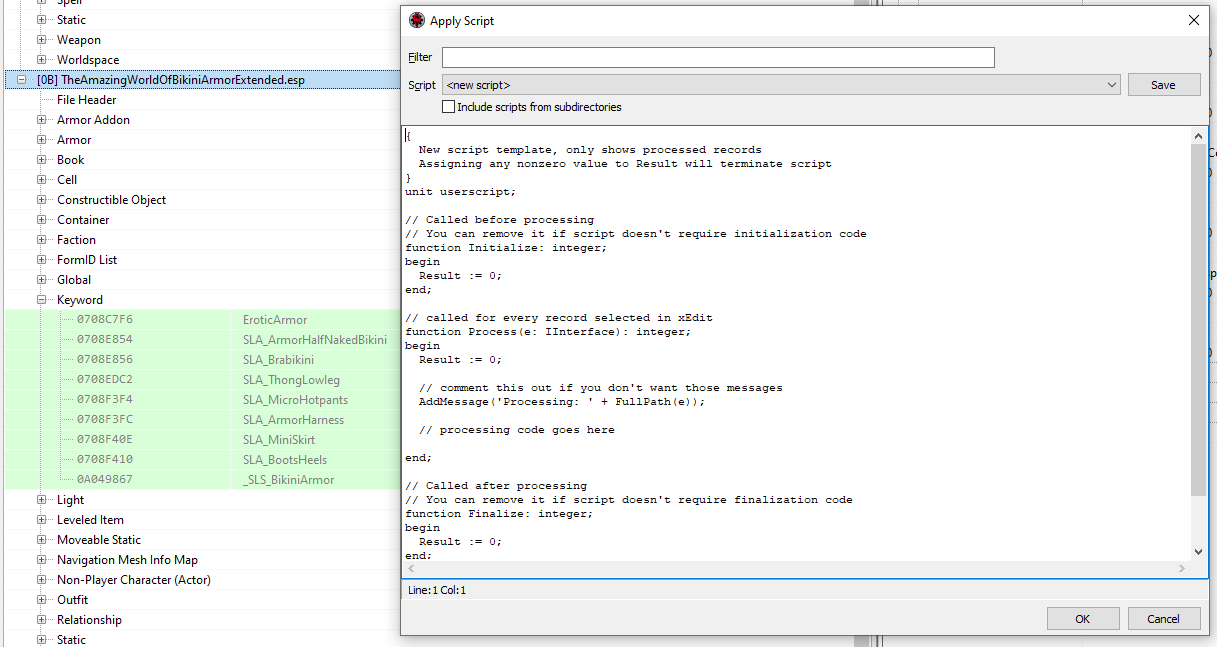
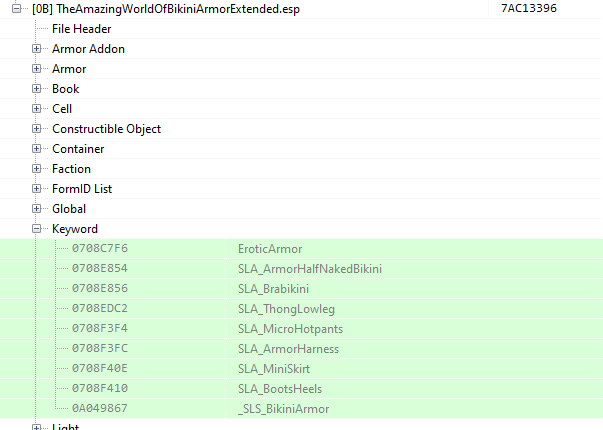
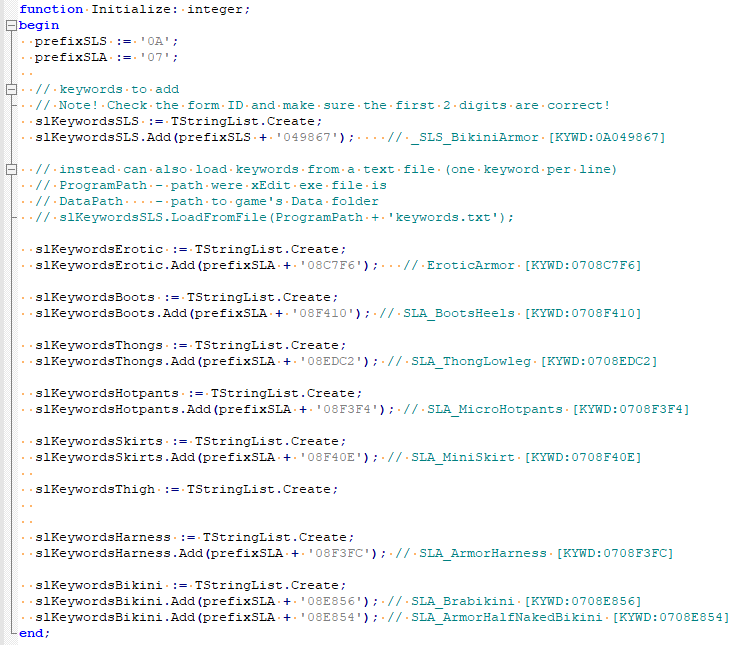
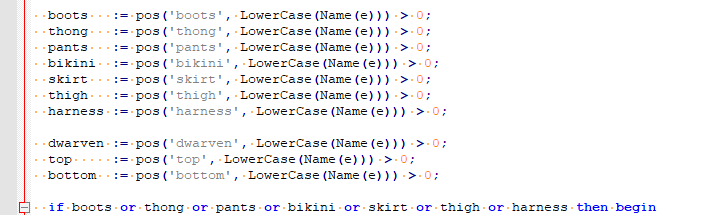
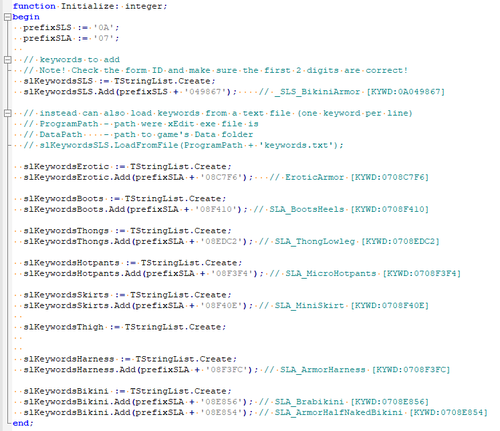
Check for NPC Tint Masks.pas Checks a mod's NPCs for face tint files in the directory you specify. Edit "sTintMaskPath" to point to your mod's FaceGenData\FaceTint directory. Make sure it ends in a backslash. The texture file name gets appended to it. e.g. "C:\... ...\mods\[My MO2 mod dir]\Textures\Actors\Character\FaceGenData\FaceTint\[My Mod's ESP/ESM file name]\" IMAD removal.pas This file will create a image space modifier removal bat file "removeimods" in your SSE game directory. If you change your load order you will have to rerun this. To use it. Load the target ESM/ESP files in SSE Edit. This can be your entire load order. CRTL+Click the target ESM/ESP files. Or CTRL+A for your entire load order. Right click on any of the target ESM/ESP files and select "Apply Script...". Select "<new script>" from the list of available scripts dropdown You'll see the New Script Template. Copy all. Delete it. Paste the IMAD removal PAS script. Save it and name it. Run it Each "rimod" command is followed by the source mod in a comment. e.g. rimod 0401EB05; DLC2DBBookLevelIod [IMAD:0401EB05] - [04] Dragonborn.esm rimod 04023F86; DLC2HMDaedraExpImod [IMAD:04023F86] - [04] Dragonborn.esm rimod 04024FBC; DLC2HMDaedraExpImod02 [IMAD:04024FBC] - [04] Dragonborn.esm rimod 040317D8; DLC2MiraakTeleportIMODStatic [IMAD:040317D8] - [04] Dragonborn.esm rimod 04031D26; DLC2StandingStoneReleaseImod [IMAD:04031D26] - [04] Dragonborn.esm While in game you can use "bat removeimods" to remove all image space modifiers. If the something that is applying the modifier is still active it will come back. You can then ALT+TAB out of the game and edit the bat file and remove "rimod" commands to find the troublesome mod. TAWOBA SLS JSON.pas Generates a BikiniArmors.json file for SexLab Survival. Before you start. Right click on any file under "SKSE\Plugins\StorageUtilData\SL Survival\" in MO2's Data Tab and select "Reveal in Explorer". Copy the full path to SL Survival's Storage Util's directory. You'll need this later Making a "BikiniArmors.json" file with SSE Edit. Load the TAWOBA mod in SSEEdit Right of the TAWOBA ESP file name and select "Apply Script..." Select "<new script>" from the list of available scripts dropdown You'll see the New Script Template. Copy all. Delete it. Paste the TAWOBA SLS JSON PAS script. Change "sJsonPath := 'E:\';" to SL Survival's Storage Util's directory. Make sure it ends with a backslash. "BikiniArmors.json" gets appended to it later. Save it and name it. Run it The script uses the ArmorMaterialXXXXXX keywords to sort and categorize the armor. TAWOBA SL Aroused and Survival.pas Automates a large portion of adding SLA and SLS keywords to armor. Instructions for using the xedit script: The Xedit script searches the armor's name for keywords to determine what SLA keywords are applied. The SLS keyword "_SLS_BikiniArmor" is applied to every piece of armor. The SLA keyword "EroticArmor" is applied to any match when the armor's name contains one of the following words boots thong pants bikini skirt thigh harness "SLA_BootsHeels" gets added to any piece if armor with the words "boots" in its name. "SLA_ThongLowleg" added with "thong" in its name. "SLA_MicroHotpants" added with "pants" in its name. "SLA_MiniSkirt" added with "skirt" in its name. "SLA_ArmorHarness" added with "harness" in its name. "SLA_Brabikini" added with "bikini" and "top" in its name. "SLA_ArmorHalfNakedBikini" added with "bikini" and "top" but not with "dwarven" in its name. Feel free to modify and share! -
Version 0.8.1 alpha
1299 downloads
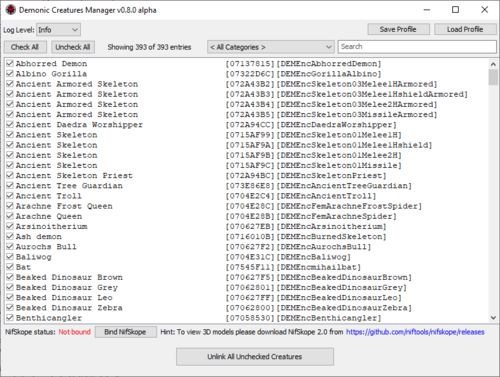
Demonic Creatures Manager, or DCM, is a xEdit Script (aka Delphi GUI app) that allows to disable the spawn of any selected creatures from Thor2000's Demonic Creatures mod. If you find some creatures too disturbing/hard/scary/non-immersive/etc, now you have a convenient way to put them into eternal metadata jail! DCM implements sophisticated algorithm that removes the records that enable creature spawn via known mechanics. Please do note that DCM is considered to be in alpha testing phase either until I get multiple confirmations from users or until Thor2000 will be so kind to confirm that I haven't miss anything. Even though I've tried my best to ensure the DCM to be as bug-free as possible, as well as to force the algo to respect the reference chain integrity, DCM still needs to go through the testing phase. If you notice any error message, please let me know about it. Compatibility: xEdit 4.0.4 / 4.1.4 Demonic Creatures SE/LE (should be compatible with all future versions of Demonic Creatures as long as the spawning methods stay the same) Installation: Install the xEdit. Make sure to run it with correct launch arguments (-SSE for SE, -TES5 for LE, -TES5VR for VR)! [Optional] Install the NifSkope. If you don't want to be able to view 3D models of creatures, you can skip this step. Unpack and place 'DemonicCreaturesManager.pas' to the '\Edit Scripts\' directory of your xEdit installation. How to start DCM: Run xEdit through Mod Manager of your choice or directly from xEdit's .exe if you don't use any Mod Manager. In 'Module Selection' popup window right click any file and click 'Select None'. Input 'dem' into the 'Filter' filed and check the checkbox of DemonicCreatures.esp. Press 'OK' to close the popup and wait until you see 'Background Loader: finished' in 'Messages' tab. It may take up to several minutes for the first time. Right click 'DemonicCreatures.esp' in the left tab and click 'Apply Script'. Input 'dem' into the 'Filter' filed, make sure that DemonicCreaturesManager script is selected and press 'OK'. How to use DCM: [Optional] Press 'Bind NifSkope', go to the location where it was unpacked, select NifSkope.exe and press 'Open'. NifSkope status will change to 'Bound'. From this point you'll be able to double click any creature to view its (sadly untextured) 3D model. Uncheck creatures you want to stop from spawning, feel free to use categories filter or full-text search to make navigation a little bit easier. Please do note that 'race' categories are based on the mod's metadata and may not be always accurate. Press 'Unlink All Unchecked Creatures' and wait until unchecked creatures become 'bricked' in the list (filled with black square). This action is global and doesn't respect the filters, but you always can double check the list of creatures that are going to be unlinked in '< Unchecked >' category! Close the DCM. [ALPHA TEST WARNING] Right click 'DemonicCreatures.esp' in the left tab and click 'Check for Errors'. Make sure xEdit says 'Errors found: 0' in the 'Messages' tab. If any errors found, please follow the Bug Reporting instruction. I strongly recommend to do this step until the DCM officially leaves testing phase. Close the xEdit, the 'Save changed files' window will pop up. To save changes check the 'Demonic Creatures.esp' and 'Backup plugins' checkboxes and then press 'OK'. To cancel changes uncheck the 'Demonic Creatures.esp' and then press 'OK'. Hint: DCM also has a handy profile system. Path to NifSkope and states of all checkboxes will be saved on pressing the 'Unlink All Unchecked Creatures' button or closing the DCM's window and loaded on launch by default (data is stored in xEdit's '\Edit Scripts\Demonic Creatures Manager Default Profile.csv'). Also you can manually save profile to any file (including the default one) with 'Save Profile' button and load any file with 'Load Profile' button. Reverting the changes: The only way to restore any creature that was unlinked in the already saved DemonicCreatures.esp is to manually replace modified .esp with backup. If you previously checked the 'Backup plugins' checkbox during saving, backuped .esp's will be located in '\Data/SSEEdit Backups\' directory ('\Data\TES5Edit Backups\' or '\Data\TES5VREdit Backups\' for LE/VR versions). Also you can always use default .esp from downloaded Demonic Creatures archive. Bug Reporting: Algo Description: Credits: Thor2000 (Demonic Creatures) ElminsterAU and co (xEdit) NifTools team (NifSkope) -
I guess I should post this here so the LoversLabLurkers can have access to it as a resource if they want it. This video is about Compacting in xEdit. Distinct from just flagging an ESP as ESL, this is changing the formIDs so they'll fit into 2048 records and forcing it to be ESL. Some of the regulars have already looked it over for correctness and watchability.
-
Asking here because google keeps giving me methods to force companions to wear stuff they wouldn't normally equip. How does NV enforce item locks like Elijahs bomb collar or the explosive collar from the Brotherhood? Looking at it in xedit, I can't see anything special about the item record, and I haven't been able to find a script that forces them to be equipped either. Thanks in advance for any help!
-
I want to make some modded food (specifically some of the loverslab mods modded food items) compatible with RND (realistic needs and diseases LE ), could I just change the food items in question in xedit by just changing their food effects and that would be enough? I noticed in the effects it becomes 'RND_EatFoodSnack "Snack" [MGEF:05003375]' or stuff like this, so could I just add this effect to another food item and call it a day? Anything I should know about adding effects to food items? I never did this specific xedit action, on a slightly different note is RND bad to install mid playthrough?
-
 Hello! I mostly thought of this while starting a Skyrim playthrough for the 10 billionth time. I do have a couple of custom followers (mainly Chloe from DCL right now, I usually keep her for extra protection until I beat Mirmulnir (the first dragon you fight). Now I really don't mind her, but she only has 2 or 3 idle lines that she repeats over and over and it's really tiring ("are you my gallant hero" and "could you get me something exotic", usually coupled with "some wine, please" whenever we're at an inn). Now, I do like her as a follower but I would also really like if there was a standalone mod in which you could select the follower and just have a bunch of idle dialogue added to them (can be generic, can be based on a "type/personality" you can choose, idc if voiced or not, I just want more life out of them). I know there are mods that add some new idle dialogue to npcs/followers, but they usually also add other things (as an example, submissive lola is very cool but it adds the whole "you're owned by your follower" dynamic, which I wouldn't use on all followers just for the dialogue expansion. I've also used joyful followers, but didn't really get much idle dialogue from it, I'm guessing because it's somehow tied to progression). If anyone can help me figure out what exactly would need changed/added and where (and if it's possible to do via xEdit) I would add them myself for various followers. I've messed with xEdit before but I know very little about modding in general and back when I tried to use ck in SE (not AE) it would crash every half an hour (or less), making any progress very frustrating.
 -
 I have seen great mods such as femout and A Girls World but i want to try to make a script for fallout which works Just like Skyfem but for fallout as it autimatically will change the mod npc's as well. i have been looking at the skyfem script and im just checking if i should where should i start with? xedit or creation kit(or even Synthesis)? just want to see if its even possible.
 -
Hello again! I'm not sure if this is the correct place to post this, but I've been having trouble with figuring this out. I would like to create a Magic Effect in xEdit that modifies current player arousal by an X amount by using Sexlab Aroused Redux (I would also like if the newly modified arousal value remains locked to that value for Y amount of time, but for now all I want is to get this first part to work). I noticed that the way to find the current player's arousal value would be via the sla_arousal faction, but I'm not sure how to proceed from here. I assume I need to create a formula in the Magic Effect that would add value X to sla_arousal, but I don't know how to do that, so if anyone could please direct me towards the right direction I would much appreciate it. PS: I cannot use the CK for this as it's crashing constantly since the AE update...
-
The title, basically. I'm running both ETaC Dawnstar and Deviously Cursed Loot and I noticed some issues with the ground meshes. Checking in xEdit, there are quite a few conflicting worldspace edits. Would it be safe to override the ones from DCL with ETaC? If not, could anyone maybe suggest an alternative to ETaC that is similar, navmeshed and doesn't have too many bugs? P.S. In addition, would it be safe to remove the new Riverwood bondage building? It overlaps with a different mod but I don't know how important it is since the NPC teleports you inside anyway. Thank you in advance for any advice!
-
 Hey everyone! Is there a mod that turns all devious devices into regular clothing? I'd love to be able to decide when to wear them and when not in exchange of real armor. I've looked up guides but they suggest I'd have to manually edit every single item both in xEdit which I've no idea how to use and the Skyrim Creation Kit as well which I did work a bit but only on Oldrim. Especially DD Expansion has so many items but sadly they're all bugged and will lock you in them, making custom lewd outfit creations for posing mods, furniture mods, outfit mods etc impossible. I'd like to fix that if there's no mod that fixed it before me.
 -
 In my bethesda games, I always genderbend all male generic NPCs like "Bandit, Raider, Guard", etc into females to make the sex mods more enjoyable. Skyrim I have the MoreWomen mod from here, FO4 I have Mostly Female NPCs from Nexus, & Oblivion I made my own mod using Construction Kit. That method took AGES though as I manually changed every generic male's appearance to female, sometimes going as far as actually giving a shit about their hair, color, etc. I really dont wanna do that CK method again for New Vegas so I looked at these^ other mods & saw how they basically rely on xEdit to change the leveled lists so males spawn as females. I'd much rather do that instead but i have never touched leveled lists before. My experience with xEdit is limited to translating foreign mods, editing dialogue, reverting worldspace edits, & editing file paths for meshes & textures. So can anyone tell me how to edit NPC leveled lists so generic NPCs spawn as female instead of male? Or point me to a relevant guide that at least touches the subject? I'm not interested in changing their gear or anything else, unless I need to go into GECK to generate face meshes & textures.
 -
 Demonic Creatures Manager (xEdit Script) View File Demonic Creatures Manager, or DCM, is a xEdit Script (aka Delphi GUI app) that allows to disable the spawn of any selected creatures from Thor2000's Demonic Creatures mod. If you find some creatures too disturbing/hard/scary/non-immersive/etc, now you have a convenient way to put them into eternal metadata jail! DCM implements sophisticated algorithm that removes the records that enable creature spawn via known mechanics. Please do note that DCM is considered to be in alpha testing phase either until I get multiple confirmations from users or until Thor2000 will be so kind to confirm that I haven't miss anything. Even though I've tried my best to ensure the DCM to be as bug-free as possible, as well as to force the algo to respect the reference chain integrity, DCM still needs to go through the testing phase. If you notice any error message, please let me know about it. Compatibility: xEdit 4.0.4 / 4.1.4 Demonic Creatures SE/LE (should be compatible with all future versions of Demonic Creatures as long as the spawning methods stay the same) Installation: Install the xEdit. Make sure to run it with correct launch arguments (-SSE for SE, -TES5 for LE, -TES5VR for VR)! [Optional] Install the NifSkope. If you don't want to be able to view 3D models of creatures, you can skip this step. Unpack and place 'DemonicCreaturesManager.pas' to the '\Edit Scripts\' directory of your xEdit installation. How to start DCM: Run xEdit through Mod Manager of your choice or directly from xEdit's .exe if you don't use any Mod Manager. In 'Module Selection' popup window right click any file and click 'Select None'. Input 'dem' into the 'Filter' filed and check the checkbox of DemonicCreatures.esp. Press 'OK' to close the popup and wait until you see 'Background Loader: finished' in 'Messages' tab. It may take up to several minutes for the first time. Right click 'DemonicCreatures.esp' in the left tab and click 'Apply Script'. Input 'dem' into the 'Filter' filed, make sure that DemonicCreaturesManager script is selected and press 'OK'. How to use DCM: [Optional] Press 'Bind NifSkope', go to the location where it was unpacked, select NifSkope.exe and press 'Open'. NifSkope status will change to 'Bound'. From this point you'll be able to double click any creature to view its (sadly untextured) 3D model. Uncheck creatures you want to stop from spawning, feel free to use categories filter or full-text search to make navigation a little bit easier. Please do note that 'race' categories are based on the mod's metadata and may not be always accurate. Press 'Unlink All Unchecked Creatures' and wait until unchecked creatures become 'bricked' in the list (filled with black square). This action is global and doesn't respect the filters, but you always can double check the list of creatures that are going to be unlinked in '< Unchecked >' category! Close the DCM. [ALPHA TEST WARNING] Right click 'DemonicCreatures.esp' in the left tab and click 'Check for Errors'. Make sure xEdit says 'Errors found: 0' in the 'Messages' tab. If any errors found, please follow the Bug Reporting instruction. I strongly recommend to do this step until the DCM officially leaves testing phase. Close the xEdit, the 'Save changed files' window will pop up. To save changes check the 'Demonic Creatures.esp' and 'Backup plugins' checkboxes and then press 'OK'. To cancel changes uncheck the 'Demonic Creatures.esp' and then press 'OK'. Hint: DCM also has a handy profile system. Path to NifSkope and states of all checkboxes will be saved on pressing the 'Unlink All Unchecked Creatures' button or closing the DCM's window and loaded on launch by default (data is stored in xEdit's '\Edit Scripts\Demonic Creatures Manager Default Profile.csv'). Also you can manually save profile to any file (including the default one) with 'Save Profile' button and load any file with 'Load Profile' button. Reverting the changes: The only way to restore any creature that was unlinked in the already saved DemonicCreatures.esp is to manually replace modified .esp with backup. If you previously checked the 'Backup plugins' checkbox during saving, backuped .esp's will be located in '\Data/SSEEdit Backups\' directory ('\Data\TES5Edit Backups\' or '\Data\TES5VREdit Backups\' for LE/VR versions). Also you can always use default .esp from downloaded Demonic Creatures archive. Bug Reporting: Algo Description: Credits: Thor2000 (Demonic Creatures) ElminsterAU and co (xEdit) NifTools team (NifSkope) Submitter SpectrumQT Submitted 08/05/2022 Category Modders Resources Requires Special Edition Compatible Yes
 -
 XEdit Scripts - Automate Utilities (SLA, SLS, + other stuff) View File Check for NPC Tint Masks.pas Checks a mod's NPCs for face tint files in the directory you specify. Edit "sTintMaskPath" to point to your mod's FaceGenData\FaceTint directory. Make sure it ends in a backslash. The texture file name gets appended to it. e.g. "mods\[My MO2 mod dir]\Textures\Actors\Character\FaceGenData\FaceTint\[My Mod's ESP/ESM file name]\" IMAD removal.pas This file will create a image space modifier removal bat file "removeimods" in your SSE game directory. If you change your load order you will have to rerun this. To use it. Load the target ESM/ESP files in SSE Edit. This can be your entire load order. CRTL+Click the target ESM/ESP files. Or CTRL+A for your entire load order. Right click on any of the target ESM/ESP files and select "Apply Script...". Select "<new script>" from the list of available scripts dropdown You'll see the New Script Template. Copy all. Delete it. Paste the IMAD removal PAS script. Save it and name it. Run it Each "rimod" command is followed by the source mod in a comment. e.g. rimod 0401EB05; DLC2DBBookLevelIod [IMAD:0401EB05] - [04] Dragonborn.esm rimod 04023F86; DLC2HMDaedraExpImod [IMAD:04023F86] - [04] Dragonborn.esm rimod 04024FBC; DLC2HMDaedraExpImod02 [IMAD:04024FBC] - [04] Dragonborn.esm rimod 040317D8; DLC2MiraakTeleportIMODStatic [IMAD:040317D8] - [04] Dragonborn.esm rimod 04031D26; DLC2StandingStoneReleaseImod [IMAD:04031D26] - [04] Dragonborn.esm While in game you can use "bat removeimods" to remove all image space modifiers. If the something that is applying the modifier is still active it will come back. You can then ALT+TAB out of the game and edit the bat file and remove "rimod" commands to find the troublesome mod. TAWOBA SLS JSON.pas Generates a BikiniArmors.json file for SexLab Survival. Before you start. Right click on any file under "SKSE\Plugins\StorageUtilData\SL Survival\" in MO2's Data Tab and select "Reveal in Explorer". Copy the full path to SL Survival's Storage Util's directory. You'll need this later Making a "BikiniArmors.json" file with SSE Edit. Load the TAWOBA mod in SSEEdit Right of the TAWOBA ESP file name and select "Apply Script..." Select "<new script>" from the list of available scripts dropdown You'll see the New Script Template. Copy all. Delete it. Paste the TAWOBA SLS JSON PAS script. Change "sJsonPath := 'E:\';" to SL Survival's Storage Util's directory. Make sure it ends with a backslash. "BikiniArmors.json" gets appended to it later. Save it and name it. Run it The script uses the ArmorMaterialXXXXXX keywords to sort and categorize the armor. TAWOBA SL Aroused and Survival.pas Automates a large portion of adding SLA and SLS keywords to armor. Instructions for using the xedit script: The Xedit script searches the armor's name for keywords to determine what SLA keywords are applied. The SLS keyword "_SLS_BikiniArmor" is applied to every piece of armor. The SLA keyword "EroticArmor" is applied to any match when the armor's name contains one of the following words boots thong pants bikini skirt thigh harness "SLA_BootsHeels" gets added to any piece if armor with the words "boots" in its name. "SLA_ThongLowleg" added with "thong" in its name. "SLA_MicroHotpants" added with "pants" in its name. "SLA_MiniSkirt" added with "skirt" in its name. "SLA_ArmorHarness" added with "harness" in its name. "SLA_Brabikini" added with "bikini" and "top" in its name. "SLA_ArmorHalfNakedBikini" added with "bikini" and "top" but not with "dwarven" in its name. Feel free to modify and share! Submitter jbezorg Submitted 05/11/2021 Category Other Requires Sexlab Aroused Redux, Sexlab Survival Regular Edition Compatible Yes