Search the Community
Showing results for tags 'tool'.
-
Rad Morphing Redux Helper View File Helper tool to set up slider sets and body morphing for Rad Morphing Redux. With RMR Helper you can completely configure Rad Morphing Redux and preview the morph changes without starting Fallout 4. Features Completely configure Rad Morphing Redux Preview morphs at all stages via BodySlide Automatically set up RMR slider sets to morph from one body preset into another Load, save, switch between multiple RMR configurations RmrHelper_BodySlide.mp4 Dependencies Rad Morphing Redux BodySlide Installing Install with your mod manager of choice. The application should end up in .../Data/Tools/RmrHelper/ Uninstalling Uninstall with your mod manager. RMR Helper does not interact in any way with the game itself, so it does not affect your savegames. How to use Start BodySlide Open the preview window Select the body (naked body or an outfit for that body) and preset you are using The BodySlide window does not have to be in the foreground, but must not be minimized. Start RMR Helper (your current RMR configuration is automatically loaded) Select the body you are using Select the preset you are using Use the Triggers tab to add additional triggers and change the trigger value to morph BodySlide's preview Use the Slider Sets tab to configure your slider sets. Descriptions for each settings can be found on RMR's mod page. Use the Overrides tab to configure overrides for the slider sets (see Global Overrides in RMR's settings). Preset-to-Preset ... Let RMR Helper automatically set up sliders to morph from the current preset into a second preset. Reconnect BodySlide If you opened RMR Helper before BodySlide or for other reasons RMR Helper loses track of BodySlide, click here to find it again. Save RMR INI Save the current settings into the MCM ini file used by Fallout 4 Save as ... Save the current settings into a file somewhere on your system. Open ... Open an MCM ini file from somewhere on your system. MO2 Apparently using RMR Helper with MO2 is a little more complicated. Thanks to @Chupacabra Gonzales for providing a quick how-to. Troubleshooting Starting with version 1.1.0 of RmrHelper, a log file is generated in the same directory as the application. If you are experiencing issues getting RMR Helper to work, please provide the log file (.../Data/Tools/RmrHelper/RmrHelper_log.log) for investigation. Source Code The full source code is available on GitHub. Changelog Submitter LenAnderson Submitted 11/23/2022 Category Other Requires Rad Morphing Redux, BodySlide
-
Rubber Duck's SAKR/RCP Gen View File Intorduction Rubber Duck’s SAKR/RCP Gen is a simple tool to help you patch armor and clothing mods for Skimpy Armor Keyword Resource (SAKR) and RobCo Patcher (RCP). It’s designed to be easy and convenient to use. Requirements Microsoft .NET Desktop Runtime 6 xEdit (FO4Edit) Skimpy Armor Keyword Resource (v1.1.0+) RobCo Patcher (v2.8.1+) Some clothing mods... (optional) BodySlide & Outfit Studio How it works RD’s SAKR/RCP Gen reads data from CSV file. To get the proper CSV file, one must use xEdit to export all the necessary data to it. Obviously, the xEdit script I'm using is included as I wrote it myself specifically for this program. Once CSV file has been loaded, it shows you the content of the loaded file and allows you to select SAKR keywords for every item inside the file. Once you’ve added keywords to items, it writes your changes to INI which you then need to copy/move to proper location. I know this sounds vague, see the tutorial for details and step-by-step instructions (with screenshots!). User Documentation Available here. My SAKR Repository Check it out here. Special thanks twistedtrebla for amazing work on SAKR (as well as other mods!) Zzyxzz for RobCo Patcher as well as other mods People who provided their patches for my SAKR Repo Microsoft for VS22 & .NET Source Code Available once I polish some things out; will probably become available for v1.0.0. Changelog Submitter rubber_duck Submitted 04/08/2023 Category Other Requires Microsoft .NET Desktop Runtime 6, xEdit, Skimpy Armor Keyword Resource, RobCo Patcher, (optional) BodySlide & Outfit Studio
-
Devious Devices - Equip (AE) View File Description With this mod you can equip and un-equip most of the devious devices available from Devious Devices Assets and Devious Devices Expansion (DDf) by using the MCM menu. You can also create and store (to a .json file) custom DD outfits. Requirements Required Mods (this mod will not work without these and their dependencies) SkyUI (5.2 or later) PapyrusUtil Zaz Animation Pack Devious Devices - Framework (DDf) Skyrim Utility Mod Optional Mods (more features available with these and their dependencies) Devious Devices - Captured Dreams Shop Restored (CD) Installation Install it using your favorite mod manager. Installation Steps 1. Install 'DDe’. 2. If you plan to use CD then install it first then, install DDe and select the ‘DDe - CD Patch’ in the FOMOD. Uninstallation Steps 1. Uninstall ‘DDe’. Updating to the Latest Version 1. Follow ‘Uninstallation Steps’, for the existing version. 2. Follow ‘Installation Steps’ for the new version. Versioning For example, version No. 1.2.3 A change in, 3 -> Patch, can be installed on the previous version (uninstall old, install new). 2 -> Content update, clean save is recommended. 1 -> Major update, clean save required, new save recommended. Features See update log below for features. API For Modders See post No. 2 in the support thread. DDe For Skyrim Legendary Edition (LE) Devious Devices - Equip LE Update Log Submitter Inte Submitted 08/12/2023 Category Adult Mods Requires SkyUI, PapyrusUtil, DDf Regular Edition Compatible No
-
Devious Devices - Equip (LE) View File Description With this mod you can equip and un-equip most of the devious devices available from Devious Devices Assets and Devious Devices Expansion (DDf) by using the MCM menu. You can also create and store (to a .json file) custom DD outfits. Requirements Required Mods (this mod will not work without these and their dependencies) SkyUI (5.1) - or higher. PapyrusUtil 3.1 -or higher. ZazAnimationPack Skyrim Utility Mod Devious Devices - Assets Devious Devices - Integration Devious Devices - Expansion Optional Mods (more features available with these and their dependencies) Devious Devices - Captured Dreams Shop Restored (CD) Devious Devices - Beast Race Refits - a DDe patch for beast races, provided by @Skullered. Installation Install it using your favorite mod manager. Installation Steps 1. Install 'DDe’. 2. Install the latest ‘DDe - CD Patch’ available in the download section, only if you have CD installed already. Uninstallation Steps 1. Uninstall ‘DDe - CD Patch’ if installed. 2. Uninstall ‘DDe’. Updating to the Latest Version 1. Follow ‘Uninstallation Steps’, for the existing version. 2. Follow ‘Installation Steps’ for the new version. Versioning For example, version No. 1.2.3 A change in, 3 -> Patch, can be installed on the previous version (uninstall old, install new). 2 -> Content update, clean save is recommended. 1 -> Major update, clean save required, new save recommended. Features See update log below for features. API For Modders See post No. 2 in the support thread. Mod Status So far the mod equips and un-equips DDs quite reliably on the PC. ... not so much on the NPCs, I cannot seem to find an API to reliably detect worn DD by NPCs. Fixed as of 1.30 Be careful when equipping devious devices on NPCs - most of them will probably break or prevent you from finishing quests by acting all retarded. Should be OK with followers, you can remove DDs from them by asking them to share items with you and just removing the DDs directly from their inventory - just make sure you have the keys first. DDe For Skyrim Anniversary Edition (AE) Devious Devices - Equip AE Translations German -> by @CGi Update Log Submitter Inte Submitted 10/31/2015 Category Framework & Resources Requires SkyUI, PapyrusUtil, DDa, DDi, DDx Special Edition Compatible No
-
Version 1.0.0
28 downloads
This is a simple Python script that will sort the contents of your saves folder so you can easily pick out saves/characters you want to keep or get rid of. Simply run the script, paste in the path to your saves folder, paste in the path to where you want your saves to be sorted, and let it do its thing. Made and tested with Python 3.11, but there's no reason it wouldn't work on earlier versions too. I've also included an exe version, but it was made with auto-py-to-exe so your antivirus will probably throw a hissy fit about it. Probably not worth the trouble. -
Skyrim Save File Sorter View File This is a simple Python script that will sort the contents of your saves folder so you can easily pick out saves/characters you want to keep or get rid of. Simply run the script, paste in the path to your saves folder, paste in the path to where you want your saves to be sorted, and let it do its thing. Made and tested with Python 3.11, but there's no reason it wouldn't work on earlier versions too. The only external library it uses is tqdm to show progress bars, but if you don't feel like installing that then it'll run just fine without. I've also included an exe version, but it was made with auto-py-to-exe so your antivirus will probably throw a hissy fit about it (which is a good thing. You really shouldn't be running random executable files you find on the internet). Probably not worth the trouble. Submitter _Starfruit Submitted 04/06/2024 Category Other Requires Python Special Edition Compatible Not Applicable
-
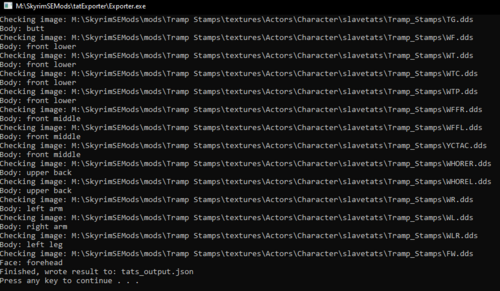
 SlaveTattoo position exporter for RapeTattoo's View File Description This is a simple tool for exporting your slavetattoo's into the format required for RapeTattoos, along with automated positioning based on reference color-based maps. Just quickly threw it together so I wouldn't have to go through the hassle of manually mapping out tattoos. It supports only face, and body. Not for any other reason other then I was too lazy to do hands. Although programmatically, it would be extremely simple to include if you want to (Just a matter of copy/pasting) How to use Click the Exporter.exe to open the program. (Or compile the software from the source) Put the absolute path of your slavetats folder for your desired mod. IE: C:\SkyrimSEMods\mods\SlaveTats AIO5\Textures\Actors\Character\slavetats\ Allow the program to read all your SlaveTattoo json files for information, then your DDS files for mapping out the physical position tats_output.json will be generated after the software is complete. Copy the elements into your Documents\My Games\Skyrim Special Edition\JCUser\rTats\settings.json file from RapeTattoos, and or your template file from the mod. Run your settings.json file through an online JSON format validator to insure there's no errors: https://jsonlint.com/ How to modify position definitions All the body parts are crudely defined by colors exact colors (RGB). You just grab a female body texture, and paint it the specific colors contained inside my reference pictures. You MUST retain the original sizes, which is 1024x1024 for the body and 512x512 for the face. License MIT - https://choosealicense.com/licenses/mit/ You can do WHATEVER you want with the source-code or binaries. I do not care Known Issues Little error handling, if you have trouble with the application chances are files are missing Does not map HAND tattoos yet due to lazyness Probably mixed up left/right on some of the arms/legs. Easily corrected by just color swapping Assumes your files are all RGBA Other Virus-Total: https://www.virustotal.com/gui/file/d4fcb7c5f97df720a09f452f730ee9db88e94cdf86145feb2d4ab22999ef4f63/detection Submitter asdt123123 Submitted 02/01/2023 Category Adult Mods Requires https://www.loverslab.com/files/file/3587-rapetattoos/ Regular Edition Compatible Yes
 -
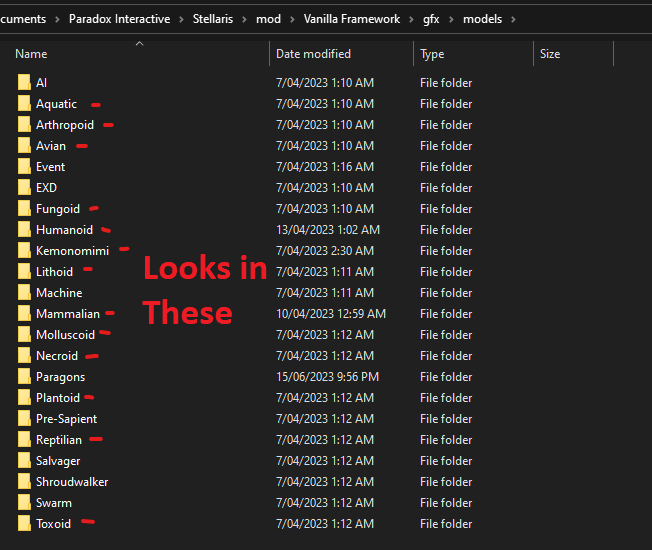
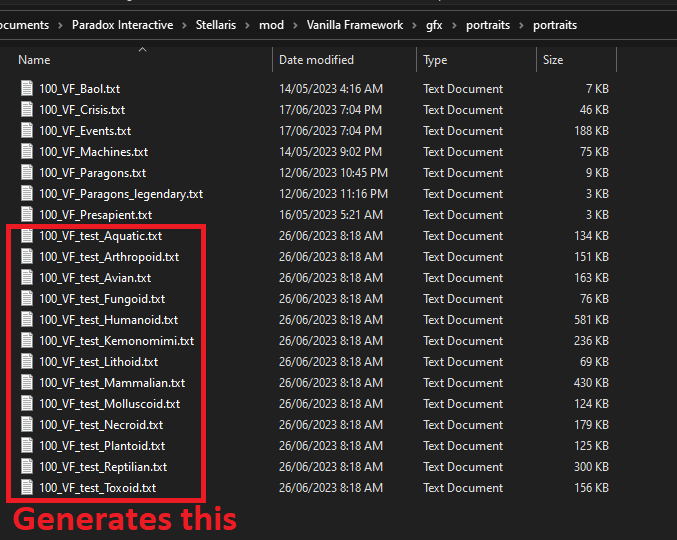
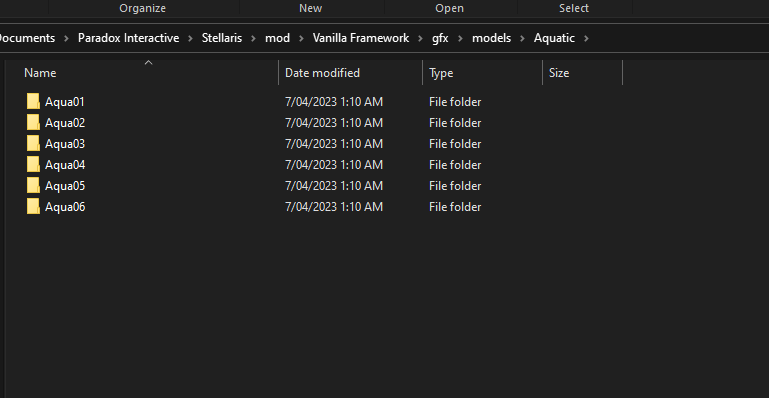
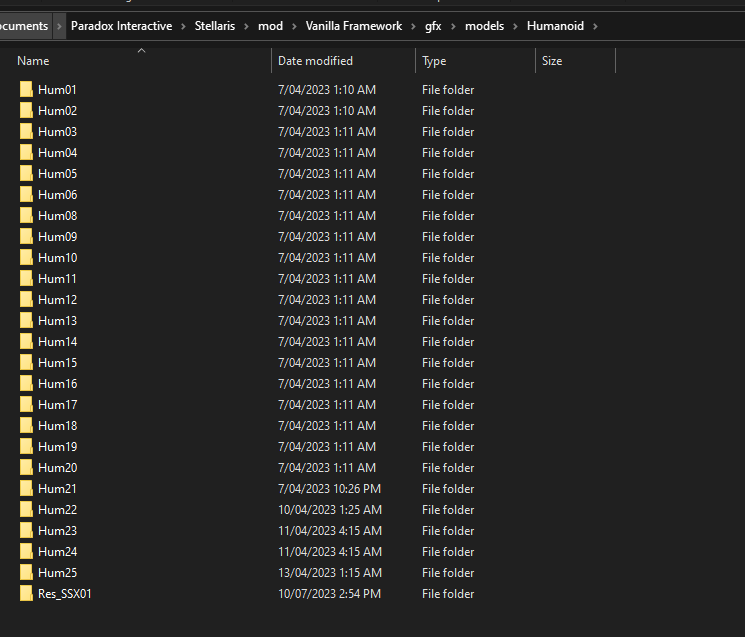
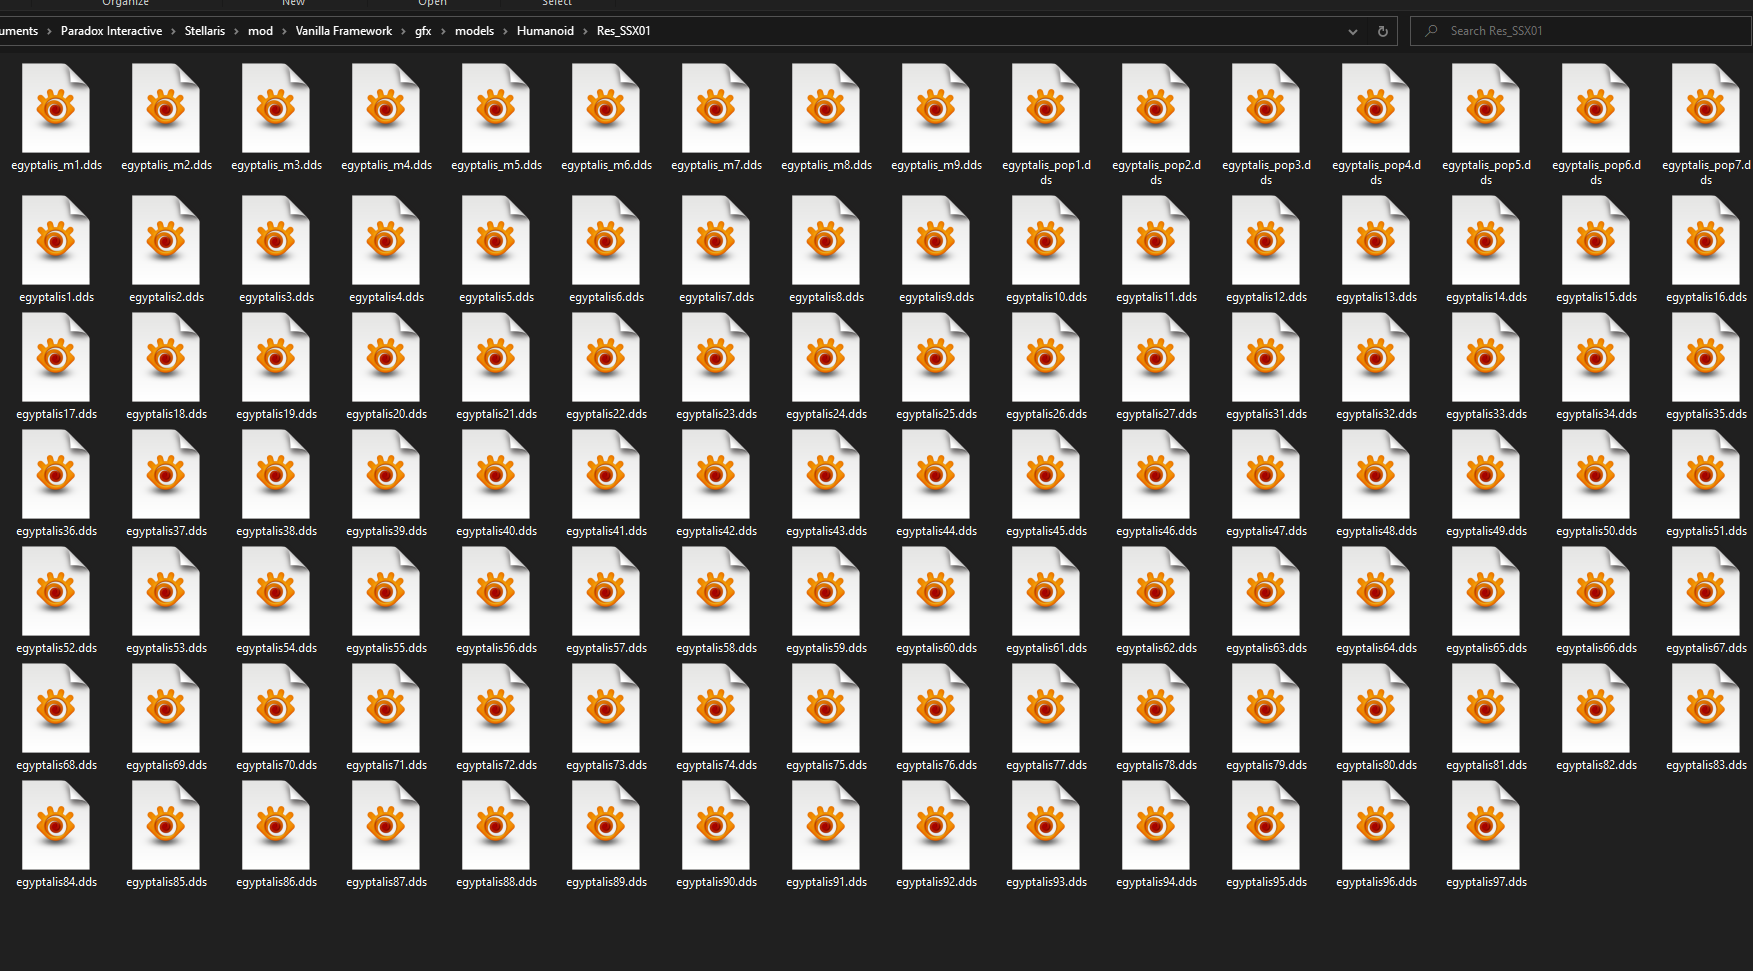
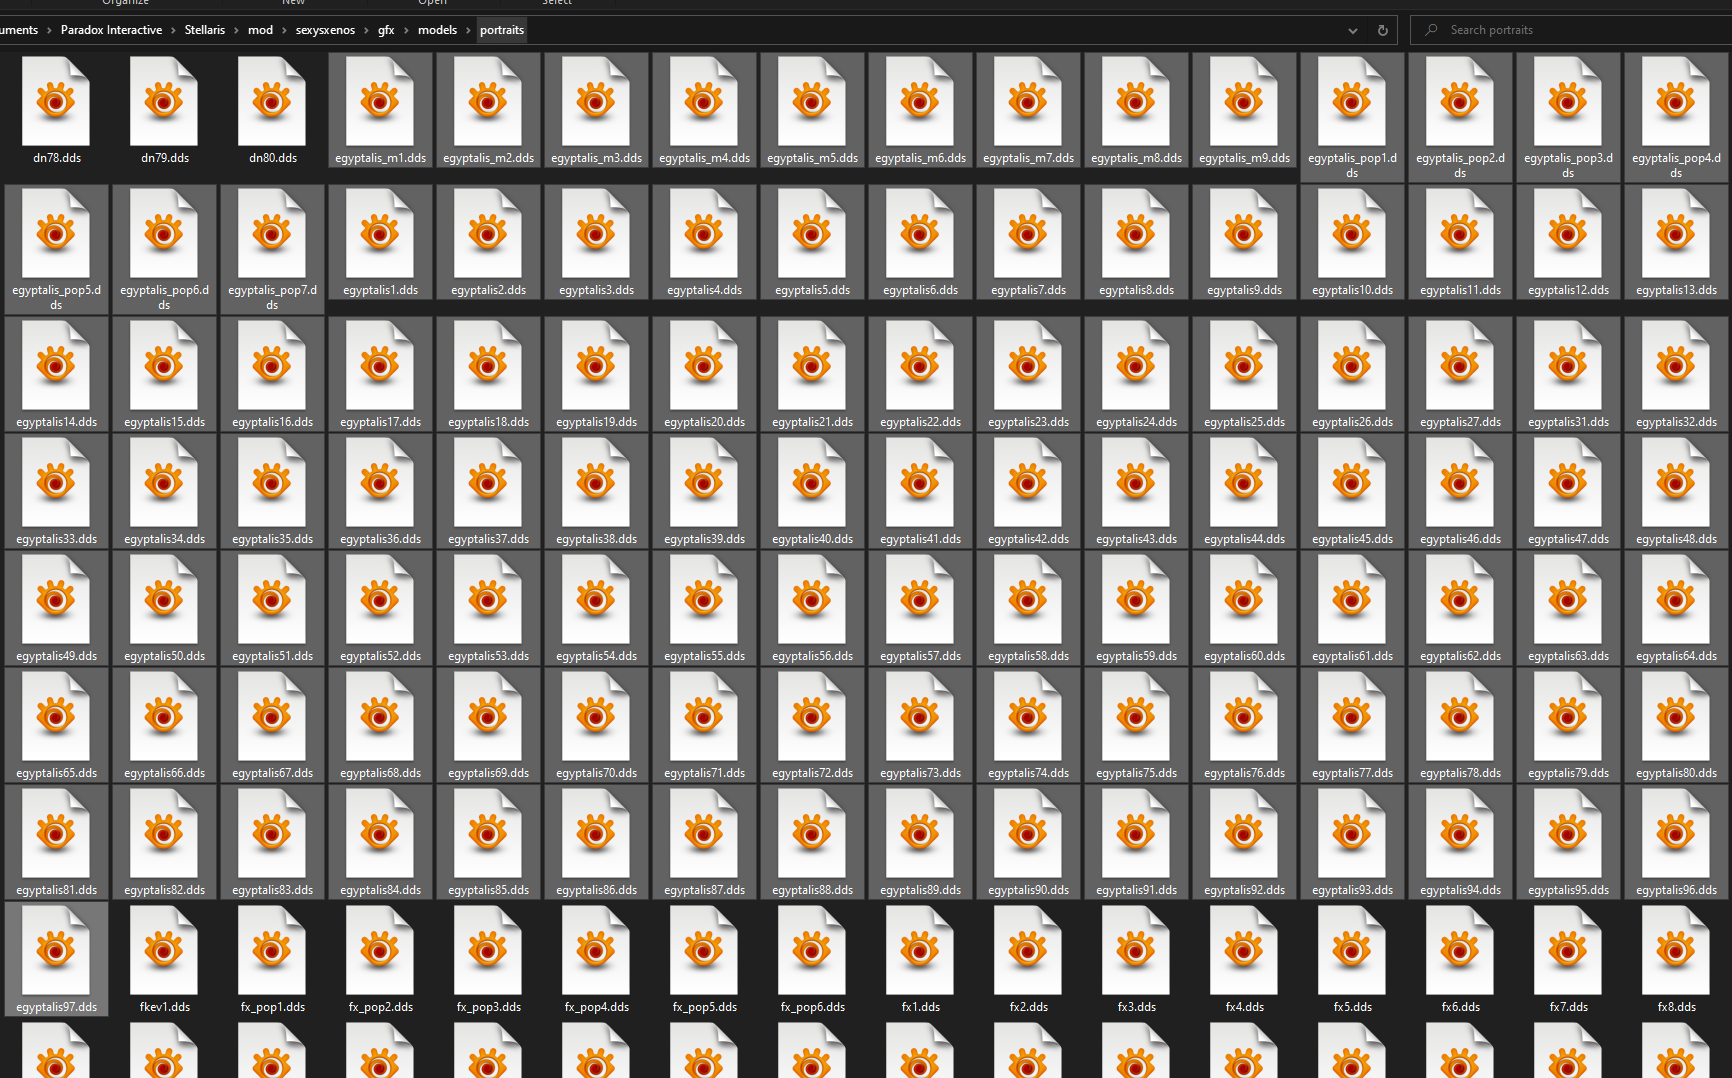
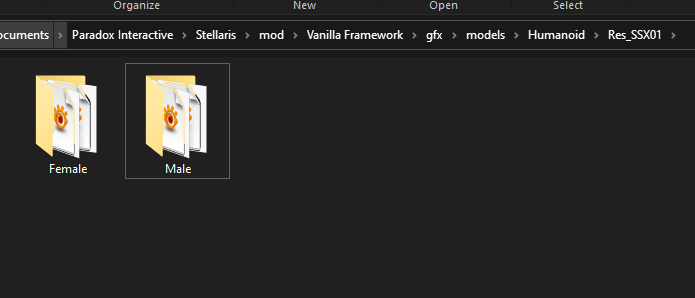
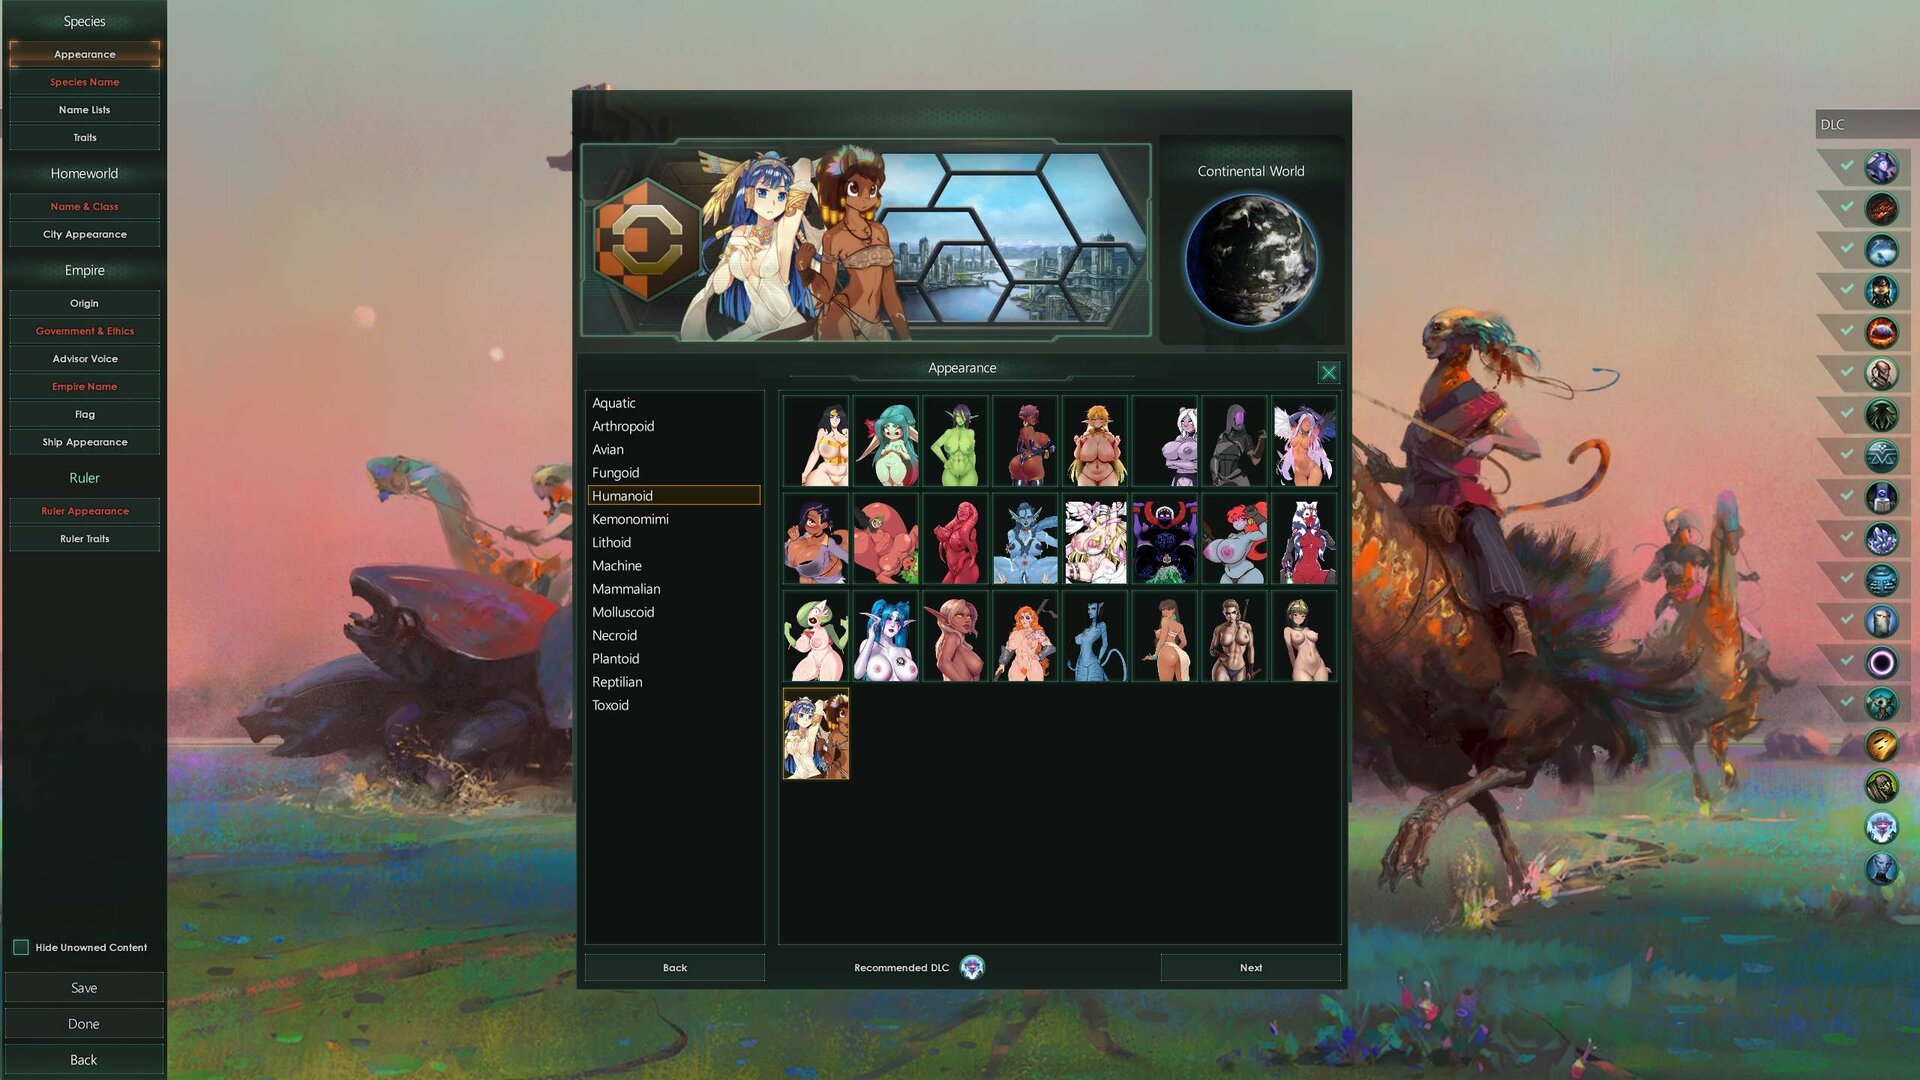
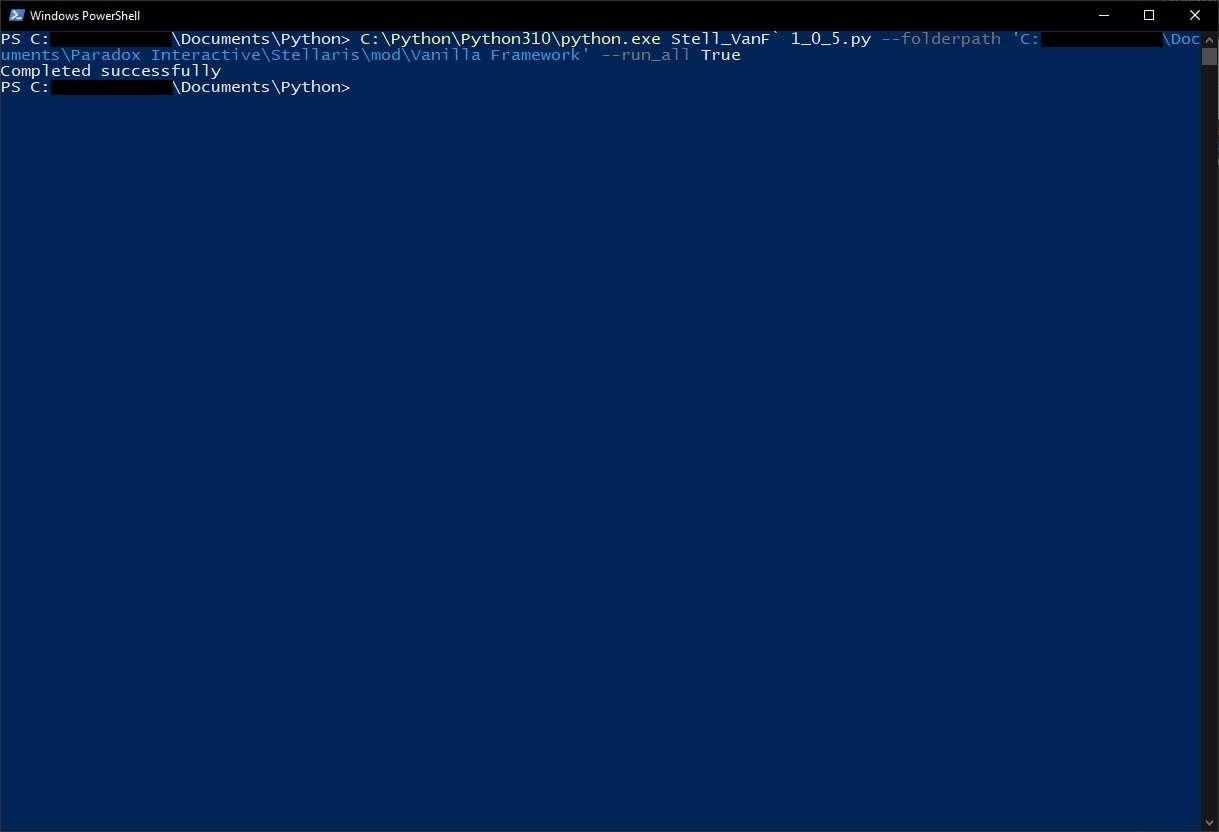
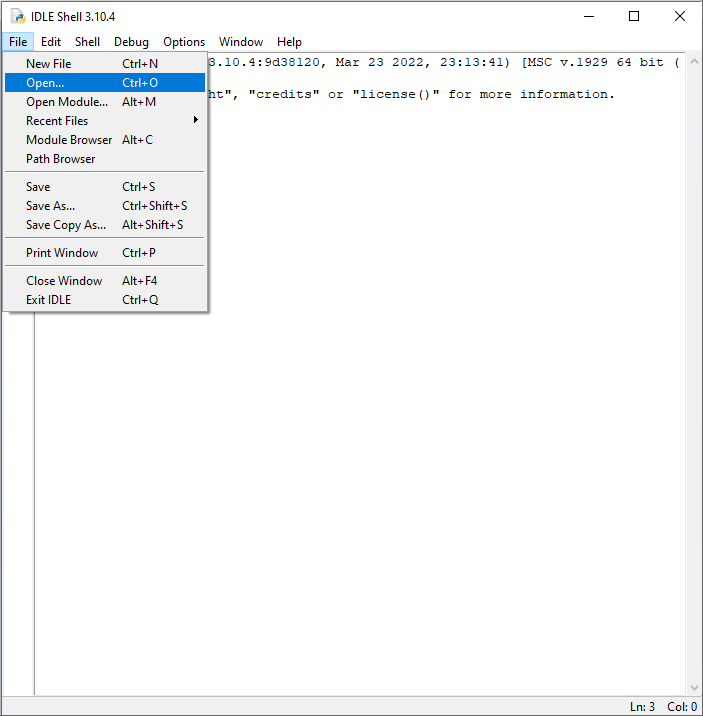
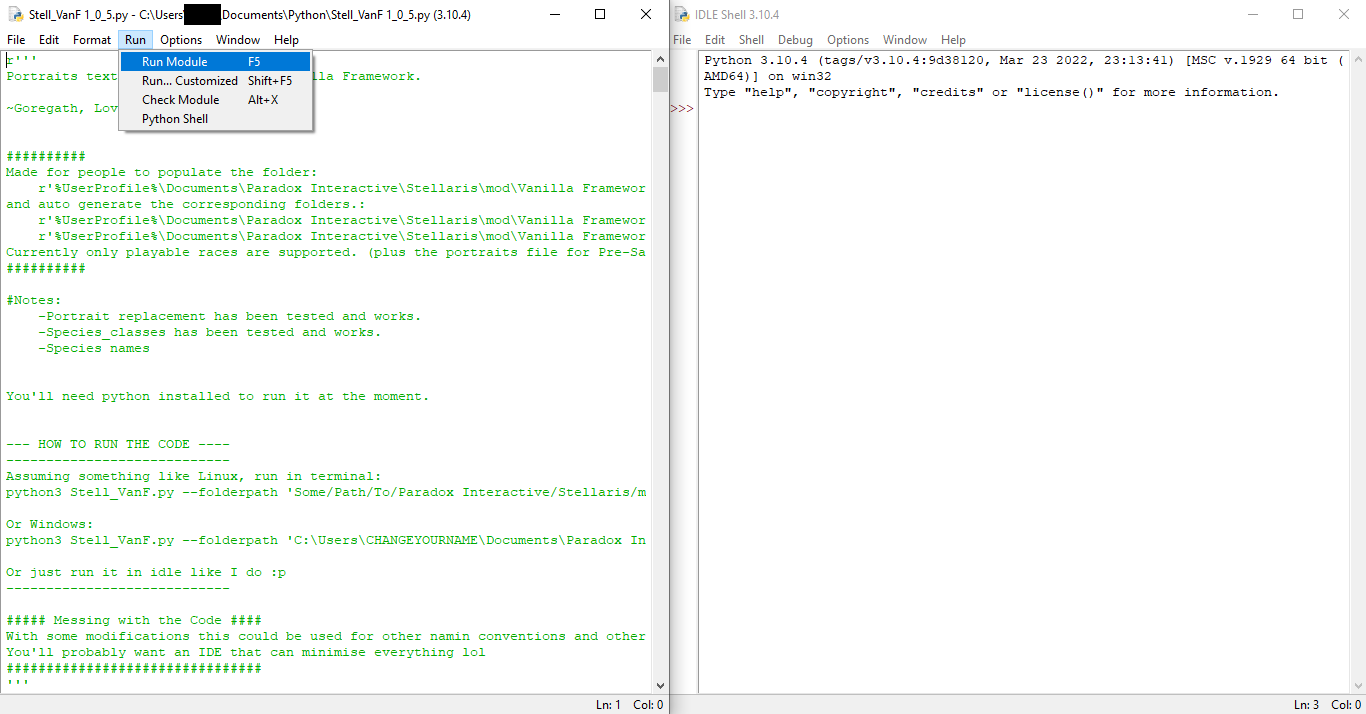
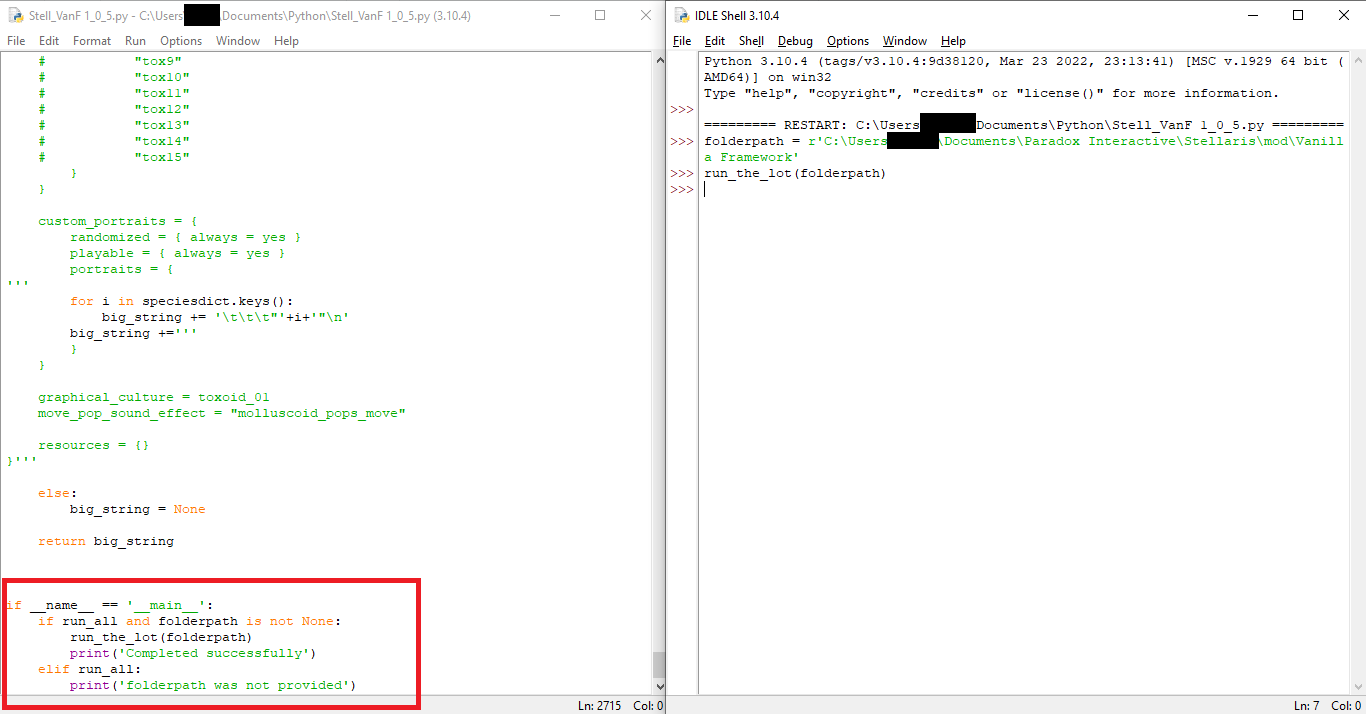
View File Species_Classes and Portraits text file generator What does it do: I made this file so I could add species to Vanilla Framework and have them 'just work'. After looking at the policies and species_classes files, I was deterred. So this program was made to look at a series of images, organized by file structure, and then create the required species_classes and portraits files automatically. It is also written in python (with comments) and should be adjustable to anyone's file structure. Thus, you can collect the images you like and have them show up in game without making/changing the species_classes and portraits files. Setup: So this script was made for the naming convention in Vanilla Framework, but can work with others. The code takes a target path to a mod folder (YourModName for example) and then assumes that you have the path: YourModName\gfx\models and is this path is a series of folders that correspond to the playable races: The code will auto ignore any folders it doens't recognise the name of. It then checks for sub-folders to make species from: The code will check inside in the Species Type (e.g. Aquatics) folder and ignore anything that isn't also a folder. In this case it assumes that Aqua01, Aqua02, ... Aqua06 are all separate species. There is no naming convention requirement here, the species can be called anything! Assuming the folder looks like this: A list of .dds files are generated such that: '01AquaF1.dds', '01AquaF10.dds', '01AquaF11.dds', '01AquaF12.dds', '01AquaF13.dds', '01AquaF14.dds', '01AquaF15.dds', '01AquaF2.dds', '01AquaF3.dds', '01AquaF4.dds', '01AquaF5.dds', '01AquaF6.dds', '01AquaF7.dds', '01AquaF8.dds', '01AquaF9.dds' are all female. '01AquaH1.dds','01AquaH2.dds', '01AquaH3.dds' are all futa. '01AquaM1.dds', '01AquaM2.dds' are all male. The code then iterates through all the folders it recognises and using the sub-folders a sspecies it generates ALL of the portraits text files for playable races (and pre-sapients), and all the species classes for playable races (not pre-sapients). It will go back to the folder YourModName and look for the two paths: YourModName\portraits\portraits YourModName\common\species_classes If it doesn't find them, it will create them. I've removed the _test in the picture, so it will now overwrite the Vanilla Framework (or others) if it has the same name. Code: File Names: Leaders: How to use: Firstly you'll need python installed. Later if I get to it I'll see if I can make it an executable or something. But in this form it is safer as people can read it to see what it's doing. Taken straight from the python file: --- HOW TO RUN THE CODE ---- ---------------------------- Assuming something like Linux, run in terminal: python3 Stell_VanF.py --folderpath 'Some/Path/To/Paradox Interactive/Stellaris/mod/YourModName' --run_all True Or Windows: python3 Stell_VanF` 1_0_5.py --folderpath 'C:\Users\CHANGEYOURNAME\Documents\Paradox Interactive\Stellaris\mod\YourModName' --run_all True There is a verbose flag that can be used. i.e. python3 Stell_VanF.py --folderpath 'C:\Users\CHANGEYOURNAME\Documents\Paradox Interactive\Stellaris\mod\YourModName' --run_all True --verbose True All command line flags: python3 Stell_VanF.py --folderpath 'C:\Users\CHANGEYOURNAME\Documents\Paradox Interactive\Stellaris\mod\YourModName' --run_all True --verbose True --vanilla_framework True --block_base_species True Just be prepared to have your screen flooded if you have many portrait files. Or just run it in idle like I do ? I should have explained more, my bad: example code: folderpath= r'C:\Users\CHANGEYOURNAME\Documents\Paradox Interactive\Stellaris\mod\YourModName' run_the_lot(folderpath=folderpath,dospecies_class=False,block_base_species=False,vanilla_framework=True,verbose=False) (values are set to the defaults in the above example, i.e. verbose is default set to false) Here is step by step of what you need to to in IDLE: VIDEO! I've added a video to the downloads with an example run on just pictures. The file path inside the test mod is required. (e.g. YourModName\gfx\models\Aquatic\Aqua01\example1.dds) ---------------------------- I'll continue to post updates as I improve the script. Feel free to use/modify this script, and to suggest changes if you like. TL;DR: -Putt all your species pictues (any name as .dds files) into sub-folders (any name e.g. Aqua01) for each set of pictures -The sets of pictures need to be in a folders that corresponds to a playable races (e.g. Aquatic) (Species Type folders shown in the first figure by the red dashes.) Species Type folders need to be here: YourModName\gfx\models (So for the example: YourModName\gfx\models\Aquatic\Aqua01\example1.dds ) run the code pointing to: C:\Users\CHANGEYOURNAME\Documents\Paradox Interactive\Stellaris\mod\YourModName Done! your species will show up in the game when you load YourModName! I also generally recommend anyone to read a script before they use it. Example 1: Making A Race From An Old Mod ASPIRATIONS LIST: Add non_VF mode, and possibly make that the default (currently has no actual effect to the end user, other than clutter in the files) Not so hard... maybe Tackle events Probably very painful Read current entries for species lists and portrait lists time consuming and difficult to decide what to do in edge cases GUI? Would cost lots of time and only add a little functionality at the moment, but would make it more accessible to others. Executable No idea how hard, but guessing hard. Would make it accessible to non-python users What's New in Version 1.0.5 Fixed two bugs: The code would actually pickup non image files and add them if they were in the folder The default image in portraits is now checked only once and not every gender, this prevents a bug when one gender had no leaders, but the others did The names variable is now a list of lists (like the leaders) and will check against each. Default behavior is now to check file names as it would for like Vanilla Framework, then look for 'Female','Male' ect. in the file path. What's New in Version 1.0.6 Minor updates: Will now name species classes as VF did (with the _classes) Changed the logic it uses to determine gender. Has no effect on the end user, but the profile files (and the python file itself) are much smaller now. What's New in Version 1.0.7 Minor update: run_the_lot will now check the inputs it has received and tell you if it's going to fail, rather than the code failing somewhere random down the line. Hopefully making it easier to pick up typos and missing definitions, What's New in Version 1.0.8 3 New additions: -vanilla_framework flag to determine if event portraits should be written to the portraits files. These are hard coded so I'll need to update if VF gets updated. But good to turn off if you have a custom portrait set or if VF gets updated and this doesn't. -More error flags for when folders are not found or ignored. -block_base_species flag for generating 00_species_classes.txt and 01_base_species_classes.txt which will block the base species portraits from appearing in the game. Submitter Goregath Submitted 06/29/2023 Category Stellaris Requires Python 3


-
Version 6.3.6
20,046 downloads
Description With this mod you can equip and un-equip most of the devious devices available from Devious Devices Assets and Devious Devices Expansion (DDf) by using the MCM menu. You can also create and store (to a .json file) custom DD outfits. Requirements Required Mods (this mod will not work without these and their dependencies) SkyUI (5.2 or later) PapyrusUtil Zaz Animation Pack Devious Devices - Framework (DDf) Skyrim Utility Mod Optional Mods (more features available with these and their dependencies) Devious Devices - Captured Dreams Shop Restored (CD) Installation Install it using your favorite mod manager. Installation Steps 1. Install 'DDe’. 2. If you plan to use CD then install it first then, install DDe and select the ‘DDe - CD Patch’ in the FOMOD. Uninstallation Steps 1. Uninstall ‘DDe’. Updating to the Latest Version 1. Follow ‘Uninstallation Steps’, for the existing version. 2. Follow ‘Installation Steps’ for the new version. Versioning For example, version No. 1.2.3 A change in, 3 -> Patch, can be installed on the previous version (uninstall old, install new). 2 -> Content update, clean save is recommended. 1 -> Major update, clean save required, new save recommended. Features See update log below for features. API For Modders See post No. 2 in the support thread. DDe For Skyrim Legendary Edition (LE) Devious Devices - Equip LE Update Log -
Version 6.3.6 [February 16, 2024]
330,771 downloads
Description With this mod you can equip and un-equip most of the devious devices available from Devious Devices Assets and Devious Devices Expansion (DDf) by using the MCM menu. You can also create and store (to a .json file) custom DD outfits. Requirements Required Mods (this mod will not work without these and their dependencies) SkyUI (5.1) - or higher. PapyrusUtil 3.1 -or higher. ZazAnimationPack Skyrim Utility Mod Devious Devices - Assets Devious Devices - Integration Devious Devices - Expansion Optional Mods (more features available with these and their dependencies) Devious Devices - Captured Dreams Shop Restored (CD) Devious Devices - Beast Race Refits - a DDe patch for beast races, provided by @Skullered. Installation Install it using your favorite mod manager. Installation Steps 1. Install 'DDe’. 2. Install the latest ‘DDe - CD Patch’ available in the download section, only if you have CD installed already. Uninstallation Steps 1. Uninstall ‘DDe - CD Patch’ if installed. 2. Uninstall ‘DDe’. Updating to the Latest Version 1. Follow ‘Uninstallation Steps’, for the existing version. 2. Follow ‘Installation Steps’ for the new version. Versioning For example, version No. 1.2.3 A change in, 3 -> Patch, can be installed on the previous version (uninstall old, install new). 2 -> Content update, clean save is recommended. 1 -> Major update, clean save required, new save recommended. Features See update log below for features. API For Modders See post No. 2 in the support thread. Mod Status So far the mod equips and un-equips DDs quite reliably on the PC. ... not so much on the NPCs, I cannot seem to find an API to reliably detect worn DD by NPCs. Fixed as of 1.30 Be careful when equipping devious devices on NPCs - most of them will probably break or prevent you from finishing quests by acting all retarded. Should be OK with followers, you can remove DDs from them by asking them to share items with you and just removing the DDs directly from their inventory - just make sure you have the keys first. DDe For Skyrim Anniversary Edition (AE) Devious Devices - Equip AE Translations German -> by @CGi Update Log -
Mods Optimizer View File Hello everyone, this is a small application that I made for myself in a hurry. I'm not sure that this forum is the best place for such utilities, but since the main task of this application for me is inextricably linked with the content from this forum, I decided to share it here. Correct me, if I'm wrong ? Description I often come across releases of some kind of creative work (sims, lots, etc.), in which the author includes absolutely all the custom content used in the creation. And, unfortunately, I always passed such releases because of the problem of duplicate files. A lot of the custom content that comes with the releases is already in my mods folder. Structured. I'm not sure I fully understand how EA solves duplicate mods folder problems, but as a developer I can tell you for sure that the physical memory of my disk and the RAM of the EA process are not infinite ? This utility allows you to scan your mods folder and your desired custom content folder in order to find only those files that you don't actually have. As a result, you will get a new folder with custom content that you can safely place in your mods folder. Note: this is proof of concept app, which can have bugs. If you have any questions or comments please contact me, I will try to help. Version 1.0.1 Fast Scan added. You can find it in new panel for settings (on by default) With Fast Scan new.mp4 Without Fast Scan old.mp4 Submitter wyler Submitted 09/10/2021 Category Uncategorized Requires May require latest .NET Runtime.
-
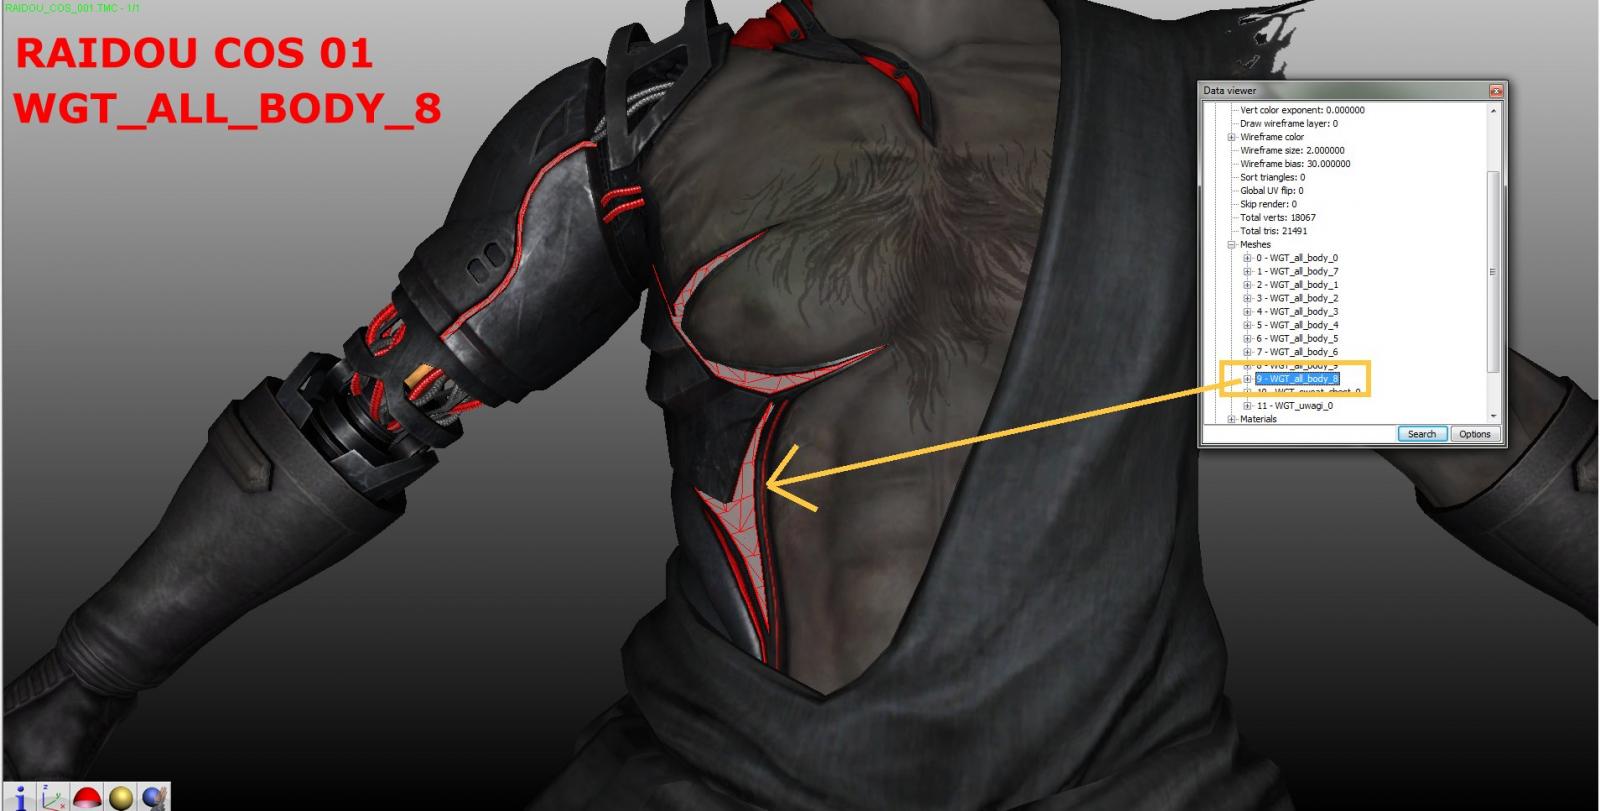
 [TUTORIAL & GUIDE] OBJECT TOOL : How to use and understand it. Doutoku Tool. This thread is under construction. Over years using this tool I will provide all what I know and discovered about this tool. How to use it, how to understand it, what is the capacity of this tool, how to optimize your mods using materials, environnement, shiny effects and else. There are a lot to say and explain about this tool. UNDERSTAND INTERFACE : On this guide I will use the version 0.26.2. Be careful if you use lower versions there are some property that don't exist with some issues and crash, I found this version stable that's why I'm using this one. WGT_all_body : Show mesh name and amount of meshes inside a TMC. VGrp : Show the group assigned per meshes. VtxCt & IdxCt : Show the amount of vertices & index count per meshes slots. Tex1-2-3-4-5 : Show the textures orders. TexType : Show how the textures are read. Trnsp : Transparency level. Dsid : Double Sided level. Mcol / mtcp / Mtrl : Material property. Z1 / Z2 / Cast / Recv / Culling : Advanced parameters. Z1 & Z2 need to be combined with Trnsp, Cast - Recv & Culling are for shadows & lightning. UNWRAPPING ALL OF THIS : WGT_all_body : RIGHT CLICK OVER A MESH SLOT ADD SUB OBJECT : .You can add as many meshes slots as you need, until now I didn't found a maximum but I also didn't tried to add more than 15 meshes slots in 1 TMC. DELETE SUB OBJECT : . You can also delete usless slots that don't include meshes, this is HIGHLY recommended to delete them to fix the blinking shadows issues. DELETE ALL VERTICES AND INDICES : . Remove the mesh inside this slots but DO NOT delete the slot itself. GET MATERIAL : . Import and inject a new material for the targeted mesh (this part will be developped separately). VGrp : . This tab show the number of UV (textures) that the mesh slot can hold. As show on the screenshot it have to be combined with the lower part. . You CAN'T change the number of UV count if a mesh is already added, you have to create a new WGT_all_body group and change the number before inject a mesh inside. . Usefull if you have a mesh that have only diffuse or don't wan't to use Normal Map and others textures for x reasons. But keep in mind a mesh group that have only 1 UV could be less detailed due to lack of Normal Map & Specular. . Also usefull for certain material injection. => On the screenshot you can notice some of my meshes actually use 1 UV (VGrp 2), this is a mesh that have shiny material with only diffuse. VtxCt & IdxCt : . Vertex Count & Index Count are just showing the amount of vertices & their index per meshes inside each slots. . I already added a mesh that have 100k vertices and was working, so I guess there are no limit but you could get some lag in game, specially if the mesh is big. Tex1-2-3-4-5 : . This is where you will swap your textures for each meshes. . A TMC can hold 5 textures per mesh slot, but until now the 5th slot is useless or I didn't found an utility despite some test. . This tab have to be combined with TexType tab to know how to swap and place your textures. . By default the order is usually 0012 (Diffuse - Diffuse / Wet - Normal Map - Specular). TexType : . 0 = Diffuse / Wet, 1 = Normal Map, 2 = Specular & 3 = Environnement. . Unless you are using a Skin Slot you can duplicate the diffuse texture when you use TexType 0012. . To enable the Environnement property you have to choose a TexType that include 3 (example 0123) then check the option. Example to understand better : 0012 : Diffuse - Diffuse - Normal Map - Specular 0123 : Diffuse - Normal Map - Specular - Environement 03 : Diffuse - Environnement . When you decided of your TexType you can swap your textures in the proper order in Tex1-2-3-4-5 tab. Trnsp : . Enable transparency for meshes that have textures with alpha channel. => Level 0 no transparency => Level 1 soft transparency => Level 2 hard transparency . If your mesh don't need alpha channel textures you can leave the setting on 0, but if you set it to 1 or 2 anyway you'll get a lighter mesh. . If your mesh have alpha channel you will have to find the proper setting (to combine with Z1 tab) : => Level 1 need to be combined with 08 setting on Z1 tab. => Level 2 need to be combined with 02 setting on Z1 tab. Others mix will give differents results but are mostly uncompatible and could give bugs. Dsid : . Give to the mesh the double sided property, useful when you have a mesh that is not "closed", good example with skirt then you won't have a kind of see through issue. . If your mesh don't need to be double sided and you activate it anyway you'll get a lighter mesh. => Combined to Level 2 Trsnp where a mesh don't need alpha channel it will give an even more lighter mesh. Mcol / mtcp / Mtrl : . Mcol is the main property where you'll inject or change your material setting. . Try to change the number and see the result by yourself, your mesh will become more or less light / dark, combined to mtcp & Mtrl it will give different result. . If you are using a Skin Slot and want to remove this property you will have to change the mtcp parameter, usually decreasing by 1 is enough to remove it (but will still have other property anyway, this is just to avoid the Wet property mostly). . This part will need a separated tutorial where you'll understand how inject and change your material property (shiny effect, animated textures and others) for each meshes via advanced tab. Z1 / Z2 / Cast / Recv / Culling : . Z1 have to be combined with Trsnp setting to enable and optimize your transparency level (reference said before). . Z2 is how the transparency meshes are read to avoid overlapped problems, 0 - 1 - 2 is the proper order, this is mostly used for hair.TMC. . Cast, Recv & Culling are 3 property where I didn't spend a lot of time but look to be related to lights & shadows, changes are almost not visible in game where I recommend to don't change these settings, whatever the original. => Set the Cast option to 2 if you have a mesh slot empty to avoid flickering shadows issue. __________________________ UNDERSTAND & EDITING MTCOL PROPERTY : This part is an advanced parameters to control and edit the material property (but I'm not talking about injecting material yet). Click on the desired mesh you want to edit then click on the top on MtrCol option. In this example I will show the first mesh slot parameters "WGT_all_body_0 (this is a body mesh without Body Skin Parameter). As show on the screenshot a new window will be opened, revealing all advanced parameters where you'll control the material in detail. INDEX : Show the material index, all meshes who have the same index will be grouped together (in this example, the mesh index 12 is lonely), editing a parameter with many meshes inside the same index will change this parameters for all these meshes. USE : Show the amount of meshes for the same material. RGB - B/W column : R = Red Color G = Green Color B = Blue Color B/W = Black & White Colors . You an add from 0 to 255 numbers for RGB setting but I don't recommend it since low number is enought to change colors too. -> This is where you can control the colors per parameters, as example you can give to a specular a red reflection without recoloring the texture itself. AMBIANT : Control the ambiant, this is what the object reflects when illuminated by ambient light rather than direct light. => Here is an example by increasing the ambiant & diffuse RGB parameters : (Left MtCol edit / Right no MtCol edit) DIFFUSE : Control the diffuse parameter, changing the colors without editing the texture itself. SPECULAR : Control the specular parameter, changing the colors without editing the texture itself (but keep in mind you'll always be more accurate by editing the texture than the MtrCol parameter, this parameter globalize all where editing a texture can let you create colors reflection on the desired spots). ENVIRONNEMENT : Control the environnement parameter, changing the colors without editing the texture itself, even increasing or decreasing the power with B/W tab. GLOW : Control the shiny effect but CAN NOT work without the material injection before (will be developped separately). SPECULAR2 / DIFFUSE2 / SPECULAR3 : Advanced parameters to dig deeper with them. RIM LIGHT : This is a light that highlights only the contours of the subject (will be developped separately). SPECULAR(Wet) : Property only applied to Skin Mesh, control the wet effect. UNKNOWS Parameters : From few test I didn't saw a change with these parameters so I don't know their utility for the moment. IMPORTANT NOTE : . Except Diffuse & Speculars parameters I HIGHLY not recommend to put high number on others settings or your mods could crash in game. . Don't abuse and don't go over 50 maximum per column. If your mod keep crashing after edited a parameter just low the numbers. . More you edit all parameters and more you take the risk to have an unstable mod, be careful and don't be greedy. ________________ GLOW & RIM LIGHT EFFECTS : GLOW : Now let's talk about how to make a mesh shiny with Glow parameter and material injection. First you will have to inject the shiny material from another TMC that include it, on this example I will take Raidou COS01 model and his WGT_All_Body_8 material. Once you located the mesh that have a shiny property in a TMC, open your mod that need to have the shiny material in Object Tool and choose the WGT_all_body slot that need this effect. On this example I will inject it in the WGT_all_body_9 slot. Right click on the mesh slot and choose "Get Material", a new window will appear. Drag Raidou COS01 into "Referenced TMC File", choose the shiny material in "Referenced Object", click on MtrlCol - Add in "Material Type" and then click OK. If your mod never had shiny material it will automatically add a new number in the MCol parameter (here it's number 13). If your mod already had this material it will ask you if you want to add it anyway since it already exist, just click yes. Your mesh is now shiny. You can increase or decrease the power of the shiny effect & their colors via Advanced MtrlCol tab as show before with RGB column. IMPORTANT NOTE : The shiny effect is sometime not visible via Neosis and LR Studio, you have to check in game to be sure it's well injected. --- RIM LIGHT : Now let's talk about how to make a mesh having highlight around the border of your mesh. Difference with Shiny material is Rim Light don't need to have a material injected and can be changed anytime on a mod. You just have to play with the advanced parameter and RGB column to choose the intensity and colors that you want to give on your mod. Here is an example with Durga Mecha HLOD mod, she have custom blue Rim Light : And here the property inside MtrlCol advanced parameters : IMPORTANT NOTE : Rim Light IS NOT Cel Shading. You can't add black Rim Light. _________________ More to explain later. Please keep in mind all of this are explained ONLY by experiments over years using the tool.
-
 View File SynthUtil - Companion tools for xVASynth voice generation Open source and released under GPL-3.0 License: https://github.com/Athena-6/SynthUtil/ .NET Framework 4.7.2 or newer required: https://dotnet.microsoft.com/download/dotnet-framework/thank-you/net472-web-installer Introduction of Functions: > Generates generic* .lip files for a whole directory of .wav files based on matching integer durations from 1 to 30 seconds > Edits .csv files generated for xVASynth, able to batch replace words and/or group lines by voice type > Preprocessing (CPU-based smoothing and resampling) audio for Creation Kit .lip generation (Fixes associated Creation Kit errors and crashes during lip generation) *The .lip files generated are *generic* and not as perfect as ones generated by Creation Kit so please do try to use that first. I will try to add more functionality in the future, whatever seems to help me in my personal workflows. Submitter Executaball Submitted 07/17/2021 Category Regular Mods Requires .NET Framework 4.7.2 Regular Edition Compatible Not Applicable
 -
 The specific mod is this one: It gives you an MUCH easier way to access racemenu to edit an specific NPC if there is some mod on skyrim similar, i dont know the name, so yeah... a bit of help here? SnapSave.io-🤨🧐🥵.mp4
 -
Version Version 0.7
2,796 downloads
THIS IS Fallout 4 Random Painting Generator! (PLEASE FOLLOW THIS FILE / TOPIC IF YOU WANT TO BE SURE TO ALWAYS HAVE THE LATEST VERSION. UP UNTIL V1.0 REGULAR VERSIONS MIGHT BE RELEASED). If you like this software, please give it a positive rating. I take feature requests, as long as I like the idea. - Do you want to have more diverse paintings in game? - Do you want those Paintings to be based on your own collection of images, different each time you run the game, or whenever you feel like it? - Do you want the paintings to be lore friendly if you want to, or look brand spanking new if you're in the mood? - Do you want to be able to fill paintings of the Commonwealth with your own photo's (or adult imagery)? If the answer to all of those questions is yes then look no further! For I have created the first stable build of FO4WC, which was my way of creating the means to have different RANDOM paintings each time I run Fallout 4. Which produces output such as this, in game (just imagine it's your own images): But I had some conditions while making it! - It should NOT be a Fallout 4 mod, I wanted no dependancies on mod breaking updates from Bathesda as I will not support this tool for long; it should be stable and it does what it's designed to do. - It should be LORE FRIENDLY when I want to and I should have a lot of tweaking options for both source image selection and the way the end result looked. - I wanted paintings to be able to look aged, worn, have contrast added (or faded) etc..etc.. or brand-new. - It should be RANDOM so I could be surprised each time I play through Fallout 4 - I wanted to give modders an opportunity to quickly create custom paintings for release When looking at all of this, I decided on creating a stand alone application called FO4WC. It uses NvidiaTexture Tools at it's core to convert created art into DDS files. What you can do with F04WC (Features) - You MAY create (and release) your own custom galleries with this tool. You can easilly release them as 'your own hard work' but it would be nice if you say somewhere that you used this software. It's sort of the right, it's the not-egocentrical not-self-centered not-bastard thing to do. - The tool automatically creates all the files in the right place. Run the tool, run the game, nothing else (unless you want to). - Create single image paintings, based on a text file list of images, or a set of selected folders, with a minimum of 132 images (88 if you use regular output only) so it can draw from the image pool. - Create double images if horizontal aspect images cannot be found using a smart algorhythm to find images within the same series of images where possible (this works especially well with porn series, as you get 'twins' of sets that make the ratio work a lot better and look like they belong together). - I've implemented very RUDIMENTARY AI into the program. If you enable 'Search for source pictures with Aspect Ratio of target' the application will try to find images best suited to the output dimensions of the paintings as they are used in Fallout 4. - Optimised routines for recognising types of images that were painted / wallpaper format You have a lot of output options: - Different cropping methods - Adjust image contrast (from 0.5 to 1.5) - Filter source images to only pick large images - Add many different image folders, then only pick 'x' random pictures per folder for a natural division of images in the eventual output. - Sequentially read files during the batch (Ascending or Descending) - Add aging options No aging / Light aging / Extra aging - Add a canvas (or not) - Add lines around the images on the canvas itself (or not) - Export to small (512x256) or large paintings (1024x1024 / 2048 / 4096). - Choose any arbitrary output folder (then rename files for your own custom galleries) Combinations of settings above led me to hours of tweaking and fiddling, so my guess is that you'll have fun with this! REQUIREMENTS: - .NET 4.0 Framework (most PC's have it these days) - Windows Vista, 7,8,10. Perhaps it'll run on WINE, not sure. - It's a standalone executable and should 'just work'. If it doesn't, well it's in alpha for a reason. - NvDxt.exe was included in this release. THINGS TO LOOK OUT FOR! - The Image Quality is very FINNICKY and works like this: For photographic (or adult) images choose 'Normal quality'. This is best optimised for such input! For DRAWINGS (e.g. real paintings or cartoons) choose Production or Higher quality. The reason for this is that the compressor of NVidia likes to add a lot of noise in higher quality images, making especially photography look weird and painted in DDS form, this is also because of the way that DXT compression works, but that's a whole different discussion. In any case, just remember the rules as stated above, or experiment for yourself on what you find is the best setting for you. Tips for tool usage: - Download vintage images, they look great and absolutely lore friendly. - Darker backgrounds work very well with the tool - Try to mix your source folders 50/50 between landscape and portrait images, it makes the tool's rudimentary ai feel nice and secure, and warm and fuzzy inside. - If all the images are landscape (as it would be if you chose your 'wallpapers' folder) then TURN OFF the 'search for source pictures with aspect ratio of target' option. Because the tool will be searching long and hard for something that doesn't exist. The options at the top right can work confusing: - Recursive Means that during the batch, each folder shown will be recursively read. (So adding folders to the list itself by pressing 'add' will NOT add folders recursively, but all images in the folders and their subfolders are read when this option is enabled). Turn this option off, if your images folder has subfolders with images that you don't want to add to your paintings in Fallout 4. - Limit images per folder Means that for each folder listed only a maximum of that number of images will be read for random selection. - Limit Total Batch Images Means to limit the total number of images that are read during the batch - Sequential read during batch Means that the images in the folders will be read in a sequential manner, instead of randomly. If you run into a bug please do the following: - Rerun the tool with the same settings and choose 'maintaing error log' then attached the created export.log file into a post and reply to this thread. I might ask follow up questions such as 'where did you download that great adult collection' or 'how many files were in the source directory', I might even ask something serious, such as 'What the hell dude, horses??? Really??'. Disclaimer: NOTHING beats manually creating galleries and tweaking each image by hand. If you are a quality freak then this is not the tool for you, go away, and certainly don't complain to me about image quality. If you do, you will be laughed at and ridiculed. By the way, this tool gets DAMNED close to professional quality. If you love versatility in your games like I do, then this is the exact right tool for you! -

Version 0.5.0
664 downloads
This is NOT a mod You can not "install" it as a mod and call it a thing. You will need to follow the instructions first. And understand what it does and what it does not. Starting from version 0.1.0 you can install the files of it as a mod, it will properly place the tool into the Apropos folder. You will stil need to follow the instructions for getting PHP environment in case you don't have one. Disclaimer If you decide to use this software, you use it as is and to your own risk. If you use this tool, like it and modified the config to your liking and want to support the community - please share your config.json! Description This is a simple script written in php. What it does? It allows you to filter unwanted animation phrases from Apropos. The filter works in two ways: Based on a banned word. This filter will try to find a properly terminated word that is in the banned list and remove any phrases that contain these words. Based on a synonym. This is very similar to words, but it will enclose the filtered word into the synonym braces and thus it's much safer to use How To Install You will need to have php environment in your system, place the script to the Apropos DB folder and run it. Again: Go to PHP site. Download the interpreter. Here's the link for the latest windows ones (7.4.2 at the moment of writing of this post). Extract the zip to somewhere Make sure to add PHP to your system PATH variable. This is important! Or else calling a script via "php" command will fail. Here's how to do it in Windows 10. Install this mod via any mod manager Open command line, you can do this with hitting Windows+R keys and then typing cmd command Go to the Apropos DB installation path (use cd command in the terminal for that) Run the script with php updater.php or double-click the updater.bat file If you did everything correctly, you will see the script going through the database and modifying the files. How To Customize First thing first - this is a file I wrote for myself when I wanted to remove some of the stuff from Apropos DB. "Default" filters are done to my liking. You may or may not agree with it - that's not the point. You can easily modify the filters. There are a lot of comments I added before publishing the script and I might be not the best engineer, but I hope the comments are self-explanatory. For filters you want to touch these config values: "blacklist" : { "words": [...] } - for banned words, and "blacklist" : { "synonyms": [...] } - for banned synonyms. See above what is the difference (and it is also mentioned in the script comments). Another dimension of customization is to use file blacklisting. You can add files that you do not want to process into the filesToSkip config array. Initially it was created to skip global DB files like Synonyms.txt but will do the trick just fine for any other file. Example: if you want to remove bestiality references from non-bestiality animations phrases only, you can achieve it by adding bestiality-related keywords to the banned entries/synonyms and then also adding bestiality file names to the blacklist (this should also work on directories, so if you add a directory name then the entire file set under this directory will not be processed) More? Not much more to add. Just play with the variables and adjust them to your liking. Why? I like Apropos idea, but I do not like certain things, like bestiality, orgies, public sex etc etc - the list can go on, it's not the point. The point is that there are 2.2k+ files in apropos db and manually fixing them after every update would be impossible. And I needed to fix it every time because Apropos is not very well set by default. A virgin PC yells "you're better than those giants"? ... a scene in complete seclusion in an inner cell causes "the guys start to cheer on"? ... Huh? ... So I let the software to do the trick. Also, why php? I happen to have an interpreter installed already. I could've done in in java so that users can just double-click the precious .jar, but it takes some effort (and in java I then would probably need to add support for config files if I want to modify filters / anything else in the software and it's just too much hassle for such a simple task) -
Version 1.0.4
2,813 downloads
Hello everyone, this is a small application that I made for myself in a hurry. I'm not sure that this forum is the best place for such utilities, but since the main task of this application for me is inextricably linked with the content from this forum, I decided to share it here. Correct me, if I'm wrong ? Description I often come across releases of some kind of creative work (sims, lots, etc.), in which the author includes absolutely all the custom content used in the creation. And, unfortunately, I always passed such releases because of the problem of duplicate files. A lot of the custom content that comes with the releases is already in my mods folder. Structured. I'm not sure I fully understand how EA solves duplicate mods folder problems, but as a developer I can tell you for sure that the physical memory of my disk and the RAM of the EA process are not infinite ? This utility allows you to scan your mods folder and your desired custom content folder in order to find only those files that you don't actually have. As a result, you will get a new folder with custom content that you can safely place in your mods folder. Note: this is proof of concept app, which can have bugs. If you have any questions or comments please contact me, I will try to help. Note 2: You may require .NET Runtime, 99% chance that you have one already, but in case if not, just download latest for Desktop apps. Version 1.0.1 Fast Scan added. You can find it in new panel for settings (on by default) With Fast Scan new.mp4 Without Fast Scan old.mp4 -
Version 1.1.0 (Beta)
276 downloads
Open source and released under GPL-3.0 License: https://github.com/Athena-6/SynthUtil/ .NET Framework 4.7.2 or newer required: https://dotnet.microsoft.com/download/dotnet-framework/thank-you/net472-web-installer Introduction of Functions: > Generates generic* .lip files for a whole directory of .wav files based on matching integer durations from 1 to 30 seconds > Edits .csv files generated for xVASynth, able to batch replace words and/or group lines by voice type > Preprocessing (CPU-based smoothing and resampling) audio for Creation Kit .lip generation (Fixes associated Creation Kit errors and crashes during lip generation) *The .lip files generated are *generic* and not as perfect as ones generated by Creation Kit so please do try to use that first. I will try to add more functionality in the future, whatever seems to help me in my personal workflows. -
Version 0.9.0
1,995 downloads
Intorduction Rubber Duck’s SAKR/RCP Gen is a simple tool to help you patch armor and clothing mods for Skimpy Armor Keyword Resource (SAKR) and RobCo Patcher (RCP). It’s designed to be easy and convenient to use. Requirements Microsoft .NET Desktop Runtime 6 xEdit (FO4Edit) Skimpy Armor Keyword Resource (v1.1.0+) RobCo Patcher (v2.8.1+) Some clothing mods... (optional) BodySlide & Outfit Studio How it works RD’s SAKR/RCP Gen reads data from CSV file. To get the proper CSV file, one must use xEdit to export all the necessary data to it. Obviously, the xEdit script I'm using is included as I wrote it myself specifically for this program. Once CSV file has been loaded, it shows you the content of the loaded file and allows you to select SAKR keywords for every item inside the file. Once you’ve added keywords to items, it writes your changes to INI which you then need to copy/move to proper location. I know this sounds vague, see the tutorial for details and step-by-step instructions (with screenshots!). User Documentation Available here. My SAKR Repository Check it out here. Special thanks twistedtrebla for amazing work on SAKR (as well as other mods!) Zzyxzz for RobCo Patcher as well as other mods People who provided their patches for my SAKR Repo Microsoft for VS22 & .NET Source Code Available once I polish some things out; will probably become available for v1.0.0. Changelog -
Version 1.0.1
611 downloads
Description This is a simple tool for exporting your slavetattoo's into the format required for RapeTattoos, along with automated positioning based on reference color-based maps. Just quickly threw it together so I wouldn't have to go through the hassle of manually mapping out tattoos. It supports only face, and body. Not for any other reason other then I was too lazy to do hands. Although programmatically, it would be extremely simple to include if you want to (Just a matter of copy/pasting) How to use Click the Exporter.exe to open the program. (Or compile the software from the source) Put the absolute path of your slavetats folder for your desired mod. IE: C:\SkyrimSEMods\mods\SlaveTats AIO5\Textures\Actors\Character\slavetats\ Allow the program to read all your SlaveTattoo json files for information, then your DDS files for mapping out the physical position tats_output.json will be generated after the software is complete. Copy the elements into your Documents\My Games\Skyrim Special Edition\JCUser\rTats\settings.json file from RapeTattoos, and or your template file from the mod. Run your settings.json file through an online JSON format validator to insure there's no errors: https://jsonlint.com/ How to modify position definitions All the body parts are crudely defined by colors exact colors (RGB). You just grab a female body texture, and paint it the specific colors contained inside my reference pictures. You MUST retain the original sizes, which is 1024x1024 for the body and 512x512 for the face. License MIT - https://choosealicense.com/licenses/mit/ You can do WHATEVER you want with the source-code or binaries. I do not care Known Issues Little error handling regarding the DDS file formats. If the program force-exits, chances are your DDS file isn't in ARGB format, or an unsupported DDS format Does not map HAND tattoos yet due to lazyness Probably mixed up left/right on some of the arms/legs. Easily corrected by just color swapping Assumes your files are all RGBA Other Virus-Total: https://www.virustotal.com/gui/file/d4fcb7c5f97df720a09f452f730ee9db88e94cdf86145feb2d4ab22999ef4f63/detection -
Version 1.6.2
3,403 downloads
Helper tool to set up slider sets and body morphing for Rad Morphing Redux. With RMR Helper you can completely configure Rad Morphing Redux and preview the morph changes without starting Fallout 4. Features Completely configure Rad Morphing Redux Preview morphs at all stages via BodySlide Automatically set up RMR slider sets to morph from one body preset into another Load, save, switch between multiple RMR configurations RmrHelper_BodySlide.mp4 Dependencies Rad Morphing Redux BodySlide Installing Install with your mod manager of choice. The application should end up in .../Data/Tools/RmrHelper/ Uninstalling Uninstall with your mod manager. RMR Helper does not interact in any way with the game itself, so it does not affect your savegames. How to use Start BodySlide Open the preview window Select the body (naked body or an outfit for that body) and preset you are using The BodySlide window does not have to be in the foreground, but must not be minimized. Start RMR Helper (your current RMR configuration is automatically loaded) Select the body you are using Select the preset you are using Use the Triggers tab to add additional triggers and change the trigger value to morph BodySlide's preview Use the Slider Sets tab to configure your slider sets. Descriptions for each settings can be found on RMR's mod page. Use the Overrides tab to configure overrides for the slider sets (see Global Overrides in RMR's settings). Preset-to-Preset ... Let RMR Helper automatically set up sliders to morph from the current preset into a second preset. Reconnect BodySlide If you opened RMR Helper before BodySlide or for other reasons RMR Helper loses track of BodySlide, click here to find it again. Save RMR INI Save the current settings into the MCM ini file used by Fallout 4 Save as ... Save the current settings into a file somewhere on your system. Open ... Open an MCM ini file from somewhere on your system. MO2 Apparently using RMR Helper with MO2 is a little more complicated. Thanks to @Chupacabra Gonzales for providing a quick how-to. Troubleshooting Starting with version 1.1.0 of RmrHelper, a log file is generated in the same directory as the application. If you are experiencing issues getting RMR Helper to work, please provide the log file (.../Data/Tools/RmrHelper/RmrHelper_log.log) for investigation. Source Code The full source code is available on GitHub. Changelog -
Version 1.0.0
155 downloads
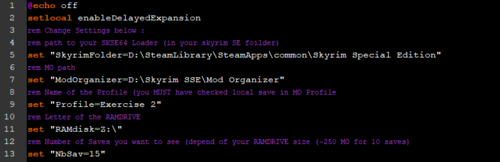
Skyrim RAM Savegames Make your Saves in RAM instead of HDD. What's the purpose ??? i was fed up having this freeze while my game was auto-saving. One of the reason that happens, is linked to the time access to your HDD. Saving to a RAMdisk, could be a boost if you think your saves kill your game. It will not eradicate the freeze, but will remove the time access linked to your HDD. This Tool works in conjunction with ModOrganizer 2 and a RAMdisk Software This tool will use a RAMdrive to save your game and synchronize (every 5 secondes) them with your local MO2 profile saves. You'll need a RAM drive tool as Dataram RAMdisk (freeware for personnal use, up to 1Gb RAMdisk), other similar softwares are available, i didn't check them all. How to install : 0) Pre-requirement : - you must use a MO2 profile with local save checkec, in MO2=>Profile=>Manage : - do a personnal backup of your current local saves, you'll find them in %MO2folder%\Profiles\YourProfile\Saves 1) Mount your RAMdisk using a RAMdisk software (i will provide a tutorial later if i have time) adviced configuration : exFAT/FAT32 and a size of 250Mb. the size of RAMdisk is adviced for a 16Gb RAM configuration, you'll be able to stock 10 to 15 saves (probably more) 2) Unrar files in your preferred folder of choice, the two files must stay together 3) Open the file launch.bat and configure the first lines : rem Change Settings below : rem path to your SKSE64 Loader (in your skyrim SE folder) set "SkyrimFolder=D:\SteamLibrary\SteamApps\common\Skyrim Special Edition" rem MO path set "ModOrganizer=D:\Skyrim SSE\Mod Organizer" rem Name of the Profile (you MUST have checked local save in MO Profile) set "Profile=Exercise 2" rem Letter of the RAMDRIVE set "RAMdisk=Z:\" rem Number of Saves you want to see (depend of your RAMDRIVE size (~250 Mb for 10 saves) set "NbSav=15" 4) in MO2 create a new Executable Tab : You will have to launch Skyrim SE from this tab now Change the arguments line with the path to place you installed Launch.vbs 5) Launching "Launch Skyrim" in MO2, will : - Copy the last most recent 'NbSav' saves (you configured in 3) ) on the RAMdisk - create a temporary saves.sync folder in your MO2 Profile folder - launch SKS64_launcher.exe (launch the game) - at this point all your saves from the game will go on the RAM disk - every 5 seconds if needed the new files created on RAMdisk will be synchronized on your HDD (saves.sync folder) - you will always only see the last most recent 'NbSav' ingame - when you quit Skyrim, saves.sync folder will be resynchronized correctly (renamed) as normal profile save folder. IMPORTANT : Launch skyrim and test that all work has attended, before using it commonly. i am not responsible for any damages caused by this tool : you will have to use it at your own risk. The code is open and configurable as wheel, so you can modify it as you wish and take responsibility of your actions. 6) if something bad happen : - go in %MO2folder%\Profiles\YourProfile, if "saves.sync" folder exist but not the folder "saves", just rename it "saves" - go on your RAMdisk and copy files to %MO2folder%\Profiles\YourProfile\saves - or as last resort : manually restore your backup done in 0) Post-Scriptum : At this state of development, this tool only works for Skyrim SE, but it's probably easy to change it to works with Skyrim LE. It would be possible to make it work without SKSE and probably outside MO2 (or with MO2 and without local saves). If you're a Batch Guru, you're adviced. -
View File Skyrim RAM savegames Skyrim RAM Savegames Make your Saves in RAM instead of HDD. What's the purpose ??? i was fed up having this freeze while my game was auto-saving. One of the reason that happens, is linked to the time access to your HDD. Saving to a RAMdisk, could be a boost if you think your saves kill your game. It will not eradicate the freeze, but will remove the time access linked to your HDD. This Tool works in conjunction with ModOrganizer 2 and a RAMdisk Software This tool will use a RAMdrive to save your game and synchronize (every 5 secondes) them with your local MO2 profile saves. You'll need a RAM drive tool as Dataram RAMdisk (freeware for personnal use, up to 1Gb RAMdisk), other similar softwares are available, i didn't check them all. How to install : 0) Pre-requirement : - you must use a MO2 profile with local save checkec, in MO2=>Profile=>Manage : - do a personnal backup of your current local saves, you'll find them in %MO2folder%\Profiles\YourProfile\Saves 1) Mount your RAMdisk using a RAMdisk software (i will provide a tutorial later if i have time) adviced configuration : exFAT/FAT32 and a size of 250Mb. the size of RAMdisk is adviced for a 16Gb RAM configuration, you'll be able to stock 10 to 15 saves (probably more) 2) Unrar files in your preferred folder of choice, the two files must stay together 3) Open the file launch.bat and configure the first lines : rem Change Settings below : rem path to your SKSE64 Loader (in your skyrim SE folder) set "SkyrimFolder=D:\SteamLibrary\SteamApps\common\Skyrim Special Edition" rem MO path set "ModOrganizer=D:\Skyrim SSE\Mod Organizer" rem Name of the Profile (you MUST have checked local save in MO Profile) set "Profile=Exercise 2" rem Letter of the RAMDRIVE set "RAMdisk=Z:\" rem Number of Saves you want to see (depend of your RAMDRIVE size (~250 Mb for 10 saves) set "NbSav=15" 4) in MO2 create a new Executable Tab : You will have to launch Skyrim SE from this tab now Change the arguments line with the path to place you installed Launch.vbs 5) Launching "Launch Skyrim" in MO2, will : - Copy the last most recent 'NbSav' saves (you configured in 3) ) on the RAMdisk - create a temporary saves.sync folder in your MO2 Profile folder - launch SKS64_launcher.exe (launch the game) - at this point all your saves from the game will go on the RAM disk - every 5 seconds if needed the new files created on RAMdisk will be synchronized on your HDD (saves.sync folder) - you will always only see the last most recent 'NbSav' ingame - when you quit Skyrim, saves.sync folder will be resynchronized correctly (renamed) as normal profile save folder. IMPORTANT : Launch skyrim and test that all work has attended, before using it commonly. i am not responsible for any damages caused by this tool : you will have to use it at your own risk. The code is open and configurable as wheel, so you can modify it as you wish and take responsibility of your actions. 6) if something bad happen : - go in %MO2folder%\Profiles\YourProfile, if "saves.sync" folder exist but not the folder "saves", just rename it "saves" - go on your RAMdisk and copy files to %MO2folder%\Profiles\YourProfile\saves - or as last resort : manually restore your backup done in 0) Post-Scriptum : At this state of development, this tool only works for Skyrim SE, but it's probably easy to change it to works with Skyrim LE. It would be possible to make it work without SKSE and probably outside MO2 (or with MO2 and without local saves). If you're a Batch Guru, you're adviced. Submitter Barzing Submitted 12/20/2020 Category Regular Mods Requires RAMdrive software, ModOrganizer 2, Windows 10 Regular Edition Compatible
-
 Fallout 4 - Random Painting Generator View File THIS IS Fallout 4 Random Painting Generator! (PLEASE FOLLOW THIS FILE / TOPIC IF YOU WANT TO BE SURE TO ALWAYS HAVE THE LATEST VERSION. UP UNTIL V1.0 REGULAR VERSIONS MIGHT BE RELEASED). If you like this software, please give it a positive rating. I take feature requests, as long as I like the idea. - Do you want to have more diverse paintings in game? - Do you want those Paintings to be based on your own collection of images, different each time you run the game, or whenever you feel like it? - Do you want the paintings to be lore friendly if you want to, or look brand spanking new if you're in the mood? - Do you want to be able to fill paintings of the Commonwealth with your own photo's (or adult imagery)? If the answer to all of those questions is yes then look no further! For I have created the first stable build of FO4WC, which was my way of creating the means to have different RANDOM paintings each time I run Fallout 4. Which produces output such as this, in game (just imagine it's your own images): But I had some conditions while making it! - It should NOT be a Fallout 4 mod, I wanted no dependancies on mod breaking updates from Bathesda as I will not support this tool for long; it should be stable and it does what it's designed to do. - It should be LORE FRIENDLY when I want to and I should have a lot of tweaking options for both source image selection and the way the end result looked. - I wanted paintings to be able to look aged, worn, have contrast added (or faded) etc..etc.. or brand-new. - It should be RANDOM so I could be surprised each time I play through Fallout 4 - I wanted to give modders an opportunity to quickly create custom paintings for release When looking at all of this, I decided on creating a stand alone application called FO4WC. It uses NvidiaTexture Tools at it's core to convert created art into DDS files. What you can do with F04WC (Features) - You MAY create (and release) your own custom galleries with this tool. You can easilly release them as 'your own hard work' but it would be nice if you say somewhere that you used this software. It's sort of the right, it's the not-egocentrical not-self-centered not-bastard thing to do. - The tool automatically creates all the files in the right place. Run the tool, run the game, nothing else (unless you want to). - Create single image paintings, based on a text file list of images, or a set of selected folders, with a minimum of 132 images (88 if you use regular output only) so it can draw from the image pool. - Create double images if horizontal aspect images cannot be found using a smart algorhythm to find images within the same series of images where possible (this works especially well with porn series, as you get 'twins' of sets that make the ratio work a lot better and look like they belong together). - I've implemented very RUDIMENTARY AI into the program. If you enable 'Search for source pictures with Aspect Ratio of target' the application will try to find images best suited to the output dimensions of the paintings as they are used in Fallout 4. - Optimised routines for recognising types of images that were painted / wallpaper format You have a lot of output options: - Different cropping methods - Adjust image contrast (from 0.5 to 1.5) - Filter source images to only pick large images - Add many different image folders, then only pick 'x' random pictures per folder for a natural division of images in the eventual output. - Sequentially read files during the batch (Ascending or Descending) - Add aging options No aging / Light aging / Extra aging - Add a canvas (or not) - Add lines around the images on the canvas itself (or not) - Export to small (512x256) or large paintings (1024x1024 / 2048 / 4096). - Choose any arbitrary output folder (then rename files for your own custom galleries) Combinations of settings above led me to hours of tweaking and fiddling, so my guess is that you'll have fun with this! REQUIREMENTS: - .NET 4.0 Framework (most PC's have it these days) - Windows Vista, 7,8,10. Perhaps it'll run on WINE, not sure. - It's a standalone executable and should 'just work'. If it doesn't, well it's in alpha for a reason. - NvDxt.exe was included in this release. THINGS TO LOOK OUT FOR! - The Image Quality is very FINNICKY and works like this: For photographic (or adult) images choose 'Normal quality'. This is best optimised for such input! For DRAWINGS (e.g. real paintings or cartoons) choose Production or Higher quality. The reason for this is that the compressor of NVidia likes to add a lot of noise in higher quality images, making especially photography look weird and painted in DDS form, this is also because of the way that DXT compression works, but that's a whole different discussion. In any case, just remember the rules as stated above, or experiment for yourself on what you find is the best setting for you. Tips for tool usage: - Download vintage images, they look great and absolutely lore friendly. - Darker backgrounds work very well with the tool - Try to mix your source folders 50/50 between landscape and portrait images, it makes the tool's rudimentary ai feel nice and secure, and warm and fuzzy inside. - If all the images are landscape (as it would be if you chose your 'wallpapers' folder) then TURN OFF the 'search for source pictures with aspect ratio of target' option. Because the tool will be searching long and hard for something that doesn't exist. The options at the top right can work confusing: - Recursive Means that during the batch, each folder shown will be recursively read. (So adding folders to the list itself by pressing 'add' will NOT add folders recursively, but all images in the folders and their subfolders are read when this option is enabled). Turn this option off, if your images folder has subfolders with images that you don't want to add to your paintings in Fallout 4. - Limit images per folder Means that for each folder listed only a maximum of that number of images will be read for random selection. - Limit Total Batch Images Means to limit the total number of images that are read during the batch - Sequential read during batch Means that the images in the folders will be read in a sequential manner, instead of randomly. If you run into a bug please do the following: - Rerun the tool with the same settings and choose 'maintaing error log' then attached the created export.log file into a post and reply to this thread. I might ask follow up questions such as 'where did you download that great adult collection' or 'how many files were in the source directory', I might even ask something serious, such as 'What the hell dude, horses??? Really??'. Disclaimer: NOTHING beats manually creating galleries and tweaking each image by hand. If you are a quality freak then this is not the tool for you, go away, and certainly don't complain to me about image quality. If you do, you will be laughed at and ridiculed. By the way, this tool gets DAMNED close to professional quality. If you love versatility in your games like I do, then this is the exact right tool for you! Submitter Reginald_001 Submitted 08/28/2016 Category Models & Textures Requires .Net 4.0 (Most systems have it already)
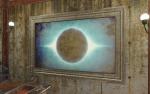


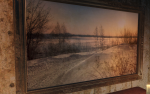
-
Apropos DB Filter View File This is NOT a mod You can not "install" it as a mod and call it a thing. You will need to follow the instructions first. And understand what it does and what it does not. Starting from version 0.1.0 you can install the files of it as a mod, it will properly place the tool into the Apropos folder. You will stil need to follow the instructions for getting PHP environment in case you don't have one. Disclaimer If you decide to use this software, you use it as is and to your own risk. If you use this tool, like it and modified the config to your liking and want to support the community - please share your config.json! Description This is a simple script written in php. What it does? It allows you to filter unwanted animation phrases from Apropos. The filter works in two ways: Based on a banned word. This filter will try to find a properly terminated word that is in the banned list and remove any phrases that contain these words. Based on a synonym. This is very similar to words, but it will enclose the filtered word into the synonym braces and thus it's much safer to use How To Install You will need to have php environment in your system, place the script to the Apropos DB folder and run it. Again: Go to PHP site. Download the interpreter. Here's the link for the latest windows ones (7.4.2 at the moment of writing of this post). Extract the zip to somewhere Make sure to add PHP to your system PATH variable. This is important! Or else calling a script via "php" command will fail. Here's how to do it in Windows 10. Install this mod via any mod manager Open command line, you can do this with hitting Windows+R keys and then typing cmd command Go to the Apropos DB installation path (use cd command in the terminal for that) Run the script with php updater.php or double-click the updater.bat file If you did everything correctly, you will see the script going through the database and modifying the files. How To Customize First thing first - this is a file I wrote for myself when I wanted to remove some of the stuff from Apropos DB. "Default" filters are done to my liking. You may or may not agree with it - that's not the point. You can easily modify the filters. There are a lot of comments I added before publishing the script and I might be not the best engineer, but I hope the comments are self-explanatory. For filters you want to touch these config values: "blacklist" : { "words": [...] } - for banned words, and "blacklist" : { "synonyms": [...] } - for banned synonyms. See above what is the difference (and it is also mentioned in the script comments). Another dimension of customization is to use file blacklisting. You can add files that you do not want to process into the filesToSkip config array. Initially it was created to skip global DB files like Synonyms.txt but will do the trick just fine for any other file. Example: if you want to remove bestiality references from non-bestiality animations phrases only, you can achieve it by adding bestiality-related keywords to the banned entries/synonyms and then also adding bestiality file names to the blacklist (this should also work on directories, so if you add a directory name then the entire file set under this directory will not be processed) More? Not much more to add. Just play with the variables and adjust them to your liking. Why? I like Apropos idea, but I do not like certain things, like bestiality, orgies, public sex etc etc - the list can go on, it's not the point. The point is that there are 2.2k+ files in apropos db and manually fixing them after every update would be impossible. And I needed to fix it every time because Apropos is not very well set by default. A virgin PC yells "you're better than those giants"? ... a scene in complete seclusion in an inner cell causes "the guys start to cheer on"? ... Huh? ... So I let the software to do the trick. Also, why php? I happen to have an interpreter installed already. I could've done in in java so that users can just double-click the precious .jar, but it takes some effort (and in java I then would probably need to add support for config files if I want to modify filters / anything else in the software and it's just too much hassle for such a simple task) Submitter Operand Submitted 02/09/2020 Category Other Requires Special Edition Compatible Not Applicable


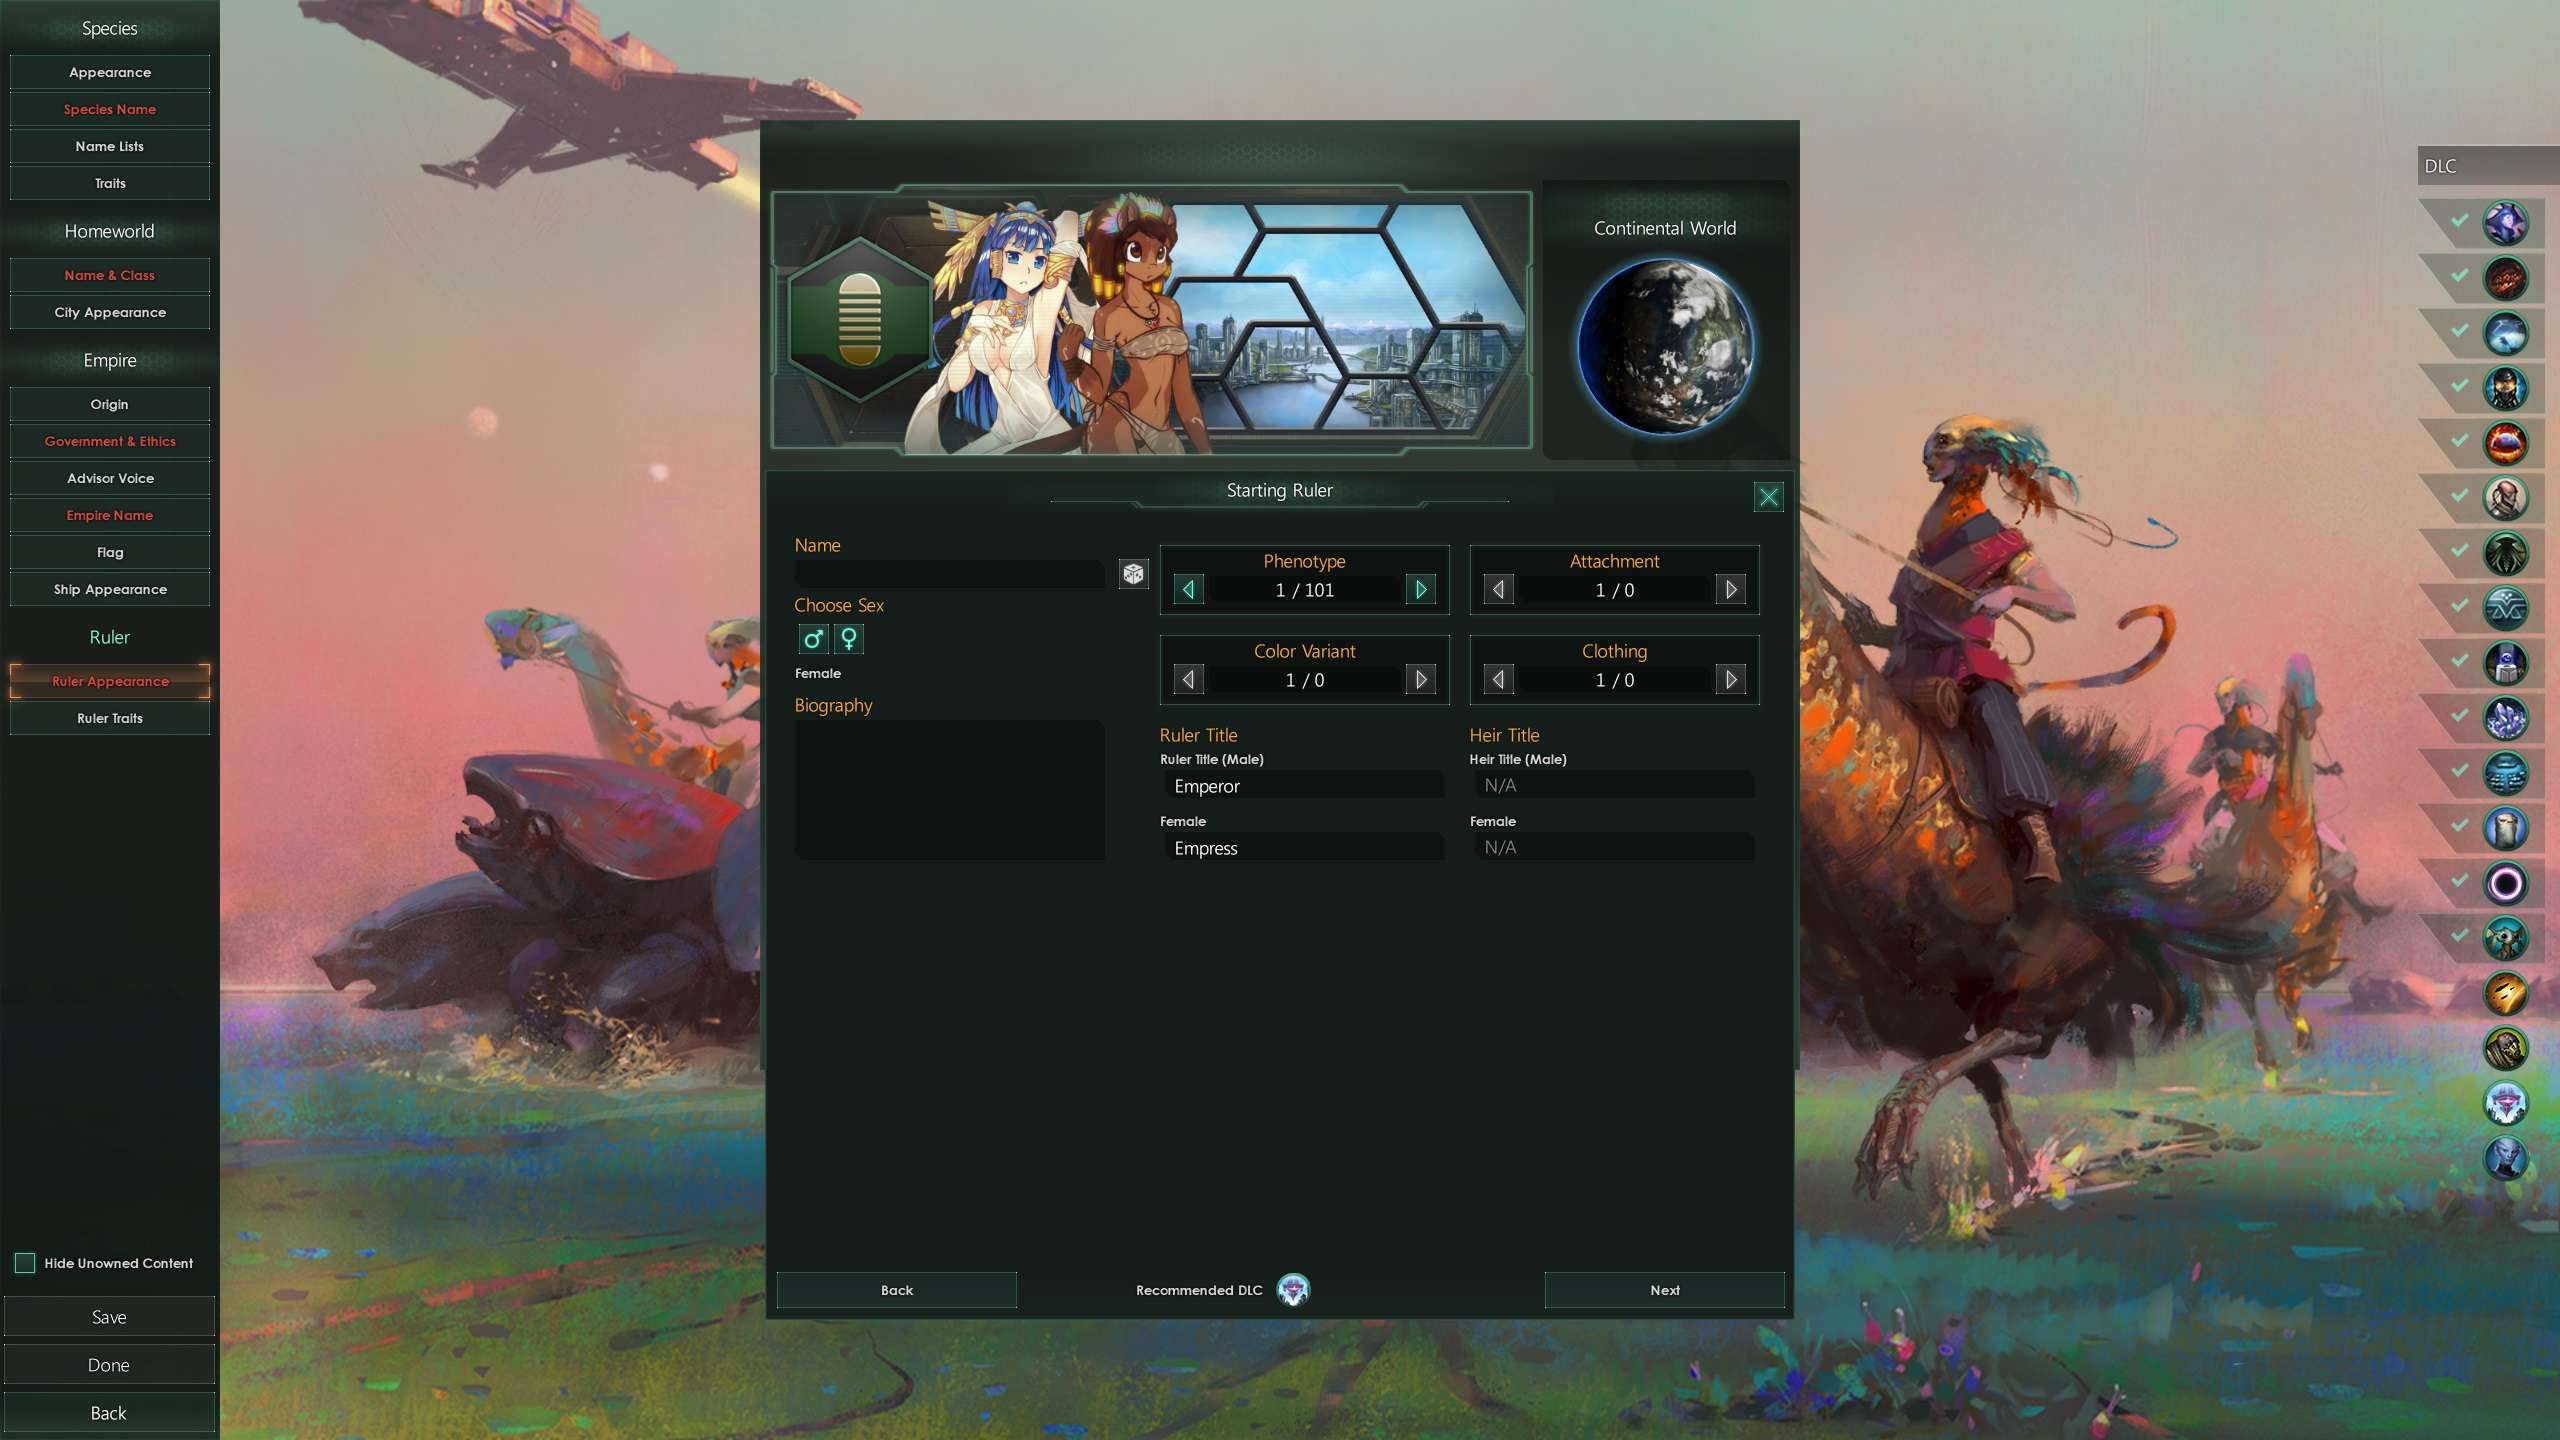
.thumb.png.5d12637319fdcf07d57a6b1fdb2f402f.png)