Search the Community
Showing results for tags 'mod organizer'.
Found 10 results
-
 First, I apologize if this seems like a lot of text, but I would like to express all my context to give you the best possible background. You see, I'm writing this post because I have a problem: I want to convert FO4 into a Mad Max but absolutely NSFW. I have followed one of the forums that I believe is the intro to all FO4 NSFW forums and have even used the modpack "Wasteland of Depravity" but it still doesn't convince me. Let me explain... My frustration is that I feel that many of the mods or the modded game itself end up saturating me with options that I ultimately don't want or don't use. Adding the number of bugs from both the base game and those that the mods might cause gives the mods a bitter taste. So, I want to come to you to see if you could guide me based on the features I want to add and/or modify to the game, drawing from your experiences and knowledge. From the start, I would like to turn the game into a real Sodom and Gomorrah that would happen in a post-apocalyptic world without rules, but also give it some order, because some of the things that have made me write this post are: When sex scenes of any kind are "activated," they happen in a disorderly manner. For example, I made a house where I assigned several prostitutes inside, and suddenly I see them having sex outside when I had assigned them the house for the debauchery. When I assign BDSM furniture to them, the least thing that happens are scenes related to that machine (taking into account that I have the correct animations). Another detail is that sometimes the sex of the animations is swapped with respect to the NPCs' gender (which is funny, to be honest, but it still brakes the experience because it's not what you were expecting). I couldn't find a middle ground in the configurations of all the sex mods, as in the end, either the scenes never occurred or they occurred constantly. Weird bugs regarding rendering, such as texture failure, behavior failure, problems in the NPC task queue, abrupt animation changes, among others. Perhaps the request I am making is "too specific" or has not been realized in code, because as a developer, I also understand what the creation of mods implies and that each author has a different vision, and the player having multiple mods, many of them generate conflicts, in addition to the fact that each work/mod also has its good and bad details. That is why I come to you anyway, so you can illuminate the path for me a bit and achieve (I won't deny it) a "morbidly fluid experience." Given the context of my request, what I want to achieve in the game is: To be able to see, use, buy/sell (coherently) prostitutes/slaves for settlements, and even be able to assign them a work environment (sexual, of course). To be able to enslave all types of NPCs and have them maintain consistency during the dynamics of master and slave. To be able to visualize/use hard explicit sex, bestiality, incest, rape, kidnapping (although honestly, mutilations do not appeal to me; what I mentioned first is enough). The possibility of slavers arriving at my settlement intending to buy/sell people to me. Super Mutant settlements kidnapping, raping, killing (the classic, although the sexual part, I know it's not canonically possible). To have coherence in the previous interactions and not have abrupt jumps between states (although I will understand if this cannot be done due to the nature of the game engine and/or the animation manager or the animations themselves). Personally, I like big breasts, butts and thick bodies, but I would also like there to be a variety of bodies, since something that happened to me with BodySlide was that it left all the NPCs under the same standard. I would also like to homogenize the textures, because there are times when I see textures that don't fit with the rest of the theme, both in definition and general texture (I don't know if I'm explaining myself). I would like the NPCs' AI to be more "intelligent" and less clumsy (although here I am completely ignorant of whether there is a mod about it or not). To be able to choose a role and not the classic "let's save our spot at Vault-Tec with the freezer while the bombs fall.👀 I don't know if it's possible, but I would like the actions to genuinely generate discomfort in the NPCs when they don't like something, such as raping/enslaving and Piper sees it and opposes it (a natural thing in real life, right?).🤔 And well, I don't know if I'm missing any details to mention, but I would also like some translations for said mods into Spanish, or at least for the configurations/actions. The rest would be weapon mods, clothes, skimpy clothes (u know...). Finally, I know that perhaps many of the items mentioned in my list are impossible or do not exist directly, but I would still greatly appreciate your guidance on the matter, so in advance, thank you very much, guys.🙏
 -

tesv: skyrim [TESV:SKYRIM] [SUPPORT] Mod Organizer Tips
rydin posted a blog entry in Rydin's Modding Cove
This post was originally published in December 2016 and has been rewritten. One of the greatest tools I have personally used during my decade in playing and modding Skyrim is Mod Organizer. There are a couple of competitors, but I have found that Mod Organizer has become my go-to support for building my various playthroughs with acutely defined mod lists to make each new game slightly different. With this in mind, when I first wrote this blog post in 2016, I was still very fresh into that journey. I still had the habit of downloading everything and scanning over a mod’s requirement list without really considering the order of mods. I had come from Nexus Mod Manager (now replaced with Vortex Mod Manager), which, at the time, meant installing mods directly into the Data folder. This meant paying attention to the order of installs, something my over-excited and inpatient undiagnosed ADHD brain was unable to manage well at the time. Welcome Crash-To-Desktop, abbreviated to CTD—my old friend. Countless hours of installing, updating, removing, and re-ordering have brought me to be confident in using Mod Organizer today. Along that journey, I developed my own techniques and learned my way around the tool. I learned a lot from the Gopher video series on YouTube, while GamerPoets has a relatively simple video on getting started with the basics. But during my time, there were a couple of little tricks that I picked up, and knowing some of these may just help you, even when you are trying to fight against the rush to just get everything installed and get up and running. To help with your modding journey in the long run, here are some of my learns during my time that I want to share, as they might just help you. While this article primarily focuses on Skyrim, the same concepts can apply to other games in the Bethesda family. MAKE BASE PROFILES There’s always a mod that requires a new game in order to work, or you discover a trove of mods that could make a great new playthrough on a new character. Or maybe you just want to start from scratch? Such mods like Alternative Start – Live Another Life offers a quick way to skip the open sequence of Skyrim. With various add-ons to give you a plethora of options on how to start your adventure, it saves a lot of time when you want to get straight into a new game. But what about your mod list? In the days of upscaled textures, improved meshes, and redesigned visuals, setting up a new game could also include setting up a new mod list and ticking all of the appropriate mods to start out with. Having a base profile of mods that you will use every time you start is a great way to speed up that process. How to build this will highly depend on your play style and your favorite mods that you may have. Do you always play the same race or gender? Do you always start with the same scenario from Alternative Start? Do you prefer to start from a different location to the game’s default? Do you ignore the main quest altogether, or do at least the Helgen quest for the handful of mods that require you to be past this part in order to use them? These are things I consider when I make a base profile. I usually set mine up with mesh and texture upgrades, location improvements, and lightweight mods such as armor or weapon additions. I tend to leave script mods out due to the nature of how they implement themselves into the game unless they are particularly lightweight or complete. For example, I will load up SkyUI and RaceMenu as I prefer these interfaces, and these mods are mostly complete or have minimal updates and are quite lightweight. Patches are also a good idea to have in base profiles. While it’s useful to have a base profile, it’s still good to check those mods for updates through the updater in Mod Organizer before using them. LOAD HEAVY MODS IN SMALL CELLS This is more for Legacy Skyrim than the Special/Anniversary editions, but it is an option if you feel your system struggles with mods. Even though Special/Anniversary editions of Skyrim are a lot more stable, loading the mods in small cells will allow you to safely check out and test out any changes or updates. While 1.6.x hasn’t given me any problems, I find it handy to do from time to time, particularly if I’m looking at installing or updating a couple of script-heavy mods at once. KEEP A PERSONAL EDITS MOD Mods are becoming more intuitive. A lot of them now offer us ways to randomize or customize our games a lot more than we could previously, and with this comes an increased opportunity for users to tweak mods to their own preferences. But what is the best way to manage this? First, I’ll share what I recommend you not to do, and that is store your customizations directly in the mod that you are making tweaks to. Adding a customer body texture that you’ve worked on and made some edits to your liking—that’s great! But what if that mod comes to update, and you accidentally hit Replace, and the entire mod is replaced with a new instance leaving your custom texture gone, and you didn’t set for an auto-backup? Obviously, I hope that you created another back of your texture somewhere else, but we are looking worst possible scenario, and mistakes can happen. Backups are always encouraged, but there is another way to avoid this type of issue, and that is to create a personal mod that is to keep a personal edits mod. This is essentially creating a mod that sits at the bottom of your priority list and holds all your personal edits inside. Mod Organizer’s function to have a priority mod order means that adding this to the bottom of your mod list (but still having the correct Data structure inside) means that these files will always overwrite anything in the mod that is higher on the order list. And, if you install an update, your edits will not be touched (but still keep a backup, just in case). It would be handy to make a note of what edits you made to what mods, and this takes us nicely into the next tip! USE THE NOTES SYSTEM When you download a mod from the Nexus, it typically comes with all the metadata. Description, version number, link to to mod page, and other pieces of information to create a clean trail back should you need to check for any updates, changes, or instructions. This is particularly handy to have, but it only works on an information basis. It’s not unique to you and your setup, and this is where notes will come in handy. What if you need a certain version to run on your game version (1.5.x versus 1.6.x for example), or you have a certain version download that has features a new version has removed, but you want to keep the old version? It can become quite complicated over time to remember all these changes to the point that you accidentally download and overwrite a previous file, and suddenly, you lose those features, or your game starts to crash. The same applies to mods that you download which are not Nexus-based. These mods likely won’t have descriptions, version numbers, or other details and leave you more at risk of slipping up. While I encourage at least updating the version number and a link to the download page, we all know that mods can be more complex than this. Adding a note on a mod about your personal setup (or profile, if you have multiple) and needs to get your game to work can be a lifesaver. It serves as a reminder of what you may or may not want to download, what version you need, and if you really need to upgrade or stick with what you have. Unless you play every day and you have memorized your complete mod order and all appropriate mod version numbers, it’s likely that you may forget during breaks (I certainly have) and come back to just update everything to new versions without thinking twice. Simple notes are best, something that just keeps you right in times when you need that little nudge on what you did before. It’s important to note that notes are saved inside the INI files that Mod Organizer creates. If you install a new mod and use the Replace option, or if your mod has an INI file as an option and you use the Replace or Merge options, or even replace the whole folder, you will lose your notes. A way around this is to install your updated mod with a new name (I append my new update mods with the version number when installing to compare changes) and move your notes over to the new version before deleting the old one. - - - I hope that some of these suggestions are helpful and put a good case forward for you to consider. Not all of these will work for you, but the important thing is to find a system that works for you. Modding, even as an end-user adding these custom creations into your game, can be a lot of work. With a little forward planning, you can reduce the time spent raiding support posts on the mod and hunting Reddit threads looking for the answer and get you back up and running with less hassle than necessary. -
 TLDR: How do I arrange my mods in Skyrim (LE)? Manually categorizing them into a fixed scheme and by using ModOrganizer. Basically, I follow a guide by MissJennaBee (Expanded Towns and Cities mod) https://forums.nexusmods.com/index.php?/topic/753253-only-you-can-prevent-forest-fires/ Your ESM Files; Bug-Fix type Mods; Game Structure and/or UI Mods: Character Appearance Mods (For NPCs and Self); Mods that Add and/or Change Locations; * Mods that Add and/or Change Items; Mods that Add NPCs; Texture Mods; Environmental Mods (things like Climates of Tamriel, Sounds of Skyrim, etc.) Mods with Gameplay Changes; Reproccers, AV, and Bashed Patches On top, I am an avid player of SkyRe, or nowadays PerMa. For folks like me, Raulfin had added a bit of help for that raised level of complexity: https://forums.nexusmods.com/index.php?showtopic=2213034 And what about SL mods? Well, I try to categorize them into the scheme above and simply put them in there. And what about merging mods? I do! Heavily! But only those, that can fit together into the same type and slot. I never mix. And once I merged them, they are sorted straight into that scheme? Formerly I used TES5Edit for that purpose with the Merge Plugins xEdit Script. Nowaydays I prefer Mator's standalone Merge Plugins for the job. LOOT? I threw that away. Not because it's a bad tool. But the rules are crap, and it can't cope with merges anyway. Yes, I could create my own rules. But I can as easily leave it be and save/load my manually created loadorder. ModManager? I took the long route .... Skyrim Vanilla Loader, NMM and someday I discovered that there is ModOrganizer. And that's where I am. Why? Many reasons: I DO like to test new mods, shift them around, break them because I still am to stupid to mod mods to my liking I have different characters, so I want profiles But Main reason: I am highly allergic to anything that modifies my game folder! And MO satisfies exactly theese needs. References Mod Organizer https://www.nexusmods.com/skyrim/mods/1334 Merge Plugins https://www.nexusmods.com/skyrim/mods/69905 My toolbox ... (** soon **) mods that I play part I - my follower mods https://www.loverslab.com/blogs/entry/7712-entrails-someone-is-following-me-my-followers/ part II - my location mods https://www.loverslab.com/blogs/entry/7754-entrails-where-am-i-here-my-location-mods/ part III - my LL mods https://www.loverslab.com/blogs/entry/7786-entrails-xxx-my-ll-mods/ My INI files for Skyrim https://www.loverslab.com/blogs/entry/7765-entrails-under-the-hood-my-ini-files/ ..
 -
 Step-by step guide to setting up a scripting enviornment in MO2 for Sexlab and SLA View File So, after googling for hours and reading over old posts, I figured I should put together a guide on how to get the creation kit to work with MO2 with a focus on SL scripting. (Download is just a word document version of this post) Install creation kit from bethesda.net, and point MO2 to the creation kit executable through this box: 2) Install SSE creation kit fixes and multiple masters fix: https://www.nexusmods.com/skyrimspecialedition/mods/2786 https://www.nexusmods.com/skyrimspecialedition/mods/20061 3) If you haven’t already, install SKSE and be sure to keep the .psc source files handy for the next part. 4)Now, create a new mod in MO2 by simply opening your MO2 profile dir and making a new folder. Inside, you will need to create 2 folders: scripts and scripts\source. 5)Move the SKSE .psc files into the \scripts\source folder 6)Now, go to your skyrim data folder (<skyrim installation path>\data\scripts) and grab a zip file called Scripts.zip. You will need to extract it into your new MO2 mod, and be sure to keep all the .psc files in the \scripts\source folder. 7) After that, you’re going to need a few more dependencies before you can start developing: SkyUI Developmet sdk: https://github.com/schlangster/skyui/wiki RaceMenu developer: https://www.nexusmods.com/skyrim/mods/29624?tab=files (download modder’s package) FNIS (FNIS ships with its sources, but you need to change the file structure. FNIS has its sources in sources\scripts, and you need to move them to scripts\sources) PapyrusUtil The regular RaceMenu plugin 8 Now you need to unpack RaceMenu’s BSA, which you can do with Cathedral Asset Optimizer. Just open it up, and point it to RaceMenu’s mod dir: You will need the RaceMenu source scripts when you are compiling. 9) Now you need to change the CK ini file to reflect your script directory: [Papyrus] bPerforceEnabled = 0 iMinMemoryPageSize = 128 iMaxMemoryPageSize = 512 sScriptSourceFolder = ".\Data\Scripts\Source" After that, you just have to boot up the CK and load Sexlab and SLA as your master files, along with any other .esps you will need. Then you’re good to go for scripting! I'm pretty sure I got everything covered, but its entirely possible I may have missed a step after getting everything working - so please let me know if I missed something. Some mods with good example scripts that you can look at: Submitter BluByt3 Submitted 02/04/2021 Category Framework & Resources Requires Regular Edition Compatible Not Applicable
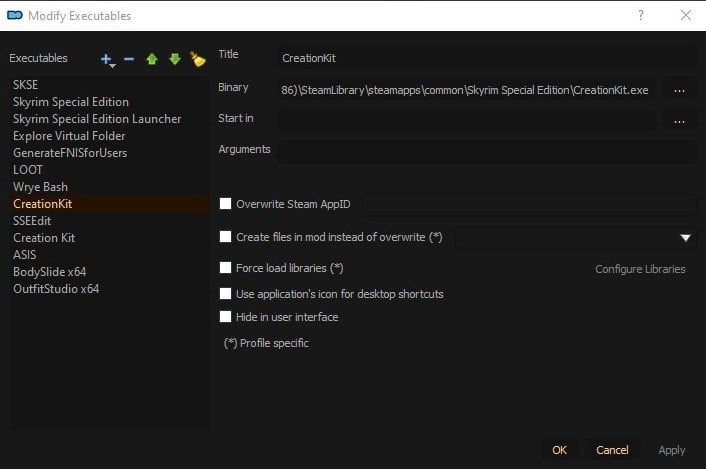

-
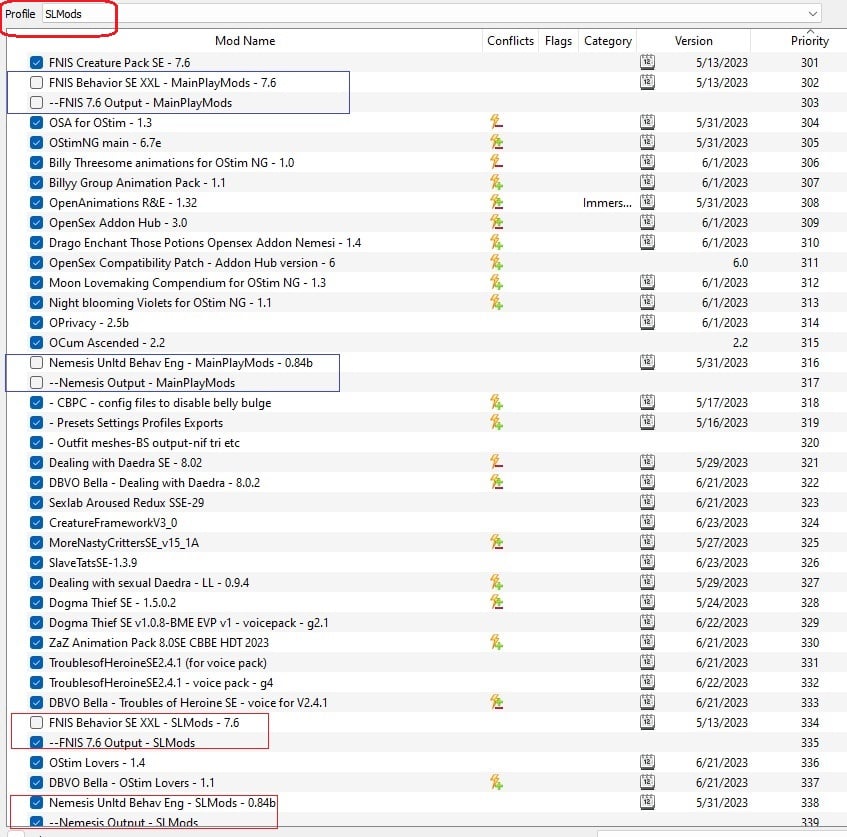
 TLDR version: If you want to switch 2 or more profiles in Mod Organizer, each with mods requiring both fnis and nemesis, you may probably have to regenerate fnis/nemesis every time you switch profile or you may get T-pose. To avoid that, you will need to install separate/duplicated copies of fnis/nemesis, not just their outputs, for multiple MO profiles. Install one copy of fnis/nemesis for each profile and treat them as separate mods. It means you need to dedicate a separate or duplicate copy of fnis/nemesis mod folder with its executable tool and its output folder to each MO profile. The long version: Years ago when there was only fnis in oldrim, I found some instructions/comments on using duplicate copies of fnis in multiple Mod Organizer profiles to get rid of the need to run fnis again upon profile switch. I remembered if I didn't use duplicate copies of fnis folders, I would T-pose when I switched to another profile in old mod organizer for skyrim LE even though I used separate fnis output folders for each profile. Recently, I had to build a new PC. So I decided to move onto 64bit skyrim AE on the new PC, starting again from scratch with all SE/AE mods. I wanted to set up two MO2 profiles again so that I can use different sets of mods, all of which require fnis/nemesis. I know we could do it with fnis but I wasn't sure about nemesis which was new to me or even about using both fnis and nemesis for each profile. Most of my google/reddit searches about nemesis turned up with conflicting information on running multiple MO2 profiles, basically with people saying nemesis has to be regenerated every time you use a different profile. Thankfully I found [LE/SE] Guide on using Nemesis alongside FNIS here on LL so I learned how to use both in one profile. So I went ahead to try the same method of using duplicate copies to both fnis/nemesis for multiple profiles and it worked. I thought I would share my experience. The example situation for using two MO2 profiles: in profile 1, you may want to set up all basic mods for your main playthrough including bathing, dancing, SL frameworks and basic OStimNG mods. Then in profile 2 you might like to set up with all profile 1's mods plus additional adult playthrough mods such as SL quest mods and OStimNG gameplay mods that you might want to try sometime but also want to keep out of your main save. Multiple profiles are also useful if you want to play conflicting mods with custom anims back and forth just by switching between profiles. I'll list general procedure to set up both fnis and nemesis in two MO2 profiles so that you can just switch profiles back and forth and play right away without having to regenerate every time you switch profiles. If you only use nemesis, it'll be simpler and the general procedure should still work. (1) Install 2 copies of FNIS and Nemesis program/mod folders, preferably using profile name as part of mod names for easier identification. So there will be 2 copies each for fnis and nemesis mod folders. One way to do this is when you download fnis/nemesis, duplicate the installer/zip files and rename them using your profile name as part of the new name. Then install both copies of fnis and nemesis as separate mods to MO2. For example: in MO2, you may install "FNIS behavior 7.6 for profile 1", "FNIS behavior 7.6 for profile 2", "Nemesis Unltd Behav Eng for profile 1", "Nemesis Unltd Behav Eng for profile 2" as four separate mods. Note: You only need one copy of FNIS creature pack, the one that you keep it on all the time following [LE/SE] Guide on using Nemesis alongside FNIS. We will also keep it on for both profiles. (2) You also need 2 copies of output mod folders each for fnis and nemesis (example, "FNIS output for profile 1", "FNIS output for profile 2", "Nemesis output for profile 1", "Nemesis output for profile 2"). For now, you can just create empty folders under MO2's mod folder and restart MO2 so that they show up as mods. You can later set up in your executable list of MO2 to force fnis/nemesis to generate their output directly into those empty output mod folders instead of inside overwrite folder. Or if you prefer, you can just let it output to overwrite folder and create a mod from it but remember to name it for specific profile. (3) After both copies of fnis/nemesis and their output folders are installed, add 4 exec files shortcut to MO2 executable list (under Mod Organizer 2 > Tools > Executables) and give it different names preferably using profile name. Example, when you add one of the fnis, give name like "Generate FNIS for user for profile 1", then choose the executable file in "FNIS behavior 7.6 for profile 1\tools\GenerateFNIS_for_Users\GenerateFNISforUsers.exe". When you add "Generate FNIS for user for profile 2" executable shortcut to MO, choose the executable file in "FNIS behavior 7.6 for profile 2\tools\GenerateFNIS_for_Users\GenerateFNISforUsers.exe". Do the same for nemesis (add Nemesis Unlimited Behav Engine for profile 1 executable with path to "Nemesis Unltd Behav Eng for profile 1\Nemesis_Engine\Nemesis Unlimited Behavior Engine.exe" and add Nemesis Unlimited Behav Engine for profile 2 executable pointing to "Nemesis Unltd Behav Eng for profile 2\Nemesis_Engine\Nemesis Unlimited Behavior Engine.exe") (4) Run fnis/nemesis for profile 1. First, switch to profile 1 in MO2 and turn on the mods you want to use in that profile. Follow the instructions of [LE/SE] Guide on using Nemesis alongside FNIS to run both fnis and nemesis together for one profile, probably starting from step 8 of that guide because you already installed fnis/nemesis (2 copies in fact) and set up four executable to MO. But it won't hurt to read earlier steps to verify what you did. If you are using OStimNG together with Sexlab creatures, read my Final Note near the end about how I disable OStimNG mods while I run fnis to avoid fnis warnings. While following [LE/SE] Guide on using Nemesis alongside FNIS, make sure to tick the correct fnis/nemesis mods and their outputs for profile 1. Example, tick "FNIS behavior 7.6 for profile 1" and "FNIS output for profile 1". Then keep following that guide and turn on "Nemesis Unltd Behav Eng for profile 1" and "Nemesis output for profile 1" at appropriate step. Keep the other copy of fnis/nemesis for profile 2 disabled (untick "FNIS behavior 7.6 for profile 2", "FNIS output for profile 2", "Nemesis Unlimited Behav Engine for profile 2", "Nemesis output for profile 2") while you works on profile 1. After you finish following that guide and set up for profile 1, play the game and see if everything work in profile 1. (5) Run fnis/nemesis for profile 2. In MO2, switch to profile 2 and enable different or additional set of mods that you want to keep separate from profile 1, disable fnis/nemesis and their outputs for profile 1 (untick "FNIS behavior 7.6 for profile 1", "FNIS output for profile 1", "Nemesis Unltd Behav Eng for profile 1", "Nemesis output for profile 1"). Follow [LE/SE] Guide on using Nemesis alongside FNIS again and turn on the fnis/nemesis/their outputs for profile 2 at appropirate steps. Basically, everything is the same as what you did for profile 1 except you will be using ("FNIS behavior 7.6 for profile 2", "FNIS output for profile 2", "Nemesis Unlimited Behav Engine for profile 2", "Nemesis output for profile 2") while keeping fnis/nemesis/output for profile 1 disabled. Play the game to see if everything work in profile 2. Now when you switch profile, you won't get T-pose nor will you need to run fnis/nemesis again. Just switch profile in MO2 and play different save right away with different mods. But of course, you will need to run fnis/nemesis again if you later want to add more mods requiring fnis/nemesis to either profile. But in that case, you only need to run the correct fnis/nemesis for that specific profile where you add more mods with additional custom anims that normally require fnis/nemesis. Additional Tips: Set nemesis executable files in both copies of nemesis to run in windows 7 compatibility mode. It will prevent nemesis from crashing before completion. Also increase maximum numbers of anims for DAR and Nemesis in their ini files (SKSE\plugins\DynamicAnimationReplacer.ini and your two profiles' nemesis folders\Nemesis_Engine\nemesis.ini). I did 32k (or 0x7D00 in hex) for DAR and 60k for Nemesis because I have a lot of conditional and PCEA DAR folders. Remember to increase it in both copies of nemesis for your two profiles. I don't know about OAR or its limit as it wasn't available while I was modding. Final Note: I use both SL creature and OStimNG at the same time and that was my reason for using both fnis and nemesis. I follow [LE/SE] Guide on using Nemesis alongside FNIS. But I turn off OStims related animations mods (or any non-creature mod that specifically requires nemesis) while running FNIS to avoid fnis warnings and turn them back on before I run nemesis. My profile 1 has all the regular gameplay mods as well as basic SL/SLAL framework and basic OStimNG related mods so that I only need to edit/export/select the anims and settings once and forget about them. Then my profile 2 has all profile 1 mods plus additional SL/Ostim gameplay mods, the ones to fool around but not to keep in my main save such as Thief, SL Solutions, Babo dialogue, Dealing with sexual daedra, OStim Lovers, etc. By using separate/duplicate copy of fnis and nemesis for each profile (mods as well as outputs), I can switch profiles to play without the need to run fnis/nemesis every time. I can also install mods recklessly in profile 2 without worry about ruining my main save because I use separate disposable saves for that profile and I can just switch back to profile 1 whenever I feel like continuing my main game. I hope this is not confusing. I've attached screenshots of my two profiles and MO's executable list for reference. If there is already similar guide here on LL, feel free to delete my post as I don't search LL forum often and thus not sure if this is common knowledge.
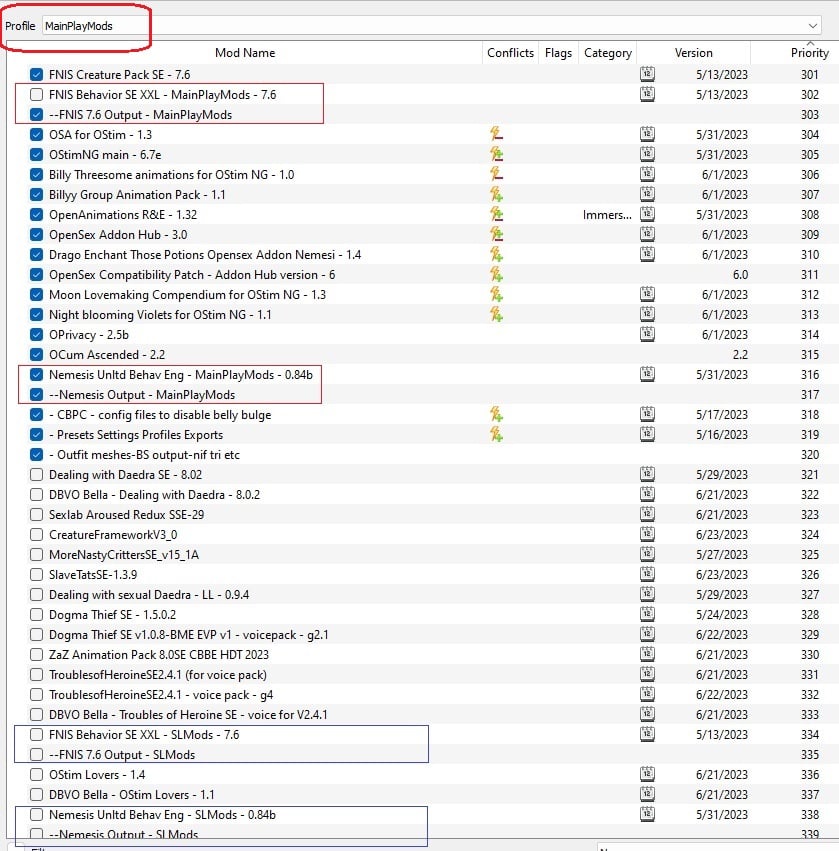

-
 Been a long while since I've played with Sex & Nudity mods, pre-AE at least. Since then I know some things have been discontinued, broken, or just haven't aged well. Started with getting OStim and it's requirements, and it's requirement's requirements. Though with the scattered information I've gathered, OSex is no longer required (and there was some drama with it?). It also asked me to get both FOREs and Nemesis, which I remember being somehow incompatible? Even then, I don't know how to Install them in Mod Organizer and their Nexus pages don't tell me much. As for bodies, I remember that Schlongs of Skyrim broke and I never figured the right way to fix it (I was watching a page about it, but it disappeared?). What's the up to date method for installing it? Anything else I should know? Are there any good tutorials? Any Discords I can join for help & info? Alternatives? The tutorials I've come across mostly seem to be their own modlists/overhauls, which I am not interested in. Just want to put together a sandbox fuck about. With so much conflicting or outdated information I've come across hopefully someone can sort it out for me.
 -
 Hey all, I've run into a pretty unique situation as of late considering my MO. Whenever I launch the game and attempt to load a previous save (which can only be done after cocing to qasmoke as loading from the main menu just creates an infinite loading screen), it says that all the plugins of that save game are missing (even DLC). Also, when I try to start a new game, it just does the Helgen start despite me having Alternate Life enabled on MO. I have made sure that the directories for the mods, Skyrim, and SKSE are correct, I have tried running TESV, SKSE, MO, and Skyrim launcher as administrator, but nothing helps. Any help would be appreciated.
 -
View File FNIS Profiles for Mod Organizer (FP4MO: TBONE Work Around) What is FP4MO? "FP4MO" is a TBONE batch file fix that saves time and effort by creating a comprehensive FNIS save for that selected profile. 1) Run FNIS_Save.bat after running FNIS. 2) Run FNIS_Restore.bat when switching back to an older profile. What are FP4MO requirements? 1) Mod Organizer https://www.nexusmods.com/skyrim/mods/1334/ 2) FNIS Framework https://www.nexusmods.com/skyrim/mods/11811 3) 7-Zip http://www.7-zip.org/ 4) Possible Windows 10 Pro version 1709 requirement? note: Not tested on Windows 7 and 8 systems; XP did not ship with robocopy and script delta's always exist system to system. How does it work? FNIS_Save uses "7Z" to zip the current FNIS Meshes/Script folders from the FNIS install folder and "robocopy" to move all the folders/files from the overwrite folder into its own folder; which should be the profile specific MO folder previously created for storing FNIS generated animations. FNIS_Restore on the other hand, clears out the FNIS Meshes/Script folders from the FNIS install folder and uses "7z" to restore those folders back to the last saved state. This method deletes any additional files while restoring any deleted/modified files to their correct state for that particular profile. Logs are also created, but mainly to re-purpose standard output status text into a record of what was actualy saved/restored. How do you manually install them? 1) Unzip FP4MO.7z. Edit FNIS_Save.bat and FNIS_Restore.bat. 2) Change install paths to the correct folders, both bat files, and save. a) set szipPath=<to 7z.exe folder> b) set fnisPAth=<to FNIS.esp folder> c) set modsPAth=<to ModOrganizer.exe folder> 3) Put FNIS_Save.bat and FNIS_Restore.bat in every MO created profile folder used for storing FNIS generated animations. How do you use them? 1) Use MO to "de-select" and "open in explorer" the correct FNIS profile folder for the current MO profile. 2) Run FNIS 3) Double click on the FNIS_Save.bat to save the FNIS state. 4) Close the explorer folder window and Re-select the FNIS profile folder and run "Skyrim". note 1: Close the MO folder when done, or MO may go WOOPS. note 2: Remember to always restore after switching back to an older profiles, or TBONE may occur due to data mismatches. note 3: I prefix MO profile names p1, p2, p3, ... etc, also reorders the MO profile menu next time it comes up. note 4: I prefix FNIS Generated Output folders, P1, p2, p3, etc. I have eight profiles and save folders; I prefix them all. MO loads/sorts profile names alphabetically. MO Profile Name MO Folder for FNIS Data ============== =========================== P1[Vanilla Skyrim] P2[UNP] FNIS GEN p2 UNP p3[CBBE TBBP] FNIS GEN p3 CBBE TBBP p4[HDT Testing] FNIS GEN p4 HDT Testing p5[CBBE HDT] FNIS GEN p5 CBBE HDT p8[papyrus testing] FNIS GEN p8 papyrus testing Lovers Lab animation modules may need to be manually re-registered using their “MCM” menus, especially whenever significant changes are made to the “FNIS” animations. Is "FP4MO" safe to use? I recommend that you acquaint yourself with any strange script; know how and what they do. I put in a lot of safety checks and a lot of error messages. I do not believe that the bats in “FP4MO” will hurt anything, even if used incorrectly. Use at your own risk, but please use a little discretion and common sense. Feel free to correct and improve the scripts for Windows 7, 8, and your own system. Write your own batch scripts or continue to do it manually. I have only posted these to let people about my solution, that works for me. Know problems. 1) The scripts may fail if any folder and/or files are in use and open? 2) The scripts may not work because of deltas on other platforms and/or installations? 3) MO likes to WOOPS, if you leave "open to explorer" mod windows open forever. Alternative Solutions. You can install multiple copies of FNIS Framework for each profile; Merging the overwrite data into the FNIS Installation Folder itself. I however, do not want seven FNIS executves and/or FNIS buttons, ones enough for me. The FNIS_restore executes a lot faster than FNIS generating a new animation set. The FNIS_save is a lot faster than me dragging and dropping files or creating a new FNIS mod. Permissions I am just posting my solution to the MO TBONE problem. Anyone wants to do it better please do. People should be able to batch, although batch is extremely picky. I used "rem", not "::", because its confuses the batch interpreter. I had to use double quotes a lot, path name expansions with certain characters confuse the interpreter. I used robocpy with /MOV, not the /MOVE, otherwise it deletes overwrite and I didn't want that. Submitter yountmg Submitted 03/02/2018 Category Other Requires Mod Organizer, FNIS, 7-Zip Special Edition Compatible Yes
-
Version 1.0.0
503 downloads
So, after googling for hours and reading over old posts, I figured I should put together a guide on how to get the creation kit to work with MO2 with a focus on SL scripting. (Download is just a word document version of this post) Install creation kit from bethesda.net, and point MO2 to the creation kit executable through this box: 2) Install SSE creation kit fixes and multiple masters fix: https://www.nexusmods.com/skyrimspecialedition/mods/2786 https://www.nexusmods.com/skyrimspecialedition/mods/20061 3) If you haven’t already, install SKSE and be sure to keep the .psc source files handy for the next part. 4)Now, create a new mod in MO2 by simply opening your MO2 profile dir and making a new folder. Inside, you will need to create 2 folders: scripts and scripts\source. 5)Move the SKSE .psc files into the \scripts\source folder 6)Now, go to your skyrim data folder (<skyrim installation path>\data\scripts) and grab a zip file called Scripts.zip. You will need to extract it into your new MO2 mod, and be sure to keep all the .psc files in the \scripts\source folder. 7) After that, you’re going to need a few more dependencies before you can start developing: SkyUI Developmet sdk: https://github.com/schlangster/skyui/wiki RaceMenu developer: https://www.nexusmods.com/skyrim/mods/29624?tab=files (download modder’s package) FNIS (FNIS ships with its sources, but you need to change the file structure. FNIS has its sources in sources\scripts, and you need to move them to scripts\sources) PapyrusUtil 8 Now you need to unpack RaceMenu’s BSA, which you can do with Cathedral Asset Optimizer. Just open it up, and point it to RaceMenu’s mod dir: You will need the RaceMenu source scripts when you are compiling. 9) Now you need to change the CK ini file to reflect your script directory: [Papyrus] bPerforceEnabled = 0 iMinMemoryPageSize = 128 iMaxMemoryPageSize = 512 sScriptSourceFolder = ".\Data\Scripts\Source" After that, you just have to boot up the CK and load Sexlab and SLA as your master files, along with any other .esps you will need. Then you’re good to go for scripting! I'm pretty sure I got everything covered, but its entirely possible I may have missed a step after getting everything working - so please let me know if I missed something. Some mods with good example scripts that you can look at: -
As the title says. Its not loading the installed mods and lauch the game as vanilla+ script extender. What should I do in this case?

