
Search the Community
Showing results for tags 'loadorder'.
Found 9 results
-
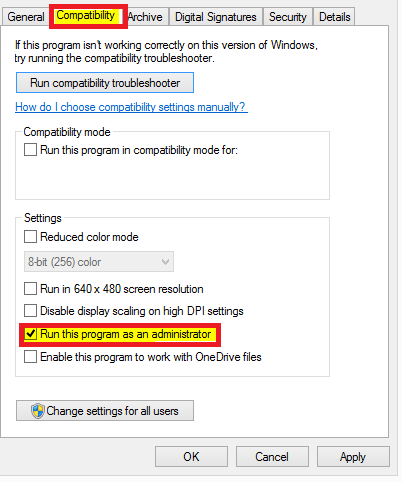
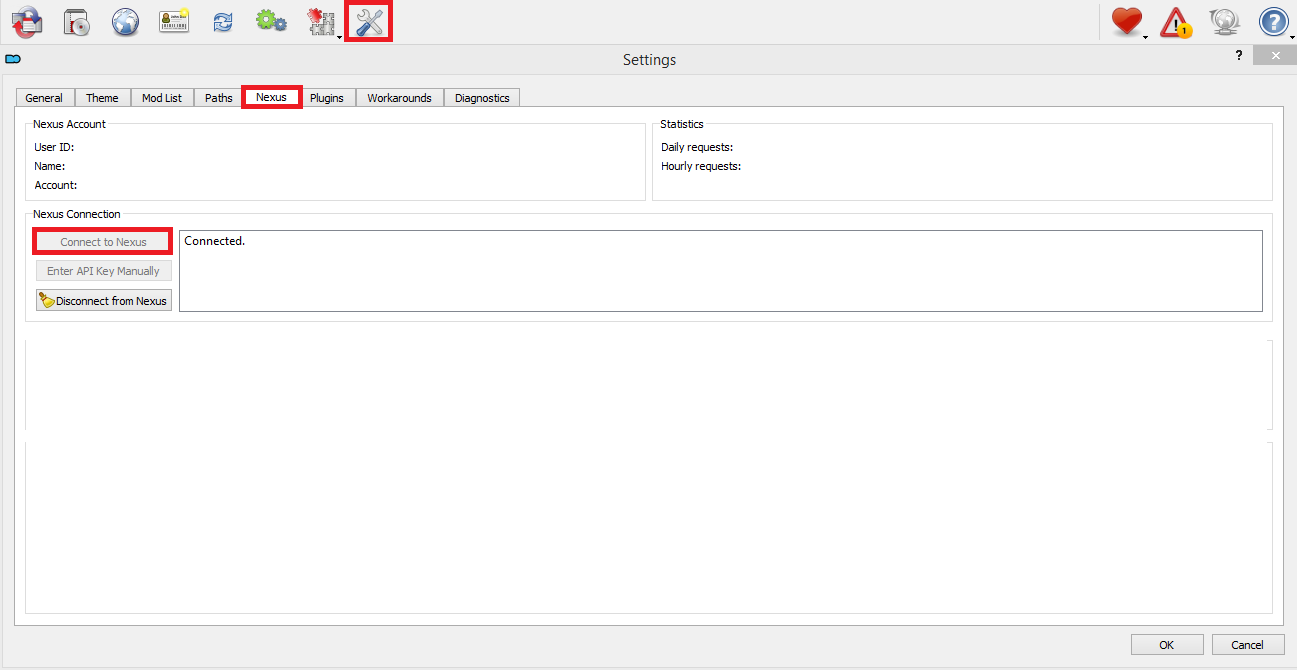
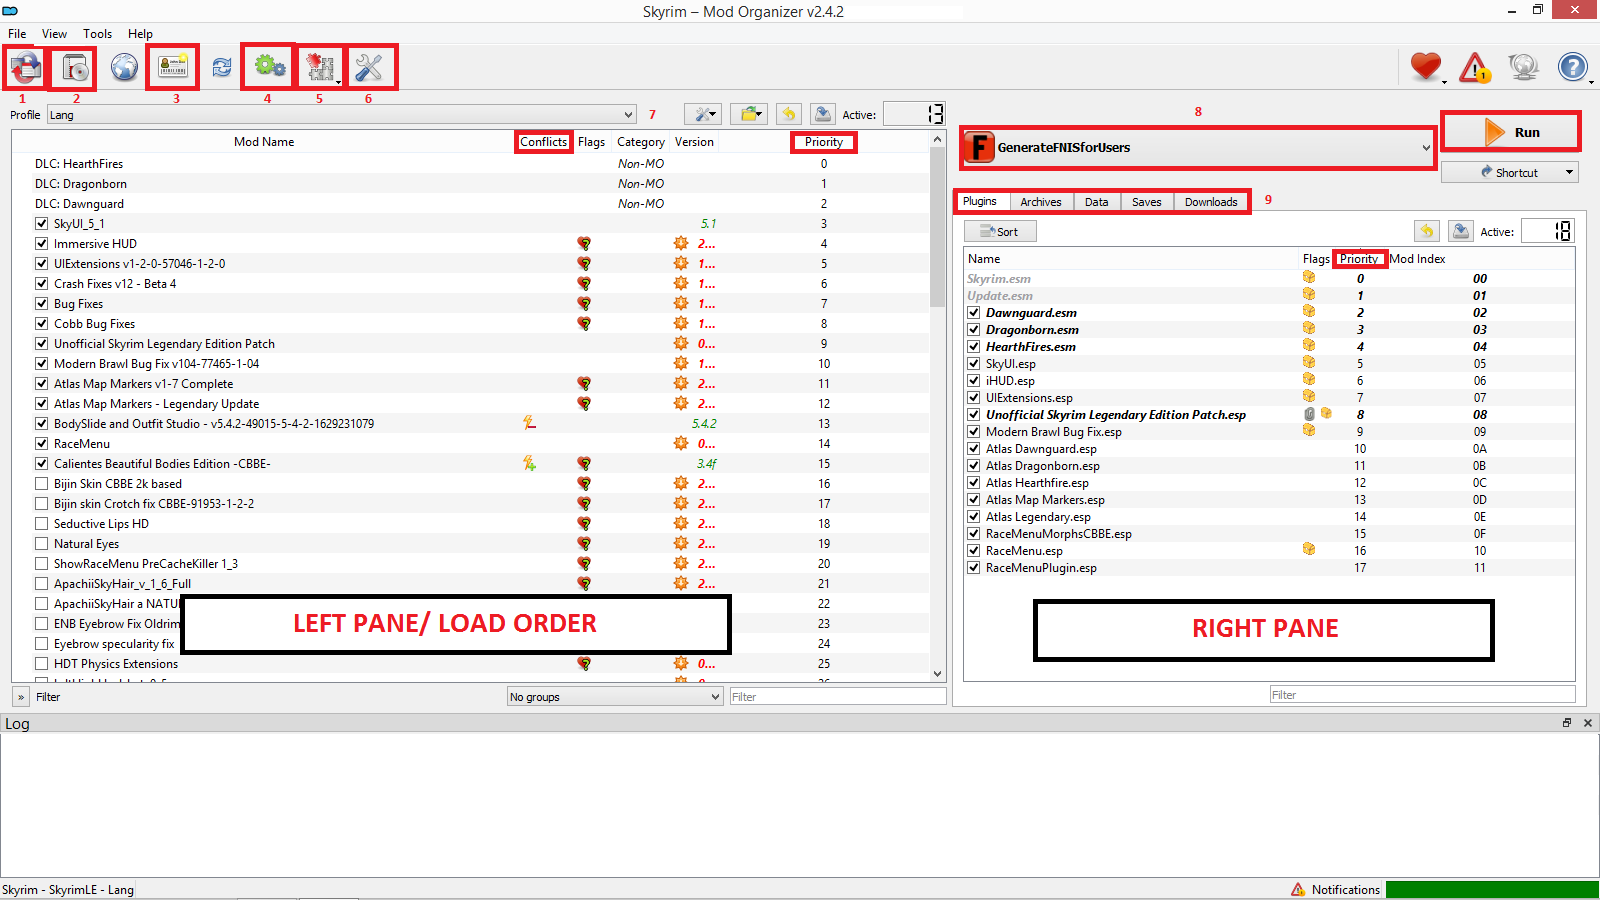
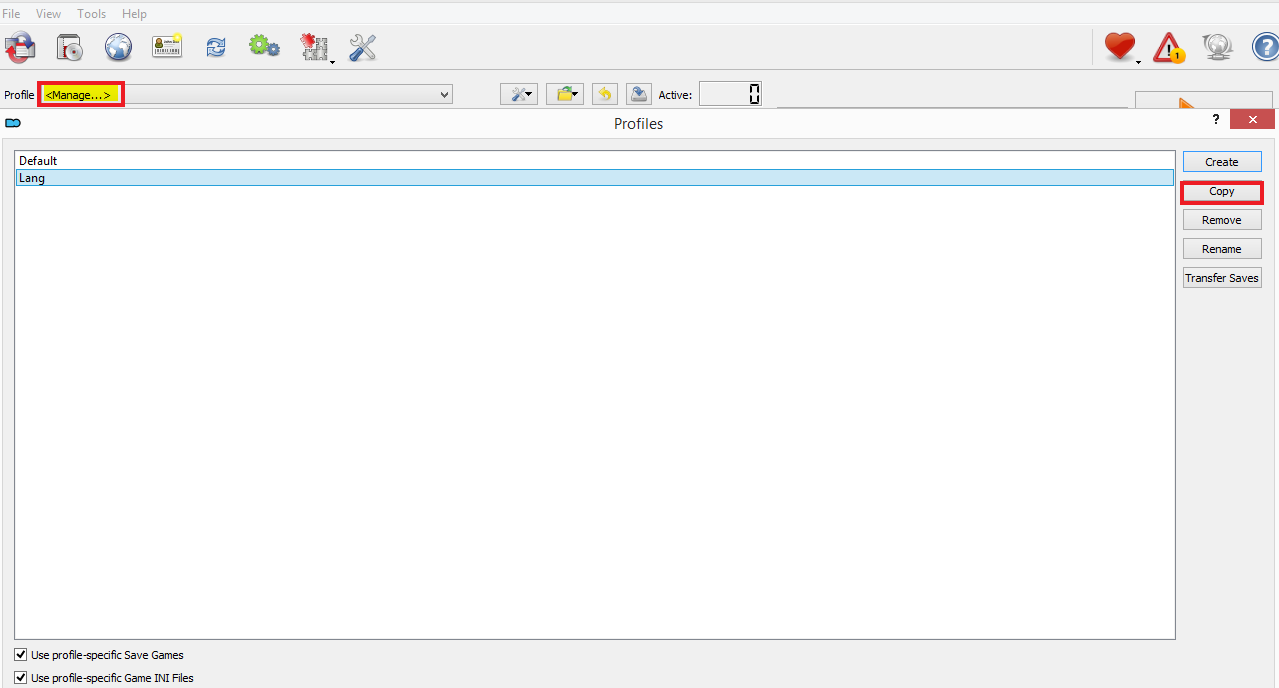
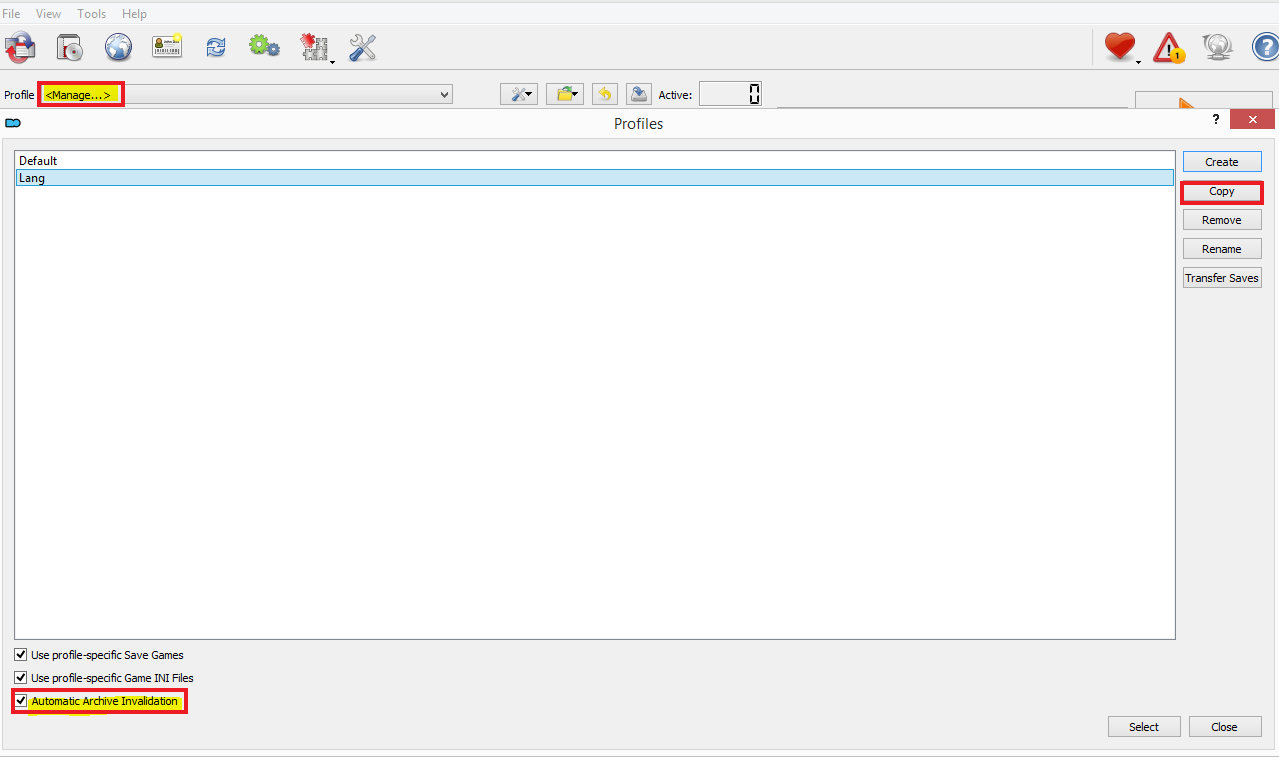
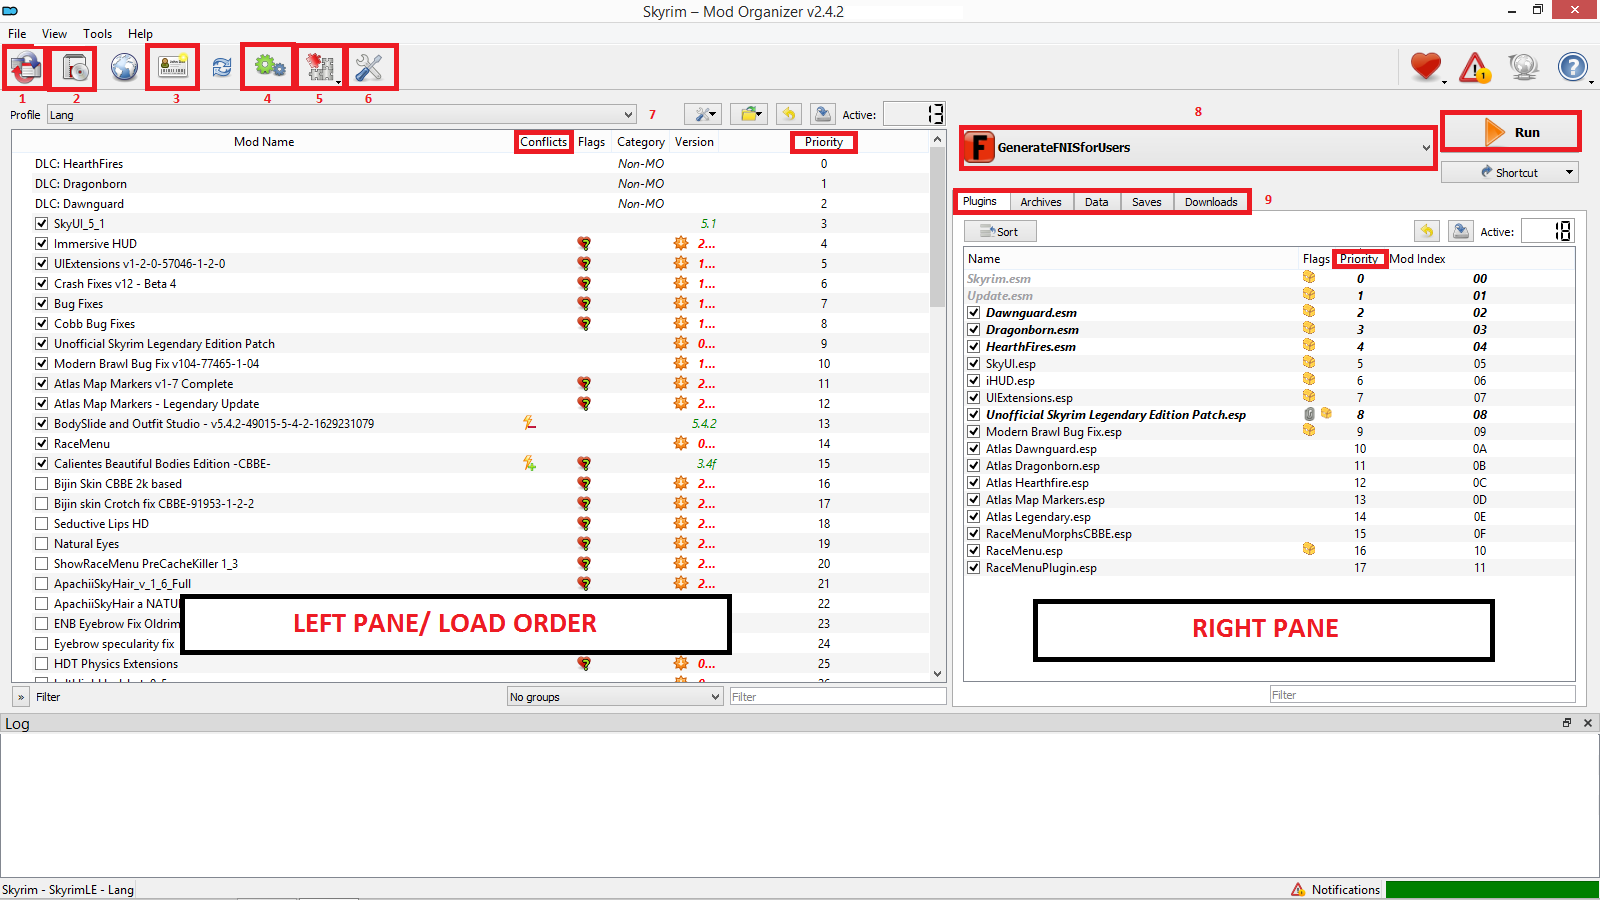
 [This guide is a byproduct of endless struggle to modding TESVSE, this is a quick start guide/ cheatbook and you can simply follow it to have a working modded game, it is comprehensive yet only cover essentials mostly.] CONTENTS OF THE CHEATBOOK/ GUIDE I. BASICS 01. SKYRIM REQUIREMENTS, PRE INSTALLATION, INSTALLATION, GRAPHIC SETTINGS, BACKUP, UNINSTALLATION RE-INSTALLATION AND UPDATES 02. SETTING UP DIRECTORIES 03. SETTING UP MOD ORGANIZER (MO2) II. CORE/ ESSENTIALS 04. SKSE & .INI SETTINGS 05. xEDIT AND CLEANING THE ESMs 06. MASTERS & OTHER ESSENTIALS 07. PATCHES AND FIXES III. REPLACERS AND UTILITIES 08. BODYSLIDE 09. RACEMENU 10. BODY REPLACER, SKINS AND OTHER BEAUTIFICATIONS IV. PHYSICS AND ANIMATIONS 11. PHYSICS 12. FNIS 13. XPMSE V. EVERYTHING ELSE (This section is optional, included here for familiarization) 14. ARMORS & CLOTHING 15. FOLLOWERS 16. COMBAT AND ITS RELATED CAMERA, HUD AND OTHER MODS 17. LOCATIONS 18. LIGHTING OVERHAUL VI. SSL AAF ESSENTIALS AND RELATED MODS 19. SSL AAF AND DEPENDENCIES/ COMPLEMENTARIES 20. CREATURE & DEVIOUS FRAMEWORK 21. ANIMATIONS, SSL BASED MODS, QUESTS AND EXTRAS 22. HOW TO PORT LE MODS TO SE [WIP (NOT A PART OF THIS GUIDE) : ENB, MERGING PLUGINS, LOD PATCH AND BASHED PATCH] - (Basically don't ask me for help with these as these are not my priority but more importantly these are highly sensitive items which could work wonders or wreck havoc) VERY IMPORTANT GAME UPDATE AND VERSION NOTE VERY IMPORTANT NOTES: #THE LE EDITION MODS HAVED GROWN TO ALMOST PERFECTION OVER THEIR LIFESPAN, SE COMPARED TO IT, IS FAIRLY NEW AND IS BEING CONSTANTLY UPDATED, SO EXPECT HICCUPS. THIS GUIDE WILL HELP YOU AVOID SUCH STUMBLING BLOCKS AND BUILD A BEAUTIFUL AND STABLE GAME. # ALTHOUGH I AM PROVIDING VIDEO LINKS WHEREVER POSSIBLE FOR BETTER UNDERSTANDING, USE THEM AS REFERENCE AND DO ONLY WHAT I HAVE MENTIONED IN THIS GUIDE, THE VIDEOS ARE VERY COMPREHENSIVE AND COVER VARIOUS WAYS AND METHODS. # EVERYTHING IS AFFECTED BY THE EFFLUX OF TIME, I (OR SOMEONE ELSE HOPEFULLY) WILL TRY AND KEEP THIS GUIDE UPDATED BUT THERE'S ALWAYS A POSSIBILITY OF UPDATES OR THAT SOMETHING NEW HAS TAKEN OVER. ASK, INCASE YOU HAVE ANY DOUBTS OR QUERIES. YOU HAVE BEEN WARNED! # DO NOT WORRY, YOU ARE NEVER ALONE! JUST REACH OUT AND YOU'LL GET THE REQUIRED HELP SOONER OR LATER. TILL THEN TRY LEARNING AS MUCH AS YOU CAN ON YOUR OWN. ALSO DON'T FORGET TO SHARE SOME LOVE, HIT THE LIKE BUTTON ON POSTS, BE OPEN TO TESTING MODS AND IF FEASIBLE SUPPORT THEM (MOSTLY ALL ARE ON PATREON) # MOST IMPORTANTLY, a humble request - At any point, if you have benefited from the site or have been a part of the community, kindly consider supporting it if feasible. Thank You! (Link in the spoiler below) # BEFORE PROCEEDING, A REMINDER THAT THIS GUIDE IS FOR THE SPECIAL EDITION. IF YOU HAVE THE LEGENDARY EDITION, CHECK OUT The Skyrim LE (TESVLE) Modding Cheatbook/ Guide [SEP/21]. PRO TIP: Always make sure you run any installer/ application with admin rights (specifically set it up for MO2 as other such as TES5Edit, LOOT, and so on would be dependent on it) 01. SKYRIM REQUIREMENTS, PRE INSTALLATION, INSTALLATION, GRAPHIC SETTINGS, BACKUP, UNINSTALLATION RE-INSTALLATION AND UPDATES : (BEFORE INSTALLING THE GAME REFER POINT of Point 2.1 given below and follow steps accordingly) 02. SETTING UP DIRECTORIES : I personally have a specific setup for making my directories, the video in Point 3 below will also guide you for the same. Basically you should have and be aware of the following directories: 2.1. Where all BASE GAMES are installed [NEVER INSTALL YOUR GAME INTO THE PROGRAM FILE/(X86) DIRECTORY. Preferably, make a Folder that will contain all your games (say, D:\GAMES\TESVSE). Make sure the folder names are not too long and that you are not making too many folders within folders. If you followed exactly what is mentioned, you will have your game installed in the TESVSE folder (it will have a data folder and the skyrim launcher)] 2.2. Where MO2 and loot gets installed (Say D:\Executables\MO2; there should be LOOT, SSEEdit and so on folders for each tool; for now just create MO2 folder and install MO2 in it) 2.3. MO2 working mods and profile folder for each game into a single working folder (So under say D:\WMF\TESVSE; there should be F04, TESVLE and so on folders for each game, for now just make the directories as mentioned in bold) 03. SETTING UP MOD ORGANIZER (MO2) : Note 1 - There are many options to mod the game, manually or via different mod managers, this guide will only cover mostly installation of mods via mod organizer. Note 2 - You should run the game once via skyrim launcher before installing MO2, no need to start a game, just run it and close it, it helps to initialize all the requirements. 3.1. Instance Configuration You will obviously be installing mods for more than one game, managing instances will help you achieve that (even if you have only one game to mod this is a useful and compulsory step) You must create and configure a GLOBAL INSTANCE for each of your game (Create say D:\WMF\TESVSE; there should be F04, TESVLE and so on folders for each game, for now just make the directories as mentioned in bold) 3.2. Profile Configuration This is an advantage of using MO2, you can configure multiple profiles and have different mod setup and saves for each profile. (Pro Tip: Never alter your Default Profile, simply click copy and enter the name for a new profile. Do not enable the 2 options unless you know what you are doing) I suggest creating at least 2 profiles other than the default profile. One profile would be your permanent/ most stable profile. The other you can use for testing and trying out mods and after that you may add it to your permanent/ stable profile. You can obviously create more as per your needs. 3.3. Nexus Integration Make an account on Nexus if you don't already have one. When asked in MO2 to integrate/connect automatically to Nexus Account, do so. Incase you have missed/skipped it, do so from - settings>nexus>connect to nexus Here is a comprehensive video tutorial for the Mod Organizer installation 3.4. MO2 Features and Usage ALWAYS GO THROUGH THE MO2 TUTORIAL FULLY ATLEAST ONCE. If you have skipped the tutorial you can always re-launch it and it will ask again or find the tutorials under the help tab. Understand that modding is so very comprehensive and you only learn through time, just to give you a glimpse of the depth, here is a guide only covering MO. (Link only for reference a simple video linked below) If after scrolling right to the bottom of the guide you feel fatigued, hope you get the point I am trying to make. I'll try and simplify things as much as possible. 3.5. MO2 Interface, Basics, Conflicts, Overwrites and Load order explained. 3.5.1 MO2 Interface & Basics 3.5.2 Conflicts, Overwrites and Load order Linking a video below that will help digest things easier, do not skip watching this video, watch it right till the end. Here is a comprehensive video tutorial on using Mod Organizer (IF YOU PLAN ON USING MO, WATCH THIS VIDEO ATLEAST ONCE) I know even this video is quite extended and much of it you might never need, will come up with something simpler soon. For now try learning the basics at least namely all the icons, downloading and installing a mod correctly, left pane, right pane and its respective tabs; load order and plugin order, conflict(s), overwrite ,explorer location of mods and ini files and adding/running executables. 04. SKSE & .INI SETTINGS : From SKSE Readme - The Skyrim Script Extender, or SKSE for short, is a modder's resource that expands the scripting capabilities of Skyrim. It does so without modifying the executable files on disk, so there are no permanent side effects. 4.1 GET THE LATEST VERSION (ARCHIVE OR INSTALLER IS YOUR CHOICE). EXTRACT OR INSTALL IT IN YOUR BASE GAME FOLDER (D:\GAMES\TESVLE) THAT SHOULD HAVE THE SKYRIM LAUNCHER AND DATA FOLDER. 4.2 REGISTER THE EXECUTABLE INTO MO2. 4.3.1 Refer steps to do so in the video linked below point 5.2. Preferably launch the game after point 5 and do the steps mentioned therein to confirm a successful installation of SKSE. IMPORTANT NOTE: FROM NOW ON EVERYTIME YOU WANT TO PLAY YOUR GAME YOU HAVE TO RUN IT VIA SKSE EXECUTABLE THAT WE REGISTERED IN MO2. 05. xEDIT AND CLEANING THE ESMs : 5.1 Download SSEEdit and install it to D:\Executables\SSEEdit 5.2 Register the xEdit and QuickAutoClean (QAC) executables into MO2. Steps to do so are in the video below. Here is a comprehensive video tutorial for the xEdit installation 5.3 First, backup/copy the following ESMs to a safe location: 5.4 Next, run QuickAutoClean (QAC) from MO2 and clean only the above mentioned ESMs one by one. Steps to do so are in the video below. Here is a comprehensive video tutorial for the cleaning the DLCs 5.5 AT THIS POINT I ADVICE RUNNING YOUR GAME ONCE VIA SKSE. SIMPLY SELECT SKSE IN EXECUTABLES RIBBON AND CLICK RUN. YOU ARE ADVICED NOT TO START A NEW GAME, JUST RUN THE EXECUTABLE, HIT '~' KEY ON YOUR KEYBOARD AND TYPE GETSKSEVERSION>HIT ENTER. THE SKSE VERSION YOU INSTALLED (IN POINT 4) SHOULD BE DISPLAYED. THAT'S IT QUITE THE GAME. FROM NOW ON, EVERYTIME YOU HAVE TO RUN A MODDED GAME YOU USE THE SKSE EXECUTABLE. VERY IMPORTANT NOTES: (DON'T YOU DARE SKIP READING THESE) A. ALWAYS READ THE DESCRIPTION AND REQUIREMENTS SECTION OF ANY AND EVERY MOD THAT YOU INSTALL OR PLAN TO INSTALL, ONLY AFTER THAT SHOULD YOU INSTALL THE MOD. B. MODDING IS PERSONAL, THERE ARE MANY OPTIONS/WAYS TO DO CERTAIN THINGS. INFINITE MODS THAT DO THE SAME THING, EACH DIFFERENTLY. C. EVERYTHING IS AFFECTED BY THE EFFLUX OF TIME, I (OR SOMEONE ELSE HOPEFULLY) WILL TRY AND KEEP THIS GUIDE UPDATED BUT THERE'S ALWAYS A POSSIBILITY OF UPDATES OR THAT SOMETHING NEW HAS TAKEN OVER. DO NOT WORRY, YOU ARE NEVER ALONE! JUST REACH OUT AND YOU'LL GET THE REQUIRED HELP SOONER OR LATER. TILL THEN TRY LEARNING AS MUCH AS YOU CAN ON YOUR OWN. (Although, this is a quick start guide/ cheatbook and you can simply follow it to have a working modded game, I recommend that you use it a reference guide because without knowing or understanding what you are doing, one can only do more harm than good more sooner than later.) 06. MASTERS & OTHER ESSENTIALS : 6.1. SkyUI Steps to install it. Here is a comprehensive video tutorial for installing SKY UI 6.2. iHUD: Get the latest version using mod manager download option. Install it via downloads tab (Right pane), then enable it in MO2 (left pane/load order). 6.3. UIExtensions: Get the latest version using mod manager download option. Install it via downloads tab (Right pane), then enable it in MO2 (left pane/load order). 6.4. Papyrus: 6.4.1 Papyrus Logging: A useful and important requirement when you ask for help on this forum or anywhere else for that matter is to include your papyrus log. By default the logging is disabled and it should be kept that way when playing. However, incase you encounter any issues and are actively looking for possible causes for issues/troubleshooting that is when you should enable the papyrus logging. You should disable the logging again once the issues are resolved and you resume your regular gameplay. If you keep it on all the time, it's impacts your system resources and will unnecessarily cause extra stress. To enable papyrus logging, in the mod manager, under tool plugins, there is an INI editor. In it, edit/add the following lines to your skyrim.ini file: Your papyrus log files by default are created in the Documents>My Games>SkyrimLogsScript 6.4.2 PapyrusUtil: An SKSE plugin adding several new scripts with native functions that provide various conveniences related to data storage and other misc functions to the scripter/ modder. Get the latest version using mod manager download option. Install it via downloads tab (Right pane), then enable it in MO2 (left pane/load order). IMPORTANT NOTE: MAKE SURE THIS MOD IS OVERWRITING ALL OTHERS. NOTHING WITH CONFLICTING FILES SHOULD EVER BE LOADED AFTER THIS MOD. *As many mods including the popular ones such as campfire, frostfall, and simply knock include an outdated version that will cause issues. It is advised to overwrite them with the most current version of the plugin. (WATCH THE VIDEO IN POINT 3.4 FOR A BETTER UNDERSTANDING OF MOD OVERWRITE (LOAD ORDER) AND CONFLICTS) 6.5. JContainers: Get the latest version using mod manager download option. Install it via downloads tab (Right pane), then enable it in MO2 (left pane/load order). 07. PATCHES & FIXES : 7.1. Address Library: Get the latest version using mod manager download option. Install it via downloads tab (Right pane), then enable it in MO2 (left pane/load order). 7.2. SSE Engine Fixes: Steps to install the fix. FOR THE FOLLOWING FIXES, simply get the latest versions using mod manager download option. Install it via downloads tab (Right pane), then enable it in MO2 (left pane/load order). 7.3. Unofficial Skyrim Special Edition Patch 7.4. Bug Fixes SSE 7.5. Modern Brawl Bug Fix 08. BODYSLIDE : 8.1 Get the latest version and install it like any other mod in MO2. 8.2 What is more important is that you register it as an executable in MO2 and run it from there itself in future. To do so, in MO2, click/go to the data tab in the right pane in it, CALIENTES TOOLS>BODYSLIDE. Right click the the Bodyslide x64.exe>Add as Executable. That's all it takes to install bodyslide and add it as an executable. BE CAREFUL WITH THIS MOD AND DO NOT MESS AROUND WITH IT, READ ABOUT IT, WATCH TUTORIALS IF YOU FEEL LIKE EXPLORING MORE. BUT BEFORE THAT STICK TO BASICS. FOR STARTERS, DO NOT HIT SAVE! I REPEAT DO NOT HIT THE SAVE BUTTON WHEN INSIDE BODY SLIDE. YOUR CHANGES GET CAST INTO STONE IF YOU DO THAT. 8.3 How to use bodyslide? (i.e modify Presets, build Assets and Custom Presets) Here is a comprehensive video tutorial for using Bodyslide 09. RACEMENU : Get the latest version using mod manager download option. Install it via downloads tab (Right pane), then enable it in MO2 (left pane/load order). 10. BODY REPLACER, SKINS AND OTHER BEAUTIFICATIONS 10.1. Caliente's Beautiful Bodies Edition (CBBE) This is another mother of all mods. It is a Body Replacer meaning that it replaces all the adult vanilla female bodies (player and NPC) with one that is fully customizable through the BodySlide tool and BodySlide's RaceMenu Morphs plugin. In short, any changes to female body are only possible due to this mod. Get the latest version (3.4r) using mod manager download option. It is packed as an Installer, so when you double click to install it via downloads tab (Right pane), it will pop up a window with various options. The options have been explained as well as recommended below, enable the ones preferred and install the mod. Then enable it in MO2 (left pane/load order) and you're set. Do not worry, you can change your preference later on easily. Not just that you can customize the body as per your liking, steps to do so are given below. There a few others as well namely UNP, UNPB and 7B, whichever you choose is personal choice. For simplicity and uniformity within this guide I am only covering CBBE throughout. From hereon, there are many options available for this section for skins, hair and other beautifications, whatever you choose is purely personal choice. 10.2. Skins In the section above I have only covered CBBE, there are other body replacers too. So in this section make sure you download files specific to the body replacer you download and installed. So, if you are using CBBE body then get CBBE Skins as well, if you use some other body mod get skin files for that specific body mod. Simply get the latest versions using mod manager download option. Install it via downloads tab (Right pane), then enable it in MO2 (left pane/load order). Choose only one. There many others, whichever you choose is purely personal choice. 10.3. Hair - Simply get the latest versions using mod manager download option. Install it via downloads tab (Right pane), then enable it in MO2 (left pane/load order). 10.4. Other Beautifications - Simply get the latest versions using mod manager download option. Install it via downloads tab (Right pane), then enable it in MO2 (left pane/load order). There a plethora of options available here I only give few mostly used and so that you get a basic idea. 11. PHYSICS Simply get the latest versions using mod manager download option. Install it via downloads tab (Right pane), then enable it in MO2 (left pane/load order). These mods add more physics, for example swishing hair, flowing skirts, bouncing boobs and so on. 12. FNIS This is the mother of all mods, do not mess up with its installation. Without it no custom animation is possible in Skyrim. Follow everything to the word. 12.1 Get the latest version and install the following 3 files like any other mod in MO2: FNIS Behaviour FNIS Creature Pack FNIS Spells 12.2 What is more important is that you register FNIS BEHAVIOUR it as an executable in MO2 and run it from there itself in future. i. Right click the installed mod FNIS BEHAVIOUR>OPEN IN EXPLORER>TOOLS>GenerateFNIS_for_Users. Copy the folder path. (It should have GenerateFNISforUsers.exe) ii. Under Modify Executables>Add from File>Paste the copied folder path>Select the GenerateFNISforUsers.exe. That's all it takes to install FNIS behavior and add it as an executable. Now since it helps with custom animations, you have to run it every time you add or modify any animation mod. You will have to run a generator tool GenerateFNISforUsers.exe (part of FNIS Behavior) every time you have installed or uninstalled FNIS, or an FNIS based mod. That is just not it, additionally for creatures, when you uninstall a mod that uses FNIS Creatures, you first have press the "De-Install Creatures" button, and then run the "Update FNIS Behaviors" There is little point in running it as it concerns with animation mods and has to be run every time on adding or removing any mod concerned with animations. As per this guide, the best time to run it would be post point 20 i.e. after you have finally installed all/most of your animation mods. So, no need to run it yet, we will be running it in point 20. (Because it will make files in overwrite folder, you need to be familiar with it. Also, if run, fixes such as 'Skeleton Arm Fix' has to be enabled, besides the other fixes it covers and then the Update FNIS Behavior button has to be clicked. However, do not worry if you already messed up and run FNIS without following correct steps, simply following the correct steps again will ensure its smooth working.) 12.3 Steps to update/run FNIS behaviour 12.4 Important points to be aware of: 1. FNIS has animation limits. The regular one is capped at 10,000 animations. And the XXL one at 32,000. 2. While counting FNIS animations even a twitch will be counted as a separate animation. So, lets say you have a mod that has a killmove animation, such single kill move animation can have many (FNIS) animations. ? 3. For those going over 10k limit or nearing/ exceeding 100% CTD probability, it is advisable to understanding a few things. Also there is a fix for the same. However, nothing is magic so be careful of your system load and tweak it accordingly. Further, also pay attention to the temperature of your PC components and overall temperature, when playing it should be anywhere between 60° C to 80° C. Read the FNIS article and the description of Anim LCF, do not proceed without reading/ understanding or you will be faced with consequences. You have been warned! Here is a comprehensive video tutorial for installing FNIS 13. XPMSE NOTHING SHOULD BE OVERWRITING THIS MOD, UNLESS SPECIFIC MOD AUTHOR HAS MENTIONED SPECIFICALLY. Simply get the latest versions using mod manager download option. Install it via downloads tab (Right pane), then enable it in MO2 (left pane/load order). 14. ARMORS & CLOTHING Simply get the latest versions using mod manager download option. Install it via downloads tab (Right pane), then enable it in MO2 (left pane/load order). Do not forget that every time you add new armor or clothing to your load order, you have to run bodyslide and build its assets to match your preset. Steps to do so are given in Point 8.3. 15. FOLLOWERS Simply get the latest versions using mod manager download option. Install it via downloads tab (Right pane), then enable it in MO2 (left pane/load order). This section is optional. 16. COMBAT AND ITS RELATED CAMERA, HUD AND OTHER MODS (THIS IS AN OPTIONAL STEP) (I recommend skipping this step if this is your first time modding, familiarize with the game a bit and get to this step after a few weeks of playing.) There are many mods that alter the combat system, however, I like and recommend this one. It is a comprehensive mod that completely overturns the Vanilla battle system and transforms it into a Sekiro battle system. The whole consortium make a plethora of changes to the game and its experience. Read the Description page thoroughly of the combat mod to understand all changes. 17. LOCATIONS Simply get the latest versions using mod manager download option. Install it via downloads tab (Right pane), then enable it in MO2 (left pane/load order). 18. LIGHTING OVERHAUL Simply get the latest versions using mod manager download option. Install it via downloads tab (Right pane), then enable it in MO2 (left pane/load order). Important Game, Save and Load Notes: (Don't Skip) Steps to make saves the right way. If you're following my guide to the word, it is time to launch the game and make an Initial save. 19. SSL AF AND DEPENDENCIES/ COMPLEMENTARIES All the necessary information is provided below. Important points to be aware of: 20. CREATURE & DEVIOUS FRAMEWORK 20.1 Creature Framework and mods All the necessary information is provided below. 20.2 Devious Framework and mods All the necessary information is provided below. Simply installing the mod will not cut it this time, you need to follow some extra steps for DD to work. Steps to do so given below. 21. ANIMATIONS, SSL BASED MODS, QUESTS AND EXTRAS All the necessary information is provided below. Note that the link may be outdated, simply performing a search will provide you with the latest links if any. 22. HOW TO PORT LE MODS TO SE Before setting out on a joyride to porting mods I recommend learning the fine art of searching ports already made, if yet unsure simply asking in the Request and Find thread could help. Know that these are deep waters, so be prepared, extra cautious and expect hiccups on the way. -------------------- ALL GOOD THINGS (MUST) COME TO AN END -------------------- As a humble request, experienced modders kindly share your experience of load orders, anything else that can/should be included in this guide. Preferred Mod Load Order & Groupings : DISCLAIMER: 1. YOU ARE RESPONSIBLE FOR YOUR ACTIONS, IF YOU HAVE DOUBTS DO NOT PROCEED WITHOUT ASKING. 2. NO ONE APPRECIATES PLAGIARISM. A MENTION WOULD BE AMAZING. 3. IF SOMEHOW YOU'RE A WIZ AND EARNING FROM ANY IDEA/ CONTENT OF THIS GUIDE, THEN BE KIND AND SIMPLY SUPPORT THIS SITE. Credits/ Gratitude @Ashal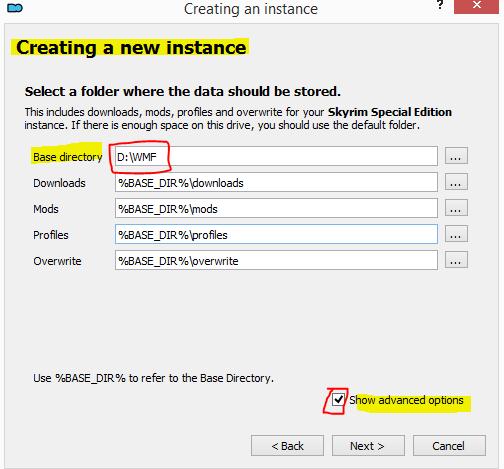
-
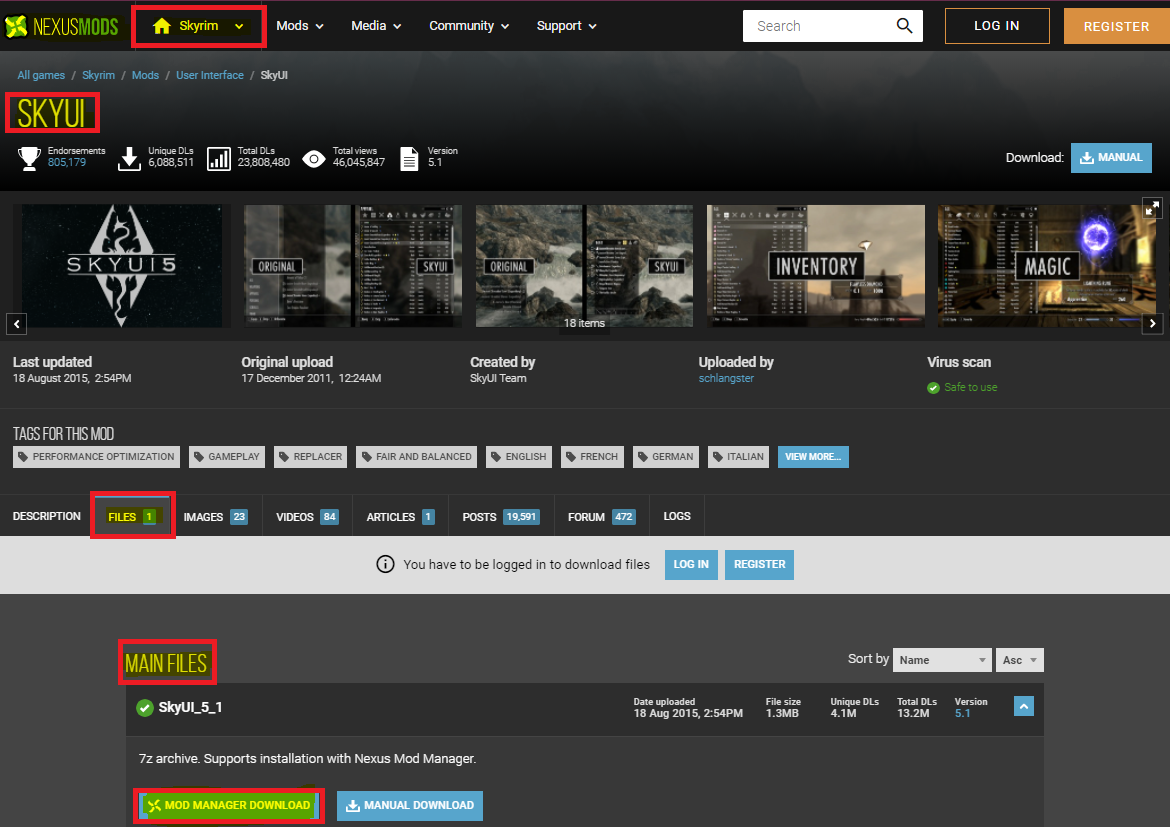
[This guide is a byproduct of endless struggle to modding TSEVLE, this is a quick start guide/ cheatbook and you can simply follow it to have a working modded game, it is comprehensive yet only cover essentials mostly.] CONTENTS OF THE CHEATBOOK/ GUIDE I. BASICS 01. SKYRIM REQUIREMENTS, PRE INSTALLATION, INSTALLATION, GRAPHIC SETTINGS, BACKUP, UNINSTALLATION & RE-INSTALLATION 02. SETTING UP DIRECTORIES 03. SETTING UP MOD ORGANIZER (MO2) II. CORE/ ESSENTIALS 04. SKSE & .INI SETTINGS 05. xEDIT AND CLEANING THE ESMs 06. MASTERS & OTHER ESSENTIALS 07. PATCHES AND FIXES III. REPLACERS AND UTILITIES 08. BODYSLIDE 09. RACEMENU 10. BODY REPLACER, SKINS AND OTHER BEAUTIFICATIONS IV. PHYSICS AND ANIMATIONS 11. PHYSICS 12. FNIS 13. XPMSE V. EVERYTHING ELSE (This section is optional, included here for familiarization) 14. ARMORS & CLOTHING 15. FOLLOWERS 16. LOCATIONS 17. LIGHTING OVERHAUL VI. SSL AAF ESSENTIALS AND RELATED MODS 18. SSL AAF AND DEPENDENCIES/ COMPLEMENTARIES 19. CREATURE & DEVIOUS FRAMEWORK 20. ANIMATIONS, SSL BASED MODS, QUESTS AND EXTRAS [WIP (NOT A PART OF THIS GUIDE) : ENB, MERGING PLUGINS, LOD PATCH AND BASHED PATCH] - (Basically don't ask me for help with these as these are not my priority but more importantly these are highly sensitive items which could work wonders or wreck havoc) VERY IMPORTANT NOTES: # ALTHOUGH I AM PROVIDING VIDEO LINKS WHEREVER POSSIBLE FOR BETTER UNDERSTANDING, USE THEM AS REFERENCE AND DO ONLY WHAT I HAVE MENTIONED IN THIS GUIDE, THE VIDEOS ARE VERY COMPREHENSIVE AND COVER VARIOUS WAYS AND METHODS. # EVERYTHING IS AFFECTED BY THE EFFLUX OF TIME, I (OR SOMEONE ELSE HOPEFULLY) WILL TRY AND KEEP THIS GUIDE UPDATED BUT THERE'S ALWAYS A POSSIBILITY OF UPDATES OR THAT SOMETHING NEW HAS TAKEN OVER. ASK, INCASE YOU HAVE ANY DOUBTS OR QUERIES. YOU HAVE BEEN WARNED! # DO NOT WORRY, YOU ARE NEVER ALONE! JUST REACH OUT AND YOU'LL GET THE REQUIRED HELP SOONER OR LATER. TILL THEN TRY LEARNING AS MUCH AS YOU CAN ON YOUR OWN. ALSO DON'T FORGET TO SHARE SOME LOVE, HIT THE LIKE BUTTON ON POSTS, BE OPEN TO TESTING MODS AND IF FEASIBLE SUPPORT THEM (MOSTLY ALL ARE ON PATREON) # MOST IMPORTANTLY, a humble request - At any point, if you have benefited from the site or have been a part of the community, kindly consider supporting it if feasible. Thank You! (Link in the spoiler below) # BEFORE PROCEEDING, A REMINDER THAT THIS GUIDE IS FOR THE LEGENDARY EDITION. IF YOU HAVE THE SPECIAL EDITION, CHECK OUT The Skyrim SE (TESVSE) Modding Cheatbook/ Guide [SEP/21]. PRO TIP: Always make sure you run any installer/ application with admin rights (specifically set it up for MO2 as other such as TES5Edit, LOOT, and so on would be dependent on it) 01. SKYRIM REQUIREMENTS, PRE INSTALLATION & INSTALLATION : (BEFORE INSTALLING THE GAME REFER POINT of Point 2.1 given below and follow steps accordingly) 02. SETTING UP DIRECTORIES : I personally have a specific setup for making my directories, the video in Point 3 below will also guide you for the same. Basically you should have and be aware of the following directories: 2.1. Where all BASE GAMES are installed [NEVER INSTALL YOUR GAME INTO THE PROGRAM FILE/(X86) DIRECTORY. Preferably, make a Folder that will contain all your games (say, D:\GAMES\TESVLE). Make sure the folder names are not too long and that you are not making too many folders within folders. If you followed exactly what is mentioned, you will have your game installed in the TESVLE folder (it will have a data folder and the skyrim launcher)] 2.2. Where MO2 and loot gets installed (Say D:\Executables\MO2; there should be LOOT, TES5Edit and so on folders for each tool; for now just create MO2 folder and install MO2 in it) 2.3. MO2 working mods and profile folder for each game into a single working folder (So under say D:\WMF\TESVLE; there should be F04, TESSE and so on folders for each game, for now just make the directories as mentioned in bold) 03. SETTING UP MOD ORGANIZER (MO2) : Note 1 - There are many options to mod the game, manually or via different mod managers, this guide will only cover mostly installation of mods via mod organizer. Note 2 - You should run the game once via skyrim launcher before installing MO2, no need to start a game, just run it and close it, it helps to initialize all the requirements. 3.1. Instance Configuration You will obviously be installing mods for more than one game, managing instances will help you achieve that (even if you have only one game to mod this is a useful and compulsory step) You must create and configure a GLOBAL INSTANCE for each of your game (Create say D:\WMF\TESVLE; there should be F04, TESSE and so on folders for each game, for now just make the directories as mentioned in bold) 3.2. Profile Configuration This is an advantage of using MO2, you can configure multiple profiles and have different mod setup and saves for each profile. (Pro Tip: Never alter your Default Profile, simply click copy and enter the name for a new profile. Enable Automatic Archive Invalidation, do not enable the other 2 options unless you know what you are doing) I suggest creating at least 2 profiles other than the default profile. One profile would be your permanent/ most stable profile. The other you can use for testing and trying out mods and after that you may add it to your permanent/ stable profile. You can obviously create more as per your needs. 3.3. Nexus Integration Make an account on Nexus if you don't already have one. When asked in MO2 to integrate/connect automatically to Nexus Account, do so. Incase you have missed/skipped it, do so from - settings>nexus>connect to nexus Here is a comprehensive video tutorial for the Mod Organizer installation 3.4. MO2 Features and Usage ALWAYS GO THROUGH THE MO2 TUTORIAL FULLY ATLEAST ONCE. If you have skipped the tutorial you can always re-launch it and it will ask again or find the tutorials under the help tab. Understand that modding is so very comprehensive and you only learn through time, just to give you a glimpse of the depth, here is a guide only covering MO. (Link only for reference a simple video linked below) If after scrolling right to the bottom of the guide you feel fatigued, hope you get the point I am trying to make. I'll try and simplify things as much as possible. 3.5. MO2 Interface, Basics, Conflicts, Overwrites and Load order explained. 3.5.1 MO2 Interface & Basics 3.5.2 Conflicts, Overwrites and Load order Linking a video below that will help digest things easier, do not skip watching this video, watch it right till the end. Here is a comprehensive video tutorial on using Mod Organizer (IF YOU PLAN ON USING MO, WATCH THIS VIDEO ATLEAST ONCE) I know even this video is quite extended and much of it you might never need, will come up with something simpler soon. For now try learning the basics at least namely all the icons, downloading and installing a mod correctly, left pane, right pane and its respective tabs; load order and plugin order, conflict(s), overwrite ,explorer location of mods and ini files and adding/running executables. 04. SKSE & .INI SETTINGS : From SKSE Readme - The Skyrim Script Extender, or SKSE for short, is a modder's resource that expands the scripting capabilities of Skyrim. It does so without modifying the executable files on disk, so there are no permanent side effects. 4.1 GET THE LATEST VERSION (ARCHIVE OR INSTALLER IS YOUR CHOICE). EXTRACT OR INSTALL IT IN YOUR BASE GAME FOLDER (D:\GAMES\TESVLE) THAT SHOULD HAVE THE SKYRIM LAUNCHER AND DATA FOLDER. 4.2 GO TO D:\GAMES\TESVLE/DATA/SKSE AND OPEN SKSE.INI AND ADD THE LINES GIVEN BELOW AND SAVE IT. IF THERE'S NO /SKSE FOLDER AND/OR .INI FILE IN IT, CREATE THEM. SIMPLY MAKE A TEXT DOCUMENT COPY THE LINES GIVEN BELOW AND RENAME IT AS SKSE.INI 4.3 REGISTER THE EXECUTABLE INTO MO2. 4.3.1 Refer steps to do so in the video linked below point 5.2. Preferably launch the game after point 5 and do the steps mentioned therein to confirm a successful installation of SKSE. IMPORTANT NOTE: FROM NOW ON EVERYTIME YOU WANT TO PLAY YOUR GAME YOU HAVE TO RUN IT VIA SKSE EXECUTABLE THAT WE REGISTERED IN MO2. 05. xEDIT AND CLEANING THE ESMs : 5.1 Download xEdit and install it to D:\Executables\TES5Edit 5.2 Register the xEdit and QuickAutoClean (QAC) executables into MO2. Steps to do so are in the video below. Here is a comprehensive video tutorial for the xEdit installation 5.3 First, backup/copy the following ESMs to a safe location: 5.4 Next, run QuickAutoClean (QAC) from MO2 and clean only the above mentioned ESMs one by one. Steps to do so are in the video below. Here is a comprehensive video tutorial for the cleaning the DLCs 5.5 AT THIS POINT I ADVICE RUNNING YOUR GAME ONCE VIA SKSE. SIMPLY SELECT SKSE IN EXECUTABLES RIBBON AND CLICK RUN. YOU ARE ADVICED NOT TO START A NEW GAME, JUST RUN THE EXECUTABLE, HIT '~' KEY ON YOUR KEYBOARD AND TYPE GETSKSEVERSION>HIT ENTER. THE SKSE VERSION YOU INSTALLED (IN POINT 4) SHOULD BE DISPLAYED. THAT'S IT QUITE THE GAME. FROM NOW ON, EVERYTIME YOU HAVE TO RUN A MODDED GAME YOU USE THE SKSE EXECUTABLE. VERY IMPORTANT NOTES: (DON'T YOU DARE SKIP READING THESE) A. ALWAYS READ THE DESCRIPTION AND REQUIREMENTS SECTION OF ANY AND EVERY MOD THAT YOU INSTALL OR PLAN TO INSTALL, ONLY AFTER THAT SHOULD YOU INSTALL THE MOD. B. MODDING IS PERSONAL, THERE ARE MANY OPTIONS/WAYS TO DO CERTAIN THINGS. INFINITE MODS THAT DO THE SAME THING, EACH DIFFERENTLY. C. EVERYTHING IS AFFECTED BY THE EFFLUX OF TIME, I (OR SOMEONE ELSE HOPEFULLY) WILL TRY AND KEEP THIS GUIDE UPDATED BUT THERE'S ALWAYS A POSSIBILITY OF UPDATES OR THAT SOMETHING NEW HAS TAKEN OVER. DO NOT WORRY, YOU ARE NEVER ALONE! JUST REACH OUT AND YOU'LL GET THE REQUIRED HELP SOONER OR LATER. TILL THEN TRY LEARNING AS MUCH AS YOU CAN ON YOUR OWN. (Although, this is a quick start guide/ cheatbook and you can simply follow it to have a working modded game, I recommend that you use it a reference guide because without knowing or understanding what you are doing, one can only do more harm than good more sooner than later.) 06. MASTERS & OTHER ESSENTIALS : 6.1. SkyUI For any MOD that you download make sure that you are downloading it for your specific game. So ensure that you're on the Nexus Skyrim page, under Files, Main Files, download the latest version using Mod Manager Download button. It will show up under downloads tab in mod manager, simply double click to install it. And then click the checkbox to enable it. Steps to do so are in the video below. Download SKYUI from the link given here. (The video is for SKYRIM SE and not LE, so do not use the links given in that video) Here is a comprehensive video tutorial for installing SKY UI 6.2. iHUD: Get the latest version using mod manager download option. Install it via downloads tab (Right pane), then enable it in MO2 (left pane/load order). Usually, you should always get the latest version, however, I have tested only its older version (2.4), so this time I suggest you that that one. 6.3. UIExtensions: Get the latest version (1.2.0) using mod manager download option. Install it via downloads tab (Right pane), then enable it in MO2 (left pane/load order). 6.4. Papyrus: 6.4.1 Papyrus Logging: A useful and important requirement when you ask for help on this forum or anywhere else for that matter is to include your papyrus log. By default the logging is disabled and it should be kept that way when playing. However, incase you encounter any issues and are actively looking for possible causes for issues/troubleshooting that is when you should enable the papyrus logging. You should disable the logging again once the issues are resolved and you resume your regular gameplay. If you keep it on all the time, it's impacts your system resources and will unnecessarily cause extra stress. To enable papyrus logging, in the mod manager, under tool plugins, there is an INI editor. In it, edit/add the following lines to your skyrim.ini file: Your papyrus log files by default are created in the Documents>My Games>SkyrimLogsScript 6.4.2 PapyrusUtil: An SKSE plugin adding several new scripts with native functions that provide various conveniences related to data storage and other misc functions to the scripter/ modder. Get the latest version (3.3) using mod manager download option. Install it via downloads tab (Right pane), then enable it in MO2 (left pane/load order). IMPORTANT NOTE: MAKE SURE THIS MOD IS OVERWRITING ALL OTHERS. NOTHING WITH CONFLICTING FILES SHOULD EVER BE LOADED AFTER THIS MOD. *As many mods including the popular ones such as campfire, frostfall, and simply knock include an outdated version that will cause issues. It is advised to overwrite them with the most current version of the plugin. (REFER POINT 3.5.2 AND WATCH THE VIDEO LINKED BELOW IT FOR A BETTER UNDERSTANDING OF MOD OVERWRITE (LOAD ORDER) AND CONFLICTS) 6.5. JContainers: Get the latest version (3.3.0.RC.3 ) using mod manager download option. Install it via downloads tab (Right pane), then enable it in MO2 (left pane/load order). 07. PATCHES & FIXES : 7.1. Crash Fixes/ Skyrim Memory Patch: VERY IMPORTANT STEP: (DON'T YOU DARE SKIP ANY INSTRUCTION CONTAINED HERE) THIS IS THE VERY FIRST CRITICAL DECISION THAT YOU WILL BE TAKING. WATCH THE VIDEO LINKED BELOW TO UNDERSTAND WHY IS IT CRITICAL. BASICALLY, IF YOU DO NOT GET THIS RIGHT, YOU WILL CONSTANTLY FACE ISSUES WITH YOUR GAME AND PROBABLY CTDs. NOTE THAT THE VIDEO COVERS INSTALLATION OF 2ND METHOD MENTIONED HERE, WATCH THE VIDEO AND UNDERSTAND THE CONCEPT OF MEMORY BLOCKS. HOWEVER, IF YOU PLAN TO FOLLOW THE 1ST METHOD, DO NOT FOLLOW THE STEPS OF THE VIDEO, INSTEAD FOLLOW THE SETPS GIVEN IN THIS GUIDE BELOW. THERE ARE 2 WAYS AVAILABLE TO MANAGE YOUR SKYRIM MEMORY ALLOCATION, TO DO SO FOLLOW ANY AND ONLY ONE OF THE FOLLOWING METHODS: (JUST SO THAT YOU DO NOT HAVE TO BOTHER ASKING ME, MY SUGGESTION IS THAT YOU USE CRASH FIXES METHOD.) 7.1.1. CRASH FIXES - BY EDITING CRASHFIXES.INI. DETAILED STEPS TO DO SO: 7.1.1.1 Installing Crash Fixes 7.1.1.2 Tweaking Crash Fix Plugin. (Refer Important Game, Save and Load Notes before doing anything mentioned herein) 7.1.2. SHESHONS MEMORY BLOCK ALLOCATION - BY EDITING SKSE.INI. DETAILED STEPS TO DO SO: Here is a comprehensive video tutorial for installing the Skyrim Memory Patch FOR THE FOLLOWING FIXES, simply get the latest versions using mod manager download option. Install it via downloads tab (Right pane), then enable it in MO2 (left pane/load order). 7.2. Unofficial Skyrim Legendary Edition Patch (USLEP) 7.3. Cobb Bug Fixes 7.4. Bug Fixes (v2 Beta 2) 7.5. Modern Brawl Bug Fix or Enhanced Blood Textures (EBT) - EBT includes MBBF. In short, install any one not both. 08. BODYSLIDE : 8.1 Get the latest version and install it like any other mod in MO2. 8.2 What is more important is that you register it as an executable in MO2 and run it from there itself in future. To do so, in MO2, click/go to the data tab in the right pane in it, CALIENTES TOOLS>BODYSLIDE. Right click the the Bodyslide x64.exe>Add as Executable. That's all it takes to install bodyslide and add it as an executable. BE CAREFUL WITH THIS MOD AND DO NOT MESS AROUND WITH IT, READ ABOUT IT, WATCH TUTORIALS IF YOU FEEL LIKE EXPLORING MORE. BUT BEFORE THAT STICK TO BASICS. FOR STARTERS, DO NOT HIT SAVE! I REPEAT DO NOT HIT THE SAVE BUTTON WHEN INSIDE BODY SLIDE. YOUR CHANGES GET CAST INTO STONE IF YOU DO THAT. 8.3 How to use bodyslide? (i.e modify Presets, build Assets and Custom Presets) Here is a comprehensive video tutorial for using Bodyslide 09. RACEMENU : Get the latest version using mod manager download option. Install it via downloads tab (Right pane), then enable it in MO2 (left pane/load order). 10. BODY REPLACER, SKINS AND OTHER BEAUTIFICATIONS 10.1. Caliente's Beautiful Bodies Edition (CBBE) This is another mother of all mods. It is a Body Replacer meaning that it replaces all the adult vanilla female bodies (player and NPC) with one that is fully customizable through the BodySlide tool and BodySlide's RaceMenu Morphs plugin. In short, any changes to female body are only possible due to this mod. Get the latest version (3.4r) using mod manager download option. It is packed as an Installer, so when you double click to install it via downloads tab (Right pane), it will pop up a window with various options. The options have been explained as well as recommended below, enable the ones preferred and install the mod. Then enable it in MO2 (left pane/load order) and you're set. Do not worry, you can change your preference later on easily. Not just that you can customize the body as per your liking, steps to do so are given below. There a few others as well namely UNP, UNPB and 7B, whichever you choose is personal choice. For simplicity and uniformity within this guide I am only covering CBBE throughout. From hereon, there are many options available for this section for skins, hair and other beautifications, whatever you choose is purely personal choice. 10.2. Skins In the section above I have only covered CBBE, there are other body replacers too. So in this section make sure you download files specific to the body replacer you download and installed. So, if you are using CBBE body then get CBBE Skins as well, if you use some other body mod get skin files for that specific body mod. Simply get the latest versions using mod manager download option. Install it via downloads tab (Right pane), then enable it in MO2 (left pane/load order). Choose only one. There many others, whichever you choose is purely personal choice. 10.3. Hair - Simply get the latest versions using mod manager download option. Install it via downloads tab (Right pane), then enable it in MO2 (left pane/load order). 10.4. Other Beautifications - Simply get the latest versions using mod manager download option. Install it via downloads tab (Right pane), then enable it in MO2 (left pane/load order). There a plethora of options available here I only give few mostly used and so that you get a basic idea. 11. PHYSICS Simply get the latest versions using mod manager download option. Install it via downloads tab (Right pane), then enable it in MO2 (left pane/load order). These mods add more physics, for example swishing hair, flowing skirts, bouncing boobs and so on. 11.1. HDT Physics Extensions 11.2. HDT HighHeels System (Optional but recommended) and its patch HDT HH Performance Patch 11.3. HDT Breast And Butt Physics - TBBP BBP Supported - Get any one file from the main files and also get the CBBE reference skeleton fix from the optional files. 11.4. HDT Bounce and Jiggles CBBE Edition - Read the description and get files accordingly. Recommended/ required files given below. 12. FNIS This is the mother of all mods, do not mess up with its installation. Without it no custom animation is possible in Skyrim. Follow everything to the word. 12.1 Get the latest version and install the following 3 files like any other mod in MO2: FNIS Behaviour FNIS Creature Pack FNIS Spells 12.2 What is more important is that you register FNIS BEHAVIOUR it as an executable in MO2 and run it from there itself in future. i. Right click the installed mod FNIS BEHAVIOUR>OPEN IN EXPLORER>TOOLS>GenerateFNIS_for_Users. Copy the folder path. (It should have GenerateFNISforUsers.exe) ii. Under Modify Executables>Add from File>Paste the copied folder path>Select the GenerateFNISforUsers.exe. That's all it takes to install FNIS behavior and add it as an executable. Now since it helps with custom animations, you have to run it every time you add or modify any animation mod. You will have to run a generator tool GenerateFNISforUsers.exe (part of FNIS Behavior) every time you have installed or uninstalled FNIS, or an FNIS based mod. That is just not it, additionally for creatures, when you uninstall a mod that uses FNIS Creatures, you first have press the "De-Install Creatures" button, and then run the "Update FNIS Behaviors" There is little point in running it as it concerns with animation mods and has to be run every time on adding or removing any mod concerned with animations. As per this guide, the best time to run it would be post point 20 i.e. after you have finally installed all/most of your animation mods. So, no need to run it yet, we will be running it in point 20. (Because it will make files in overwrite folder, you need to be familiar with it. Also, if run, fixes such as 'Skeleton Arm Fix' has to be enabled, besides the other fixes it covers and then the Update FNIS Behavior button has to be clicked. However, do not worry if you already messed up and run FNIS without following correct steps, simply following the correct steps again will ensure its smooth working.) 12.3 Steps to update/run FNIS behaviour 12.4 Important points to be aware of: 1. FNIS has animation limits. The regular one is capped at 10,000 animations. And the XXL one at 32,000. 2. While counting FNIS animations even a twitch will be counted as a separate animation. So, lets say you have a mod that has a killmove animation, such single kill move animation can have many (FNIS) animations. ? 3. For those going over 10k limit or nearing/ exceeding 100% CTD probability, it is advisable to understanding a few things. Also there is a fix for the same. However, nothing is magic so be careful of your system load and tweak it accordingly. Further, also pay attention to the temperature of your PC components and overall temperature, when playing it should be anywhere between 60° C to 80° C. Read the FNIS article and the description of Anim LCF, do not proceed without reading/ understanding or you will be faced with consequences. You have been warned! Here is a comprehensive video tutorial for installing FNIS 13. XPMSE NOTHING SHOULD BE OVERWRITING THIS MOD, UNLESS SPECIFIC MOD AUTHOR HAS MENTIONED SPECIFICALLY. Simply get the latest versions using mod manager download option. Install it via downloads tab (Right pane), then enable it in MO2 (left pane/load order). 14. ARMORS & CLOTHING Simply get the latest versions using mod manager download option. Install it via downloads tab (Right pane), then enable it in MO2 (left pane/load order). Do not forget that every time you add new armor or clothing to your load order, you have to run bodyslide and build its assets to match your preset. Steps to do so are given in Point 8.3. 15. FOLLOWERS Simply get the latest versions using mod manager download option. Install it via downloads tab (Right pane), then enable it in MO2 (left pane/load order). This section is optional. 16. LOCATIONS Simply get the latest versions using mod manager download option. Install it via downloads tab (Right pane), then enable it in MO2 (left pane/load order). 17. LIGHTING OVERHAUL Simply get the latest versions using mod manager download option. Install it via downloads tab (Right pane), then enable it in MO2 (left pane/load order). Important Game, Save and Load Notes: (Don't Skip) 1. Steps to make saves the right way. If you're following my guide to the word, it is time to launch the game and make an Initial save. 2. Crash Fixes Tweaks - If you are using the OSAllocators method (refer point 7.1.1.1), you may (now) refer and follow the steps mentioned in 7.1.1.2. 18. SSL AF AND DEPENDENCIES/ COMPLEMENTARIES All the necessary information is provided below. Important points to be aware of: 19. CREATURE & DEVIOUS FRAMEWORK 19.1 Creature Framework and mods All the necessary information is provided below. 19.2 Devious Framework and mods All the necessary information is provided below. Simply installing the mod will not cut it this time, you need to follow some extra steps for DD to work. Steps to do so given below. 20. ANIMATIONS, SSL BASED MODS, QUESTS AND EXTRAS All the necessary information is provided below. Note that the link may be outdated, simply performing a search will provide you with the latest links if any. -------------------- ALL GOOD THINGS (MUST) COME TO AN END -------------------- As a humble request, experienced modders kindly share your experience of load orders, anything else that can/should be included in this guide. Preferred Mod Load Order & Groupings : DISCLAIMER: 1. YOU ARE RESPONSIBLE FOR YOUR ACTIONS, IF YOU HAVE DOUBTS DO NOT PROCEED WITHOUT ASKING. 2. NO ONE APPRECIATES PLAGIARISM. A MENTION WOULD BE AMAZING. 3. IF SOMEHOW YOU'RE A WIZ AND EARNING FROM ANY IDEA/ CONTENT OF THIS GUIDE, THEN BE KIND AND SIMPLY SUPPORT THIS SITE. Credits/ Gratitude @Ashal @fore @MadMansGun @mrsrt @donttouchmethere @Saya Scarlett @CPU @Psalam @LaEspada @Heroine HoneyCrotch
-
 Hello everyone, I literally have no Idea where to look for help, so I figured to try my luck here. Never posted here so please bear with me. Long story short, while in idle state all female's (pc/npc) thigh bones start spazzing out. It is also visible when you run/sneak etc, but it is not as bad as with idling. I tried disabling/enabling/different load order/ nothing works except disabling body mod itself (baka Haeun UNP) = (BHUNP), but my whole modlist is built around the mod, so I have no Idea what to do. I will provide anything needed just ask, since I don't really know what else to add. My SKSE is - skse64_2_02_06.7 No FNIS, I use NEMESIS Video with the thing itself included. The Elder Scrolls V Skyrim Special Edition 2024.06.02 - 13.36.08.04.mp4 modlist.txt PapyrusUtilDev.log loadorder.txt
 -
 Hey folks, I've got a problem. Actors won't undress for any animation. Even the Undressing Spell from Estrus won't strip them. I tried for a few days but could not find a solution. Everything else seems to be working. Could some modding genuis help me please? 0 0 Skyrim.esm 1 1 Update.esm 2 2 Dawnguard.esm 3 3 HearthFires.esm 4 4 Dragonborn.esm 5 5 SkyrimVR.esm 6 6 RSkyrimChildren.esm 7 7 Unofficial Skyrim Special Edition Patch.esp 8 8 SexLab.esm 9 9 SexLabAroused.esm 10 a paradise_halls.esm 11 b ZaZAnimationPack.esm 254 FE 0 hdtHighHeel.esm 12 c CreatureFramework.esm GRIM Wednesday Addams.esm paradise_halls_farengars_study.esl 13 d SkyUI_SE.esp 14 e SMIM-SE-Merged-All.esp 15 f Immersive Wenches.esp 16 10 Immersive Sounds - Compendium.esp 17 11 Lore Weapon Expansion - Daedric Crescent.esp 18 12 Lore Weapon Expansion - Goldbrand.esp 19 13 Lore Weapon Expansion - Relics of the Crusader.esp 20 14 EnhancedLightsandFX.esp 21 15 Odin - Skyrim Magic Overhaul.esp 22 16 ELFX - Exteriors.esp 23 17 paradise_halls_SLExtension.esp 24 18 SexLab-AmorousAdventures.esp 25 19 AmorAdvExtended.esp 254 FE 1 3BBB.esp 26 1a SOSRaceMenu.esp My Home Is Your Home (MHiYH 2plus) dialogue patch.esp My Home Is Your Home dialogue patch.esp 27 1b PsycheAnimationObjects.esp 28 1c SLAL_SHanimAnimObj.esp ELFX - Weathers.esp 254 FE 2 JailRape.esp 29 1d ZIA_Complete Pack.esp 30 1e Wintersun - Faiths of Skyrim.esp 254 FE 3 Wintersun - SexLab Integration.esp WintersunSLI - DD expansion.esp Wintersun - ZIA Patch.esp 31 1f Wintersun - VR Patch.esp 32 20 HG_LaraCroft.esp 33 21 PAH_HomeSweetHome.esp 34 22 Vivace.esp Pahe_AltStartLAL.esp Pahe_Dwarven_Devious_suits.esp Pahe_Immersive_Creature Special Edition patch.esp pahe-tdf-patch.esp 35 23 MeseFollower.esp 36 24 HG_Aerith_FF7R.esp 254 FE 4 CiceroFemaleSE.esp 37 25 Arcanum.esp 38 26 PAH_AndYouGetASlave.esp 39 27 Hateful Wenches.esp 40 28 KNM_Mour.esp 41 29 pahe_lakeview_manor_cell.esp 42 2a Triumvirate - Mage Archetypes.esp 43 2b [SunJeong] Ninirim Collection.esp 44 2c LADX_SSE.esp 45 2d paradise_halls_fellglow_slave_camp.esp 46 2e AutoK.esp 254 FE 5 [Ichirou] Fredrika Follower.esp 47 2f Chaconne.esp 48 30 FollowerSelina.esp 49 31 haijin Followers - Mina Harker SI -.esp 50 32 HG_TifaLockhart_FF7R.esp 51 33 Meena Follower.esp 52 34 PAHSlaveCart.esp 53 35 Miri_Follower.esp 54 36 LucyRykerfollower.esp 55 37 Spellsiphon.esp 56 38 Souyu_Matasan.esp 57 39 Elvira Follower.esp 58 3a JuniFollowerV2.esp 59 3b EclipseHeimFollowers.esp 60 3c RayneStandaloneFollower.esp 61 3d AwpSylvanas.esp 62 3e SLAnimLoader.esp 254 FE 6 SLAL_AnimationByBakaFactory.esp 63 3f CBBE.esp 64 40 FNIS.esp 65 41 RaceMenu.esp 66 42 RaceMenuPlugin.esp 67 43 RaceMenuMorphsCBBE.esp 68 44 XPMSE.esp 69 45 Tiwa44_SGMD_CBBE_1_4.esp 70 46 Tiwa44_Minidresses_CBBE.esp 71 47 Tiwa44_Minidresses_Dragonborn_CBBE.esp 72 48 zzEstrus.esp 73 49 SLALAnimObj.esp 74 4a FNISSexyMove.esp 75 4b MoreNastyCritters.esp 76 4c MassMatchMakerSE.esp 77 4d RSChildren.esp 78 4e Growl - Werebeasts of Skyrim.esp 254 FE 7 BakaFactoryABC.esp 79 4f Bijin AIO.esp Bijin NPCs.esp Bijin Warmaidens.esp Bijin Wives.esp 254 FE 8 CiceroFemaleConversion.esp 80 50 SLAL_GSAnimObjects.esp 81 51 SexLabDefeat.esp 82 52 SLAL_AnimationsByLeito.esp 83 53 SLALAnimObjBillyy.esp 84 54 Serana.esp 85 55 Valerica.esp 86 56 Succubus-san.esp 87 57 SexLab Aroused Creatures.esp 88 58 Spellforge.esp 254 FE 9 Spellforge - Library - Arcanum.esp 254 FE a Spellforge - Library - Base - Odin.esp 254 FE b Spellforge - Library - Odin (for Apoc).esp 89 59 Vivid WeathersSE.esp 90 5a Vivid Weathers SE - Extended Snow.esp 254 FE c aMidianBorn_Book of Silence.esp 254 FE d armorFlesh.esp 91 5b FNISspells.esp 92 5c FXCameraAttachFogEffect for Scenery ENB VR.esp 93 5d 12FemaleBrows.esp 94 5e Forgotten Wenches.esp 95 5f higgs_vr.esp 96 60 Judgment Wenches.esp 97 61 PAN_FollowerPack1.esp 98 62 HentaiCreatures.esp 99 63 SkyrimVR - USSEP Patch.esp 100 64 PAN_Aumriel.esp 101 65 Neo's Slave Leia Renewal.esp 254 FE e Spellforge - Library - Triumvirate.esp 102 66 Lore Weapon Expansion.esp 103 67 MageVR.esp 104 68 PAN_NPCs_DB.esp 105 69 PAN_NPCs.esp 106 6a Radiant Raiment NPC Replacer - CBBE.esp 107 6b Schlongs of SkyrimSE - Light.esp 254 FE f ClickySoundBegone.esp 254 FE 10 Spellsiphon - Palm Ward.esp 108 6c vrik.esp 254 FE 11 Voidgate.esp 109 6d AnubAnimObj.esp 110 6e NibblesAnimObjects.esp 111 6f PAN_Celyria.esp 112 70 Ordinator - Perks of Skyrim.esp 113 71 Apocalypse - Magic of Skyrim.esp 254 FE 12 Spellforge - Library - Apocalypse.esp 114 72 Apocalypse - Ordinator Compatibility Patch.esp 115 73 Odin - Ordinator Compatibility Patch.esp 116 74 Ordinator - VR Patch.esp 117 75 Sacrosanct - Vampires of Skyrim.esp 118 76 ELFXEnhancer.esp 119 77 Realm of Lorkhan - Custom Alternate Start - Choose your own adventure.esp
 -
.thumb.jpg.70513e8e6661eaa92b0adb493ceeb676.jpg) Yes, I know, it's another one of these posts. Same old, same old. I DID check with a lot of the other posts about animations not playing, and don't get me wrong, I theoretically know what to do, but I'd still like to have some help about it. So... My problem: The animations I've downloaded (which btw a quite a few...) do not play out. When I, as an example, use the Matchmaker spells on my character, on an npc or both, and then wait 10 seconds, the animations are about to start. The "minimap" (top of the screen) disappears, the characters seem to be reset, all is fine. But then the game just continues as normal, as if the animations were skipped right away. This problem is common, but hear me out. When I use the Defeat mod OR the hentai creatures mod, that's the only times I am actually shown animations. Which isn't ideal, I kinda wanna force them with Matchmaker, for reasons of... you know, "killing time" late at night. The only animations that play are from the ZAZ animation pack, although I have downloaded countless others. Also, a lot of mods don't have their MCMs shown... and the Animation Loader appears, but there's nothing besides the picture, no options etc... I don't think that's ideal either. The OBVIOUS solution (which I'm gonna pursue): Reinstall all mods from scratch, and don't f*ck that up again. (My current mod situation is plagued by a LOT of reinstalls, again and again, which probably screwed my load order up big time. Especially XPMSSE and SkyUI... though SkyUI takes the whole damn cake, it always stopped working after installing new mods) I know that I won't be able to get around starting fresh. I hate doing it, but it must be done. However, I wanna be prepared this time, which is where I need your help. I want to know in which order I should install all mods, so that the whole reinstall thing doesn't happen again. I'd also like to know if I should watch out for specific mod versions, especially with skse, skyui and so on. And I'd love if someone with enough knowledge and time on their hands could help me out here... Oh, and remarks like "clothing/appearance mods should be put before animation mods" or similar ones are also greatly appreciated, because I don't know shit when it comes to load order. My mods (I'm gonna do my best for mentioning all of them): (All looked up with NMM) CBP Physics (0.26) CBPC (1.3.6) FNIS XXL (7.6) FNIS Creature Pack (7.6) SINful CBP (6.1.0) XPMSSE (4.8) Rogue Sorceress Outfit (3BB)(SMP Cape) (1.0) Argonian - Khajiit FabULook Eyes (1.0) Argonian Hair Plus (1.0) Beast Race Bodypaints SE -Khajiit and Argonian Themed Bodypaints (3.2) CBBE (1.6.2) CBBE 3BA (2.06) Color Matching Feathers for Argonian Tails (2.0) Horns Are Forever (1.1) Schlongs of Skyrim SE (1.1.4) One With nature (1.0) Joy of Perspective (2.0.2c) SLAL_SE (1) Schlongs of Skyrim SE HDT-SMP files (1.1) JContainers SE (4.1.13) Argonian Improvements SSE - Horns (1.0) Argonian Vampire Eyes - Dawnguard (2.0) BAT - Bigger Argonian Tails SE (1.0.3) Feminine Argonian Textures (Chameleon and Lizard) (3.1) Male Dragonic Argonian Textures 4k - 2k (SOS and Vanilla - 2k SOS (0.1) New Notcurnal Statue SE (1.0.0) HDT-SMP (2.11) Animal SOS SE (0.1.6.7.a10) Anub C 3.2021 Anub F 11.2020 Anub H 3.2021 Anubs Old Animations SE BadDogArousalSpell BakaFactory Animated Beasts Cocks (2.30) Billyy's SLAL Animations 2.9 Cobalt Animations SE v.1.3.1 Creature Framework 1.1.0 Decaying Draugr MNC Devious Devices (5.1) FlufyFox_SLAL_SE HentaiCreatures_MNCv12_6SE HornyCreaturesofSkyrim_V1_27SE K4_anims-1.5SE Kidnapped by Rieklings MoreNastyCritters_v12_6SE Naked Defeat 3-0 full (SE) SexLab Aroused Creatures SE v04.08 SexLab Matchmaker SexLab More Creatures SE v1.02 SexLabArousedSSELoose-29 SexLabFrameworkSE_v163_BETA9 Simple No More Stupid Dog .01.0 SL Defeat SSE SLAL Animations by Leito v1.6 The Book of Sex SE v1.1 ZAZ 8.0 CBBE SE v1.1 ZaZ Animation Pack + CBBE HDT V8.0 Main Menu Replacer Sexy Argonian (which, btw, is overwritten by some animations mod which now always shows animals fucking when I load up the game... I prefer the other one tbh) RaceMenu (0.4.16) SkyUI (5.2SE) BodySlide and Outfit Studio (5.4.2) Fuz Ro D-oh - Silent Voice (1.7) Verdant's Axe (1.0) Now, mind you, I have also downloaded a few mods through SE's mod browser, so these are not all of them. However, my load order should show them as well... On to My load order (looked up with LOOT): Skyrim.esm Update.esm Dawnguard.esm HearthFires.esm Dragonborn.esm ccbgssse063-ba_ebony.esl unofficial skyrim special edition patch.esp climatesoftamriel.esm Schlongs of SKyrim - Core.esm SexLab.esm SexLabAroused.esm CreatureFramework.esm Devious Devices - Assets.esm Devious Devices - Integration.esm Devious Devices - Expansion.esm Devious Devices - Contraptions.esm ZaZAnimationPack.esm inigo.esp morningstar - minimalistic races of skyrim.esp violens se.esp the paarthurnax dilemma.esp deadly civil war of skyrim.esp the brotherhood of old.esp alternate start - live another life.esp get_immersive_cheats_sp0ckrates.esp immersive movement.esp werewolfcanlootandrevertform.esp carryingbags.esp fos - forests of skyrim.esp businessinskyrim.esp bm_simpleaction.esp visible favorited gear.esp img-christmas-2016.esp icepenguingworldmap.esp skyland balanced.esp rela mountains.esp dd - enhanced blood main.esp dr_bandolier.esp realisticwatertwo.esp immersive citizens - ai overhaul.esp barenziahquestmarkers.esp dd - realistic ragdoll force - realistic.esp ordinator - perks of skyrim.esp apocalypse - magic of skyrim.esp werewolfperksexpanded.esp open cities skyrim.esp RaceMenuPlugin.esp HornsAreForever.esp FabLookEyesSSE.esp ArgoHairPlus.esp Color-Matching-Tail-Feathers.esp Schlongs of Skyrim.esp SOS - Smurf Average Addon.esp SOS - VectorPlexus Muscular Addon.esp CBBE.esp RaceMenuMorphsCBBE.esp Joy of Perspective.esp SINful CBP.esp 3BBB.esp [Zynx] RogueSorceress.esp FGCVerdantAxe.esp MoreNastyCritters.esp HentaiCreatures.esp SexLabDefeat.esp Simple No More Stupid Dog.esp SexLab More Creatures.esp OneWithNature.esp SexLab Aroused Creatures.esp Devious Devices SE patch.esp Devious Devices For Him.esp Devious Devices - BRRF.esp KidnappedByRieklings.esp TBOS.esp BDArousalSpells.esp SLAL_AnimationsByLeito.esp CobaltAnimations.esp SLAL_K4Anims.esp BakaFactoryABC.esp FlufyFoxAnimObjects.esp SLALAnimObjBillyy.esp HornyCreatures.esp Animal_SOS.esp AnubAnimObj.esp SexLabMatchMaker.esp FNIS.esp SLAnimLoader.esp DBIC.esp (not active) KidnappedByRieklings_GoblinSlayer.esp (not active) Naked Defeat.esp (not active) BRB_BeastRaceBodypaints.esp (not active) SOSRaceMenu.esp (not active) ZAZpatch.esp (not active) RaceMenu.esp XPMSE.esp SkyUI_SE.esp phew... yeah, that's quite a few mods, sorry to make you read through them all. But as I said, help of any kind is greatly appreciated, I'm really in a pickle here... So thanks for your help, and I wish you all a nice evening! - Poldoo
Yes, I know, it's another one of these posts. Same old, same old. I DID check with a lot of the other posts about animations not playing, and don't get me wrong, I theoretically know what to do, but I'd still like to have some help about it. So... My problem: The animations I've downloaded (which btw a quite a few...) do not play out. When I, as an example, use the Matchmaker spells on my character, on an npc or both, and then wait 10 seconds, the animations are about to start. The "minimap" (top of the screen) disappears, the characters seem to be reset, all is fine. But then the game just continues as normal, as if the animations were skipped right away. This problem is common, but hear me out. When I use the Defeat mod OR the hentai creatures mod, that's the only times I am actually shown animations. Which isn't ideal, I kinda wanna force them with Matchmaker, for reasons of... you know, "killing time" late at night. The only animations that play are from the ZAZ animation pack, although I have downloaded countless others. Also, a lot of mods don't have their MCMs shown... and the Animation Loader appears, but there's nothing besides the picture, no options etc... I don't think that's ideal either. The OBVIOUS solution (which I'm gonna pursue): Reinstall all mods from scratch, and don't f*ck that up again. (My current mod situation is plagued by a LOT of reinstalls, again and again, which probably screwed my load order up big time. Especially XPMSSE and SkyUI... though SkyUI takes the whole damn cake, it always stopped working after installing new mods) I know that I won't be able to get around starting fresh. I hate doing it, but it must be done. However, I wanna be prepared this time, which is where I need your help. I want to know in which order I should install all mods, so that the whole reinstall thing doesn't happen again. I'd also like to know if I should watch out for specific mod versions, especially with skse, skyui and so on. And I'd love if someone with enough knowledge and time on their hands could help me out here... Oh, and remarks like "clothing/appearance mods should be put before animation mods" or similar ones are also greatly appreciated, because I don't know shit when it comes to load order. My mods (I'm gonna do my best for mentioning all of them): (All looked up with NMM) CBP Physics (0.26) CBPC (1.3.6) FNIS XXL (7.6) FNIS Creature Pack (7.6) SINful CBP (6.1.0) XPMSSE (4.8) Rogue Sorceress Outfit (3BB)(SMP Cape) (1.0) Argonian - Khajiit FabULook Eyes (1.0) Argonian Hair Plus (1.0) Beast Race Bodypaints SE -Khajiit and Argonian Themed Bodypaints (3.2) CBBE (1.6.2) CBBE 3BA (2.06) Color Matching Feathers for Argonian Tails (2.0) Horns Are Forever (1.1) Schlongs of Skyrim SE (1.1.4) One With nature (1.0) Joy of Perspective (2.0.2c) SLAL_SE (1) Schlongs of Skyrim SE HDT-SMP files (1.1) JContainers SE (4.1.13) Argonian Improvements SSE - Horns (1.0) Argonian Vampire Eyes - Dawnguard (2.0) BAT - Bigger Argonian Tails SE (1.0.3) Feminine Argonian Textures (Chameleon and Lizard) (3.1) Male Dragonic Argonian Textures 4k - 2k (SOS and Vanilla - 2k SOS (0.1) New Notcurnal Statue SE (1.0.0) HDT-SMP (2.11) Animal SOS SE (0.1.6.7.a10) Anub C 3.2021 Anub F 11.2020 Anub H 3.2021 Anubs Old Animations SE BadDogArousalSpell BakaFactory Animated Beasts Cocks (2.30) Billyy's SLAL Animations 2.9 Cobalt Animations SE v.1.3.1 Creature Framework 1.1.0 Decaying Draugr MNC Devious Devices (5.1) FlufyFox_SLAL_SE HentaiCreatures_MNCv12_6SE HornyCreaturesofSkyrim_V1_27SE K4_anims-1.5SE Kidnapped by Rieklings MoreNastyCritters_v12_6SE Naked Defeat 3-0 full (SE) SexLab Aroused Creatures SE v04.08 SexLab Matchmaker SexLab More Creatures SE v1.02 SexLabArousedSSELoose-29 SexLabFrameworkSE_v163_BETA9 Simple No More Stupid Dog .01.0 SL Defeat SSE SLAL Animations by Leito v1.6 The Book of Sex SE v1.1 ZAZ 8.0 CBBE SE v1.1 ZaZ Animation Pack + CBBE HDT V8.0 Main Menu Replacer Sexy Argonian (which, btw, is overwritten by some animations mod which now always shows animals fucking when I load up the game... I prefer the other one tbh) RaceMenu (0.4.16) SkyUI (5.2SE) BodySlide and Outfit Studio (5.4.2) Fuz Ro D-oh - Silent Voice (1.7) Verdant's Axe (1.0) Now, mind you, I have also downloaded a few mods through SE's mod browser, so these are not all of them. However, my load order should show them as well... On to My load order (looked up with LOOT): Skyrim.esm Update.esm Dawnguard.esm HearthFires.esm Dragonborn.esm ccbgssse063-ba_ebony.esl unofficial skyrim special edition patch.esp climatesoftamriel.esm Schlongs of SKyrim - Core.esm SexLab.esm SexLabAroused.esm CreatureFramework.esm Devious Devices - Assets.esm Devious Devices - Integration.esm Devious Devices - Expansion.esm Devious Devices - Contraptions.esm ZaZAnimationPack.esm inigo.esp morningstar - minimalistic races of skyrim.esp violens se.esp the paarthurnax dilemma.esp deadly civil war of skyrim.esp the brotherhood of old.esp alternate start - live another life.esp get_immersive_cheats_sp0ckrates.esp immersive movement.esp werewolfcanlootandrevertform.esp carryingbags.esp fos - forests of skyrim.esp businessinskyrim.esp bm_simpleaction.esp visible favorited gear.esp img-christmas-2016.esp icepenguingworldmap.esp skyland balanced.esp rela mountains.esp dd - enhanced blood main.esp dr_bandolier.esp realisticwatertwo.esp immersive citizens - ai overhaul.esp barenziahquestmarkers.esp dd - realistic ragdoll force - realistic.esp ordinator - perks of skyrim.esp apocalypse - magic of skyrim.esp werewolfperksexpanded.esp open cities skyrim.esp RaceMenuPlugin.esp HornsAreForever.esp FabLookEyesSSE.esp ArgoHairPlus.esp Color-Matching-Tail-Feathers.esp Schlongs of Skyrim.esp SOS - Smurf Average Addon.esp SOS - VectorPlexus Muscular Addon.esp CBBE.esp RaceMenuMorphsCBBE.esp Joy of Perspective.esp SINful CBP.esp 3BBB.esp [Zynx] RogueSorceress.esp FGCVerdantAxe.esp MoreNastyCritters.esp HentaiCreatures.esp SexLabDefeat.esp Simple No More Stupid Dog.esp SexLab More Creatures.esp OneWithNature.esp SexLab Aroused Creatures.esp Devious Devices SE patch.esp Devious Devices For Him.esp Devious Devices - BRRF.esp KidnappedByRieklings.esp TBOS.esp BDArousalSpells.esp SLAL_AnimationsByLeito.esp CobaltAnimations.esp SLAL_K4Anims.esp BakaFactoryABC.esp FlufyFoxAnimObjects.esp SLALAnimObjBillyy.esp HornyCreatures.esp Animal_SOS.esp AnubAnimObj.esp SexLabMatchMaker.esp FNIS.esp SLAnimLoader.esp DBIC.esp (not active) KidnappedByRieklings_GoblinSlayer.esp (not active) Naked Defeat.esp (not active) BRB_BeastRaceBodypaints.esp (not active) SOSRaceMenu.esp (not active) ZAZpatch.esp (not active) RaceMenu.esp XPMSE.esp SkyUI_SE.esp phew... yeah, that's quite a few mods, sorry to make you read through them all. But as I said, help of any kind is greatly appreciated, I'm really in a pickle here... So thanks for your help, and I wish you all a nice evening! - Poldoo -
I was going to clean up my Modlist and it Crashed, after i startet MO2 again my whole List was fcked. I forgot to make any backups (thats my fault, i know) Im working ~10h now to move everything back into place because if i dont, i have severe Bugs (Texture/ Animation, etc.). For example all horses are invisible eccept for their mane. What have i done so far: Used FNIS many times, Used Bodysliders many times (helped with ~10% of the Texture and Clipping Bugs) Also used LOOT many Times. Changed the Loadlist manually. I'll send my Modlist and Loadorder in hope to get some help. Note. If someone could help in German I would prefer, my English is pretty bad tbh modlist.txt loadorder.txt
-
Hello, I really need help with fixing/sorting out my load order in MO2, when I started modding skyrim last year I wasn't aware that mods need to be in a specific order for the game to be working properly, and now it's super messy, I can't even make a new save file because of a notification that makes the game stuck,but playing an existing save is fine. If someone could give me tips or even help me with my load order I would really appreciate it! loadorder.txt modlist.txt plugins.txt
-
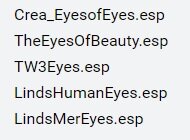
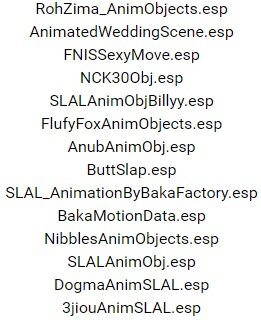
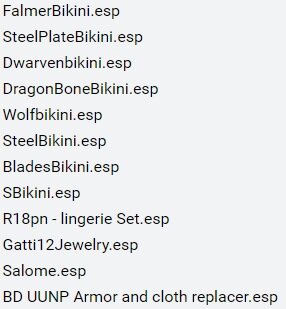
 Hi. I need help with merging mods. So far I've created merged into plugins: Eyes.esp Animation.esp Cloths.esp Hair.esp What else can I merge from my load plugins list? (physics?) By the way... Should I change anything in load order from my plugins list? (text from google translator) loadorder.txt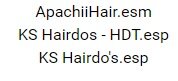
-
Hello everyone! I'm new to Fallout 4 and modding so i need a bit help with a modlist for a lower end pc that can handle like 350 mods max i guess or atleast 350 on my skyrim works well. Do anyone know a Fallout 4 V.1.10.163 NSFW modlist and load order to share Thank you.


