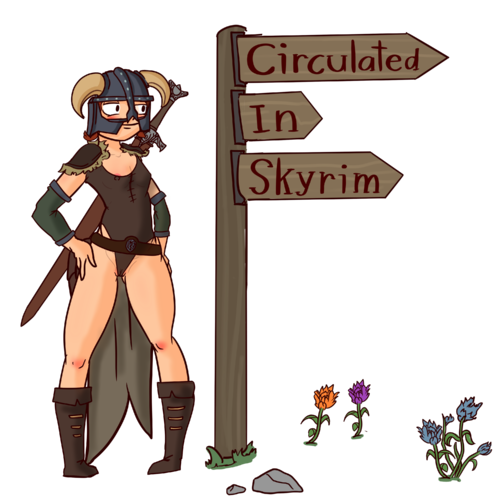

About This File
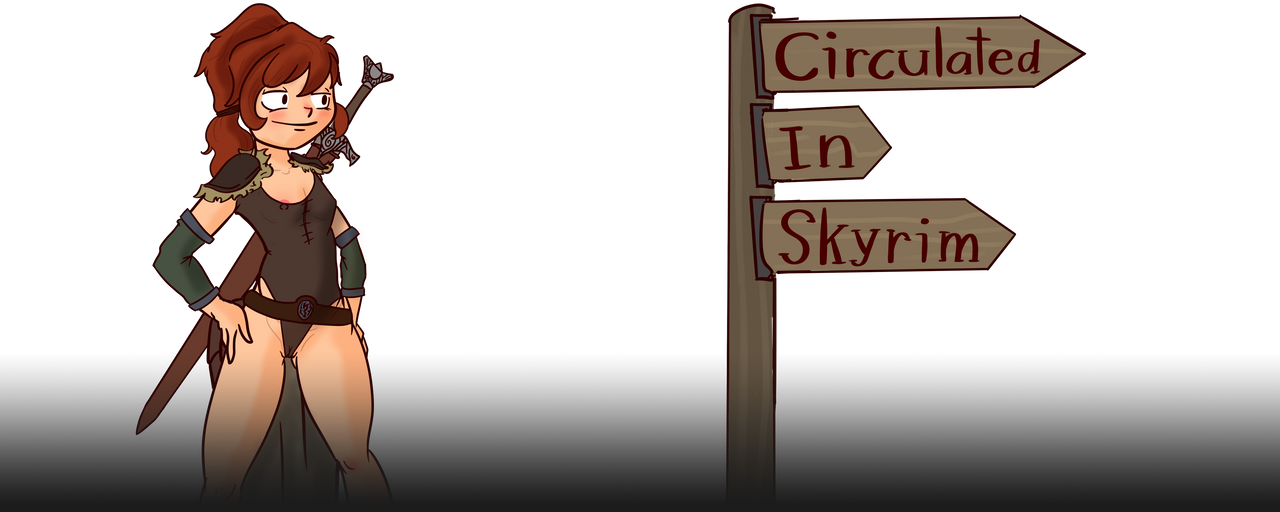
This mod is a prerequisite to my “Circulated In Skyrim” (CIS) patches. All up-to-date CIS patches reference CISCore content.
*Note* CISCore is only a set of "core files". It will not "circulate" or "distribute" items by itself.
What is CIS?
The CIS (or “Circulated In Skyrim”) mods distribute items added by other mods that are otherwise unobtainable in-game without the use of console commands or scary scripts. Many mods that add new items to Skyrim don't make them available to NPCs or lootable objects. The CIS series not only fixes this problem, but it also rebalances and adds new variants of modded items based on vanilla content. In some cases, CIS mods also repair minor bugs present in mod content.
What is CISCore?
CISCore is a collection of custom leveled lists (LVLI), object effects (OBJE) and outfit templates (OTFT) that are referenced by other CIS mods (also called "CIS patches"). By having CIS patches use a set of core files, it's possible to perform updates to the CIS series without individually updating every patch. In addition, it makes adding new entries to the CIS series significantly easier, and reduces the likelihood of errors when creating and merging CIS content.
What does this mod do, and how so?
In a nutshell, the CIS series replaces items in Skyrim with leveled lists (LVLI), which makes it possible for different items (such as modded content) to be spawned in place of vanilla content. CIS mods override vanilla leveled lists (LVLI) and outfit templates (OTFT) using CIS-leveled lists (LVLI), which contain mod-content. When applicable, CIS mods also add new content (based on mod-content) to CIS-leveled lists, such as enchanted items.
Table of Contents
------------------------
- What are CIS Patches?
- What CIS Patches are there?
- How does CIS Work?
- Why use CIS?
- Why not to use CIS?
- Goals
- Questions, comments or concerns
- Installation
- Permissions
- Requirements
- Updates
What are CIS Patches?
--------------------------------
CIS patches inject CISCore's leveled lists (LVLI) and vanilla leveled lists (LVLI) with mod-content. CISCore is a framework, and CIS patches use CISCore to distribute new content in-game. Every CIS patch is specifically tailored to one or more mods. They are responsible for enchanting (when applicable) and rebalancing the items they circulate in Skyrim.
It takes a lot of work to distribute and enchant modded content, so it's understandable why many authors don't bother. With mods like Lootification, one could technically argue that it's unnecessary. However, mods like Lootification are what I like to call "blanket fixes". While they do distribute modded content, they only cover-up the problem. Script-based solutions offer much flexibility, but they can be considered “one-size-fits-all” strategies.
Most loot-distributing mods are designed with weapons and armor in mind. They may or may not pay attention to other types of items, and in many cases, they can’t. While they work great with basic sets of gear (such as cuirass, helmets, greaves etc.) they struggle with non-vanilla-based gear (such as "bikinis", collars, and other "non-standard" gear). They cannot dynamically enchant or rebalance these "exceptions", and will require user input to maintain in-game balance.
My CIS patches are created by hand, allowing for a greater degree of balancing and edits no "blanket fix" can do. These patches are carefully designed to be balanced in relation to the vanilla Skyrim experience. They rename, enchant, adjust, and distribute modded content into Skyrim. By avoiding scripts, the CIS series won’t (directly) contribute to script latency or lag. CIS patches come in all shapes and sizes, to best integrate modded content into your game.
How do I make my own CIS patch?
-------------------------------------------
I will show you how how to make a quick-and-easy, basic CIS patch using xEdit. In this example, we will will be using CISCore to inject mod-content from the Pero Pero robes collection into Skyrim. Please note that this tutorial is intended for non-enchanted items. Enchanted gear tends to be directly injected into Skyrim's vanilla Leveled Lists (LVLI), as opposed to CISCore's. This tutorial will assume that you have little to no experience with xEdit and Leveled Lists. Note - To expand any of the images, simply right-click and "Open image in new tab".
Let us begin!
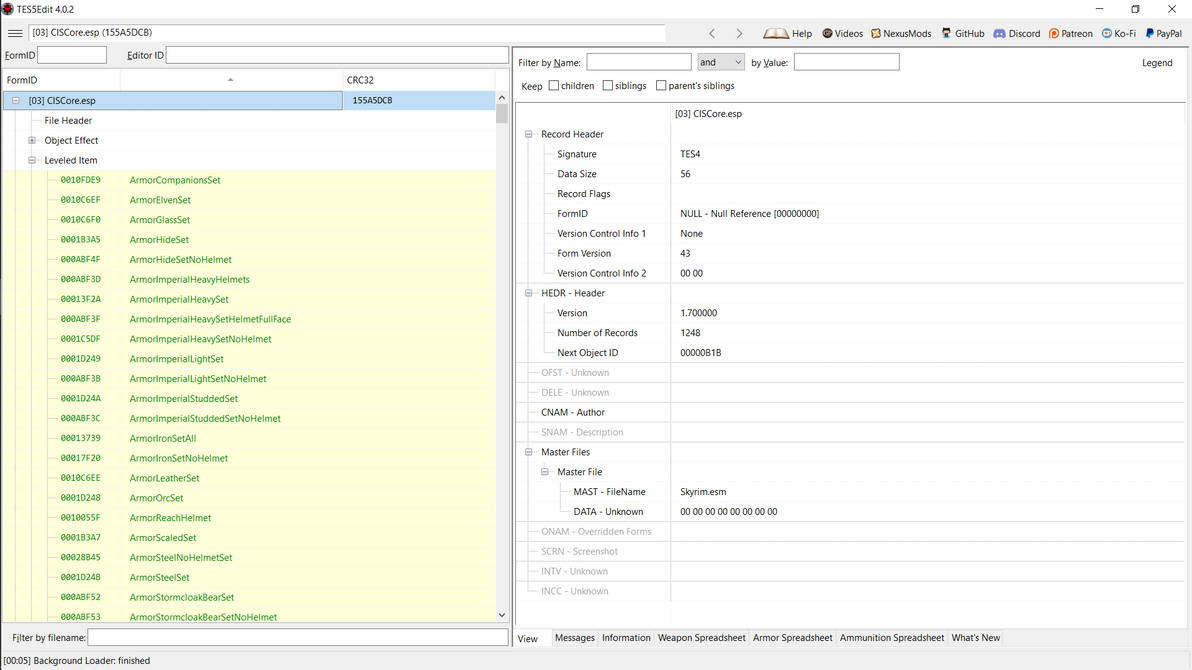
(1) First, boot up xEdit. From the plugins menu, select 'CISCore.esp" and the mod you want to create a CIS patch for. Here's a helpful tip; by right clicking on the plugins menu, you can click "Select None" to uncheck all checked plugins. This is particularly useful when you have a large load order.
(2) Click the small box (with the "+") next to CISCore.esp. Then, click the same box next to "Leveled Item". A drop down menu of all item-related Leveled Lists (LVLI) will appear. I recommend sorting this menu by Editor IDs, by clicking the space between "FormID" and "CRC32" towards the top of the interface. Depending on what you have selected, you may or may not see the words "EditorID". In any case, clicking the appropriate area will have the same effect. All CIS-leveled lists are carefully named, and designed to be easily sorted.
Color Coding
You will see both Skyrim's vanilla Leveled Lists (LVLI) and CISCore's. CISCore overides select vanilla Leveled Lists, which should be highlighted yellow. This indicates that there are two copies of the same Leveled Lists (LVLI) in question, and both have different data. You may also see Leveled Lists (LVLI) which are highlighted green. This means the same thing as yellow Leveled Lists (LVLI), except that both copies are exactly the same. This is bad modding practice, and you should avoid these in your personal mods whenever possible. Non-highlighted Leveled Lists (LVLI) indicate that they are not being overridden by another mod.
Naming Conventions
CISCore and Skyrim's Leveled Lists (LVLI) are both carefully named. In this example, we will only be using CISCore's Leveled Lists. All of CISCore's Leveled Lists (LVLI) start with one of two prefixes, "CIS" or "CISNPC". Entries with the "CISNPC" prefix are only used by a specific CIS mod called "CISNPCs". If you don't plan on using this mod, you will not need to worry about editing "CISNPC" Leveled Lists (LVLI). However, if you plan in distributing your CIS patch, I highly recommend that you use both "CIS" and "CISNPC" Leveled Lists (LVLI). For every "CIS" Leveled List (LVLI), there is exact copy with the prefix "CISNPC".
For this CIS patch, will be only be using sublists. A "sublist" is simply an identifier used to indicate that a Leveled List (LVLI) is intended for use inside another Leveled List (LVLI, and does not usually use leveled items. Each CIS sublist represents an item in-game. For example, "CISSublistArmorFurBoots" stands for "Fur Boots". For every instance of Fur Boots that spawns in-game, CISCore checks for modifications to CISSublistArmorFurBoots. If another mod adds an entry to CISSublistArmorFurBoots (for example, another CIS patch), CISCore will randomly choose between that entry and the original (vanilla) entry.

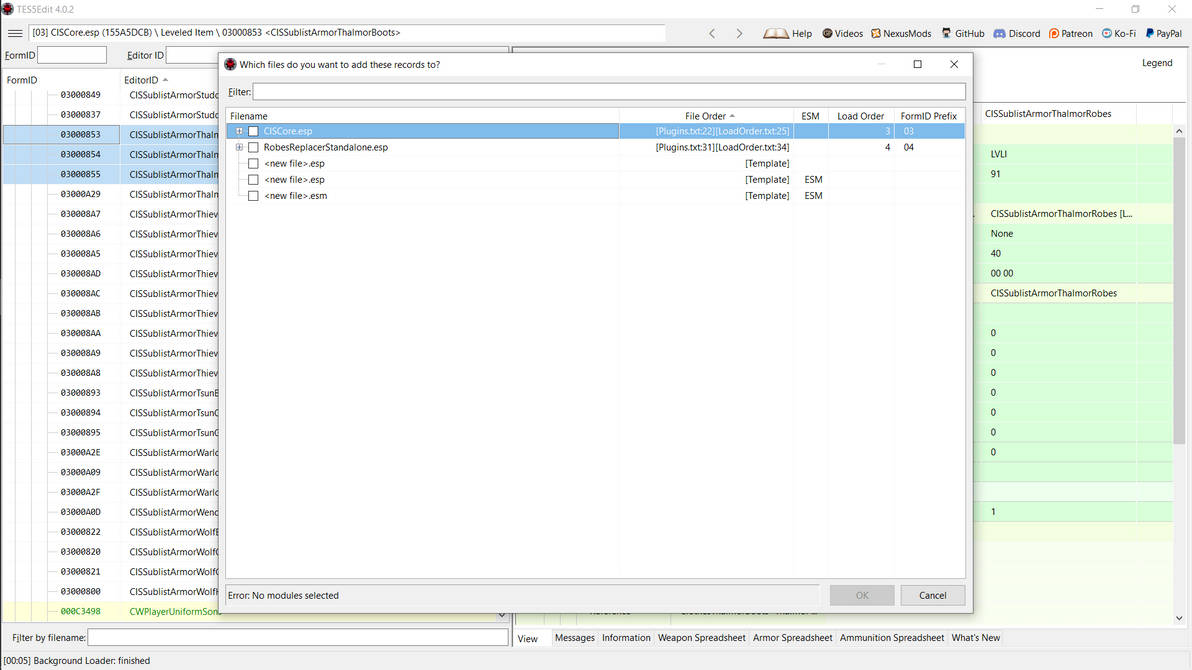
(3) In this example, we will be creating a CIS patch for Thalmor clothes (from the Pero Pero Robes collection). With that in mind, scroll down CISCore's Leveled Items (LVLI) until you find the appropriate entries; I have selected CISSublistArmorThalmorBoots, CISSublistArmorThalmorGloves, and CISSublistArmorThalmorRobes. Hold down the CTRL key to select multiple entries at once. Then, right click any selected entry. Click "Copy as override into. . ." (See Naming Conventions, above)
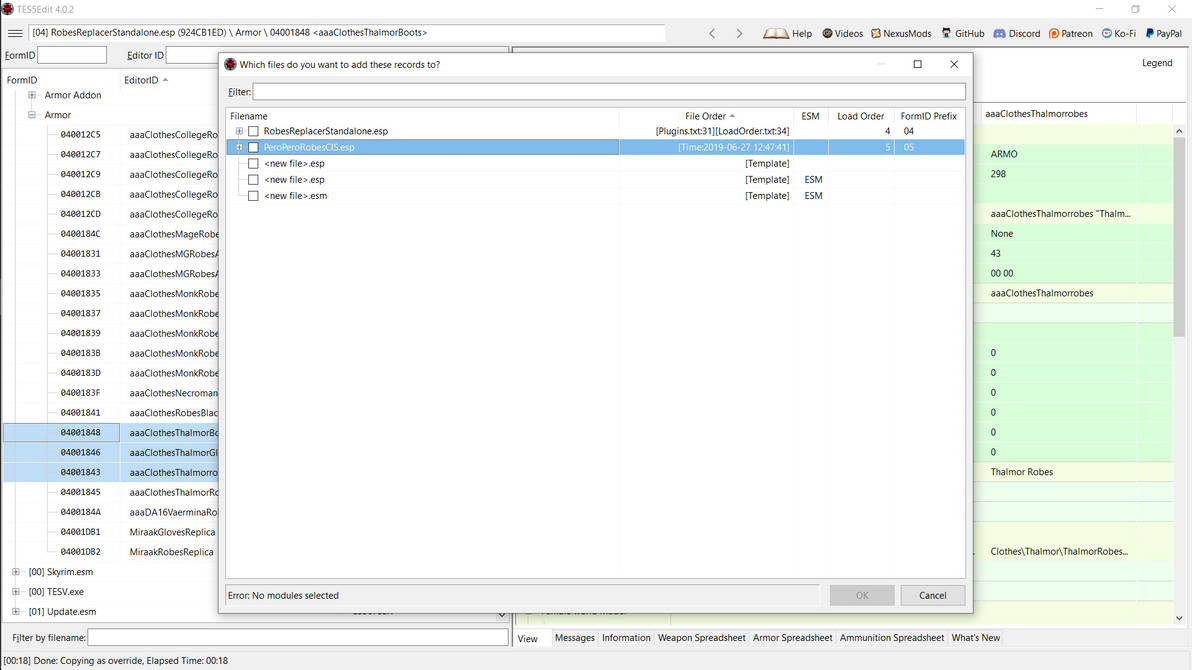
(4) You will then be asked which files do you want to add these records to? Check off <new file>.esp and then click "OK" on the bottom right. Give your CIS patch a name and click "OK" again. I will name this CIS patch "PeroPeroRobesCIS". As a general naming convention, CIS patches use no spaces (or symbols), and always end in "CIS". The selected records will turn green, indicating they are (now) being overwritten by another loaded mod. (See Color Coding, above)

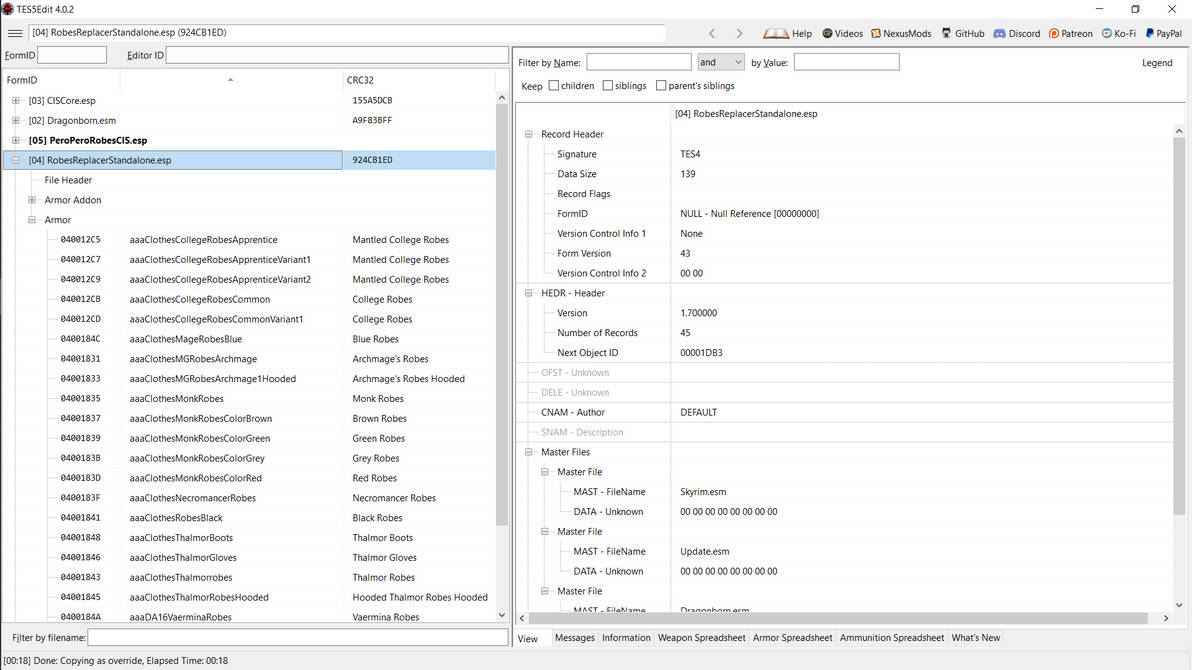
(5) Click the small box (now with a "-") next to CISCore.esp. This will collapse all entries from CISCore, tidying up your interface. Now click the small box (with the "+") next to the mod you want to create a CIS patch for. In this case, I am using RobesReplacerStandalone.esp.
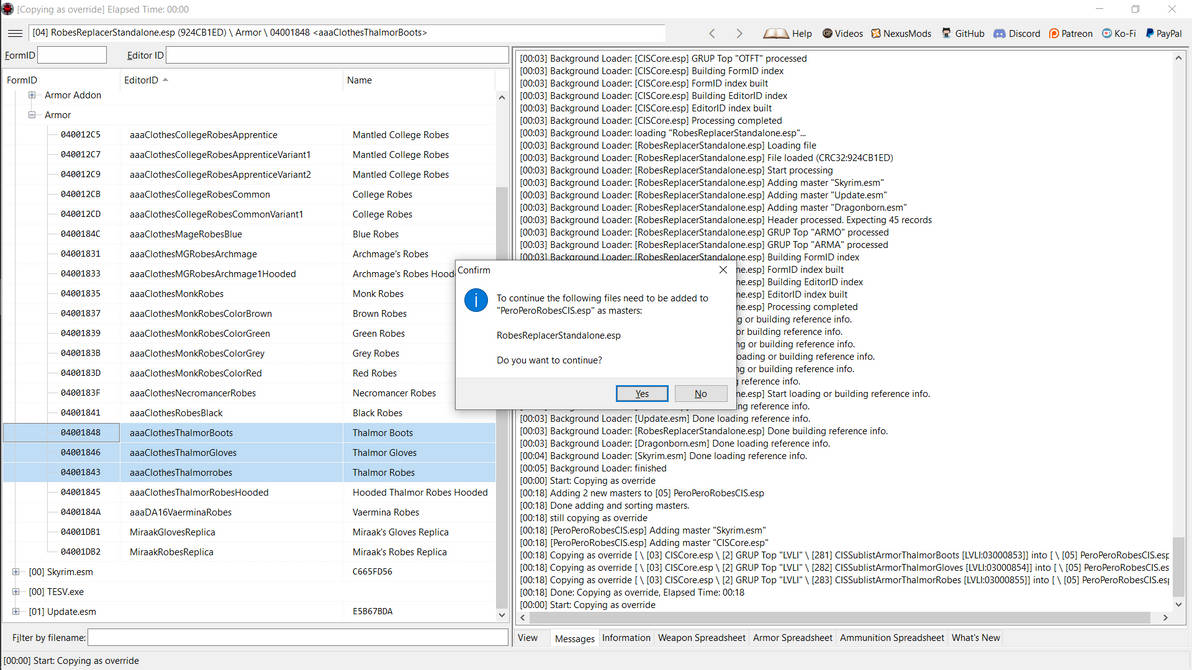
(6) This step is technically optional, but useful when dealing with mods with 100s or 1000s of entries. You'll see why later, but this step will automatically add the appropriate master(s) to your CIS patch, which is a crucial step. Scroll down until you find the items you want to add to your CIS patch. In this example, I am adding Thalmor clothes. Follow the same steps you did for CISCore's sublists. Hold down the CTRL key to select multiple entries. Then right click on any selected entry, and click "Copy as override into. . ."
(7) Instead of checking-off "<new file>.esp", check-off the CIS patch you made earlier. In this example, I will be checking off "PeroPeroRobesCIS.esp".
(8) You will then be asked if you'd like to add one or more new masters to the CIS patch you created. Click "OK".
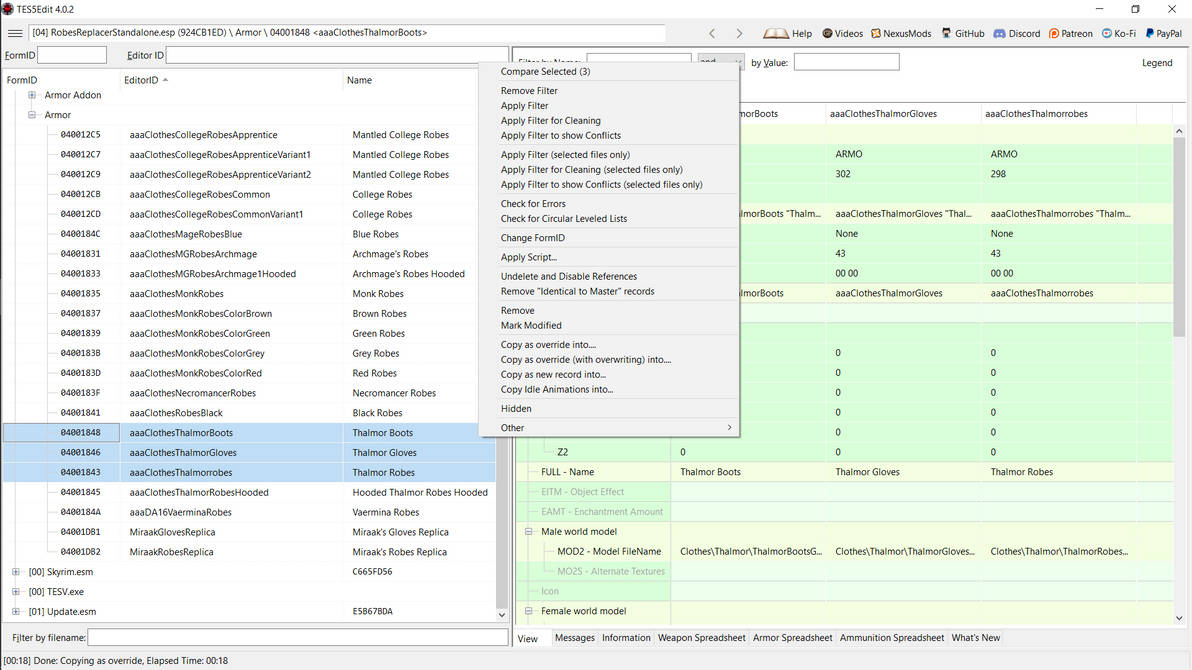
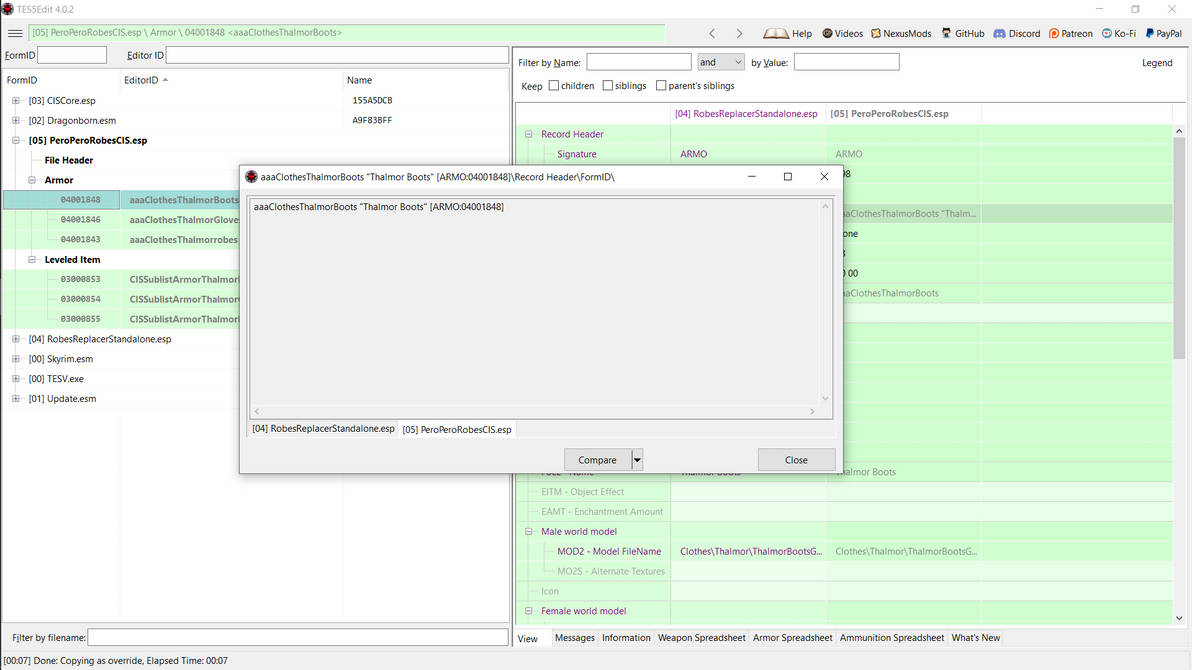
(9) Click the box (now with a "-") next to the mod you are creating a CIS patch for. Then click the box (with a "+") next to your CIS patch. From there, do the same for "Armor" and "Leveled Item". Before you can add items from the mod being patched to your CIS patch, you will need to collect FormIDs. I suggest keeping a word processing program open during this step. FormIDs are unique addresses assigned to everything.
(10) To obtain an item's FormID, click on the item on the left-hand interface. Then double-click on the "FormID" listed in the right interface. Copy and paste this code into a word processing program. If need be, take a note of which item that FormID corresponds to. Exit the pop-up window, and then rinse and repeat for all items you would like to add to your CIS patch.

(11) Now we will add items to the CISCore Leveled Items (LVLI) we copied earlier using the saved FormIDs. Click on a CIS sublist (listed under "Leveled Item") on the left-hand interface. In this example, I will begin adding a pair of Thalmor Boots to the appropriate Leveled Item (LVLI), CISSublistArmorThalmorBoots. Right-click "Leveled List Entry" on the right-hand interface, then click "Add". The Leveled List (LVLI) entry in the left-hand interface will turn yellow, indicating we now have two different copies of the same Leveled Item (LVLI). (See Color Coding, above)
(12) Right-click "Reference" (on the right-hand interface, and currently set to "NULL") inside of the Leveled List Entry you have just created. A prompt will pop-up.
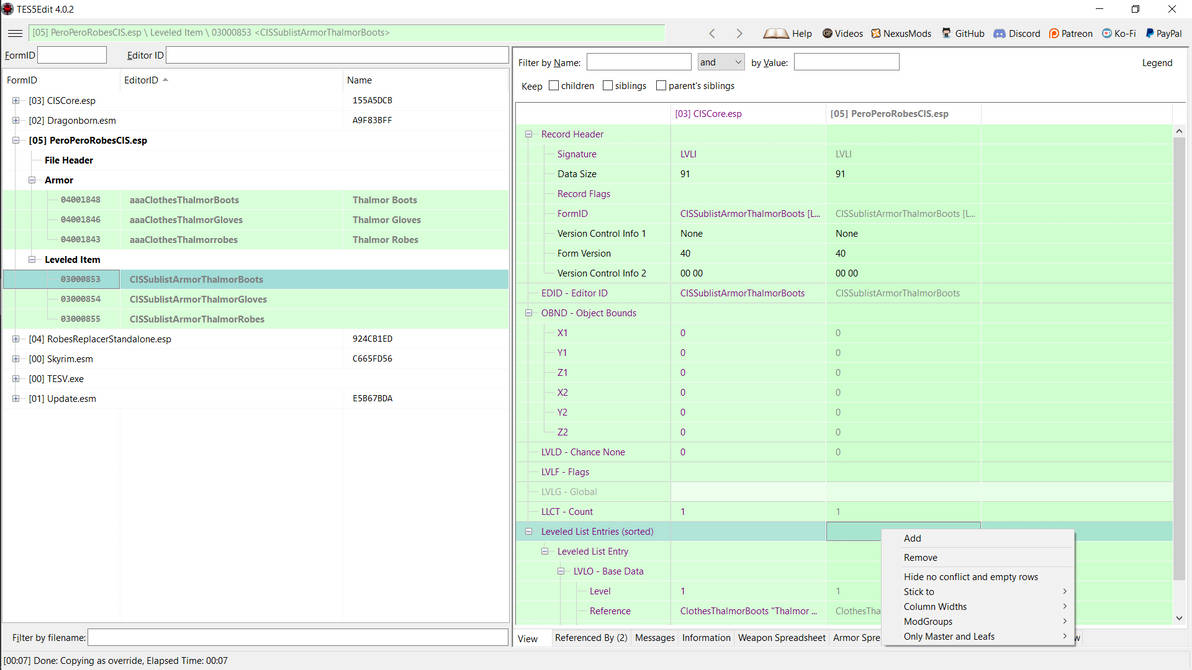
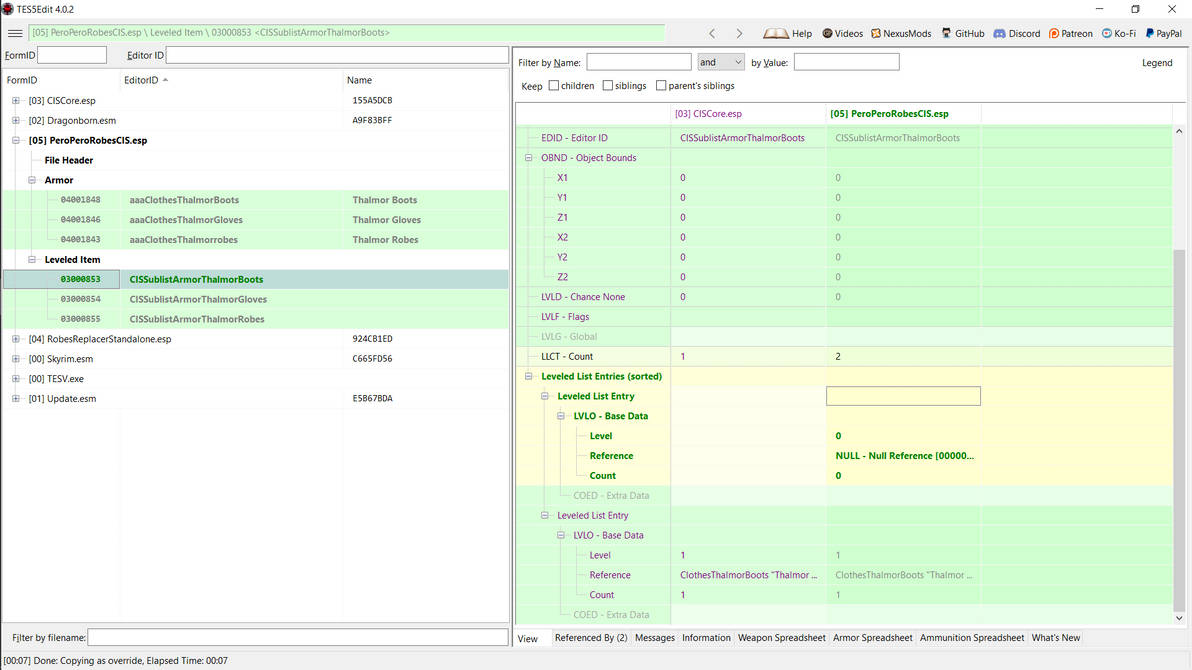
(13) Copy/paste the appropriate FormID into the prompt. Because I am editing CISSublistArmorThalmorBoots, I will make sure I am copy and pasting the FormID of the Thalmor Boots from the Pero Pero mod I'm patching. Then click "OK".
(14) Right-click (or double-click) "Level" and "Count" and set them to "1". "Level" tells Skyrim what level the player has to be before the item in question spawns, and "Count" tells Skyrim how many of those items spawn at a time.

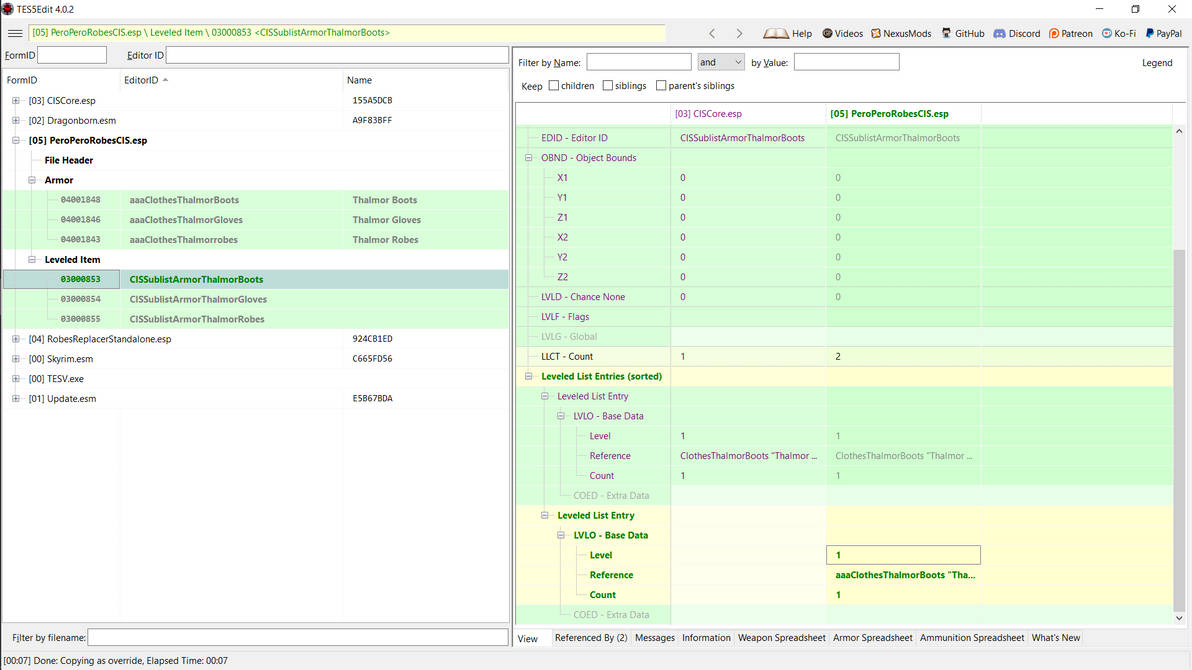
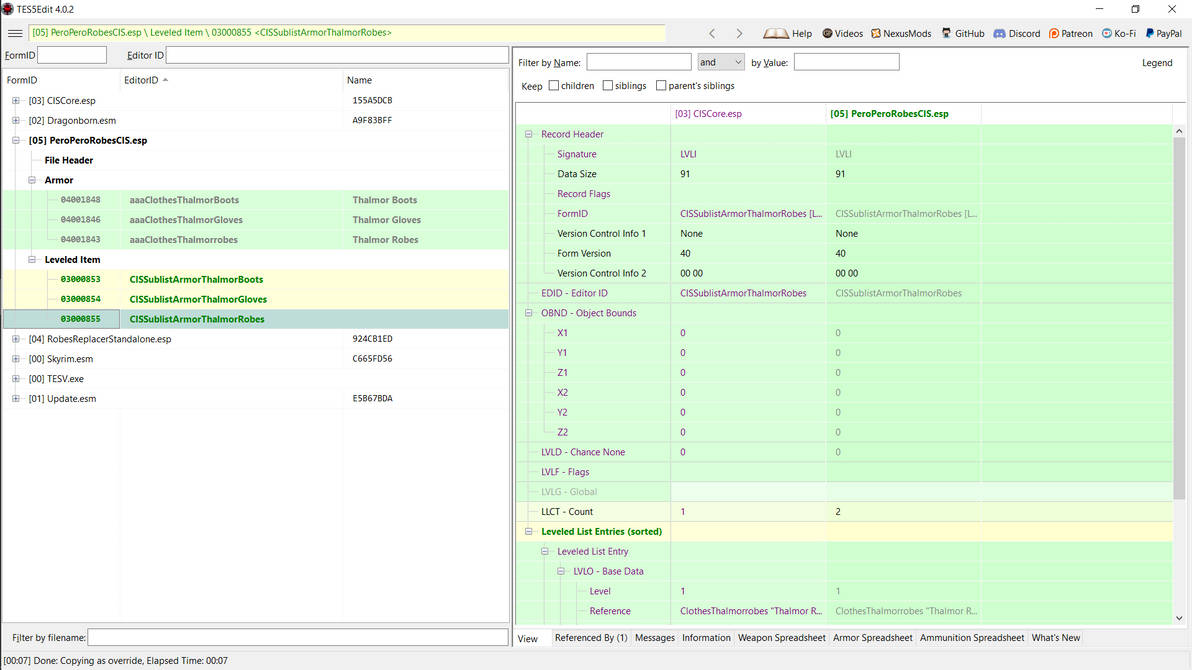
(15) Rinse and repeat steps "11" through "14" for however many items you are adding to CISCore's Leveled Lists (LVLI). In this example, I will repeat steps "11" through "14" for Thalmor Gloves and Thalmor Robes.
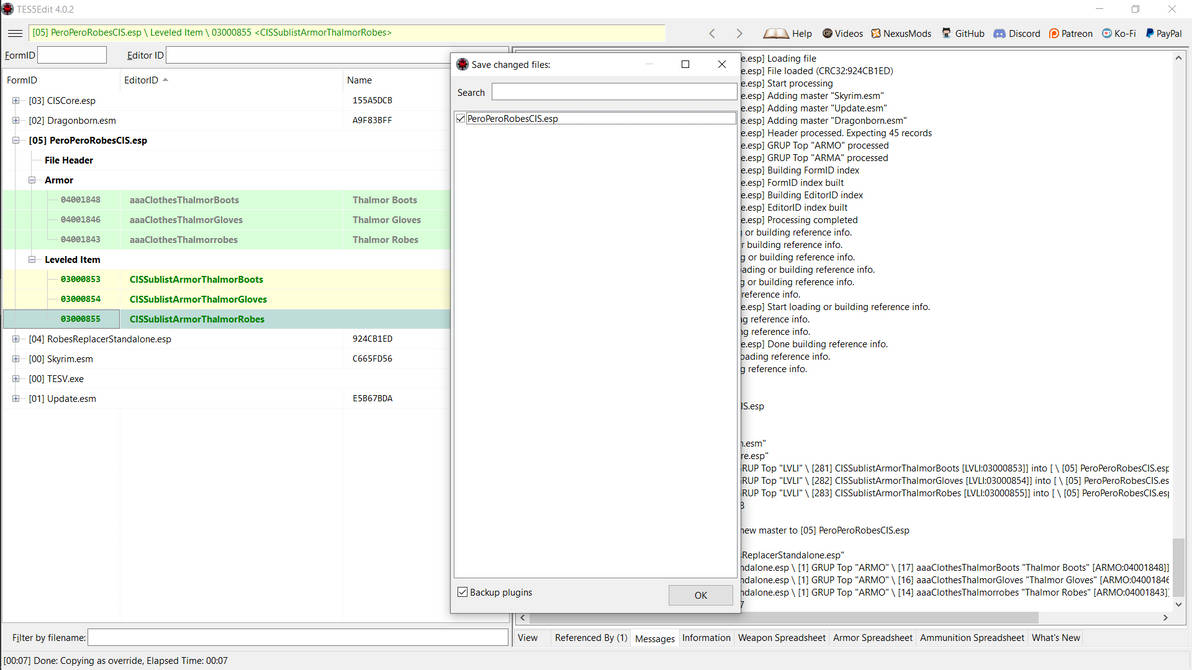
(16) Afterwards, hold down the CTRL and "S" key to bring up the "Save changed files" prompt. Make sure your CIS patch is checked off, and click "OK". Alternatively, you can exit the apppliation and this menu should automatically appear. But it is good practice to save often, and I prefer the (much safer) method of the "CTRL+S" keys. After exiting the application, your CIS patch should now be ready for use! Make sure you merge this new patch into a merged .esp, or use Wyre Bash to create a Bashed Patch.
What CIS Patches are there?
-------------------------------------
How does CIS work?
-----------------------------
As mentioned before, the CIS series replaces items in Skyrim with leveled lists (LVLI), which makes it possible for different items (such as modded content) to be spawned in place of vanilla content. But before I can describe how CIS mods work in detail, you’ll need to be well-acquainted with leveled lists (LVLI) and outfit templates (OTFT).
Leveled lists (LVLI) are (literally) lists of one or more items that Skyrim spawns randomly and/or based on the player-character’s level. They are used for anything between filling lootable objects (such as barrels or chests) and equipping NPCs with gear. Outfit Templates (OTFT) determine what weapons and armor an NPC spawns (and is equipped) with. They contain one or more items or leveled lists (LVLI).
All CIS patches rely on a set of core files, CISCore. CISCore replaces items in Skyrim’s leveled lists (LVLI) and outfit templates (OTFT) with new leveled lists containing that item. These leveled lists (LVLI) all referred to as "CIS leveled lists". Mod-content is inserted into CISCore’s leveled lists via “CIS patches”, separate mods which work with CISCore. After creating a Bashed Patch (using Wyre Bash) or a merged patch (using say, xEdit), Skyrim will randomly spawn mod-content in place of vanilla content. . . thereby circulating it in Skyrim. CIS patches also inject new enchanted variants of mod-content into CIS and Skyrim leveled lists (LVLI).
Some CIS patches may distribute items in your game a little differently, but it's all based on the same method. CIS mods use no scripts whatsoever.
Why have "core files"?
Technically speaking, there's no need to have "core files" (or "CISCore") for this method of loot-distribution to work. However, CISCore provides both you (the user) and me (the modder) distinct advantages. CISCore manages outfits (OTFT) and leveled lists (LVLI) which are used by other CIS mods. It also contains custom object effects (OBJE), which are used for custom enchantments. By having these items managed by a set of core files, it makes it possible to update them (and by extension, the whole CIS series) with a single .esp (rather than updating all CIS .esps). On your end (the user), it makes updates a snap! CISCore also reduces file sizes and makes merging the CIS series easier, by reducing the amount of data needed in each CIS Patch.
Why use CIS?
-------------------
When distributing new content to Skyrim, there are many ways to do so. I'm going to try to convince you to use my way.
Console Commands don’t randomly distribute items to characters or lootable objects, and they are impractical to use with regularity. Every console command requires user input, breaking immersion for many players. You could use batch commands, but it doesn't solve any of the problems listed above.
Add Item Menu (or AIM) is a user-friendly way to add items to player’s inventory, but it suffers the same disadvantages as console commands.
Automatic Spells and Increased Spawns (or ASIS) only distributes spells and perks. It will not rebalance them without user input. As a script-based solution, it has a significantly higher chance of causing undesired effects, such as unbalanced encounters or script-related issues.
Lootification does distribute new content into Skyrim, and with great proficiency. However, it does not rebalance individual items by itself, and has limited renaming capabilities. It will struggle with any "non-vanilla" based loot, and is intended for equipable gear. Like all script-based solutions, Lootification is “one-size-fits-all” and suffers similar disadvantages to ASIS.
Wyre Bash doesn’t distribute new content to Skyrim by itself. It merges pre-existing leveled lists together, which exist in vanilla Skyrim and are created by mod authors. Most mods which add items to Skyrim don’t include leveled lists, and thus cannot be distributed in-game by Wyre Bash alone.
But here's the beauty of my CIS mods. No matter what method of loot distribution you use, CIS should be compatible with all of the above options (and more!) Because CIS uses no scripts, it is (in theory) compatible with just about anything you install.
Why not use CIS?
-------------------------
No mod is perfect, plain and simple. I hate to rag on my blood sweat n' tears, but something's got to be said.
- CIS may conflict with other loot-distribution mods. I know what I just said, but hear me out. While the effects of such conflicts shouldn’t break your game, you may have NPCs spawning with extra copies of items, or not spawning with the full range of items you have installed. Although, you should be able to solve most of these conflicts with a mod merge or patch.
- CIS has no in-game or easy-access settings. To edit any CIS file, you'd need to open them via Creation Kit or xEdit and edit them manually. Unfortunately, CIS patches require an immense amount of labor to edit. CIS patches have taken me anywhere from hours to literal days to create. In one case, I spent over one-hundred hours making a CIS patch.
- CIS uses a great deal of leveled lists (LVLI), and every CIS patch you install may increase that number and/or the number of entries in those leveled lists (LVLI). Every leveled-list (LVLI) and leveled-list (LVLI) entry taxes system resources, and they may affect frame-rate if called upon in large numbers (such as spawning many NPCs at once).
- CIS uses a new .esp for every patch. This problematic for the avid modder, where .esps are a valued commodity. If you are in need of free space in your load order, I highly recommend merging all CIS patches. Do not merge CISCore with your CIS patches. . . I'm not sure what would happen. It might be okay though.
Goals
--------
Custom Enchantments - For the time being, I will be sticking to vanilla enchantments. However, I would like to introduce custom enchantments to the CIS patches, thereby increasing the variety of loot they bring to Skyrim. I intend on making them similar to vanilla enchantments, to insure they remain balanced. Perhaps on a later date, I'll try less erm, balanced ideas.
Screenshots - I’ve never been a fan of mods without screenshots, but I’ve yet to settle on an aesthetic for my Skyrim installation. When I am ready to show-off my Skyrim, I will upload screenshots showcasing the effects of the CIS patches in-game.
Stability - I want the CIS series to be as stable as possible. To help insure stability, I will try to minimize null references and try to use only the assets provided by vanilla Skyrim (and DLC) and the mods being “patched”. I plan on keeping the CIS series strictly script-free, to maximize compatibility between Skyrim installations.
Questions, comments or concerns
-------------------------------------------------
Feedback is deeply appreciated, and necessary to the improvement of my work. Are my mods working as intended? If not, please notify me straight-away. I want to insure that my mods are as universally-functional as possible. If you have any ideas or suggestions, let me know and I will consider them for future releases of my mods.
Will you make a “Circulated in Skyrim” patch for [insert mod]?
Are you paying me? If not, probably not. The keyword is probably, not definitely.
What if I'm paying you?
I wasn't expecting that. . . uh, I'll work for as long as I have Mountain Dew in my mug.
Installation
----------------
Unzip the contents of the “CISCore” file within your “Data” folder inside of your Skyrim install folder. This mod must be placed ABOVE any CIS patches you have installed.
Permissions
------------------
Feel free to modify my work to your heart's content. You may share my (modified) work with other, but please provide a link to the original (download page) and do not host my mods on other sites without my prior permission. In the event that I cannot be contacted (within' a month's time), then you may distribute and host my work (to your heart's content). However, I may revoke this privilege at any time.
Requirements
--------------------
Skyrim.esm
Updates
------------
Version 2.3.? (Est. Release: July, 2019)
Minimum Requirements: All Skyrim DLC
Added standalone leveled lists for (vanilla) armors.
Added standalone leveled lists for CISNPC
Added standalone leveled lists for (vanilla DLC) armors.
Added replacers for (vanilla) Outfit Templates
Updated (vanilla DLC) Leveled Lists with CIS Leveled Lists
Updated (vanilla) Outfit Templates with CIS Leveled Lists
Updated (vanilla DLC) Outfit Templates with CIS Leveled Lists
Version 1.3.0 (June 29, 2019)
Minimum Requirements: None.
Added standalone leveled lists for (vanilla) armors.
Added standalone leveled lists for CISNPC
Updated (vanilla) Outfits with CIS Leveled Lists
Version 1.2.0 (June 25, 2019)
Minimum Requirements: None.
Added standalone leveled lists for (vanilla) armors.
Added standalone Object Effects (or enchantments)
Added standalone leveled lists for CISNPC
Updated (vanilla) Leveled Lists with CIS Leveled Lists
Version 1.1.0 (May 25, 2019)
Minimum Requirements: None.
Added standalone leveled lists for several new (vanilla) armors.
Added replacers for (vanilla) Outfit Templates
Fixed "Hunter Outfit" with proper boots.
Updated (vanilla) Outfit Templates with CIS Leveled Lists
Version 1.0.0 (Aug 29, 2018)
Minimum Requirements: None.
Added standalone leveled lists for vanilla armors
What's New in Version 1.3.0
Released
Added standalone leveled lists for (vanilla) armors.
Added standalone leveled lists for CISNPC
Updated (vanilla) Outfits with CIS Leveled Lists