
HDT vagina textures, the manual way (with Photoshop/GIMP) + Template PSD
Entry posted by Rattlesnark
11,852 views
Here's a step-by-step-ish tutorial I've written for others like me who for some reason would prefer to add the vagina texture(s) to body textures manually, instead of using TexBlend or getting a set of prepared textures from a compilation mod (e.g. All-in-One).
Additionally, I have also prepared template .psd files that you can use to quickly insert your own body textures, vagina-fy them up, and export them as .dds textures.
The vagina textures included in the template are from BodySlide & Outfit Studio (UUNP), Clams of Skyrim (CBBE), and inner vagina textures for use with Bazinga's Naturalistic HDT Chinese UUNP meshes.
This guide, in PDF format, as well as the templates are available for download here: MEDIAFIRE LINK
Part 1: Preparing the Tools & Materials
What you are expected to have before we begin.
1. Image editing tool – Adobe Photoshop, GIMP.
This tutorial will contain screenshots and instructions specifically for Photoshop (CS6), but the general procedure should be similar with any other tool (e.g. GIMP).
2. NVIDIA Texture Tools for Adobe Photoshop.
Free download from the official source: https://developer.nvidia.com/nvidia-texture-tools-adobe-photoshop
For GIMP, use GIMP’s DDS plugin: https://code.google.com/archive/p/gimp-dds/downloads
* For more support on GIMP & DDS, there’s this helpful guide on Steam written by ₸ʌʟwıcĸ.
https://steamcommunity.com/sharedfiles/filedetails/?id=816839147
Make sure to install them after they’re downloaded.
3. Windows Texture Viewer, provided by NVIDIA.
We’ll use this to quickly view details on the texture files (.dds format). Free download from the official source: http://www.nvidia.com/object/windows_texture_viewer.html
No, you don’t need an NVIDIA GPU to be able to use it.
4. Your choice of body textures.
Any female body texture mod will do, we’ll be working with the ‘femalebody_1*.dds’ texture files.
e.g. SG Textures Renewal, Real Girls, Pure Skin – any can be worked with.
5. The vagina textures.
The texture files of vagina to be added to the body.
For UUNP: You can get these from many sources, including from the Bodyslide and Outfit Studio mod’s TexBlend folder.
You’ll find a set of Color + Normal + Specular textures under …/CalienteTools/TexBlendUUNP/Library/Body and Feet/ either from the installation directory or directly from the archive (as per the screenshot below).

For the Color textures, simply select one among the 6 that is most visually appealing to you.
For CBBE/CoS: You can get the textures provided with the Clams of Skyrim installation/archive (CLAMS OF SKYRIM innie outie.rar). You’ll find a set of Color + Normal + Specular textures under …/CalienteTools/CBBE Body Options Blender/Library/Body and Feet/
CoS doesn’t have multiple selections of Color textures, so just use the one provided.
Part 2: Working the Textures
Adding the vagina textures to the body textures, the “hard” way. The procedure is the same for both UUNP and CBBE/CoS.
Step 1: Retrieve the three texture body texture files to be edited.
These files are ‘femalebody_1.dds’ (Color), ‘femalebody_1_msn.dds’ (Normal), and ‘femalebody_1_s.dds’ (Specular).
You can work with the body textures directly, or make copies of them for backup & differentiation purposes.
Step 2: Determine the size, compression format, and other details from the texture.
Opening the texture file with WTV (shown is femalebody_1.dds), we can see details of it in the bottom left corner. In the example screenshot below, we can tell that the compression format is DXT1, and it is a 4K texture (4096x4096). MipMap count at 13 is perfect, but ignore it for now. If the texture size is 2K – also fine.
Step 3: Getting the vagina nice and ready.
1. Next, we’ll look at the vagina texture file. Since we’re working with the Color texture, open up one of the Color vagina textures (actually images) in Photoshop. They’re in .png format so you’ll have no trouble.
2. All these vagina textures are in 2K size. If that matches the size of your body texture, skip #3 below. Otherwise…
3. Since our Color body texture is in 4K, we’ll need to do some simple resizing. With the vagina texture image (e.g. unpVaginaColor2.png) open, click on Image > Image Size… and set the pixel dimensions to 4096 by 4096. Don’t worry, it’ll still look perfectly fine and pretty as you will see. Feel free to save this 4K sized vagina texture for convenience and future use.
Keep the vagina texture/image open in Photoshop, we’ll be needing it.
Step 4: Putting our instruments together.
1. Now we open the body texture file (.dds) with Photoshop (with NVIDIA DDS plugin installed) – everything at default is fine so just click OK.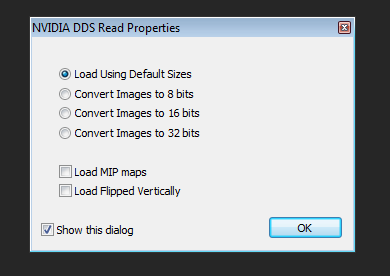
2. The body texture will likely open in to a ‘Background’ layer in Photoshop, which isn’t editable. Either Duplicate the layer, or copy-paste the image from the canvas for it to auto-create another layer.
3. With our body texture ready (and editable), let’s return to our vagina texture in Photoshop. Select the layer, then press CTRL + A to select the entire image (blank space included) and then CTRL + C to copy it.
4. Back to the body texture – Paste in Place our vagina texture over the body by clicking Edit > Paste Special > Paste in Place, or with the shortcut SHIFT + CTRL + V. This will put our vagina exactly where it needs to be to show up correctly in the game. If the vagina is looking too big or too small, you have mismatching sizes.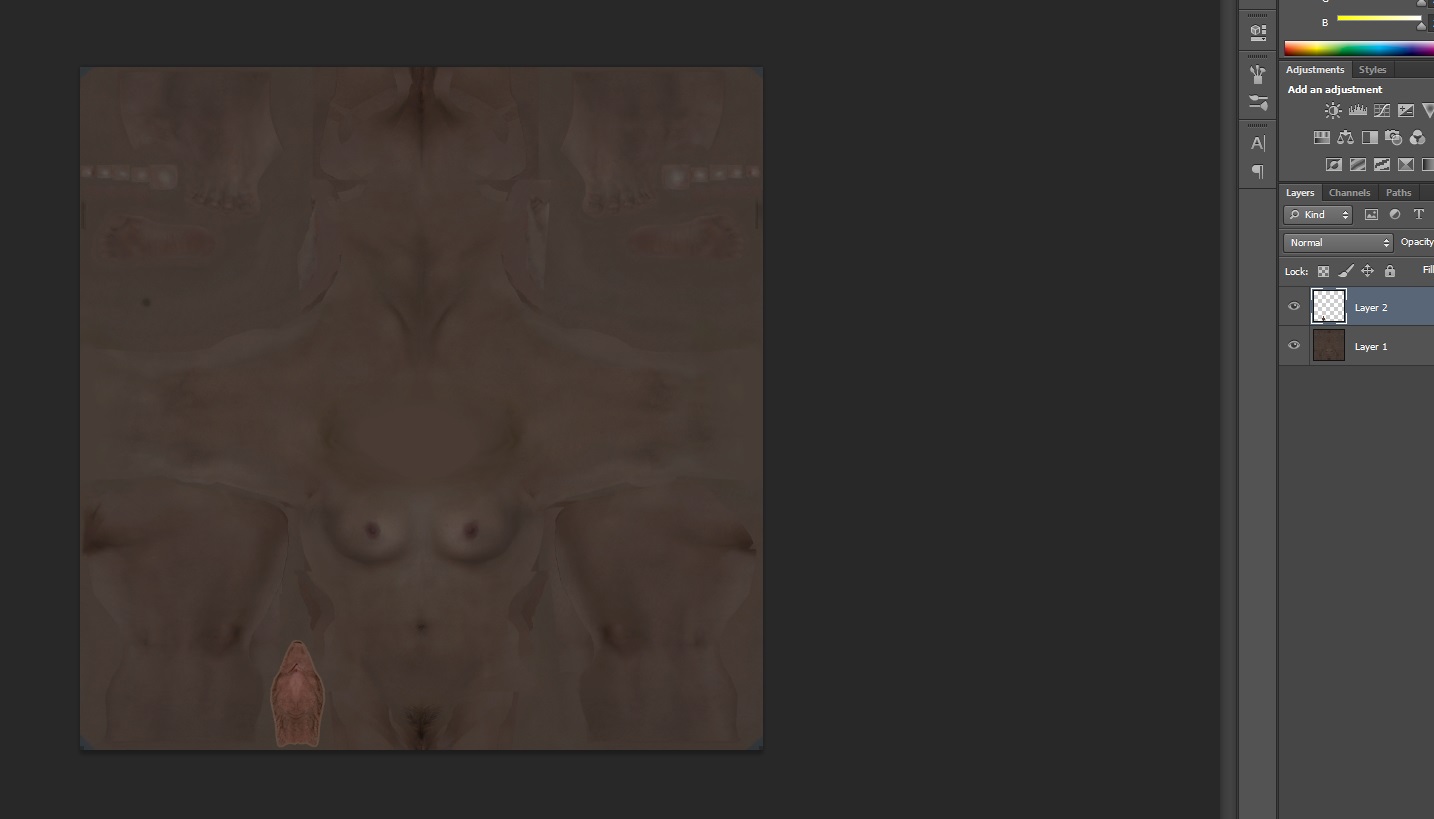
The above screenshot shows how it should be looking at this point (UUNP).
Step 5: Exporting our product.
1. Now that our body texture has its lady bits, it’s time to save and export our work as a proper .dds texture. Follow the familiar Save As procedure. Keep a .psd copy of your work if you’d like.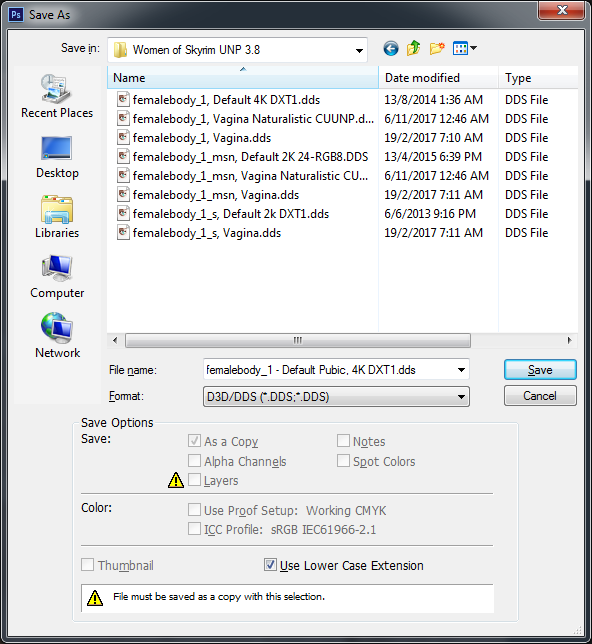
2. You can name your output .dds file anything at all. I have many copies because I’m meticulous like that. However, it must be named the correct femalebody_1.dds (for Color texture) for it to work with the game. Feel free to overwrite the original .dds as well.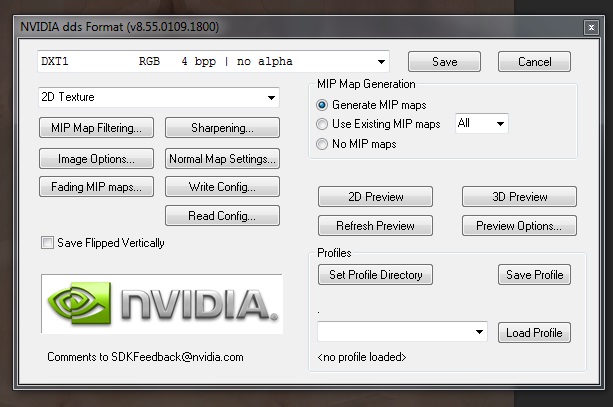
3. In the export settings screen, we select the right format which matches the original skin texture. As we’ve checked earlier, the right one would be DXT1. Keep the other settings as they are, and ‘Generate MIP maps’ will produce 13 MipMaps, which is exact to our requirement.
NOTE: You could probably get away with saving it in any other suitable format, but for peace of mind we’ll follow exactly what the original texture creator has set.
To be sure everything is exact, the output and original .dds files will be the exact same size.
NOTE: In the case of NOT identical file sizes, it could be due to different number of MIP MAPS. In our sample tested earlier, the mip map count at 13 is perfect and is the case for most textures. Our edited output file will always have 13 mip maps when we ‘Generate MIP maps’ while exporting. I’ve tried playing around with the settings (including ‘Use Existing MIP maps’) but never managed to get it to match perfectly. However, not having the same mip maps hasn’t seemed to cause any problems at all – so I’d say we can pretty much ignore this problem altogether.
We’re done! We’ve added a vagina to the body texture and produced a working .dds texture file out of it.
Repeat the above steps for both Normal and Specular textures. Then, install your edited textures however you wish – whether packaging it in an archive to install or overwriting the original body texture’s files.
If you use Bazinga’s Naturalistic HDT Chinese UUNP body, remember to also include the required ‘inner vagina’ texture along with the outer labia texture.
Extra: Using the ‘HDT Vagina Template’ PSD
You will need Adobe Photoshop to view and use the .psd files, and the NVIDIA Texture Tools in order to export the .dds textures. Refer to the guide above for details for each.
1. Open the femalebody_1*.dds texture to be edited in Photoshop.
2. Open either ‘HDT Vagina Template-2k.psd’ or ‘HDT Vagina Template-4k.psd’ depending on the size of the texture you are editing.
3. Select the ‘Your Texture Here’ layer, and paste the body texture within this layer.
4. Check the ‘eye’ (visibility) symbol next to the vagina texture to be overlaid. Included are selections for Color/Normal/Specular for UUNP, CoS, as well as the inner vagina texture (which you’ll only need if you use Bazinga’s CUUNP body mesh – you’ll know what it is if you are indeed using it).
5. With the body texture and the vagina texture(s) of choice visible, export the .dds file with the appropriate settings.
6. Repeat the process for as many textures as you require.
1 Comment
Recommended Comments