tesv: skyrim [TESV: SKYRIM] [GUIDES] Sexlab Scene Builder - A Guide to Editing Conversions


The SexLab Framework (SLF) is an impressive piece of kit, built and developed over several years by a team of developers here on the forum. Recently, that same framework has been branched off and enhanced further with the development of SexLab P+ (SLP+). Having taken the initiative to upgrade to Skyrim 1.6.1170, I dived into using this patch to see the changes it brings to this fantastic framework.
One of the features that comes with SexLab P+ is the SexLab Scene Builder (SLSB), a tool used to convert the files for animations into the new format that SLP+ uses. This tool can help assemble key variables defining how animations should run. Packed with a visual interface to help build the scenes, it can help modders and users who want a little bit more control over their animations put packs together to meet their personal needs in the game.
As someone who was a little overwhelmed at first with the tool and found no guide that helped me understand how the files were made or edited, I played around until I got to grips with it. In doing so, I wanted to put a small guide together (that I will expand over time as I use more) on how to use it to help anyone else looking to get their hands dirty. I'll share what I know and update it as I learn more or if the tool gets further updates.
While this guide came about due to my need as a player who has a male/male playthrough and needing to edit the default conversions file kindly offered to get that set up and animations to run, this can be used by anyone wanting to get a better handle on the SLSB tool and how to edit and export the files within.
Before starting, you will need to visit the Citadel Discord server (link on the SexLab P+ mod description page) and get the tool and the Automated SLSB Conversions. This guide assumes that you use Mod Organizer 2 to manage your mods, but if you don't or use another mod manager, always make sure to have backups.
SETUP
There are a few steps you should do and check before proceeding:
- check for any updates to the SLSB tool (Citadel Discord Server > #dev-releases)
- check for any updated Automated SLSB Conversion (Citadel Discord Server > #slsb-packs)
- make a backup of any previous edits in case you make any mistakes or override anything in error.
If you are doing this for the first time, you can skip this section, but if you are doing any updates to a previous pack, DO NOT OVERWRITE your files. Read the section on updating, found later in this guide.
FIRST TIME VIEW
Using the tool can look a little overwhelming initially, but once you know what each section does and how it works, you will find it relatively simple. If this is your first time, you should start with an empty file before working on live files. We'll review what each section does individually before we look at a live environment that we can edit and change.
When you open the executable, you will have a screen with a blue button that says "New Scene". Press the button, and you will get the image below.
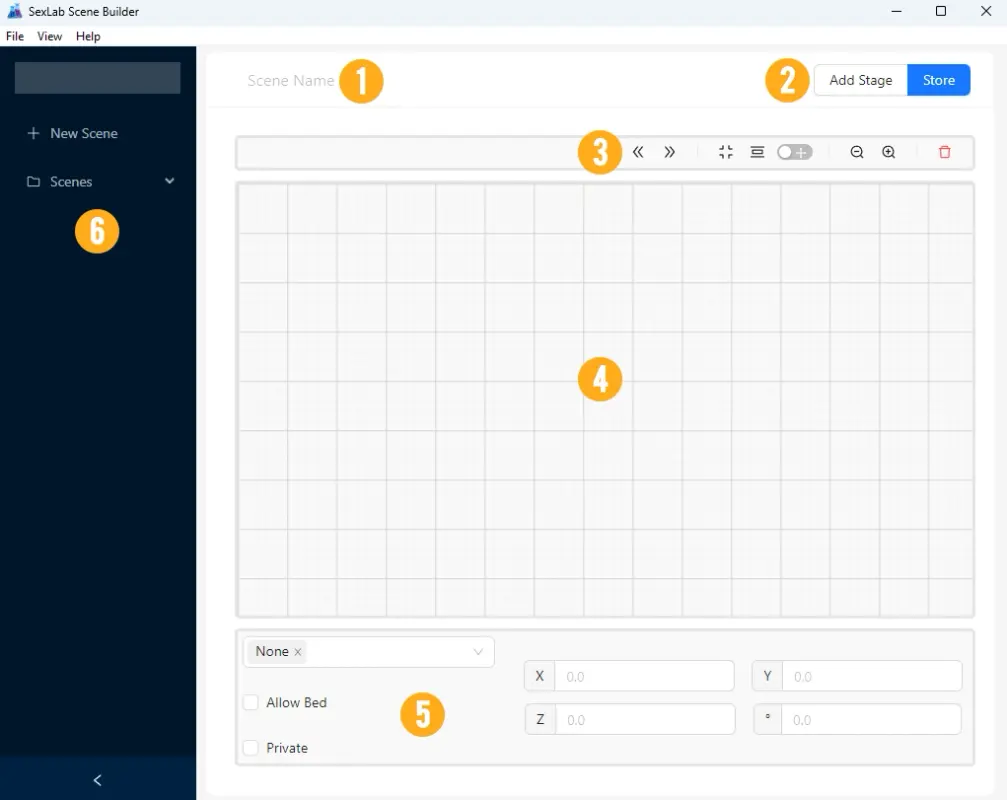
To break down this view:
- Scene Name - this will be where you enter/edit the name of the animation (they will be listed under "Scenes" in section 6 once you have made/loaded some)
- Staging - this allows you to add stages into the wire map in section 4, where they can be linked up. Store will save the information, which must be done before you move to make/edit a new scene. It is important to note that this WILL NOT save your file, as you will have to go to File > Save to save any changes/progress you have made.
- Navigation - this bar controls the view in the wire map in section 4). Hover over each icon to find out what they do.
- Wire Map - this is where your stages will be shown, and you can link them together here to create a progression. We will cover this later in the guide.
- Global Options - these will be global options for the scene. The drop-down box has a list of furniture (I am not aware of what this controls at this time, so I will not mention it in the guide until I do), Allow Bed will set if the scene can be played on a bed, while I am not sure what Private does. The boxes on the right control positional and rotation.
- Scene List - This will show a list of scenes you have created or have stored, with the option to edit or delete any as you see fit. Remember to click Store after any edits before moving scenes.
Now, let's look at the Staging options before we move forward. Press "Add Stage" in the top right (number 2 on the image above).
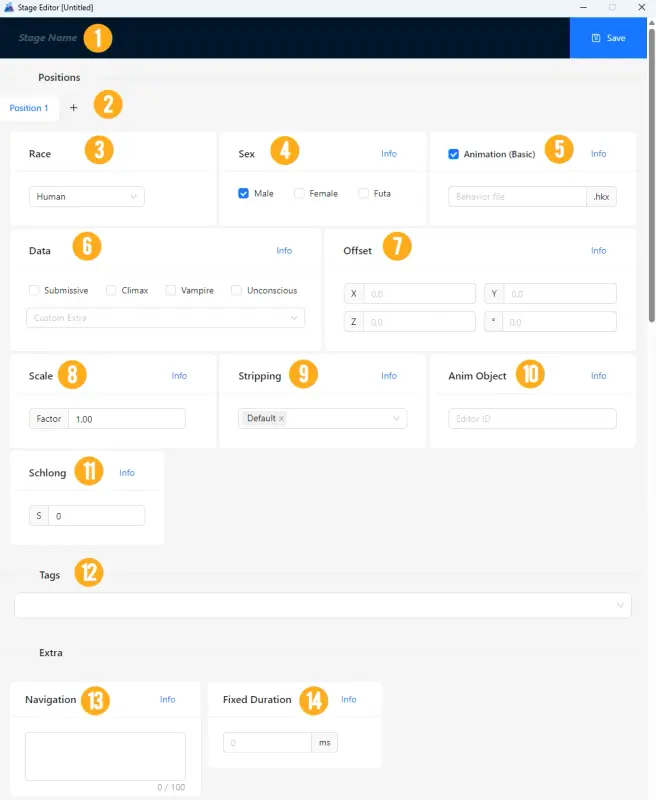
Two break down this view:
- Stage Name - self explanatory space where you can add the stage's name. As best practice, you might call the first stage "Stage 1", then the second would be "Stage 2". If you don't. They will be listed as "Untitled," which can lead to confusion when multiple stages are linked. Take note of the Save button on the far right of this box. This will save any changes and close this window.
- Positions - this is where you will define the number of actors, such as humans and/or creatures. For example, each actor will have different settings in some of the sections below, allowing us to set who is dominant and who is submissive. The rules of thumb typically state that Position 1 is the submissive role. You can use the + symbol to add more actors. For note, solo animations need one position, couples need two positions, and threesomes and more will need three positions or more.
- Race - here is where you will define the actor's race, with humans being the PC races and then a list of creatures like Draugr, Trolls, Giants, etc. This will be set across all stages.
- Sex - the sex the actor should be. You can select more than one actor if more than one actor fits the animation position; however, this will depend on the animation you are working on. This will be set across all stages.
- Animation (Basic) - in this box, you will enter the name of the HKX file. HKX files are the animation files used by the engine, typically written as something similar to "human_scene_a1_s1" where the a stands for "Actor" and the s stands for "Scene". This will be set individually per stage.
- Data - here, you can define additional data about the actor filling the position, if applicable. For example, if the animation for that actor position is a submissive position, you can tick this box to say that it is a submissive position. You can hover over the others for more information. This section can be handy in defining specifics that SLP+ can later use. We'll learn more later. This can be set individually per stage.
- Offset - if animations are out of line, you can use this section to change the alignment. This can be set individually per stage.
- Scale - this will change the scale of that particular actor in the animation. This can be set individually per stage.
- Stripping - this is set to default, which can then be set in SLP+ in the Strip Editor. However, you can use these options to force strip everything, strip nothing, or only strip certain parts for each stage individually.
- Anim Object - if animation objects are used in a stage, these can be defined here. This can be set individually per stage.
- Schlong - sets the angle of the schlong on a male actor. This can be set individually per stage.
- Tags - this is where individual tags can be set for the animation. Clicking on the box will bring up an SFW and NSFW option. These can be expanded into the common tags used in modding. If you want to add a custom tag, you can start typing to add one. Note that you do not need to add tags for sex, such as FM, MM, MMF, etc. These will automatically be set by the number of position tabs set and the genders of each sex. You will only need to set sex tags if the automatic ones set by the tool don't fit your needs.
- Navigation - this section is not currently used (you can hover over the info box to find out what it does, but I haven't been able to use it successfully yet).
- Fixed Duration - if the stage should only last a certain period before moving to the next stage (in place of looping), you can use this box to define the length of time before the animation progresses to the next stage.
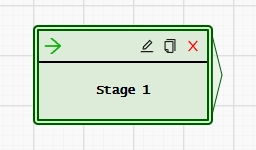
Fill in some basic details, but type anything into the Animation (Basic) box before hitting save. This will take you back to the main screen, and you will now have a block on the wire map. If you don't see the icons in the top right corner of the box, hover over it to see them. Additionally, if you didn't name your stage, it might be called "Untitled". The Pencil icon allows you to edit the stage, while the double page icon is to duplicate the stage. The red cross will delete it.
Click on the Duplicate option to open a new staging window. This will be handy if you have added tags and multiple positions, as it will create a direct copy. Some elements, such as Animation (Basics), must be entered every time. Once you save and have two stages, you can link them by clicking on the arrow end of the right side of the box, then moving the mouse over and clicking on the box you want to link. And that's it; you've connected one stage to the next in the chain.
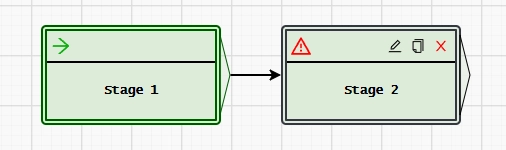
You may spot a red warning triangle on the second stage once linked. This is because we put nothing into Navigation - don't worry, this won't harm anything.
At this point, in a live environment, you would hit Store to record your progress, then File > Save to save your work. Remember, doing this before closing or moving between scenes to edit is essential, as you can lose your progress.
If you are confident with this, let's move on and look at a live environment.
FILE STRUCTURE
To be added/continued...
Edited by rydin
0 Comments
Recommended Comments
There are no comments to display.