Levionte
-
Posts
253 -
Joined
-
Last visited
-
Days Won
6
11 Followers


Recent Profile Visitors


-
CITRUS Heads (High Poly Heads)
Levionte replied to blabba's topic in Downloads - Skyrim Non Adult Mods
The tri files need no modifications at all to work in SSE. The only thing you need to convert is the mesh type. I barely run SSE aside from brief mod testing. But I have released a couple followers on Nexus, that I made using the citrus head; and I haven't heard of any problems. -
What I do is: When I've finished one of the weights (I usually do the 0 first), I import both male-body-weight meshes, collapse them, and setup a Morpher modifier on the 0 to transform into the 100. Then I put a Skin Wrap modifier on my actual body I've cut pieces out of, and Add(Skin Wrap) the 0 weight mesh I just added the Morpher modifier to. The skin wrap should work extremely well, since all the vertices are in exactly the same place as the whole 0 mesh, some are just missing. Then you just turn up the dial on the Morpher modifer to transform it into the 100, and the custom mesh should morph with it. You can do something similar with the armor pieces to give yourself a head start on the other weight, but results may vary. For the Nifskope stuff, I've been known to only setup one of them and using NifMerge to generate the other. But since it wasn't designed to work on armors, I'm reluctant to suggest it to others. It's always safer to do it by hand.
-
Outfit Studio/Bodyslide 2 CBBE Conversions
Levionte replied to XunAmarox's topic in Skyrim Adult Mods
Sorry for the late reply. I haven't been checking LL regularly. The answer is, 'probably?' I actually don't have the faintest recollection of converting that outfit. But I always updated the original post when I updated something. -
When you build the outfits, Bodyslide should create 3 things for the outfit piece: a MeshName_0.nif, MeshName_1.nif, and a MeshName.tri file. If your Bodyslide slider settings don't show up in the game, there's something wrong with the NIF files or their folder placement. The TRI file is the instructions for in-game RaceMenu sliders to be applied to the outfit. First thing you should do is make sure those are all there and in the right place. If you're competent in Nifskope, you could even open the NIF files and make sure there's a NiStringExtraData pointing to the TRI file. If they're not there, even after building the meshes properly, then there's something wrong with your Bodyslide installation. You could try reinstalling, if you use MO make sure it's setup correctly, etc. If the files are there and the sliders just won't apply within the in-game RaceMenu, then you should reinstall RaceMenu, make sure you don't have loose scripts from and old version, etc. All of this is assuming you're using Bodyslide correctly in the first place.
-
[Unofficial] Bodyslide 2/Outfit Studio Tutorials
Levionte replied to blabba's topic in Skyrim Adult Mods
Sorry for being blunt, but this is going to be some speed answering. I was only going to answer one question. But then I started feeling guilty about all the unanswered questions I would be ignoring and ending up typing a million things. Sorry to the dude with the MO question, but I don't use it. (But the "data" folder should be the one above CalienteTools.) He means in the creation kit. You need to open the ArmorAddons entry for the piece (The typical naming convention for the CK would be something like HuntressArmorAA.), go to the female section (on the bottom) and select the _1 version of the nif in the designated folder. Even if it looks correct, you should reselect it. Depending on how the "pregnancy" is implemented in the mod, it may be possible that all you need to do is add a Belly bone to the outfit and weight it appropriately. But if it needs a morph for instructions, there's no way around making one. You might try other brushes like the "Smooth" or maybe move it around manually. To answer your question, most 3d editors (3DS Max, Blender, etc.) do have a Symmetry modifier that can probably help. I would not recommend trying to fix it in Nifskope. Also: It should mask everything except the unweighted vertices when you get that message. You should switch to the bones tab and paint in some kind of weight. If you don't want it to save as a new project, make sure you named everything exactly the same as it was previously. This is especially true for the "Slider Set Name" and the "Slider Set Filename." Also note, you can type in folder paths on the latter, so make sure it's in the same location as well. Alternatively, you can go to your SliderSets folder and delete the duplicates. In theory, using "Save" as opposed to "Save As" should probably do this automatically. But, honestly, I always use "Save As," for some reason. So, I can't really tell you. Unfortunately, if the preset is not provided in a downloadable format, there is no way to "extract" from built meshes. -
[Unofficial] Bodyslide 2/Outfit Studio Tutorials
Levionte replied to blabba's topic in Skyrim Adult Mods
You'd be better off asking cell for technical details, either here or via the Nexus, since he's actively developing it. I'm just a user that's never really seen the need to dissect it, so I can only offer educated speculations. That being said, regardless of how you make the sliders, what you're doing is creating morphing instructions to tell each vertex where it should move to when the slider is applied. But, you're only making them for the base shape. Morphing only works when the mesh has the exact same number of vertices, because that's what the instructions call for. Similar data also has to be created for each outfit mesh. It can't use the same data, as it will almost definitely have a different number of vertices and be in a different order. Based on its number, it will think it's moving a vertex on the shoulder, but on the outfit it's actually on the thigh; that kind of thing. And if it's a complicated outfit, there will be lots of vertices that don't have any data at all; or vice versa. You have to create "sliders," or the morphing data, for each outfit piece. Outfit Studio (not bodyslide) can attempt to apply sliders automatically based on their position, but it almost always requires manual adjustment to avoid clipping. I suppose you could try to create the morphs in blender and export it the same way. Regardless of how, it does have to be created for each individual outfit before Bodyslide can apply them. Clicking the build button applies the respective morph data to the meshes according to the slider position. Batch build simply builds multiple outfits at once. Lastly, I haven't actually tried to open up the .TRI file Bodyslide generates. My presumption, though, is that it's just the same collection of the morph data collected into a format similar to the head .TRI files that the game uses to morph vanilla faces. And, in this form, RaceMenu can read and apply the morphs the same as it can apply face sliders during character creation. I really couldn't tell you how that happened. Game updates may break a lot of mods, but I don't expect they'd ever break meshes. And for the same reason, I would also be surprised if Outfit Studio suddenly decided to export meshes differently than it's been doing (successfully) since its release. But there are a bunch of things wrong with that NIF. For starters, a single object never needs more than one BSLightingShaderProperty, and it should be above the NiAlphaProperty. Second, I don't know why you'd want to include a head mesh with your outfit, but then I don't know what you're working on. But my initial guess is that they're not assuming the correct names which could indicate some issues on the top of your tree. Third, and perhaps the biggest issue, I don't see any bones nor their respective BSSubIndexTriShape / skin data. It will certainly not work without those and probably crash your game. I can't see your mesh, but it is possible they are hidden in some of your branches. But, at the very least, they're in the wrong place if not outright missing. Silver lining is, if you fix the issues with the mesh without messing with the vertices, your bodyslide data will probably still be valid and work correctly. I believe cell implemented some skin transformation settings that you may be able to use to fix the problem. Personally, I just load it into 3DS Max and export it again. Only takes a second and always seems to fix it. -
Outfit Studio/Bodyslide 2 CBBE Conversions
Levionte replied to XunAmarox's topic in Skyrim Adult Mods
It's at the bottom of the page, above the comments. I can't post a direct link as I'm not allowed to circumvent the mod author's website.
-
[Unofficial] Bodyslide 2/Outfit Studio Tutorials
Levionte replied to blabba's topic in Skyrim Adult Mods
I just tried a quick conversion and I didn't have any problems. But, I only did a simple mesh to test. When you're exporting to .OBJ in Nifskope, you should select on the objects individually and export them one by one, and not the whole scene. It's the second message, the generated warnings, that's probably causing it not to load. You'll have to click the "Show Details" button to get a better idea of what the problem is. -
[Unofficial] Bodyslide 2/Outfit Studio Tutorials
Levionte replied to blabba's topic in Skyrim Adult Mods
I don't use Mod Organizer, so I can't give you a more detailed explanation. If you look at the texture paths of your reference, the texture by default is set to point at the vanilla skin texture (textures\actors\character\female\femalebody_1.dds). Unless you made changes to the mesh, in whatever circumstances OS is running, either your actual data folder or your MO profile, you don't seem to have the correct textures installed. At a glance, it kind of looks like the _sk texture for a UNP body; but not the ones from Fair Skin. The person who creates the bodyslide conversion sets up each slider individually. And not every slider is included on every conversion, either because of personal choice by the creator or because you don't need them (ie. you're not going to setup an 'arms' slider for you pants mesh). The problem with creating new sliders is that Bodyslide won't magically figure out how to apply them to all the outfits. Someone would have to open each project individually, load the new reference with your custom sliders and create the data. It's not an impossible or even particularly difficult task to create a few extra sliders. But if you consider the number of conversions that would have to be updated, you end up asking a lot. I suspect that's the reason cell, Caliente, and the bodyslide team haven't updated any of the sliders themselves. -
[Unofficial] Bodyslide 2/Outfit Studio Tutorials
Levionte replied to blabba's topic in Skyrim Adult Mods
Are you using trousers and stockings that have been converted to bodyslide and built to fit the body you're using? If you are, my first guess without more information is that the conversion either wasn't done or wasn't used correctly. That being said, pants are easily the most difficult article of clothing to fit correctly as it's not attached to the main body piece but covers the legs which move around a lot. That means the bone weighting has to be done really well or the outfit has to be expanding to hide any deficiencies, all without having Zap sliders to help you out. The weird shading textures could be about 10 million different things. It could be a lighting mod. It could be your ENB. You could need to tweak an .ini file. It could be a texture conflict. It could just be the fact that shadows in Skyrim suck in general. Try this one. cuirassNew_0.nif -
[Unofficial] Bodyslide 2/Outfit Studio Tutorials
Levionte replied to blabba's topic in Skyrim Adult Mods
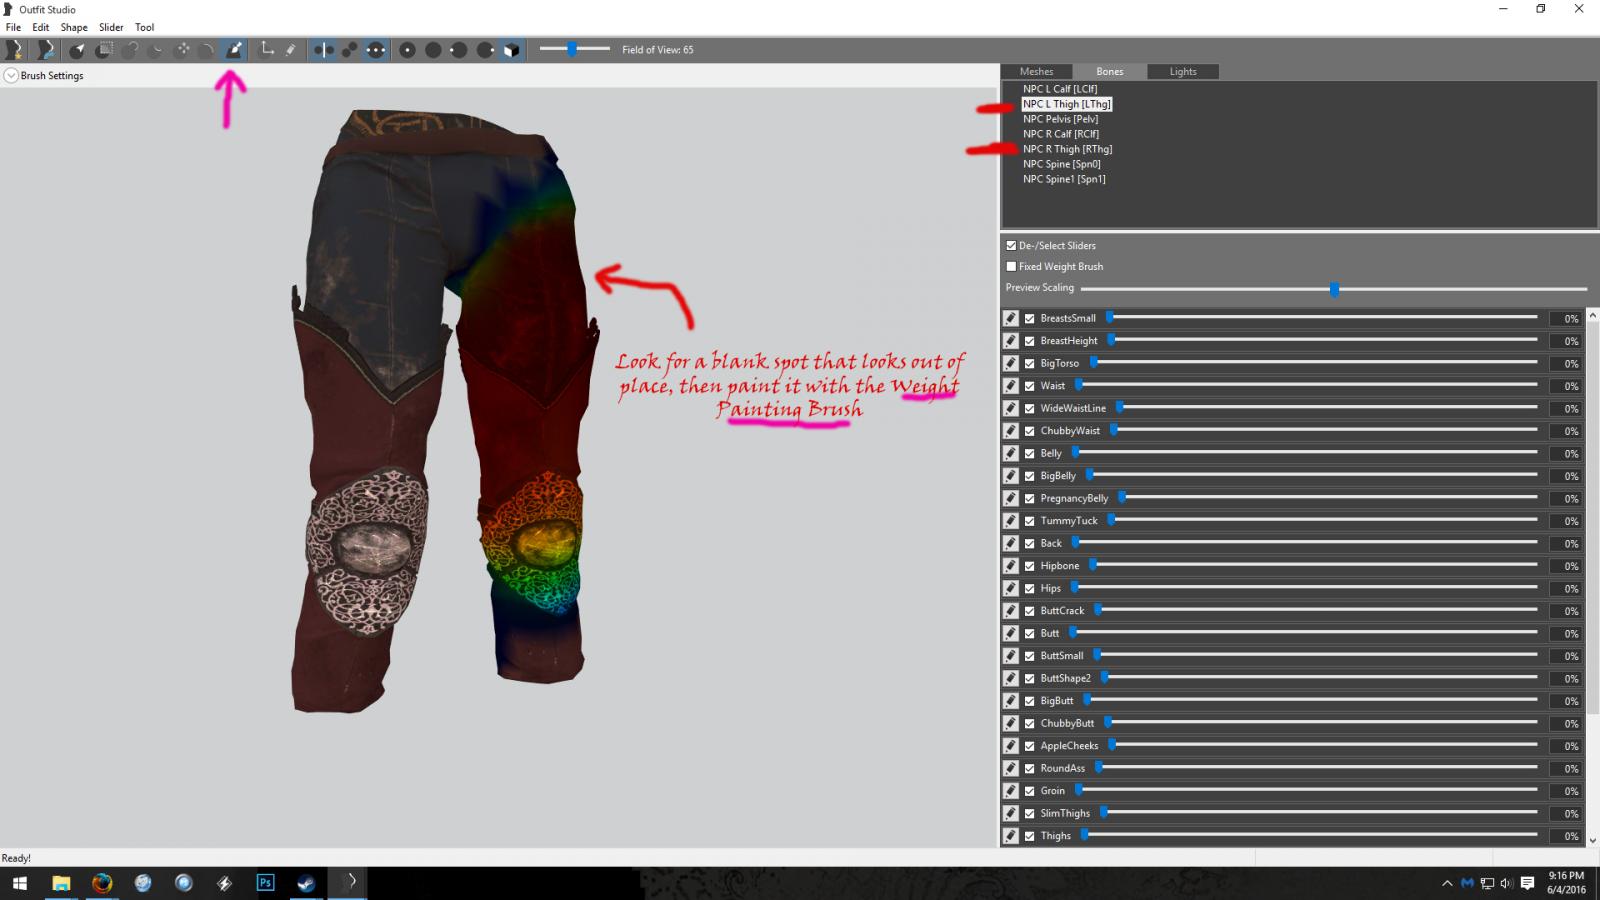
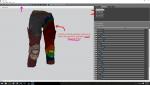
#1: It looks like a bone weighting issue. If you load the pants in Outfit Studio, select your object, and then click the Bones tab on the right, above the sliders, you should be able to scroll down a list of bones. When you click on a bone, it should color parts of the mesh blue to red depending on how strong it is. You'll probably see a blank spot on your troubled area when selecting something like the Thigh bones, that would prevent it from moving with the leg properly. You just have to fill it in with the Weight Painting Brush. #2: What do you mean, "already wearing said piece"? You mean, you're wearing that item when you save, but when you load your save it's invisible? Does it get fixed when you un-equip and re-equip the item? Something like that would be some crazy skeleton issue, most likely. Or your HDT is freaking out. If you mean the outfit doesn't show up in general, but the body underneath does, you most likely have a conflicting partition slot. Main body pieces are slot 32 in Skyrim by default. This setting can be found in the BSDismemberSkinInstance block under 'Partitions' at the bottom. Obviously, make sure you're looking at the outfit, or whatever isn't displaying. Your body underneath is probably set correctly, which is why it's displaying.
-
[Unofficial] Bodyslide 2/Outfit Studio Tutorials
Levionte replied to blabba's topic in Skyrim Adult Mods
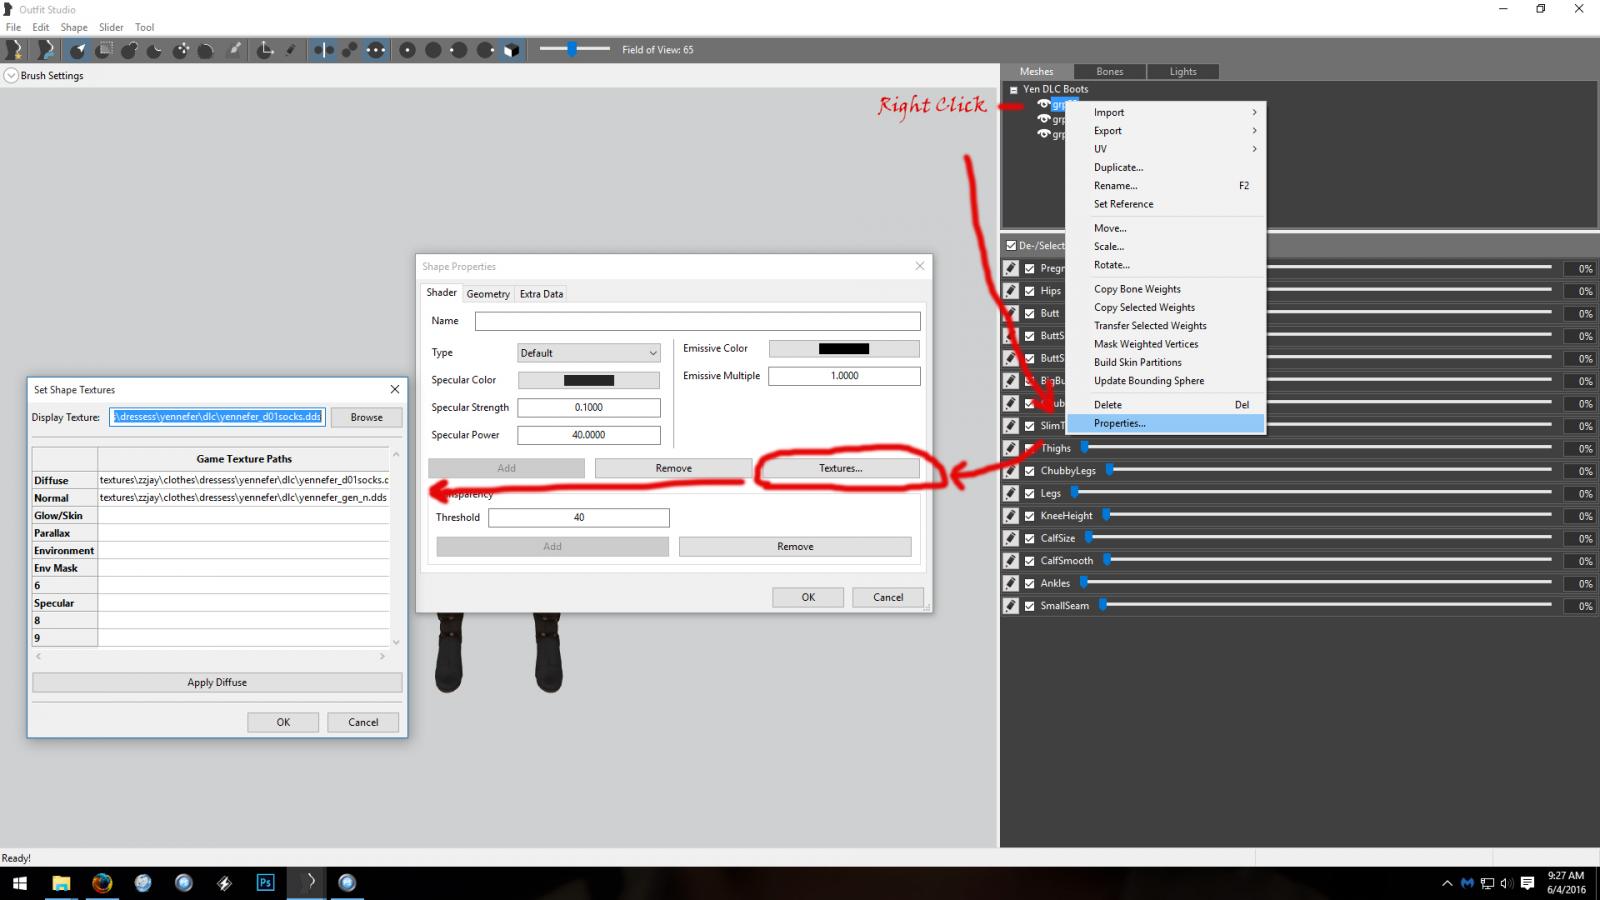
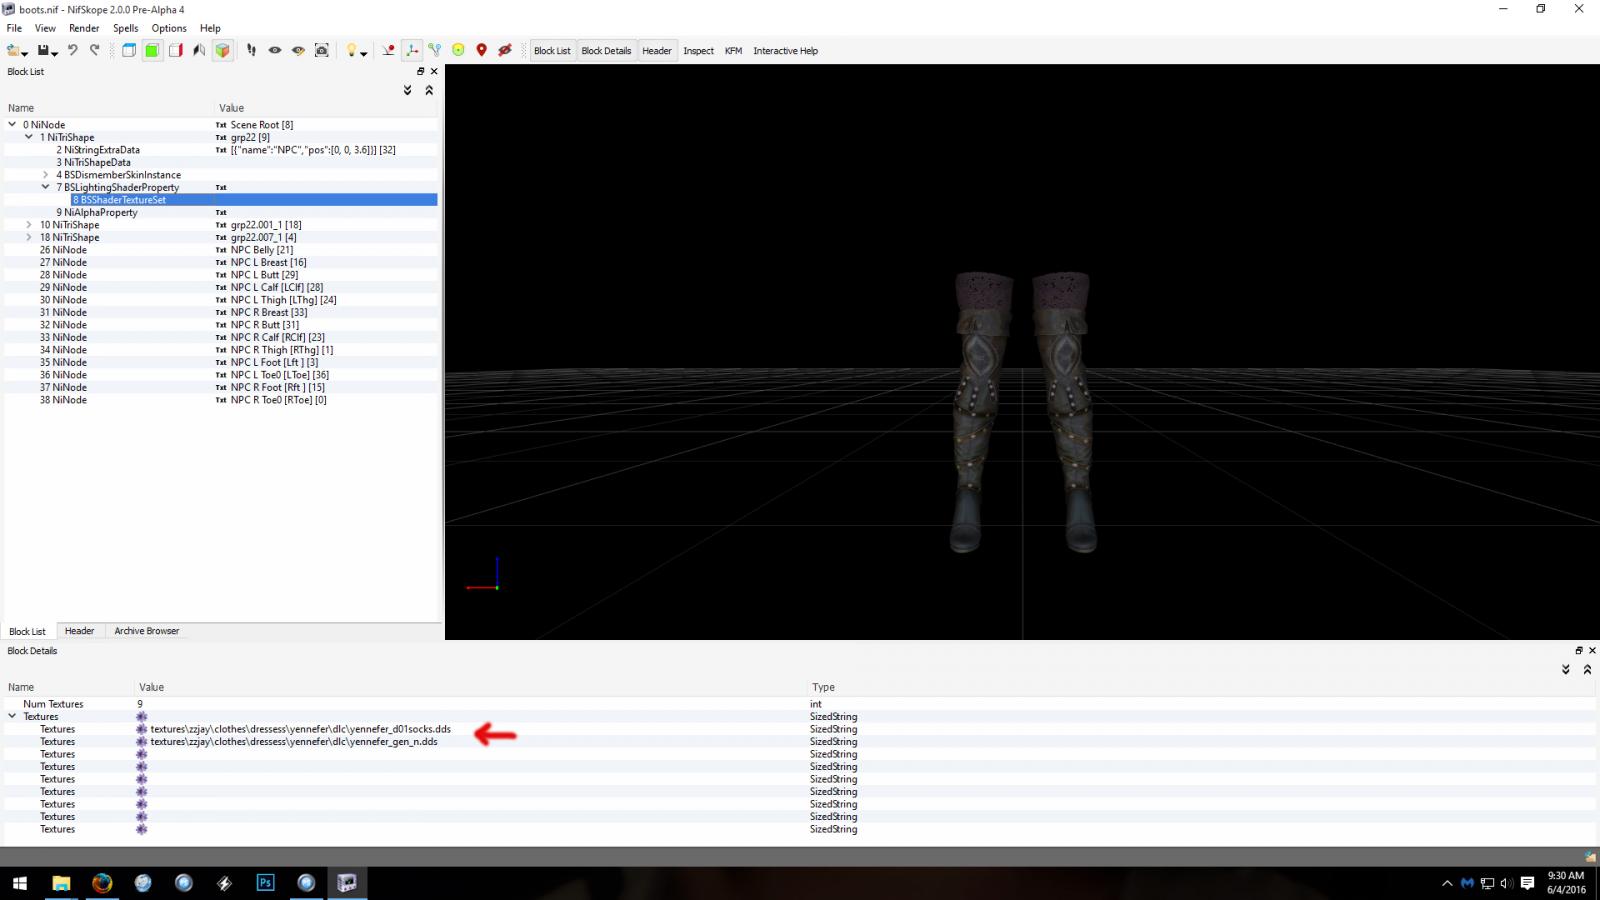
Hello. Welcome back to Skyrim. You should make sure your textures are set correctly. You can check and change the texture path in Nifskope under the BSLightingShaderProperty > BSShaderTextureSet within the NiTriShape. Or, since this is an Outfit Studio topic, by right clicking the object in OS > Properties > Textures. If you didn't change them after copying and pasting the first NIF, it's probably still pointing to its respective textures. Texture swaps can also be done via a Creation Kit plugin. I'm assuming your mod isn't currently set up to do that, because you'd only have one mesh. But it would be another way to correct your issue, and then you'd only have to deal with one mesh in future modifications. The mesh that shows up in your inventory is actually unique from the mesh your character actually wears. Sometimes modders get lazy and point to the same one, but traditionally it's separate. It's usually called OutfitName_g or _ground.nif, since it's also the mesh that appears when you drop your outfit on the ground.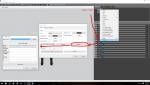

-
[Unofficial] Bodyslide 2/Outfit Studio Tutorials
Levionte replied to blabba's topic in Skyrim Adult Mods
You load your boots with the body mesh first, and you conform to the relevant sliders. Then you load a new reference. When you select the feet, on the same window check "Merge new sliders with existing sliders" at the bottom. Then conform to the foot sliders. On the "Save As" window, you uncheck the "Copy reference shape into output" to have it not include the reference when you build the outfit. I mean, it can be done. It won't be easy to get it to look good, given how drastically different the body shapes are. People convert male outfits to (usually skimpy) female versions all the time. But they typically use a 3DS Max or Blender type of program. The point of Outfit Studio was to be user friendly enough that almost anybody could use it. But that means it's not as powerful as the real thing, and some of the advanced features really come in handy on a project like that. You could certainly try it, though. If your lingerie doesn't have sleeves or legs, that would make it a whole lot easier. -
Outfit Studio/Bodyslide 2 CBBE Conversions
Levionte replied to XunAmarox's topic in Skyrim Adult Mods
It's so weird when people randomly reply to you a year and a half after you said something. At least I finally got some feedback! Lol. But yes, it was intentional. -
[Unofficial] Bodyslide 2/Outfit Studio Tutorials
Levionte replied to blabba's topic in Skyrim Adult Mods
Similar answer. When you first start a project, you can "Conform All" as in conform all of your objects to be subject to all the morphing. Or you can "Conform Selected" as in it will conform only the selected object to the sliders. Select your pants, and then "Conform Selected" and it will only bodyslide the pants. Before you conform, you can also uncheck any sliders and it won't create an entry for them, meaning they won't move at all when the slider is activated. You can then create a slider manually by turning it on and changing, conforming, or moving the object however you want it to. I'd probably recommend doing Shape > Move to align things to where they should be without distorting the object. If you're asking if there's a way to have your holsters move without any distortions automatically when you conform to sliders, I'm afraid it doesn't work like that. 3DS Max, or any 3d modelling program for that matter, doesn't see holsters, canteens, and knives. It just sees vertices (little dots that combine to create the object) that need to be moved around. It really doesn't take long to move it manually, though. Another way, is to mask the pieces you don't want to move around. This would be more useful if the holster was part of your pants and not a separate object. You could mask the holster, then conform to sliders and it would move your pants around like normal, but the holster wouldn't move. Then you could invert the mask and Shape > Move things to where they need to be.