Myst42 Posted July 26, 2013 Posted July 26, 2013 As I'm soon to finish my last big modding project, my future plans in Oblivion involve dedicating entirely to screenshooting and mash-up making Also some custom armor releases may follow such as some rips from Alien vs Predator I had, some outfits I created on the designs and artwork of Spanish artist Luis Royo, and some other ideas I had for armor... If only I was better at Photoshop... But what I really want to do is play and screenshoot... I've played very little in fact. Modding is very time-consuming and there are other things to do too. So I actually almost don't have any time to play. However what calls my attention is the fact some pictures I've seen have various strange effects that do not often appear in game... Such are the cases of motion blur in some action shots... As I know according to what I've seen, its impossible to take good real action shots, everything is achieved though cheats and poses but it still happens on images Another case is static focus background blur, like the camera is focusing on something and background is seen out of focus. As the in-game camera does not have focus that's not real either. I know of a way to achieve blurry backgrounds in Photoshop, but is it the only way? What of those ENB set ups people talk about? (Which I don't know nothing about) Some people take really good high-res close ups on their characters and even at the highest resolution I have, the close up still doesn't look as detailed And for last, something a little nastier I've witnessed on some images depicting sexual acts, I think they are Japanese, but those shots have something special: moist. Their characters look like if they were all sweaty and wet, on the skin, different from glossiness on textures this goes even beyond... So my question is what does people really know about these techniques? how is it possible? is it mods? is it only Photoshop?... How?
Zadil Posted July 26, 2013 Posted July 26, 2013 Most if not all of the effects you mention could indeed be done in Photoshop with enough time and effort, but there are also other, more practical ways to achieve some of them.The blurred background for example, or DOF (Depth of Field), is a popular ENB element alongside other effects like film noise, color saturation, bloom and a few others, depending on the ENB configuration. ENB is pretty much a must for taking beautiful screenshots, so you should definitely take a look at it, but be aware that some effects require a lot of computing power.Another handy thing to know about for taking screenshots is the free-fly camera - a camera/viewangle that you can move around independently of your character. You can toggle it on and off by entering 'tfc' in the ingame console. Good for capturing images that would otherwise be hard to take, like those really close-up character shots.As for moist skin - not sure exactly how those particular modders did it. An oily skin mod perhaps?So yeah, for image enhancements you generally have these options (that I know of): mods that change the visuals directly ingame, ENB effects for visual post-processing, and image editing afterwards using additional software.
Teechan Posted July 26, 2013 Posted July 26, 2013 Oh my, I apologize for the wall of text that's about to be typed out. ;D - FOV is a way to get hi res closeups on faces. When in 1st person mode, FOV of lower numbers magnifies everything. FOV 75 is the game's normal setting. Having FOV settings on the player or in free cam mode takes a little modification. What I do for my videos and stuff is get a batch file (it's a simple text file with console commands) You name it whatever, and then in console type in "bat xxx.txt) So to get flying camera mode with a different FOV, I'll run a bat file with the line SetINISetting "fDefaultFOV:Display" 45 (or whatever. I use FOV 20-55 for actions shots) But also make sure you make another bat file that runs SetINISetting "fDefaultFOV:Display" 75, (75 being the default fov) before shutting down Oblivion as the UI will also be bigger when Oblivion is restarted. Also, get a hold of a mod called WHOOSH. It allows you to set slowdown/speedup motion speeds. - For quick facial expressions through console, I use Shiny Emotions (which has a calling actor "say" a silent lip file, which is a different way to get emotions then other pose mods, which list emotion enums though .kf text files.) This is a chart - in console hit "say XXXXXX") and the actor will "say the emotion. - TCL does this neat thing where it will freeze dropped objects like arrows in the air. I tend to drop arrows and have my actors "Look" at them, which makes them look like they're looking at something interesting...but they're actually looking at a floating arrow. ;D - Speaking of "Look", that's an actual thing you can do in console. So with your actor selected type in "look XXXXXXX" You can also "StopLook", and even have your actor "look" at themselves. - Incidentally, you can also use this OBSE plugin called RuntimeEditorIDs. You know how each NPC and other objects have a code of some sort when selected in the console? Say your npc is called "Shirley" in the CS. In console, you can now call her "Shirley". You can even have an NPC cast something from the console too (but can be quirky at times) With this, you can TAI (or dreeze) your actors through a BAT file. - PRID is pick reference ID. This is awesome for when you can't select an actor through the console with your cursor. "PRID 14" will pick yourself. Also, this is relevant with video, but might have neat effects if taking screens. OBSE 21/ beta 4 now has camera speed modifiers for Oblivion like SUCSM for Fallout or Skyrim. This lone feature made me puke rainbows. I'll write in more thing when I think of them.
Myst42 Posted July 27, 2013 Author Posted July 27, 2013 I've been taking a few before so I'm familiar with a few of the basic tricks Such as the some nice pose mods, tfc and tm command, the tai command for battle scenes and one or two mods taking care of illumination. A particularly good one allows to press a key and instantly hide menus, start flying camera and add a light source right in front of your character. It also allows to set some weathers and change said light source or turn it off. But that's only the basics of the good stuff... Thanks for clarifying some new things Though like I said I know nothing of ENB, except it exists so some of these things I guess I'll have to do research. I actually did a test some time ago on a screenshot applying my very modest Photoshop skills and manage to do a successful background blur focusing on a new character I own But something told me there was another way... I thin It'd be a good idea to share these knowledge here at LL at least... there's little info on these tricks and they can mean a big different between a modest picture and a real artwork
Poontank Posted July 28, 2013 Posted July 28, 2013 IT'S ANOTHER WALL O'TEXT!!! Pretty in pink. Some helpful information has already been posted indeed. I personally never use the TM command as I prefer taking every shot with the console active. It's 'freezing time' and automatically hides all HUD elements. What's left is the tiny console command prompt in the lower left-hand corner. Takes only a few seconds to get rid of that with the stamp tool in Photoshop. Actors can be frozen in mid-animation with the TAI command, alright. For animated effects like fire or a waterfall I activate and then double-tap the console key until I have that effect's optimal frame when said fire or waterfall is looking best. Works also perfect to find the right frame of a character doing an animation or a facial expression. In general I love to have as much of a scene as static as possible, to be able to choose the perfect angle for a shot. About every element on the screen can be manipulated with the right console command. To change a reference's position, click on anything to bring up its ref ID and use the command getpos x or y or z. The numerical values you will get can then be used with the command setpos x/y/z by slightly (or drastically, depending on the situation) changing the current parameter you got from the previous command. Remember you can bring up all previous console commands by tapping the uparrow key, then use the end key to make the cursor jump to the end of the command line and backspace to erase the current parameters. The same thing can be done for angles with the commands getangle x/y/z and the corresponding setangle x/y/z. But actors can only be rotated on the z-axis, unfortunately. The size of objects can slightly be modified in the console with setscale <quantity>. There are limits however. The factors 0.5 and 2 are the min and max size that objects can be scaled via a console command. For more drastic size changes a simple CS edit is needed. Factor 10 is the absolute maximum anything can be scaled up in Oblivion. You can use the command getscale on anything first to be sure it isn't already scaled up. If so, it might actually turn smaller even if you use the command setscale 2 on it! Several techniques of illumination are possible: An illumination mod (I even commented on it when I was still tolerated over there!), a light spell, torches - or a console command. The latter works especially well outside as it changes the RGB values for any weather type: Setweathercolor <R> <G> <B> 1 <weather ID> 1 is responsible for the colour of the fogging. Setweathercolor <R> <G> <B> 3 <weather ID> 1 is responsible for the colour of ambient light. Setweathercolor <R> <G> <B> 4 <weather ID> 1 is responsible for the colour of direct light. A pain to input those codes, I know. Ambient lighting works best I find. A list of the weather IDs - I know them by heart now - can be found here (along with other useful console commands). These IDs can be also used with the more drastic forceweather command fw <weather ID> or the slower setweather command sw <weather ID>. Those two weather commands can be used in combination with set timescale to <quantity>, say, 100 to create a mix of two different weather situations. Just remember to reset the timescale back to default with the quantity parameter of 30. Or any other parameter below. I'm actually using a timescale of 1, so the game is running in real-time. A colour effect like the described complicated weather colour command can be easily created instead with OBGE's 'Colour Mood' shader. And even more easily in Photoshop with a coloured layer for example. This shows that it's a good idea to learn more about Photoshop post-production editing in general. What I'm using Photoshop for the most is editing out clipping and other imperfections. Stamp tool FTW. The 'slimy' effect you describe in the opening post is just a Photoshop filter named 'Plastic Wrap'. Certain people are very fond of it. But no self-respecting graphic designer would ever use that one . Edit: Fixed an embarrassing typo in the weather colour commands' syntax.
Teechan Posted July 29, 2013 Posted July 29, 2013 Oooo I didn't even know about the other weather color codes. SAA is Set Actor Alpha. That makes an actor translucent or totally invisible. Now, they'll still be "seen" and detected by others, but you can get a neat ghostlike appearance. I think the values go SAA 1 (totally visible) and use decimals to 0 for total invisibility. Another neat trick is PMS/SMS - PlayMagicShaders/StopMagicShaders. You can find the codes in the CS. PMS 18b75, for instance, adds the Mysticism enchantment color pink to the actor it's called on. (Or if you use the REID OBSE plugin I talked about above, effectEnchantMysticism works well too.) Kill of course kills an actor, but when used with TCL they freeze in the air.
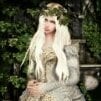
Emily Posted July 30, 2013 Posted July 30, 2013 And for last, something a little nastier I've witnessed on some images depicting sexual acts, I think they are Japanese, but those shots have something special: moist. Their characters look like if they were all sweaty and wet, on the skin, different from glossiness on textures this goes even beyond... So my question is what does people really know about these techniques? how is it possible? is it mods? is it only Photoshop?... How? Ah, Those are Emily Renders, they are not ENB filtering. It's are common photoshop trick in visual art to enhance 3d and eliminate pixel edges. There are very good reason why Emily avoid American server to host some of her uploads. Here is the tutorial: 1. Load a screenshoot. Your Initial Caption Lighting and Shading depth ratio is critical for render result. [55:45] Not too bright - Not too dark. * . [This method are effective on medium shoot, close up and extreme Close up. Avoid long shoot caption.] 2. Create two layer of that screenshoot. *. Now you have [layer.1] and of the same image. ---------------------------------------- 3. [De-saturate] [the background]. 4. [Add 4.5 strength Gaussian Blur Filter] on the [layer.1] 5. Set Layer.1 property to overlay. --------------------------------------------------- 6. Balance out the desaturated B/w version lightning and shading on . Not too dark - Not too bright, keep the 3d expression sharp and original. Done! ----------------------------------------------------- 7. Now moving to [layer.1], color editing balancing, Leveling, curving, the color should be as realistic as it can be and less "toony". ------------------------------------------------------------------------- 8. Now for the Goo and sweat effect. GO to filter > Artistic > plastic warp. [Highlight strength= 4] viscosity - glossy [Detail=11] Deform-Thickness [smoothness=5] liquidity [To Layer.1] DONE (SKIP this filtering step, If you're not doing NSFW Render). --------------- Finally, Do more adjustment to Layer.1 or Background as much as required until you reach a satisfactory render result. 9. Save and Share. -------------------------- Attachment, Below is Raw screenshoot and Render Result.
Myst42 Posted July 31, 2013 Author Posted July 31, 2013 Oh so Emily used Photoshop Those kind of captures are not really my thing, but I was really curious on how and though it was some kind of mod. It's always good to know If I ever use it It would be for gladiator and arena themes http://oblivion.nexusmods.com/mods/39381//? After all this Photoshop and command using, this must look really silly, but I forgot to link this mod In my opinion its very underrated It solves many problems as resetting poses, adding instant light, changing a few weather types and giving a flying camera All of what could take lots of commands and careful placing of light sources, and more commands to set the right weather... all of it in a matter of seconds Combined with knowledge of commands it could be even better
Emily Posted July 31, 2013 Posted July 31, 2013 Color filter that support saturation and hue with dynamic motion blur is what we need to improve oblivion medieval visual display. Emily have them for fallout.3 but not for tes.IV
Poontank Posted August 1, 2013 Posted August 1, 2013 Doing this for two years now, I have literally entered millions of console commands in the making of my shots. I'm so used to the console that entering and subsequently editing commands takes only a very short time. Facilitated by the described shortcuts like uparrow key to edit previously input commands. And with a lot of utility mods installed, my keys are already mapped to all kinds of functions. To use the mod you linked I would have to remap quite a lot of keys (and find free keys for that in the first place). And effects like blending of two different weather conditions are still reserved to console trickery. So I'd say if you start out with serious screenshooting, that mod might be a helpful tool indeed. But it can never be a substitute to the pinpoint accuracy of console commands, no matter how much utterly annoying 'extra work' inputting them might mean. Besides, every pose mod has already a reset function implemented. Careful placement of (coloured!) light sources for effect can't be beaten by this mod's ambient-only lighting function. OBGE's colour effects also allow changing brightness and contrast. Even the game's very own video settings can be used to change the brightness. Photoshop post-production offers limitless editing possibilities. One crucial point I forgot to mention in my previous post: Actors frozen with the TAI command seem impervious to setangle. To rotate them on the z-axis, you need to input a setpos command after setangle. While the player character however is correctly rotated with setangle even when stopped with TAI. Some poses have the nasty habit of making characters look goofy due to the head tracking when they are frozen and then moved with setpos. Move a character and watch the head fly off in a stupid angle if the pose in question has head tracking enabled. There might be an ini tweak to globally switch off the head tracking, I haven't tried out yet if it is a valid solution to the problem. Simply unfreezing them by using a targeted TAI again, moving the characters and switching off their AI again after the setpos command does work in any case. Or try using the look command Tee described to make NPCs' heads turn in a particular direction (with a dummy object they are looking at).
Teechan Posted August 2, 2013 Posted August 2, 2013 Move a character and watch the head fly off in a stupid angle if the pose in question has head tracking enabled. There might be an ini tweak to globally switch off the head tracking, I haven't tried out yet if it is a valid solution to the problem. I had this issue recently with a head slap animation I made for a machinima scene. Even when I had "stoplook", the NPC still looked at others. One method is to have them "look" at themselves, or run a bat script (which I just put together and tested) to set the ini. To turn off headtracking: SetINISetting "bDisableHeadTracking:General" 1 To turn it back on: SetINISetting "bDisableHeadTracking:General" 0 Another annoyance are NPC's that are in their pose but keep trying to "face" you. SetRestrained 1/0 will make them stay put. SetUnconscious 0/1 Will make them close their eyes and knock them out, which is good for kissing poses. Only bad thing is their eyes stay shut once they're awake, but you could resurrect them to reset, or if you have OBSE installed, Update3D usually is helpful to snap out whatever animated anomaly they get themselves stuck in.
Poontank Posted August 2, 2013 Posted August 2, 2013 Yes, this is the ini setting I had in mind. So does it reliably work to get rid of the silly headtracking that is implemented into poses? If so, I'm going to use this as I had many instances when the look command didn't work correctly for reasons unknown. For permanently closed eyes I usually used the kill command and afterwards resurrect 1 - which has more advantages than just resurrect, it revives NPCs on the spot. And every facial animation sequence (with the silent voice file attached) has characters blinking two times. When activating and then double-tapping the console, it's easy to freeze actors in those exact frames when they have their eyes closed, or half closed for a 'droopy' or seductive expression. One more thing I forgot in the introduction of my pink wall post: Though this one is included in every list of console commands, it's better to explicitly mention it anyway. 'Clear Screen' - cls - is the command to get rid of the list of used commands that clutter up the screen over time. After that there is only the command prompt left. About every other command is not case sensitive, TFC works just as well as tfc. But cls must be lowercase to work.
Teechan Posted August 2, 2013 Posted August 2, 2013 I assume silly headtracking happens when there are no keyframes giving the neck/head a pose, so the game engine takes over which makes the head wibble where it wants. I only tested the player, so I'm assuming it'll work on everybody globally.
Recommended Posts
Archived
This topic is now archived and is closed to further replies.