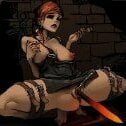
sunhawken Posted June 12, 2021 Posted June 12, 2021 *** Texturing 101 *** Rev 1.0, January 2009 Vince Bly Virtually every object in Oblivion, whether it be a plant, an ogre, or a castle, consists of one or more polygonal meshes that define its shape. Textures and materials are used to define its appearance. The following presents basic information relating to textures as used in Oblivion. It is not a tutorial as that would depend on specific software. So, it does not answer the "how" of texturing, but does attempt to answer the "what". Glossary: TEXTURE - A texture is a combination of one to three, two-dimensional images that is applied (mapped) to a polygonal mesh to modify its appearance. It always includes a diffuse map, usually includes a normal map, and may include a glow map. DIFFUSE MAP - A diffuse map (sometimes called a color map) is the regular image that defines the color and general appearance of a surface. It might be a wood grain, a brick wall, or a tree's bark. NORMAL MAP - A normal map is used to add depth to a surface. It uses the red, green, and blue (R, G, B) colors of an image to store details about the contours of a surface. More specifically, the R, G, and B values encode the X, Y, and Z direction cosines of the local surface normal. Almost all textures in Oblivion include a normal map. The common exceptions are icons and animated textures. BUMP MAP - Bump maps (sometimes called height maps) while not used in Oblivion are often used to create normal maps. A bump map stores height information as shades of grey. Dark areas correspond to low spots on the surface and bright areas to high spots. Bump maps are relatively easy to make and bump map to normal map plugins are available for programs like PhotoShop, Paint.Net, and the GIMP. You can also create normal maps from bump maps using nVidia's Texture Tools 2. Example 1: The images below show the diffuse, bump, and normal maps for a dragon image used to decorate an oriental tea pot. The bump map was made from the diffuse map by filling in the center, adding a few tweaks, blurring the image slightly, and converting to shades of grey. The normal map was made from the bump map using nVidia's Texture Tools 2. Diffuse Map Bump Map Normal Map The image below shows the tea pot with a plain, flat normal map on the left and with the normal map shown above on the right. As you can see, the difference is quite dramatic! Tea Pot Comparison Showing the Effect of a Normal Map GLOW MAP - A glow map is used to make portions of a mesh glow in the dark. Glow maps modulate the mesh material's emissive color. When using a glow map, the emissive color is usually set to maximum. Then, portions of the mesh surface corresponding to light areas in the glow map will glow in the dark. Example 2: The first image below shows a glow map for the blade of a dagger, highlighting the runes and maker's mark. The image below that shows the dagger at night with the corresponding elements glowing. Glow Map Dagger at Night ALPHA - Virtually all image formats store red, green, and blue information for each pixel of the image. Formats that support transparency store a fourth parameter: alpha. The alpha value corresponds to transparency. Usually stored as an 8-bit value, an alpha value of 255 corresponds to completely opaque, while 0 corresponds to completely transparent. Alpha can be incorporated in a diffuse map to make the texture appear partly or completely transparent. This requires the addition of a NiAlphaProperty block in the .nif file (see the glass table under the pot in Example 1). Alpha can be incorporated in the normal map to control specular reflection (shininess). A high alpha (near opaque) results in a shiny surface, while a low alpha results in a duller, more matte surface. A NiAlphaProperty block is not needed for this case. Example 3: The images below demonstrate the difference in specular reflection (shininess) due to the alpha value of the normal map. The normal map for the right half of the test panel is opaque (alpha = 255). The normal map for the left side is nearly transparent (alpha = 10). The first image was taken around noon under diffuse illumination. The second image was taken near sunset with the sun behind the viewer. As you can see, the difference in specular reflection is quite apparent. Panel Under Diffuse Illumination Panel Under Specular Illumination MIPMAPS - Mipmaps are smaller versions of a texture, stored with it to increase frame rates. If an object with a 512 by 512 texture is being viewed from such a distance that the entire object will only be 8 pixels wide, using the full 512 by 512 image to calculate the display would be very inefficient. That's were mipmaps come into play. Each mipmap is one fourth the size of the previous. So, for a 512 by 512 texture, the first mipmap would be 256 by 256, the next would be 128 by 128, and so forth. The GPU (Graphics Processor Unit) will choose the best match to the actual size of the displayed image. Formats: .DDS - All textures used in Oblivion are stored on one of several Direct Draw Surface formats. The dimensions of each texture must be a power of two, for example: 64 by 128, 512 by 512, or 256 by 1024. There are four DDS formats supported in Oblivion: DXT1, DXT3, DXT5, and A8R8G8B8. DXT1 - This is the most compact DDS format and does not support alpha (transparency). DXT3 - This compressed format is about twice the size of DXT1 but does support alpha. It is especially good where there are sharp transitions in alpha, but not very good for smooth alpha gradients. DXT5 - This format is also compressed, yielding files the same size as DXT3. It too supports alpha and is better than DXT3 for smooth gradients in alpha, but not as good for sharp alpha transitions. A8R8G8B8 - This format is uncompressed. It is about four times larger than an equivalent DXT3 or DXT5 file. It does support alpha and is especially good for storing normal maps of relatively coarse, high relief surfaces. In some cases a 256 by 256 A8R8G8B8 normal map can provide better results than a 512 by 512 DXT3 or DXT5 map, although the files sizes are similar. FILENAMES - The diffuse texture should be stored in a subfolder of your Oblivion\Data\Textures folder, such as Textures\MyNewModTexs\StoveBlack01.dds. The corresponding normal map would be StoveBlack01_n.dds. The corresponding glow map, if you have one, would be StoveBlack01_g.dds. Do not use the underline character, "_", elsewhere in the texture name unless you know exactly what you are doing. ICONS - An icon is used to identify an object, such as in the player's inventory. It must be 64 by 64 pixels, must not include mipmaps, and does not require a normal map. It is best if its background is transparent as that will allow it to display properly in alternate interfaces such as Dark UI. Icons are stored in the Data\Textures\Menus\Icons folder or a subfolder of it. If you wish, you can store reduced size icons in the Icon folders under menus50 and menus80 for optimum visibility with low display resolutions. Parameters that Affect Appearance: MATERIAL COLORS - The Diffuse and Ambient Colors have no effect in Oblivion (although they do have an effect in NifScope). The Specular color does not appear to have an effect under normal circumstances, but can be useful in special cases. For a practical example of the use of specular color, see Texians Static Water Meshes (see Links below). The Emissive Color makes an object glow in the dark. As noted above, a glow map can be used to define which areas glow, in what color, and by how much. MATERIAL GLOSSINESS - This parameter is related to the small scale roughness of the surface. Example 4: If you had a perfectly smooth ball, the reflection of the sun (or 'glint") would be nearly a point on the sphere's surface. If, instead, you had a ball with a satin finish, light would be reflected over a larger area, producing a more diffuse glint. You can see this most easily in the figure below where the glossiness increases from left to right. Examples of Increasing Glossiness MATERIAL ALPHA - You should usually leave this at its default 1.0000. The transparency of things like glass objects can be controlled by the alpha values of the diffuse map and an associated NiAlphaProperty block in the .nif file. NITEXTURINGPROPERTY APPLY MODE - Apply Mode in the Block Details of the NiTexturingProperty block determines which shaders will be applied to the texture. For most applications, the default APPLY_MODULATE works best. For very shiny things like glass or armor, APPLY_HIGHLIGHT may look best. Caution: you should use either APPLY_MODULATE or APPLY_HIGHLIGHT when using a glow map. APPLY_HIGHLIGHT2 enables the parallax shader which is not compatible with glow maps. WINDOW REFLECTIONS VIDEO OPTION - This Oblivion option simulates reflection of the horizon on shiny things like polished armor. Unfortunately, it can substantially degrade the appearance of smooth transparent surfaces. Example 5: In the figure below, the screen shot on the left was made with Window Reflections on, while the shot on the right was made with Window Reflections off. These images were made running with the 1.1 patch. Some changes were made to this feature with the 1.2 patch, so results with 1.2/SI will look a bit different, although the appearance of smooth, curved, transparent surfaces will still be degraded with Windows Reflections on. "Window Reflections On" vs. "Window Reflections Off" Links: More information on Normal Maps nVidia's Texture Tools 2 More information on DXT formats Texians Static Water Meshes This post as a Word .doc file Credits: WindmillTilter for many helpful suggestions.
Recommended Posts
Archived
This topic is now archived and is closed to further replies.