
Entry posted by Roggvir
2534 views
I converted some outfits from UUNP/UNPB HDT to the new CBBE SMP 1.1.3, and when i was asking permission (btw. he wasn't the creator, so he couldn't) to upload the conversion, the guy wanted to know how i did it.
So, i wrote it down for him, but i guess maybe it can be useful to other ppl, so here it is.
Though this is to convert to CBBE SMP 1.1.3, i believe the process can be adapted to just about anything.
This is written while using the Jessica Rabbit Clothing outfit as an example, so i recommend you download that outfit and follow this "guide" while converting it yourself (think of it as an exercise), and after you do that, then try to adapt the process to convert teh outfit you actually wanted to convert.
You will also need to do some work in NifSkope at the end, so you should be familiar with it too (if you are not... well, it's nothing advanced, you should be fine).
WARNING: I am no artist, my knowledge of any related tools is really basic, and i am no Outfit Studio guru, so take anything you see here with a (big) grain of salt.
And if you see any mistake, nonsense, unneeded step, or think of a way how this can be improved, please post a comment and i'll fix it.
I describe the process in more words that is really neccessary - please know that it is not because i would think you are an idiot, i just dont know what is your experience with OS/NifSkope, and this is just my way of explaining things.
The process is split into creating two projects in Outfit Studio, and then adding the first project into the second one (which will then become the final product), because that was the only way how it worked for me - that doesn't mean the process cannot be simplified, i just dont know how (if you think of a way, post it in a comment).
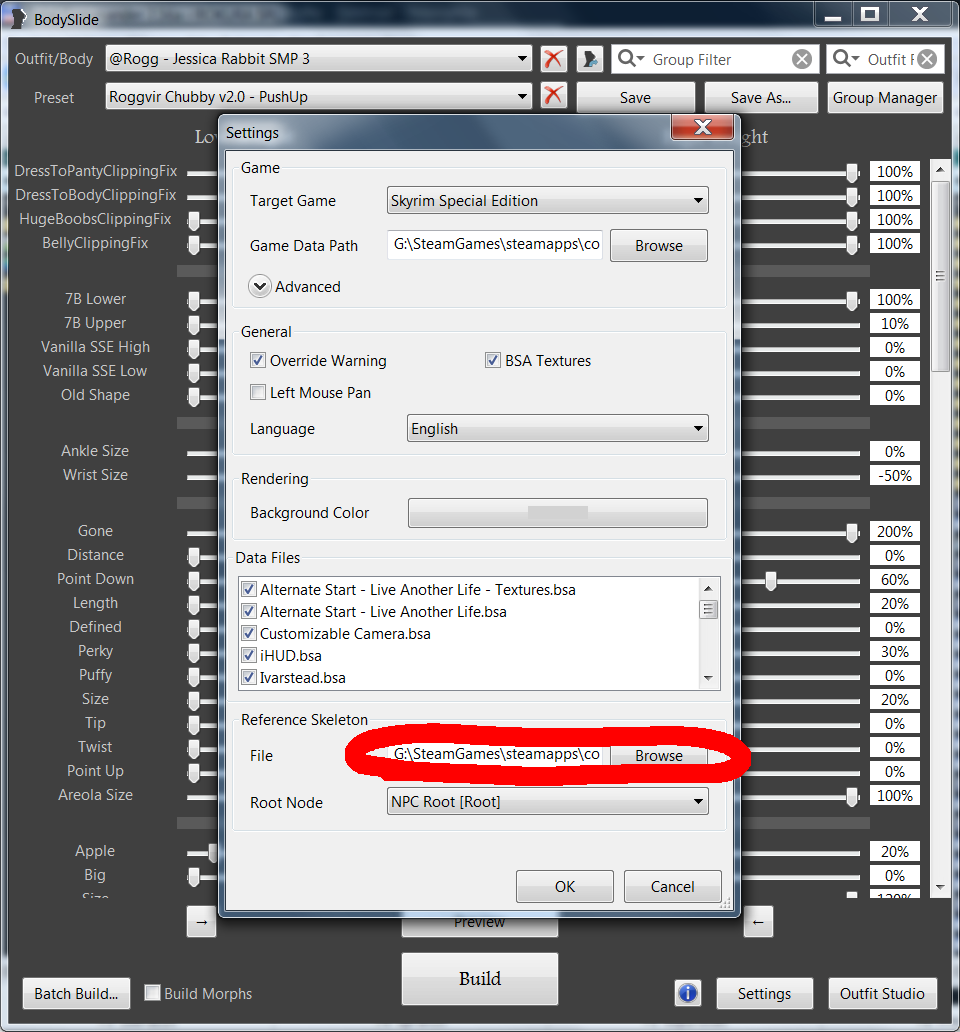
First, you need to set the skeleton file in BodySlide / Outfit Studio to point to the actual skeleton file from CBBE SMP 1.1.3.
(i am actually not sure you NEED to do this, but i had to - but i was using BodySlide/OS v4.7.4, so maybe that is why? Somebody pls clarify)
So, make sure you do that and point it to "G:\SteamGames\steamapps\common\Skyrim Special Edition\Data\meshes\actors\character\character assets female\skeleton_female.nif" (obviously your path will be slightly different):
Second, you want to add the CBBE SMP Body to possible references to choose from.
It makes things easier, and the process is described while assuming you did this.
Locate the file "Data\CalienteTools\BodySlide\RefTemplates.xml", open in your favourite XML editor (Windows Notepad should work too, if you don't have anything set up for this), and insert the following line into the <RefTemplates> block:
<Template sourcefile="SliderSets\CBBE Body SMP.osp" set="CBBE Body SMP" shape="CBBE">CBBE Body SMP</Template>
PROJECT #1 - a prefab project where we conform the outfit to the shape of CBBE body.
- Create new empty project and import the original outfit NIF
- Remove all meshes except for the outfit mesh "Model001_23_dress1nPart__5_16_16", panties "neiku1", and "feet".
-
Load Reference "CBBE Body SMP"
We load this reference to get the "BreastHeight" slider we will need to make the outfit shape fit the CBBE body. -
Load Reference "UNPB To CBBE"
Make sure the "Merge new sliders with existing sliders" is checked, so we dont loose the sliders loaded in previous step. - Set slider "BreastHeight" to 100%, select the outfit mesh in "Meshes" list, and use menu "Slider --> SetBaseShape".
- Use menu "Slider ---> Conform All"
- Set slider "UNPB To CBBE" to 100%, select all meshes in "Meshes" list except "CBBE", and use menu "Slider --> SetBaseShape".
- Set slider "BreastHeight" to -100% (note: its not 100%, but NEGATIVE 100%), select the outfit mesh in "Meshes" list, and use menu "Slider --> SetBaseShape".
- Select all meshes except "CBBE" in the "Meshes" list, and use menu "Slider ---> Clear Slider Data".
-
Remove ALL bones from the project
Switch to the "Bones" list, select all bones, and use context menu "Delete > From Project".
NOTE: without this step the CBBE SMP body that we load again later always got broken (it looked ok in Outfit Stufio or BodySlide, but made the game crash and NifSkope showed it wildly stretched and broken into pieces).
You may not have the same problem with other outfits or other bodies you convert to, but if you want to be sure, always do this. - Save the project as "Project 1" (do NOT include the CBBE body reference! make sure "Copy reference shape into output" is NOT checked).
PROJECT #2 - the actual conversion where we use the prefab project 1
-
Load Project "CBBE Body SMP.osp" and save it as a new project named "Project 2" (or whatever you want).
Make sure to change all the names and paths when saving as new project, so you dont overwrite the original "CBBE Body SMP" files! -
Add the previously created "Project 1"
Use menu "File --> Add Project.." to add the project #1. -
Fix any clipping.
Fix any panties<->body clipping first, then fix dress<->body and dress<->panties clipping. - Conform the dress, panties, and feet to relevant sliders.
-
Rename the main outfit mesh from "Model001_23_dress1nPart__5_16_16" to "Dress"
We will be loading the original outfit mesh from the original NIF file as a reference, so we must change the name of our normal outfit mesh so it wont collide with the mesh we load as reference. -
Unset/deactivate the "CBBE" reference.
If the "CBBE" in the "Meshes" list is displayed in green color, it is set as the active referemce, so right click on the "CBBE" mesh in the "Meshes" list, and click "Set Reference" to deactivate it.
If the "CBBE" in the "Meshes" list is not displayed in green color, then that's already how we want it. -
Load the original dress as reference to copy the HDT bones from.
Use menu "File --> Load Reference...", then choose "From File" and browse and select the original outfit NIF.
Select "Model001_23_dress1nPart__5_16_16" (the main dress mesh) as the Shape to load.
Check the "Merge new sliders with existing sliders" checkbox, and click the "OK" button. -
Copy the "je*" bone weights from the reference we just loaded.
Select the "Dress" mesh in the "Meshes" list, then switch the view to the "Bones" list.
In the "Bones" list select all the bones whose name starts with "je", then switch the view back to "Meshes" list.
Back in the "Meshes" list, right click on the "Dress" mesh and select "Transfer Selected Weights". -
Copy bone weights from "CBBE" reference.
In the "Meshes" list, right click the "CBBE" mesh, and select "Set Reference" to set it the active reference.
In the "Meshes" list, right click the "Dress" mesh, and select "Mask Weighted Vertices" - i dont know if this is the general rule, but at least for this particular outfit, you get the best results if the loose skirt part of the mesh which is now weighted on the "je*" bones, is weighted ONLY on those "je*" bones and nothing else, so that is why we now mask the already weighted vertices.
Right click the "Dress" mesh again, and select "Copy Bone Weights" (keep the default values).
Let's not forget the panties - in the "Meshes" list, right click the "neiku1" mesh, and select "Copy Bone Weights" (keep the default values). -
Delete the original dress mesh we loaded as reference to copy bone weights from.
Right click "Model001_23_dress1nPart__5_16_16" in the "Meshes" list and select "Delete".
Now you could rename our "Dress" mesh back to "Model001_23_dress1nPart__5_16_16" as it is referenced in the XML, but you will need to edit the XML anyway to change some names, because we effectively replaced the original outfit's collision meshes with those that originated from the "CBBE Body SMP" project, so you may keep the name "Dress" and just remember to also rename it accordingly in the XML later. -
Add the NiStringExtraData required by HDT
Due to how we did things, the NIF doesn't contain this node, so we must add it.
Outfit Studio can add extra data nodes only to meshes, but HDT requires it to be on the top NiNode, so we need to use NifSkope to add it.
SAVE THE PROJECT and close Outfit Studio (we're done with OS).
Open the project NIF in NifSkope, right click the topmost "NiNode" (named "Scene Root") in the "Block List" and select "Node > Attach Extra Data > NiStringExtraData" (make sure it is "NiStringExtraData" and not "NiStringsExtraData").
Find the new node you just inserted and select it, then right click the "Name" property in "Block Details" below, choose "Edit String Index", paste in "HDT Skinned Mesh Physics Object" (wihtout the double quotes!) and click "OK".
Same way paste "meshes\hongqun\je.xml" (wihtout the double quotes!) into the "String Data" property (right click the property, choose "Edit String Index", paste in "meshes\hongqun\je.xml" without the quotes, click "OK").
Save the NIF (make sure the "Auto Sanitize before Save" in the "File" menu is OFF).
Close NifSkope, open BodySlide and built the outfit.
0 Comments
Recommended Comments
There are no comments to display.