About This File
THIS IS A MODDERS-ONLY RESOURCE
The X2 Torso Fixer Tool automagically repairs the waist seam between torsos and legs in Blender.
Waist seam gaps aren’t caused by geometry-they come from mismatched vertex weights between the two meshes.
When the legs and torso aren’t weighted identically along that border, the game deforms them differently, creating a visible gap in motion.
This tool fixes that by copying the correct weights from Moo’s smooth legs (our authoritative reference seam) to the torso’s seam vertices.
The result is a perfectly sealed waist with consistent deformation. The optional vertex movement step is just a minor bonus.
────────────────────────────────────────────────────────────────────────────────────────────────
INSTRUCTIONS
────────────────────────────────────────────────────────────────────────────────────────────────
1. Open `TorsoWaistSeamFixTool.blend` in Blender 4.5.0+
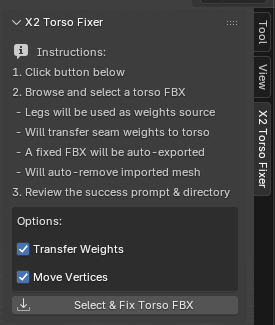
2. Open the Tools panel (press **N**) and select the **X2 Torso Fixer** tab.
3. (Optional) Adjust the checkboxes under “Options” — defaults are recommended (both enabled).
4. Click **Select & Fix Torso FBX**.
5. Browse to your torso FBX and double-click it.
6. Wait a second for the tool to complete.
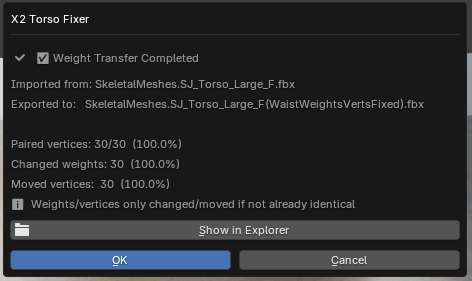
7. When done, a success prompt will appear summarizing the results.
8. Click **Show in Explorer** or manually navigate to your new `(WaistWeightsVertsFixed).fbx`. Merry Christmas.
────────────────────────────────────────────────────────────────────────────────────────────────
NOTES
────────────────────────────────────────────────────────────────────────────────────────────────
• Always fix the torso, never the legs — Moo’s smooth legs are the reference baseline.
• All temporary imports are automatically removed after export to keep your scene clean.
• Edit mode is intentionally disabled, this file is only for tool usage.
• The exported file is XCOM2-safe and ready to drop straight into your mod pipeline.
• For the tool tab to show automatically upon opening the file, you'll need to enable `Edit > Preferences > Save & Load > Auto Run Python Scripts`.
────────────────────────────────────────────────────────────────────────────────────────────────
Happy modding!
- SurferJay
────────────────────────────────────────────────────────────────────────────────────────────────
What It Does
It emulates these steps, which you'd have to do manually otherwise:
1. Export to FBX the smooth legs from Moo's mod
2. Export to FBX your torso(s)
3. Import both meshes into Blender
4. Select your torso, go into edit, select the second to the bottom row of vertices
- The bottom row of vertices SHOULD be the end of the Hidden material. Leave that alone.
- The row above that is the end of the actual skin layer. Select this row.
5. Go to the Data tab to view the vertex groups and lock all vertex groups
6. Create a deleteme vertex group and assign the selected vertices to it
7. Go to the Modifiers tab and create a new Data Transfer modifier
- Source: Moo's smooth legs
- Mix Mode: Replace (default)
- Mix Factor: 1 (default)
- Vertex Group: deleteme
- (Open modifier's Vertex Data options)
- Tick to enable Vertex Groups
- Mapping: Nearest Face Interpolated
8. Exit out of edit mode, going back to object mode
9. Click the dropdown to the right of the Data Transfer modifier's name, click Apply
10. Go to the Data tab and delete all UNLOCKED vertices (better not have skipped step 5)
11. Unlock all vertices, click your torso, shift-click your armature, and export to FBX
| Preview of Tool Tab | Preview of Success Prompt |
|
 |
![More information about "[WOTC] Ummy's Tachy Suit NSFW"](https://static.loverslab.com/screenshots/monthly_2026_04/ModPreview.thumb.jpg.7714f6681b221534ac526fa6949a8f30.jpg)
![More information about "[WOTC] NAPD Patrol Officer - Fallen Doll [NSFW]"](https://static.loverslab.com/screenshots/monthly_2026_03/ModPreview.thumb.jpg.5a699f95bece50d2bc0c992f832955f9.jpg)
![More information about "[WOTC] Stellar Blade - Christmas Dress NSFW"](https://static.loverslab.com/screenshots/monthly_2025_12/ModPreview.thumb.jpg.877b2f970937b3464a7901a6457cf5ee.jpg)