

XunAmarox
-
Posts
484 -
Joined
-
Last visited
-
Days Won
1


-
Hi! I was looking for a SE version of your awesome mod "Sculpture Statue Mannequins", but couldn't find it. Did you port this to SE or do you know if anybody else did?
Greetings,
Alcyone
-
I don't port anything to SE and I don't allow anyone to port any of my mods to SE. People can have their own opinions but for me it's a ridiculous cash grab and I refuse to support it. Not to mention I have hundreds upon hundreds of mods, most personally customized, transitioning over would be literally impossible for me even if I didn't despise the very idea of it.
-
-
How to use Face ripper to make an ESP for Companions
XunAmarox replied to shadowknightlrc's topic in Fallout 4 Non Adult Mods
Since this is what came up in google while I was refreshing my memory I'll add that you shouldn't include any hair or other head part for the face that is in that esp/esm itself or in an esp that is mastered to that esp/esm as it'll cause circular references resulting in a stack overflow which will prevent it from being able to be opened in FO4Edit (OK will be grayed out), and CTD the game. I don't know why faceripper will try to add the esp as its own master but it's dumb like that so it is what it is. Solution is to use a vanilla part replacing it then correct it in FO4Edit later. If it's a head part in an esp/esm that it could validly have as a master then it's fine. Just not itself or something that is mastered to it. The ideal solution would be for the creator of face ripper to make the program aware of trying to master an esp/esm to itself and, ya know, not do that. That'd just be a partial fix for something that should obviously never happen. But it'd be difficult for it to check to see if it's mastering something to the esp/esm that is mastered to that esp/esm as it'd have to check every esp/esm depended upon and its masters. Though if it could and just null reference it and inform you of that it'd be nice. -
No it can't.
-
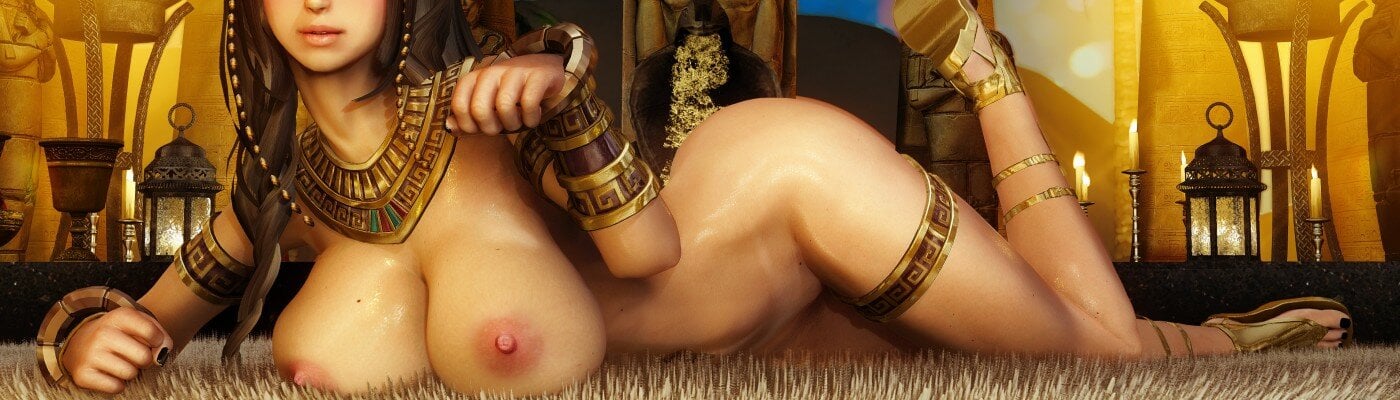
I'm looking for where this outfit from the header of XP32 Maximum Skeleton is from. The broad collar reminds me of an Ancient Egyptian wesekh, though the designs remind me of Dwarven armor.
-
It was only mod pages for me, posts worked fine. Appears to be working now as far as I can tell. Will report back if that changes.
-
Optional Files (will add later - can't seem to add attachments for some reason) • Fix that Radiation Sign-22519-.7z - A bat file to put the fallen radiation sign in the reactor room back on the wall. Install to game's exe directory and use "bat fix-that-sign"; you may need to change the first 2 numbers after prid. • More Vault Rooms Compatability Patch-22519-.7z - Adds the Window category to MVR and moves the window it adds there. Without this patch you will see none of the spy windows added, or probably any windows at all for that matter except the one MVR adds. • Windows Patch-22519-.7z - Use this if you don't have the Windows category, or if the vanilla windows are showing up in the Doors category. Should be last in load order. Can be used in place of MVR patch if MVR is updated but MVR's windows would be in Doors category without patch.
-
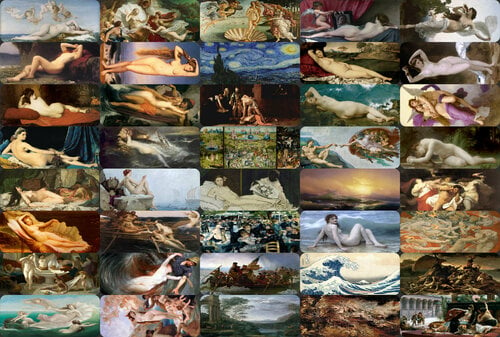
Vault 88 Extras View File Description: Adds some missing Vault objects such as doors with override boxes as well as adding a whole slew of other stuff. New placards and ceiling signs, tons of one-way painting disguised windows, some missing lights, and Vault 88's blueprints. Read on to find out what all is added... Requirements DLC requirements Vault-Tec Workshop Paintings! Adds over 40 one-way windows disguised as classical paintings (like Vault 75) so you can spy on all the things! Also moves all the windows into their own window category rather than being grouped into doors, which didn't make much sense. I recommend Vault 88 Room Corners Plus if you want to use these without wasting too much space (no middle slot necessary if you can use them in corners :P). Paintings include: Alexandre Cabanel - The Birth of Venus Jules LeFebvre - Mary Magdalene in the Cave Jules LeFebvre - Odalisque Jean Auguste Dominique Ingres - La Grande Odalisque Marià Fortuny - The Odalisque Henri Pierre Picou - Venus Henri Pierre Picou - Jeunes femmes au bain Henri Pierre Picou - Sea Nymphs Henri Pierre Picou - The Birth of Venus Eugène Emmanuel Amaury Duval - La Naissance de Venus Frederic Leighton - The Fisherman and the Siren Gustav Wertheimer - The Kiss of the Siren Edward Armitage - The Siren Herbert James Draper - Ulysses and the Sirens Knut Ekwall - Fisherman and The Siren William-Adolphe Bouguereau - The Birth of Venus Sandro Botticelli - The Birth of Venus Vincent Van Gogh - Starry Night Caravaggio - The beheading of St. John the Baptist Hieronymus van Aeken Bosch - The Garden of Earthly Delights by Bosch Edouard Manet - Olympia Auguste Renoir - Dance at the Le Moulin de la Galette Emanuel Leutze - Washington Crossing the Delaware Claude Lorrain - Ascanius Shooting the Stag of Sylvia Diego Velázquez - The Toilet of Venus Giorgione - Sleeping Venus Paul-Jacques-Aimé Baudry - The Pearl and the Wave Michelangelo - The Creation of Adam Hovhannes Aivazovsky - The Ninth Wave William-Adolphe Bouguereau - The Wave Katsushika Hokusai - The Great Wave Off Kanagawa Peter Paul Rubens - The Fall Of The Damned William-Adolphe Bouguereau - Dawn William-Adolphe Bouguereau - Bather William-Adolphe Bouguereau - Psyche William-Adolphe Bouguereau - Biblis William-Adolphe Bouguereau - The Remorse of Orestes John Singer Sargent - Orsetes Pursued by the Furies Théodore Géricault - The Raft of the Medusa Alexandre Cabanel - Cleopatra testing Poisons on Condemned Prisoners Doors! Speaking of doors! Adds the 5 missing vault doors with functional override boxes. I have no idea why Bethesda didn't include the override boxes even though they designed the doorways with slots clearly intended for them. The one you'll most likely want to use is the "LL" version which has override boxes on the left side of each end of the doorway like the doorways are designed. You may also want to use the L version (one override box on one left side only) for doorways that don't have a spot for the box on the other side. The others are just sort of extra. RL/RR/R. The one real caveat to keep in mind is that the door included with the Vault-Tec Workshop DLC crumples up into itself when it's opened so the door panel that just raised into the ceiling isn't actually there. These don't. They function with a bit more realism. You'll have to design your vault with door awareness. If you have a doorway above a doorway below then if the door below is opened then the bottom half of the doorway above will be blocked off. The same goes for hallways. So you'll need to ensure your design aligns lower level doorways to a wall above. If you do that though, they work wonderfully. Build responsibly. Placards & Ceiling Signs! Adds over 20 new placards, and matching ceiling signs for a few areas that you might want but just didn't have any kind of label for. These include: Laundry, Overseer's Office, Elevator, Showers, Armory, Bar, Stairs, Gym, Casino, Weapons Depot, Armor Depot, Clothing Depot, Trade Depot, North Sector, South Sector, East Sector, West Sector, Robotics, Restricted Area, and Firing Range. The existing arrows snap right onto the placards, just like the originals. New in 1.1: Upper Level, ↑Upper Level↑, Lower Level, ↓Lower Level↓, Level One, ↓Level One↓, Level Two, ↑Level Two↑, ↓Level Two↓, Level Three, ↑Level Three↑ Lights! Adds 4 missing vault lights. Two variations of a curved sort of L-shaped light that is used pretty extensively in Vault 81, along with a round one for the ceiling that is also used pretty extensively in Vault 81. The last one is a double light that goes in the fixtures in one of the walls of the Overseer's room. It fits perfectly. The big problem with that one however is that once placed it is unmoveable and unscrappable. You'll need to use the DELETE console command to get rid of it. So I suggest you quick save before attempting to place it in case you don't get it just right. Misc! Also adds the Vault 88 blueprints as a painting since it's just kind of lost if you scrap Overseer Barstow's original desk. Just kinda something nice to have. Those designs are horribly off though. I recommend this reddit user's Vault 88 blueprints if you actually want to use them to plan anything. Compatibility: I had to edit the keywords for the 3 existing vault windows to move them out of the doors category and into the new windows category. I also edited the ceiling signs and wall placards to add the new ones into those respective sections, and the vault menu to add the new window category. So if anything edits those directly without using script injection it'll probably be incompatible. Plans: In regards to the double light for the overseer rooms... It's like that because it was never actually intended to be used so it has no collision mesh. I have all the tools needed to give it one, I've just never learned the new process. I haven't really done much 3D modeling after Oblivion when the import/export process got so darn complicated. So that's something I'll be looking into. Along those same lines, I'd also put out some standalone static non-functional override boxes that could be placed in doorways that are recessed ~6 inches less than any of the boxes were designed to go. Credits See list of painting artists. Rhutos - for the standalone override box script. Changelogs Version 1.3 • Added functional standalone override box. Place one next to any door and you will be able to open/close the nearest door. Works for even non-vault doors. Script generously created by Rhutos. • Added collision to the overseer double light. You can now move it and scrap it once it's placed, though it is somewhat difficult to place. I recommend disabling surface snap via Place Everywhere's F4SE plugin. Version 1.2.1 • Adds the missing Level Three DOWN signs and placards that were accidentally overlooked in the 1.21 update. • Minor change to Level Five ceiling sign texture paths. Shouldn't affect anything. Not even important, really. Version 1.2 • Adds a free Cafeteria floor piece • Adds 12 new signs and placards: Observation, Optometry, Surgery, Recovery, Storage, Waiting Room, Level Four, Level Four UP, Level Four DOWN, Level Five, Level Five UP, Level Five DOWN Version 1.1 -Improved Elevator placard UV (it was a lil wonky) -Added 11 new Placards, and 11 new Ceiling Signs: Upper Level, ↑Upper Level↑ Lower Level, ↓Lower Level↓ Level One, ↓Level One↓ Level Two, ↑Level Two↑, ↓Level Two↓ Level Three, ↑Level Three↑ Version 1.0 Initial release. Optional Files • Fix that Radiation Sign-22519-.7z - A bat file to put the fallen radiation sign in the reactor room back on the wall. Install to game's exe directory and use "bat fix-that-sign"; you may need to change the first 2 numbers after prid. • More Vault Rooms Compatability Patch-22519-.7z - Adds the Window category to MVR and moves the window it adds there. Without this patch you will see none of the spy windows added, or probably any windows at all for that matter except the one MVR adds. • Windows Patch-22519-.7z - Use this if you don't have the Windows category, or if the vanilla windows are showing up in the Doors category. Should be last in load order. Can be used in place of MVR patch if MVR is updated but MVR's windows would be in Doors category without patch. Submitter XunAmarox Submitted 07/08/2021 Category Other Requires Vault-Tec Workshop DLC
-
Version 1.3
2,913 downloads
Description: Adds some missing Vault objects such as doors with override boxes as well as adding a whole slew of other stuff. New placards and ceiling signs, tons of one-way painting disguised windows, some missing lights, and Vault 88's blueprints. Read on to find out what all is added... Requirements DLC requirements Vault-Tec Workshop Paintings! Adds over 40 one-way windows disguised as classical paintings (like Vault 75) so you can spy on all the things! Also moves all the windows into their own window category rather than being grouped into doors, which didn't make much sense. I recommend Vault 88 Room Corners Plus if you want to use these without wasting too much space (no middle slot necessary if you can use them in corners :P). Paintings include: Alexandre Cabanel - The Birth of Venus Jules LeFebvre - Mary Magdalene in the Cave Jules LeFebvre - Odalisque Jean Auguste Dominique Ingres - La Grande Odalisque Marià Fortuny - The Odalisque Henri Pierre Picou - Venus Henri Pierre Picou - Jeunes femmes au bain Henri Pierre Picou - Sea Nymphs Henri Pierre Picou - The Birth of Venus Eugène Emmanuel Amaury Duval - La Naissance de Venus Frederic Leighton - The Fisherman and the Siren Gustav Wertheimer - The Kiss of the Siren Edward Armitage - The Siren Herbert James Draper - Ulysses and the Sirens Knut Ekwall - Fisherman and The Siren William-Adolphe Bouguereau - The Birth of Venus Sandro Botticelli - The Birth of Venus Vincent Van Gogh - Starry Night Caravaggio - The beheading of St. John the Baptist Hieronymus van Aeken Bosch - The Garden of Earthly Delights by Bosch Edouard Manet - Olympia Auguste Renoir - Dance at the Le Moulin de la Galette Emanuel Leutze - Washington Crossing the Delaware Claude Lorrain - Ascanius Shooting the Stag of Sylvia Diego Velázquez - The Toilet of Venus Giorgione - Sleeping Venus Paul-Jacques-Aimé Baudry - The Pearl and the Wave Michelangelo - The Creation of Adam Hovhannes Aivazovsky - The Ninth Wave William-Adolphe Bouguereau - The Wave Katsushika Hokusai - The Great Wave Off Kanagawa Peter Paul Rubens - The Fall Of The Damned William-Adolphe Bouguereau - Dawn William-Adolphe Bouguereau - Bather William-Adolphe Bouguereau - Psyche William-Adolphe Bouguereau - Biblis William-Adolphe Bouguereau - The Remorse of Orestes John Singer Sargent - Orsetes Pursued by the Furies Théodore Géricault - The Raft of the Medusa Alexandre Cabanel - Cleopatra testing Poisons on Condemned Prisoners Doors! Speaking of doors! Adds the 5 missing vault doors with functional override boxes. I have no idea why Bethesda didn't include the override boxes even though they designed the doorways with slots clearly intended for them. The one you'll most likely want to use is the "LL" version which has override boxes on the left side of each end of the doorway like the doorways are designed. You may also want to use the L version (one override box on one left side only) for doorways that don't have a spot for the box on the other side. The others are just sort of extra. RL/RR/R. The one real caveat to keep in mind is that the door included with the Vault-Tec Workshop DLC crumples up into itself when it's opened so the door panel that just raised into the ceiling isn't actually there. These don't. They function with a bit more realism. You'll have to design your vault with door awareness. If you have a doorway above a doorway below then if the door below is opened then the bottom half of the doorway above will be blocked off. The same goes for hallways. So you'll need to ensure your design aligns lower level doorways to a wall above. If you do that though, they work wonderfully. Build responsibly. Placards & Ceiling Signs! Adds over 20 new placards, and matching ceiling signs for a few areas that you might want but just didn't have any kind of label for. These include: Laundry, Overseer's Office, Elevator, Showers, Armory, Bar, Stairs, Gym, Casino, Weapons Depot, Armor Depot, Clothing Depot, Trade Depot, North Sector, South Sector, East Sector, West Sector, Robotics, Restricted Area, and Firing Range. The existing arrows snap right onto the placards, just like the originals. New in 1.1: Upper Level, ↑Upper Level↑, Lower Level, ↓Lower Level↓, Level One, ↓Level One↓, Level Two, ↑Level Two↑, ↓Level Two↓, Level Three, ↑Level Three↑ Lights! Adds 4 missing vault lights. Two variations of a curved sort of L-shaped light that is used pretty extensively in Vault 81, along with a round one for the ceiling that is also used pretty extensively in Vault 81. The last one is a double light that goes in the fixtures in one of the walls of the Overseer's room. It fits perfectly. The big problem with that one however is that once placed it is unmoveable and unscrappable. You'll need to use the DELETE console command to get rid of it. So I suggest you quick save before attempting to place it in case you don't get it just right. Misc! Also adds the Vault 88 blueprints as a painting since it's just kind of lost if you scrap Overseer Barstow's original desk. Just kinda something nice to have. Those designs are horribly off though. I recommend this reddit user's Vault 88 blueprints if you actually want to use them to plan anything. Compatibility: I had to edit the keywords for the 3 existing vault windows to move them out of the doors category and into the new windows category. I also edited the ceiling signs and wall placards to add the new ones into those respective sections, and the vault menu to add the new window category. So if anything edits those directly without using script injection it'll probably be incompatible. Plans: In regards to the double light for the overseer rooms... It's like that because it was never actually intended to be used so it has no collision mesh. I have all the tools needed to give it one, I've just never learned the new process. I haven't really done much 3D modeling after Oblivion when the import/export process got so darn complicated. So that's something I'll be looking into. Along those same lines, I'd also put out some standalone static non-functional override boxes that could be placed in doorways that are recessed ~6 inches less than any of the boxes were designed to go. Credits See list of painting artists. Rhutos - for the standalone override box script. Changelogs Version 1.3 • Added functional standalone override box. Place one next to any door and you will be able to open/close the nearest door. Works for even non-vault doors. Script generously created by Rhutos. • Added collision to the overseer double light. You can now move it and scrap it once it's placed, though it is somewhat difficult to place. I recommend disabling surface snap via Place Everywhere's F4SE plugin. Version 1.2.1 • Adds the missing Level Three DOWN signs and placards that were accidentally overlooked in the 1.21 update. • Minor change to Level Five ceiling sign texture paths. Shouldn't affect anything. Not even important, really. Version 1.2 • Adds a free Cafeteria floor piece • Adds 12 new signs and placards: Observation, Optometry, Surgery, Recovery, Storage, Waiting Room, Level Four, Level Four UP, Level Four DOWN, Level Five, Level Five UP, Level Five DOWN Version 1.1 -Improved Elevator placard UV (it was a lil wonky) -Added 11 new Placards, and 11 new Ceiling Signs: Upper Level, ↑Upper Level↑ Lower Level, ↓Lower Level↓ Level One, ↓Level One↓ Level Two, ↑Level Two↑, ↓Level Two↓ Level Three, ↑Level Three↑ Version 1.0 Initial release. Optional Files • Fix that Radiation Sign-22519-.7z - A bat file to put the fallen radiation sign in the reactor room back on the wall. Install to game's exe directory and use "bat fix-that-sign"; you may need to change the first 2 numbers after prid. • More Vault Rooms Compatability Patch-22519-.7z - Adds the Window category to MVR and moves the window it adds there. Without this patch you will see none of the spy windows added, or probably any windows at all for that matter except the one MVR adds. • Windows Patch-22519-.7z - Use this if you don't have the Windows category, or if the vanilla windows are showing up in the Doors category. Should be last in load order. Can be used in place of MVR patch if MVR is updated but MVR's windows would be in Doors category without patch. -
I get "You are only allowed to upload 0 files." when I try to add an attachment while uploading a mod. Seems to work fine on normal forum posts.
-
Having said that... not to toot my own horn or anything but I've long thought Stormcrown Estate is pretty great as it is and pretty much consider it "complete" without really needing anything else done to it. So it's unlikely it'll see any future updates unless the spoilered bits ever come to pass. But I haven't modded nor played Skyrim in years. I'd probably have to relearn a lot of modding which I've flat out forgotten. But even in my prime I couldn't get those ideas going so I wouldn't hold your breath is what I'm saying. But that'd be an entirely separate mod anyways, at most I might've edited in a cryptic note in Dovahzul which once translated would lead the player to the entrance to the other mod.
-
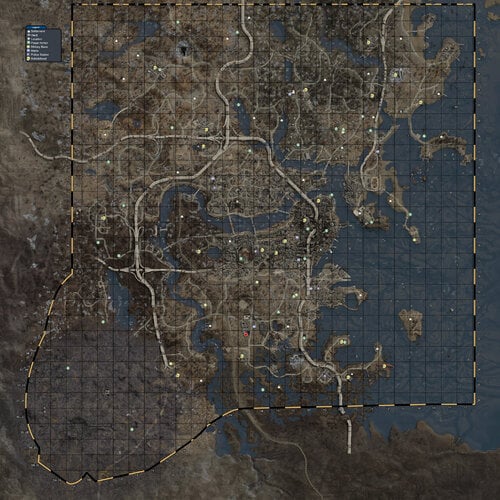
Satellite Color World Map Combo View File Description: This is a replacer for your World Map in your Pip-Boy. It's a combination of Satellite World Map by FloorBelow and Color Map by VirusZ. It is a texture replacer and of the correct size so no ESP file is required. The map itself gives a satellite view of the Commonwealth made using the game's LoD meshes and textures. This map has icons for settlements, vaults, power armor, military bases, metros, police stations, magazines, discoverable locations (optional), and roads + railroads (optional). You'll discover many varieties of options in terms of what icons should appear on your map during the installation process, and this particular map features a more accurate boundary line. Oh yes, I painstakingly (with god mode and tons of run speed gear) ran around the edge of the entire wasteland just for you, so I could discover where the boundaries actually are. What was ever the point of a border on the map that didn't even represent any kind of boundary anyways? Sheesh. Get your stuff together, Bethesda. Aside from the new boundary lines and the combining of those two maps, the icons being used have also been updated and the grid for the map has been made more like we're used to. The outer boundaries were manually fixed, because the original large black grid from the Satellite World Map was actually the individual meshes of the LoD and they didn't quite meet seamlessly. So... clone stamp, bitches! I was going to remove the large black grid from Satellite World Map from the entire map (which would have been kind of a pain in the ass tbh) but it occurred to me that it would be more useful if there was a grid there. And so, I completely remade the grid - I even pulled out a calculator to figure out the exact size each square needed to be (hey, I was really proud of myself about that... I suck at math. For real.) - and now it's labeled with coordinates. That way it's easier to tell your friends where to find something. Like, "I ran into this crazy overpowered deathclaw at 1C-30, so don't go there! Or, uh... I mean... Forget what I said. There's tons of loot just laying around at 1C-30, go there immediately... and uh... don't save for a few hours before that. Yeah. Do that. >:]" Anyways, I'm sure you all will figure out some kind of use for it. There are two primary editions: Vault Boy bobbleheads, or Vault Girl bobbleheads. We have replacers for the bobbleheads already and we'll surely have a full interface replacer sometime soon; so, we may as well have a matching map. Each of these types includes several variations: all features, no location markers, no location markers and no roads, and just no roads. You can choose which you prefer during the FOMOD installation. "But Xun, I don't use NMM." Well, then you can manually install! The folders are named pretty intuitively, and here's how you do it... Manual Installation: Extract archive.Choose your desired flavor, and open that folder (e.g. VG-All).Copy "worldmap_d.dds" to "textures\interface\pip-boy" in your Data folder.Done! All of this shit's in color. That means it's not going to be just pure pink or green or whatever the heck you have your Pip-Boy color set as. It's not going to look like that though unless you do some wizardry in your ini files first. Now look, before I continue... I'm just going to be up front with you: The entire interface for your Pip-Boy will be white after this, but the rest of your UI will be unaffected. So, weigh whether you want a color map & white pip-boy UI or if you'll just settle for a monotone map. Your choice. Installation: To get it in color you're going to need to navigate to Documents\My Games\Fallout4 and either edit your existing file or create a new file called Fallout4Custom.ini and it needs to have this: [Pipboy] bPipboyDisableFX=1 Now, if your map doesn't work at all - dude, have you done any texture or mesh replacer mods yet? - then you'll need to edit your Fallout4.ini and under [Archive] you'll want to add this line: bInvalidateOlderFiles=1 And if you have anything after sResourceDataDirsFinal= then delete all that shit after it because it makes your game load like a sloth stoned out of its mind. Seriously. This will be your game's load speeds: You don't want that. Or maybe you do. I don't know. I'm not the boss of you. Do what you want. Moving on! So, my map is the same resolution as the 8K Satellite Map. I know what you're thinking... "mmm... 8K... high res... want..." But, my map is only 4K. I have a good reason though. The 8k Satellite Map had a ton of extra map area that quite frankly isn't really necessary. Once you crop the map to just the actual map area (which is why this map doesn't require an ESP), then it's the same resolution as it was with the 8K even though it's 4K. Aaand, uh... that's pretty much it. ...EXCEPT FOR THE CREDITS! Permissions If you can get permission from everyone else whose assets were used in this (they're literally listed below), and you'd fucking better, then you can use whatever you want from this that is my work. Sharing is caring, ay? Only caveat: Don't put it on NexusMods without my express written consent. Credits: Satellite World Map by FloorBelow, for the satellite map. Used with permission. Color Map by VirusZ, for icon placement, some icons, and inspiration. Used with permission. JAMA / Armor Location Map by Nixsy, for the roads & railroads. Used with permission. Shadman for vault girl's icon. Shadman is awesome. Check out Shadman's art. Uhh... if you're over 18. Definitely... only... if you're over 18... Fallout 4 Map on Reddit by koolkyle802 which I used for placing magazine locations. Oh!!! I almost forgot!!! That little fucking red thing. What the fuck was that?: Well, I'll tell you what the fuck that was... It was THIS. Open that in a new tab and look at it. Things will make sense. It still looked kind of ghetto though, but it got better: You're welcome. Troubleshooting: Problem: My map isn't in color. What gives? Solution: To get it in color you're going to need to navigate to Documents\My Games\Fallout4 and either edit your existing file or create a new file called Fallout4Custom.ini and it needs to have this: [Pipboy] bPipboyDisableFX=1 If you already have those entries in your other ini files then you'll need to either edit them there or remove them from there. Problem: My map isn't in color but I've already done the ini changes. What gives? Solution: Double check to make sure they're correct first. But failing that, if you're using Fallout 4 Configuration Tool (previously called the Fallout 4 Tweaker) by Bilago, some people mentioned a page back in the comments that the ini settings don't work because they're overwritten by it. "In the UI tab, there is button by Pipboy Colors called Disable FX that is not enabled by default." Problem: Uhh... everything on the map is way off from where it should be. Solution: Chances are you've installed Satellite World Map by FloorBelow. You'll need to either uninstall it or disable the ESP that came along with that mod. It will mess up this one. Problem: I'm new to modding Fallout 4 and this doesn't work at all. Nothing changed. Solution: Did you by any chance completely skip the installation instructions? There are some ini entries you'll need to make to get this to show in color and some more entries - especially if you're new to Fallout 4 modding - to get any changes to your game to work whatsoever. Problem: Since the new update my player symbol is now a cave! Solution: This map mod is just a texture. It doesn't mess with actual interface files. If you are having this problem it is likely due to Zoom Out Extended mod by Zenotep and if that is the case you can either uninstall it or try this fix. Problem: I want a color map and a color pip-boy instead of a white pip-boy screen. How can I do that? Solution: Try something like Gold Kit for Color Pipboy. Problem: My power armor's map is way too bright. Solution: Try something like Power Armor map fix. Changelog: 1.3 - Feb 15, 2016 New! -Placed the Agility bobblehead icon back at the FMS Northern Star, whose icon was incorrectly removed and placed on Spectacle Island in 1.2 as the Luck bobblehead that was added to Spectacle Island. -Replaced location dots with small question marks. I did this because even as the map maker I didn't keep locations on because they cluttered the map. -Location renamed to Point of Interest. -Vault icons were made smaller. -Metro icons were made smaller. -Military base icons were made smaller. -Power armor icons were made smaller. -Settlement icons were updated to look more like a house, made light brown, and made somewhat smaller. -Bobblehead icons were made smaller. -Russian version added to misc files (as one was requested). 1.2 - Feb 7, 2016 -Corrected location of Luck Bobblehead. -Removed incorrectly placed bobblehead locations from Lexington. -Moved Perception Bobblehead closer to the Museum of Freedom. -Moved Concord power armor to roof of Museum of Freedom. -Added a missing power armor location. -Added magazine locations. They're all likely a bit off so just assume "in this general area." -All roads + railroads are now the faint version. -Boston Commons area roads made significantly more defined for easier navigation. -Removed variations: VB-NoRoad, VG-NoRoad, VB-NoLocFaintRoads, VG-NoLocFaintRoads, VB-NoLocNoRoad, VG-NoLocNoRoad. Why? I think the faint roads look better with a satellite map and there were starting to be far too many versions to maintain. -Added variation: No Special: Removes the bobblehead, power armor, and magazine icons. -Lighter grid for all variations except mono. -Fixed a power armor icon so it looks better without full roads. 1.1 - Feb 3, 2016 -Adds the bridge outside sanctuary which was previously missing. -Removes the vault icon from Vault 111. Why, you might ask? Well, it's impossible not to discover so it's pointless. -Adds two new versions: Clean with only roads and clean with only faint roads. -Adds two new variations: Vault Girl bobbleheads + no locations + faint roads, and Vault Boy bobbleheads + no locations + faint roads. This was previously the XunCustom. 1.0 - Feb 2, 2016 -Initial release. Where TF are the DLC maps Xun? Eh? Eh?! I got permission from DigitalUtopia to use his satellite maps for Far Harbor & Nuka World. So I'll be doing those at some point™. I haven't played Fallout 4 in quite some time and probably won't for quite some time, so it's pretty much on the backburner. It'll happen some day when I'm particularly bored and think of doing it. In the meantime, you can use Sakura9's satellite maps for Far Harbor & Nuka World. Misc/Optional Files • Mono-Blank-9414-1-1.7z Monotone with darker high contrast ocean and no icons. • Satellite Color World Map Combo RUS 1-3-9414-1-3.7z FOREIGN LANGUAGE. FOMod Installer. Russian. Русская язык. Submitter XunAmarox Submitted 07/05/2021 Category Models & Textures Requires
-
Version 1.3
16,725 downloads
Description: This is a replacer for your World Map in your Pip-Boy. It's a combination of Satellite World Map by FloorBelow and Color Map by VirusZ. It is a texture replacer and of the correct size so no ESP file is required. The map itself gives a satellite view of the Commonwealth made using the game's LoD meshes and textures. This map has icons for settlements, vaults, power armor, military bases, metros, police stations, magazines, discoverable locations (optional), and roads + railroads (optional). You'll discover many varieties of options in terms of what icons should appear on your map during the installation process, and this particular map features a more accurate boundary line. Oh yes, I painstakingly (with god mode and tons of run speed gear) ran around the edge of the entire wasteland just for you, so I could discover where the boundaries actually are. What was ever the point of a border on the map that didn't even represent any kind of boundary anyways? Sheesh. Get your stuff together, Bethesda. Aside from the new boundary lines and the combining of those two maps, the icons being used have also been updated and the grid for the map has been made more like we're used to. The outer boundaries were manually fixed, because the original large black grid from the Satellite World Map was actually the individual meshes of the LoD and they didn't quite meet seamlessly. So... clone stamp, bitches! I was going to remove the large black grid from Satellite World Map from the entire map (which would have been kind of a pain in the ass tbh) but it occurred to me that it would be more useful if there was a grid there. And so, I completely remade the grid - I even pulled out a calculator to figure out the exact size each square needed to be (hey, I was really proud of myself about that... I suck at math. For real.) - and now it's labeled with coordinates. That way it's easier to tell your friends where to find something. Like, "I ran into this crazy overpowered deathclaw at 1C-30, so don't go there! Or, uh... I mean... Forget what I said. There's tons of loot just laying around at 1C-30, go there immediately... and uh... don't save for a few hours before that. Yeah. Do that. >:]" Anyways, I'm sure you all will figure out some kind of use for it. There are two primary editions: Vault Boy bobbleheads, or Vault Girl bobbleheads. We have replacers for the bobbleheads already and we'll surely have a full interface replacer sometime soon; so, we may as well have a matching map. Each of these types includes several variations: all features, no location markers, no location markers and no roads, and just no roads. You can choose which you prefer during the FOMOD installation. "But Xun, I don't use NMM." Well, then you can manually install! The folders are named pretty intuitively, and here's how you do it... Manual Installation: Extract archive. Choose your desired flavor, and open that folder (e.g. VG-All). Copy "worldmap_d.dds" to "textures\interface\pip-boy" in your Data folder. Done! All of this shit's in color. That means it's not going to be just pure pink or green or whatever the heck you have your Pip-Boy color set as. It's not going to look like that though unless you do some wizardry in your ini files first. Now look, before I continue... I'm just going to be up front with you: The entire interface for your Pip-Boy will be white after this, but the rest of your UI will be unaffected. So, weigh whether you want a color map & white pip-boy UI or if you'll just settle for a monotone map. Your choice. Installation: To get it in color you're going to need to navigate to Documents\My Games\Fallout4 and either edit your existing file or create a new file called Fallout4Custom.ini and it needs to have this: [Pipboy] bPipboyDisableFX=1 Now, if your map doesn't work at all - dude, have you done any texture or mesh replacer mods yet? - then you'll need to edit your Fallout4.ini and under [Archive] you'll want to add this line: bInvalidateOlderFiles=1 And if you have anything after sResourceDataDirsFinal= then delete all that shit after it because it makes your game load like a sloth stoned out of its mind. Seriously. This will be your game's load speeds: You don't want that. Or maybe you do. I don't know. I'm not the boss of you. Do what you want. Moving on! So, my map is the same resolution as the 8K Satellite Map. I know what you're thinking... "mmm... 8K... high res... want..." But, my map is only 4K. I have a good reason though. The 8k Satellite Map had a ton of extra map area that quite frankly isn't really necessary. Once you crop the map to just the actual map area (which is why this map doesn't require an ESP), then it's the same resolution as it was with the 8K even though it's 4K. Aaand, uh... that's pretty much it. ...EXCEPT FOR THE CREDITS! Permissions If you can get permission from everyone else whose assets were used in this (they're literally listed below), and you'd fucking better, then you can use whatever you want from this that is my work. Sharing is caring, ay? Only caveat: Don't put it on NexusMods without my express written consent. Credits: Satellite World Map by FloorBelow, for the satellite map. Used with permission. Color Map by VirusZ, for icon placement, some icons, and inspiration. Used with permission. JAMA / Armor Location Map by Nixsy, for the roads & railroads. Used with permission. Shadman for vault girl's icon. Shadman is awesome. Check out Shadman's art. Uhh... if you're over 18. Definitely... only... if you're over 18... Fallout 4 Map on Reddit by koolkyle802 which I used for placing magazine locations. Oh!!! I almost forgot!!! That little fucking red thing. What the fuck was that?: Well, I'll tell you what the fuck that was... It was THIS. Open that in a new tab and look at it. Things will make sense. It still looked kind of ghetto though, but it got better: You're welcome. Troubleshooting: Problem: My map isn't in color. What gives? Solution: To get it in color you're going to need to navigate to Documents\My Games\Fallout4 and either edit your existing file or create a new file called Fallout4Custom.ini and it needs to have this: [Pipboy] bPipboyDisableFX=1 If you already have those entries in your other ini files then you'll need to either edit them there or remove them from there. Problem: My map isn't in color but I've already done the ini changes. What gives? Solution: Double check to make sure they're correct first. But failing that, if you're using Fallout 4 Configuration Tool (previously called the Fallout 4 Tweaker) by Bilago, some people mentioned a page back in the comments that the ini settings don't work because they're overwritten by it. "In the UI tab, there is button by Pipboy Colors called Disable FX that is not enabled by default." Problem: Uhh... everything on the map is way off from where it should be. Solution: Chances are you've installed Satellite World Map by FloorBelow. You'll need to either uninstall it or disable the ESP that came along with that mod. It will mess up this one. Problem: I'm new to modding Fallout 4 and this doesn't work at all. Nothing changed. Solution: Did you by any chance completely skip the installation instructions? There are some ini entries you'll need to make to get this to show in color and some more entries - especially if you're new to Fallout 4 modding - to get any changes to your game to work whatsoever. Problem: Since the new update my player symbol is now a cave! Solution: This map mod is just a texture. It doesn't mess with actual interface files. If you are having this problem it is likely due to Zoom Out Extended mod by Zenotep and if that is the case you can either uninstall it or try this fix. Problem: I want a color map and a color pip-boy instead of a white pip-boy screen. How can I do that? Solution: Try something like Gold Kit for Color Pipboy. Problem: My power armor's map is way too bright. Solution: Try something like Power Armor map fix. Changelog: 1.3 - Feb 15, 2016 New! -Placed the Agility bobblehead icon back at the FMS Northern Star, whose icon was incorrectly removed and placed on Spectacle Island in 1.2 as the Luck bobblehead that was added to Spectacle Island. -Replaced location dots with small question marks. I did this because even as the map maker I didn't keep locations on because they cluttered the map. -Location renamed to Point of Interest. -Vault icons were made smaller. -Metro icons were made smaller. -Military base icons were made smaller. -Power armor icons were made smaller. -Settlement icons were updated to look more like a house, made light brown, and made somewhat smaller. -Bobblehead icons were made smaller. -Russian version added to misc files (as one was requested). 1.2 - Feb 7, 2016 -Corrected location of Luck Bobblehead. -Removed incorrectly placed bobblehead locations from Lexington. -Moved Perception Bobblehead closer to the Museum of Freedom. -Moved Concord power armor to roof of Museum of Freedom. -Added a missing power armor location. -Added magazine locations. They're all likely a bit off so just assume "in this general area." -All roads + railroads are now the faint version. -Boston Commons area roads made significantly more defined for easier navigation. -Removed variations: VB-NoRoad, VG-NoRoad, VB-NoLocFaintRoads, VG-NoLocFaintRoads, VB-NoLocNoRoad, VG-NoLocNoRoad. Why? I think the faint roads look better with a satellite map and there were starting to be far too many versions to maintain. -Added variation: No Special: Removes the bobblehead, power armor, and magazine icons. -Lighter grid for all variations except mono. -Fixed a power armor icon so it looks better without full roads. 1.1 - Feb 3, 2016 -Adds the bridge outside sanctuary which was previously missing. -Removes the vault icon from Vault 111. Why, you might ask? Well, it's impossible not to discover so it's pointless. -Adds two new versions: Clean with only roads and clean with only faint roads. -Adds two new variations: Vault Girl bobbleheads + no locations + faint roads, and Vault Boy bobbleheads + no locations + faint roads. This was previously the XunCustom. 1.0 - Feb 2, 2016 -Initial release. Where TF are the DLC maps Xun? Eh? Eh?! I got permission from DigitalUtopia to use his satellite maps for Far Harbor & Nuka World. So I'll be doing those at some point™. I haven't played Fallout 4 in quite some time and probably won't for quite some time, so it's pretty much on the backburner. It'll happen some day when I'm particularly bored and think of doing it. In the meantime, you can use Sakura9's satellite maps for Far Harbor & Nuka World. Misc/Optional Files • Mono-Blank-9414-1-1.7z Monotone with darker high contrast ocean and no icons. • Satellite Color World Map Combo RUS 1-3-9414-1-3.7z FOREIGN LANGUAGE. FOMod Installer. Russian. Русская язык. User submitted YouTube videos: https://www.youtube.com/watch?v=L64NwBKNDn0 -
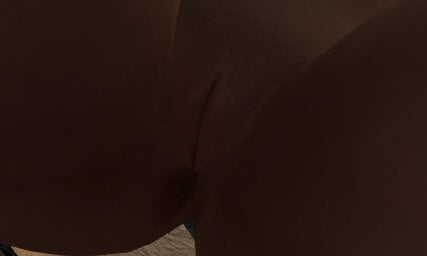
CBBE Innies - Fallout 4 Edition View File Description: Changes the texture that comes with CBBE to have an "innie" rather than "outie" pussy. It may be called a "cameltoe" pussy, or in Japanese "sujiman." Comes in six styles (currently): shaved, traditional, small strip, strip, v, and bushy. Features brand new nipples, and several normal map options to choose from. Dirty raider textures included (with innies). See images for exact depictions. No ENB or post editing were done on images. If you want to make some better ones feel free to upload them! Want to learn how to make an NMM installer yourself? Check out my NMM Installer Tutorial. Want CBBE Innies for Skyrim? Get them here! Should be compatible with adding shaving styles via TextureBlend if you would like more options than provided. Just install shaved/waxed style if you intend to add different styles with texture blend. REQUIREMENTS: (required) Calientes Female Body Mod Big Bottom Edition -CBBE- by Caliente Non-NMM installation: -Install with NMM Installer. Non-NMM installation: -Install CBBE. -Download and extract the CBBE Innies archive. -Choose whether you want default CBBE abs or Sporty abs. Once decided open one of those folders, e.g. "1 - Default Abs" or "2 - Sporty Abs" and copy the contents of that folder (you can only choose one) into "0 - Required\textures\Actors\Character\BaseHumanFemale" -Next, choose which of the five available shaving styles you want: Shaved, Small Strip, Strip, Traditional, or V. Copy the contents of the chosen shaving style's folder to the same directory as you did the abs, e.g. "0 - Required\textures\Actors\Character\BaseHumanFemale" -Now, copy the contents of your "0 - Required" folder to your Fallout 4's Data folder. Overwrite when asked. Troubleshooting: First of all, if you're having problems... please do not send me a PM. My inbox is constantly at 99% full, if not completely full. Use the comments section instead. Problem#1: I don't see any changes?? Solution: Navigate to Documents\My Games\Fallout4 and add bInvalidateOlderFiles=1 under [Archive] in your Fallout4.ini... Also, install CBBE and the vanilla armor & clothing replacer (on the CBBE page) and ensure they work first. CBBE doesn't change vanilla clothing and armor by itself and it has a different UV so any vanilla outfit that shows skin will look wrong without the replacer installed. Problem#2: My skin texture looks really weird... like a huge nipple on my stomach, a foot on my arm, and so on... Solution: This means you either didn't install CBBE correctly or you installed something overwriting either the CBBE mesh or texture. If you're seeing it while wearing armor that shows skin it just means you don't have the vanilla clothing/armor replacer from the CBBE page, or that particular outfit hasn't been converted with Outfit Studio yet. For the first problem, install CBBE again and ensure it looks right in-game and once it does install my texture again. Problem#3: Help! My character has on a white tank top and a pair of shorts when naked... what gives?! Solution: When you batch build using BodySlide make sure you uncheck CBBE nevernude. That's what is causing it. Problem#4: When I try to reinstall with NMM to try a different option it doesn't pull up the installer and just starts installing again without giving me a choice. Solution: You only disabled the mod. You'll need to right click it and uninstall for all profiles before reinstalling it. Frequently Asked Questions: Q: Will you add a wild hairy wilderness to your shaving styles so furry it scares me a little thinking it might come alive at any moment? A: I... will not. I don't think bushy shaving styles look good without a merkin mesh and by the time we get to the point of adding meshes we're moving beyond the initial scope of this mod. You can find one such mesh here. Oh fine, I added it. I still think it needs a merkin mesh though. Q: Can you make a version of your textures with X but without Y? A: A lot of people make requests like this and in short... I can... but if I fulfilled every request people asked for I'd never get any work done on anything that I actually want to do. So, I won't. But all hope is not lost! Head over to the CBBE mod page and into the Misc section. There's a resource file there, including my work, that will let you mix and match and swap stuff around to your personal tastes to your heart's content. There will be a slight learning curve but it's well documented and shouldn't be too hard! Q: I used NMM back before version 0.6x.x when they added profiling. How can I install a second copy to use for Fallout 4 without messing up my Skyrim, Fallout 3, Dragon Age, et cetera? A: There's a post on the forums here that details how to do that. The long and the short of it is to download the latest NMM installer file manually then install it to a different location. My old 0.5x version is installed in "C:\Program Files\Nexus Mod Manager" and I installed the new one in "G:\Game Install\New NMM" and after it installed I didn't let it find any of my games I didn't want it to touch (hit the red X on the found game until it didn't find it). I just manage my old games with the old one and new games with the new one. Changelog: 1.5 - January 13 2016 New! -Somehow I had missed 3 moles, this has been rectified. -Dirty textures have been added as a primary option for the players that want it. -A new shaving style... hairy wilderness. It's a more extreme bushy with arm, leg, and armpit hair. -I added my abs slider for the CBBE body to the fomod installer as an optional installation. 1.4 - January 1 2016 -Bushy pubic hairstyle added by popular request. -Both normal maps adapted for bushy pubic hairstyle. They're optional but if you use the bushy pubic hair then I'd recommend using them, otherwise ignore and avoid them. -Dirty raider textures added with innies, without scars, and with bushy pubic hair. -Mod is moved out of Beta and into its full release. 1.3.1 Beta - Hotfix - December 28 2015 -Hotfix - corrects a typo in the NMM installer for the default abs option. 1.3 Beta - December 27 2015 -Mod is moved out of Alpha and into Beta. -Converted Sporty Abs over from the Skyrim CBBE Innies. -Default CBBE abs now included as an optional file. -Optional shaving styles are no longer a separate package. -NMM installer like the Skyrim version of CBBE Innies. 1.2 Alpha - December 24 2015 -Textures updated from CBBE 0.1a base to CBBE 1.0a base which fixes most seams and offers various other texture fixes. -Updated vulva region in normal map so that it's smoother, and the pudendal cleft (slit) should appear deeper. -Spec map should match CBBE base aside from mole removal, nipple changes, and vulva/slit changes. 1.1 Alpha - December 12 2015 -Diffuse textures recompressed as DXT1 for better compatibility and reduced file size. -Hand textures no longer included as they were redundant, already included in CBBE and were unchanged. 1.0 Alpha - December 12 2015 -Initial release. Alpha stage. Normals & Specular maps likely need redone. Credits: Thepal for his nude females texture Caliente based his texture on supplied in the CBBE 3.2.3 releasexs2reality's Sporty Sexy Map for the optional abs included as well as SvarogNL's Fitness Body for the upper and lower ab smoothing of the Sporty Sexy MapUbercharge for the dirty raider textures included with CBBE.Intel ® Texture Works Plugin for PhotoshopNVIDIA Texture Tools for Adobe Photoshop Known Issues: -No known issues. Please report them if you find any. Optional Files CBBE 2.3 plus ABs-5659-.7zUpdates my CBBE + Abs bodyslide files to CBBE 2.3. Not currently included in CBBE Innies 1.5 CBBE Innies - Spartan Compatibility Patch-5659-1-5.7zCompatibility patch for Spartan Sniper outfit. FOMOD installer with most pubic hair options and an optional abs slider for the pants. Xun Slider Presets-5659-.7zFor anyone that wants the presets I use in my screenshots. Two variations included. Submitter XunAmarox Submitted 07/05/2021 Category Models & Textures Requires
-
Version 1.5
5,087 downloads
Description: Changes the texture that comes with CBBE to have an "innie" rather than "outie" pussy. It may be called a "cameltoe" pussy, or in Japanese "sujiman." Comes in six styles (currently): shaved, traditional, small strip, strip, v, and bushy. Features brand new nipples, and several normal map options to choose from. Dirty raider textures included (with innies). See images for exact depictions. No ENB or post editing were done on images. If you want to make some better ones feel free to upload them! Want to learn how to make an NMM installer yourself? Check out my NMM Installer Tutorial. Want CBBE Innies for Skyrim? Get them here! Should be compatible with adding shaving styles via TextureBlend if you would like more options than provided. Just install shaved/waxed style if you intend to add different styles with texture blend. REQUIREMENTS: (required) Calientes Female Body Mod Big Bottom Edition -CBBE- by Caliente Non-NMM installation: -Install with NMM Installer. Non-NMM installation: -Install CBBE. -Download and extract the CBBE Innies archive. -Choose whether you want default CBBE abs or Sporty abs. Once decided open one of those folders, e.g. "1 - Default Abs" or "2 - Sporty Abs" and copy the contents of that folder (you can only choose one) into "0 - Required\textures\Actors\Character\BaseHumanFemale" -Next, choose which of the five available shaving styles you want: Shaved, Small Strip, Strip, Traditional, or V. Copy the contents of the chosen shaving style's folder to the same directory as you did the abs, e.g. "0 - Required\textures\Actors\Character\BaseHumanFemale" -Now, copy the contents of your "0 - Required" folder to your Fallout 4's Data folder. Overwrite when asked. Troubleshooting: First of all, if you're having problems... please do not send me a PM. My inbox is constantly at 99% full, if not completely full. Use the comments section instead. Problem#1: I don't see any changes?? Solution: Navigate to Documents\My Games\Fallout4 and add bInvalidateOlderFiles=1 under [Archive] in your Fallout4.ini... Also, install CBBE and the vanilla armor & clothing replacer (on the CBBE page) and ensure they work first. CBBE doesn't change vanilla clothing and armor by itself and it has a different UV so any vanilla outfit that shows skin will look wrong without the replacer installed. Problem#2: My skin texture looks really weird... like a huge nipple on my stomach, a foot on my arm, and so on... Solution: This means you either didn't install CBBE correctly or you installed something overwriting either the CBBE mesh or texture. If you're seeing it while wearing armor that shows skin it just means you don't have the vanilla clothing/armor replacer from the CBBE page, or that particular outfit hasn't been converted with Outfit Studio yet. For the first problem, install CBBE again and ensure it looks right in-game and once it does install my texture again. Problem#3: Help! My character has on a white tank top and a pair of shorts when naked... what gives?! Solution: When you batch build using BodySlide make sure you uncheck CBBE nevernude. That's what is causing it. Problem#4: When I try to reinstall with NMM to try a different option it doesn't pull up the installer and just starts installing again without giving me a choice. Solution: You only disabled the mod. You'll need to right click it and uninstall for all profiles before reinstalling it. Frequently Asked Questions: Q: Will you add a wild hairy wilderness to your shaving styles so furry it scares me a little thinking it might come alive at any moment? A: I... will not. I don't think bushy shaving styles look good without a merkin mesh and by the time we get to the point of adding meshes we're moving beyond the initial scope of this mod. You can find one such mesh here. Oh fine, I added it. I still think it needs a merkin mesh though. Q: Can you make a version of your textures with X but without Y? A: A lot of people make requests like this and in short... I can... but if I fulfilled every request people asked for I'd never get any work done on anything that I actually want to do. So, I won't. But all hope is not lost! Head over to the CBBE mod page and into the Misc section. There's a resource file there, including my work, that will let you mix and match and swap stuff around to your personal tastes to your heart's content. There will be a slight learning curve but it's well documented and shouldn't be too hard! Q: I used NMM back before version 0.6x.x when they added profiling. How can I install a second copy to use for Fallout 4 without messing up my Skyrim, Fallout 3, Dragon Age, et cetera? A: There's a post on the forums here that details how to do that. The long and the short of it is to download the latest NMM installer file manually then install it to a different location. My old 0.5x version is installed in "C:\Program Files\Nexus Mod Manager" and I installed the new one in "G:\Game Install\New NMM" and after it installed I didn't let it find any of my games I didn't want it to touch (hit the red X on the found game until it didn't find it). I just manage my old games with the old one and new games with the new one. Changelog: 1.5 - January 13 2016 New! -Somehow I had missed 3 moles, this has been rectified. -Dirty textures have been added as a primary option for the players that want it. -A new shaving style... hairy wilderness. It's a more extreme bushy with arm, leg, and armpit hair. -I added my abs slider for the CBBE body to the fomod installer as an optional installation. 1.4 - January 1 2016 -Bushy pubic hairstyle added by popular request. -Both normal maps adapted for bushy pubic hairstyle. They're optional but if you use the bushy pubic hair then I'd recommend using them, otherwise ignore and avoid them. -Dirty raider textures added with innies, without scars, and with bushy pubic hair. -Mod is moved out of Beta and into its full release. 1.3.1 Beta - Hotfix - December 28 2015 -Hotfix - corrects a typo in the NMM installer for the default abs option. 1.3 Beta - December 27 2015 -Mod is moved out of Alpha and into Beta. -Converted Sporty Abs over from the Skyrim CBBE Innies. -Default CBBE abs now included as an optional file. -Optional shaving styles are no longer a separate package. -NMM installer like the Skyrim version of CBBE Innies. 1.2 Alpha - December 24 2015 -Textures updated from CBBE 0.1a base to CBBE 1.0a base which fixes most seams and offers various other texture fixes. -Updated vulva region in normal map so that it's smoother, and the pudendal cleft (slit) should appear deeper. -Spec map should match CBBE base aside from mole removal, nipple changes, and vulva/slit changes. 1.1 Alpha - December 12 2015 -Diffuse textures recompressed as DXT1 for better compatibility and reduced file size. -Hand textures no longer included as they were redundant, already included in CBBE and were unchanged. 1.0 Alpha - December 12 2015 -Initial release. Alpha stage. Normals & Specular maps likely need redone. Credits: Thepal for his nude females texture Caliente based his texture on supplied in the CBBE 3.2.3 releasexs2reality's Sporty Sexy Map for the optional abs included as well as SvarogNL's Fitness Body for the upper and lower ab smoothing of the Sporty Sexy MapUbercharge for the dirty raider textures included with CBBE.Intel ® Texture Works Plugin for PhotoshopNVIDIA Texture Tools for Adobe Photoshop Known Issues: -No known issues. Please report them if you find any. Optional Files CBBE 2.3 plus ABs-5659-.7zUpdates my CBBE + Abs bodyslide files to CBBE 2.3. Not currently included in CBBE Innies 1.5 CBBE Innies - Spartan Compatibility Patch-5659-1-5.7zCompatibility patch for Spartan Sniper outfit. FOMOD installer with most pubic hair options and an optional abs slider for the pants. Xun Slider Presets-5659-.7zFor anyone that wants the presets I use in my screenshots. Two variations included. -
Xun Rama Coin View File Description: Good god, another coin replacer! Aye, my friend. But this one is a little different. Features a beautiful girl on front, and (dat) ass on bottom. Made for the fictional Empire of Rama (my own creation). Funny Athiest joke included on back at no additional charge. Default version is Bottoms Up Edition. Features (dat) ass on front, and a beautiful girl on bottom. Grab the original edition here: xr-coin v1-3-1577-1-3.7z Features a beautiful girl on front, and (dat) ass on bottom. Installation: 1. Drop in /Data/ in /Data/ folder. 2. Yes to overwrite. 3. Enjoy! Uninstallation: 1. Navigate to Data/textures/clutter/ 2. Delete relevant contents. 3. Stop enjoying. Version History: 1.4 - bottom's up edition added (only use this version if you want the coin flipped around so the booty is on top rather than bottom; e.g. when you look at it in your inventory you'll see tails instead of heads.) 1.3 - redid butt/legs normal manually painting 1.2 - butt normal improved further 1.1 - butt normal fix 1.0 - Release Submitter XunAmarox Submitted 07/05/2021 Category Models & Textures Requires Special Edition Compatible No
