
The Butler
-
Posts
901 -
Joined
-
Last visited


Recent Profile Visitors


-
No reason to ban someone just because of a difference in opinion. They're not attacking anyone, just voicing their opinion in a rude way. Also for all parties let's keep this topic focused on discussion about the game.
-
Wip
-
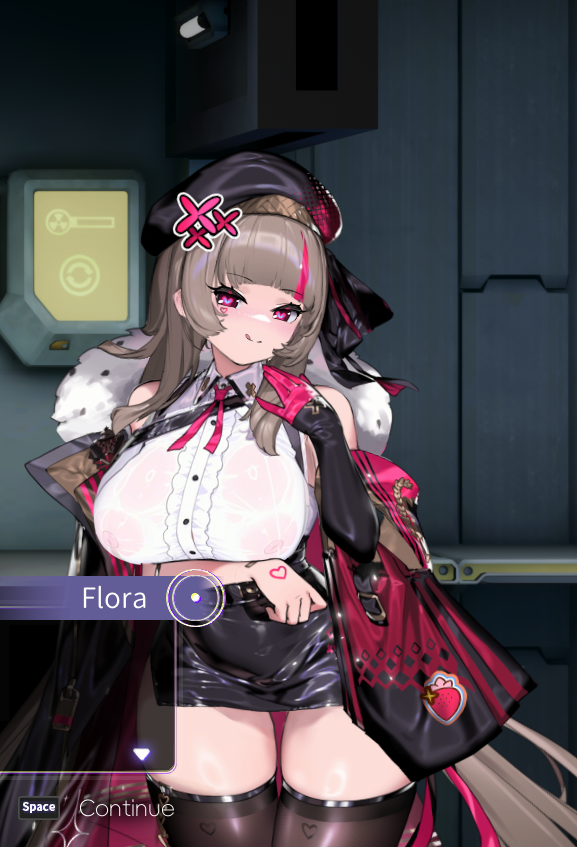
Kotama and Academy Citadel -- Nude Texture Mod -- Necessary Tools: BepinEx + Texture Replacer plugin Install: Extract in game folder. Default Path [icode]SteamLibrary\steamapps\common\KotamaAcademyCitadel[/icode] [TB] BepinEx Base + Plugin.7z For Modders: F11 - Toggle between scan mode (on = Modded textures will load, off = Default Game textures) ALT+F11 - Toggle Texture Dump F12 - Cycle between modded textures (check official plugin page for folder structure) Mods: Install: Just extract in game folder. Nude Tama [TB] Tama (nude).7z Preview:
-
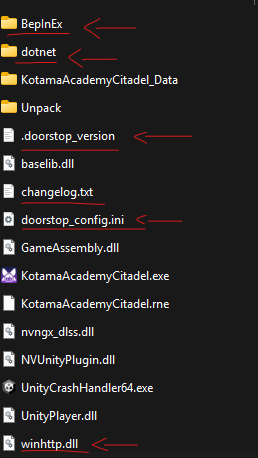
For reference, this is what the game folder should look like. The textures takes 1 second to kick in. F11 works as a toggle to Load/Don't Load textures. EDIT: Found the issue...

-
It's a mod made for unity games using BepinEx, it will work in almost all Unity games. - Texture Replacer plugin Page F95 Biggest advantage is that it's easy to extract texture and you can replace them in real time for testing. Compatible across updates. But as the name implies it's only for working with textures. That said: My own mod version is anexed... It needs both BepinEx Previews here : Install: PS: Size is mostly due to BepinEx and dotNet. [TB] Kotama.7z
-
I suggest using texture replacer for working with textures

-
"Hello! Could you please help me with installing a mod for the new v3 body with visible nipples? The mod itself has three options, but I can't figure out which one is for visible nipples. I think I followed the instructions correctly: first through CTE, then I downloaded Adobe Photoshop and installed the Nvidia texture tool plugin. For example, I inserted the file 30_00_H.cat from the mod into the left window. After doing that, I got 30_00_H.cat.3.clothes00_EE.dds. Is that correct? Then I opened this file in Adobe Photoshop, pressed Ctrl+Shift+S to save, and chose DDS (Nvidia). After clicking "Save," a window popped up saying the file already exists. Should I overwrite it? And after I click "Overwrite," the Nvidia texture tool plugin window appears. I somehow figured out how to set the DTX1 format and saved it. Then I went to the character's skin folder named skn00_c0_H.cat. This is the regular option. I dragged it into CTE, and when I try to drag the resulting texture, I don't know if it's correct. I drag 30_00_H.cat.3.clothes00_EE.dds into the right window in CTE, and I get an error: 'Unrecognized pixel depth:1.' And that's it. Am I doing something wrong? I've been struggling for half a day and can't get anything to work. Please help, I don't want to play without mods."For the game Senran Kagura Burst REnewal"
Больше: https://sinonim.org/perevod_ru#res -
Здравствуйте! Вы не могли бы мне помочь, как установить мод на новое тело v3 с торчащими сосками? В самом моде есть три варианта, только я не пойму, какой вариант с торчащими сосочками. И я вроде всё правильно сделал по инструкции: сначала через CTE, потом скачал прогу Adobe Photoshop, установил плагин Nvidia texture tool. Вот, например, вставил слева в окошко файл 30_00_H.cat, который был в самом моде. После того как сделал, у меня получился 30_00_H.cat.3.clothes00_EE.dds. Это же правильно получилось? Дальше я открыл этот файл в Adobe Photoshop, нажал комбинацию кнопок Ctrl+Shift+S, чтобы сохранить, выбрал DDS (Nvidia). После того как я нажимаю "Сохранить", у меня выскакивает окошко, что уже такой файл есть. Мне же его нужно перезаписать? И после этого, как нажимаю "Перезаписать", появляется окошко плагина Nvidia texture tool. Кое-как нашёл, как сделать формат DTX1, вроде сохранил. Потом перешёл в папку с скином персонажа под названием skn00_c0_H.cat. Это обычный вариант. Перетащил его в CTE, и после того как хочу перетащить полученную текстуру, я вообще не знаю, правильно получилось, перетаскиваю 30_00_H.cat.3.clothes00_EE.dds в правое окошко в CTE, и у меня выскакивает ошибка Unrecognized pixel depth:1. И на этом всё. Может, я что-то не так делаю? Просто полдня мучаюсь, и ничего не получается сделать. Помогите, пожалуйста, а то без модов не хочется играть.
-
Not really, 3Dmigoto works on all DirectX 11 Games.
-
Something simple (in theory) but nice to have would be a mod that allows you to enter the "Girls" area in the onsen. Both Freely and via Ticket. Ticket could be more tricky. Being searching Nexus for it but I didn't find anything related to it. Also thanks for the hard work @jmedia7. I still need to go back in learning unreal modding (and modeling) but life has been hitting pretty hard here, thanks to people like you I can enjoy games a bit more.
-
Abandoned, Lost my HDD from that time due to a lightning. Plus time spent on it was too much.
-
Issue 1 You can adjust pre-multiply by adjusting the meta file for that asset, but it's been a while since I did it so i don't remember. Issue 2 Some important information is saved on the actual .png file. you can do a small and quick experiment by simply copying everything from a png file and pasting in a brand new png file. You will notice that texture will be fully broken, so my guess is that unity write important data in that png. Workarounds: 1. Make thick black borders, however it will cause issues such as connection joints (where leg collect with main body) will have a visible seam. 2. When erasing use an aliased eraser, this way there will be no lefthover 1% opacity colors.
-
Game runs on unreal engine, so you make a mod as usual for this engine. (.pak, .sig).
-
Hmmm, interesting ideas. But as a request would you be willing to make just normal nude portraits ? I should go back to modding as well when I have time...
-
Oh, Zai, welcome back.

.thumb.png.cf3c9be17ba4e5c0b6b44cec0feba41e.png)