About This File
Sunstarved - Tanlines Race Menu Overlays by Domainwolf "converted" to use with Slavetats.
Description:
This is basically just the .json files for slavetats and empty folders you have to place the mods textures in as the mods permissions dont allow me to include the raw texture files in this "mod".
See original mod for screenshots and what it is. I asked for permission to include the textures, but I doubt the author is still active, so I'm not expecting to get one and because of that release this as it is. That means you have to do a few extra steps for the installation yourself.
I think the use with slavetats and especially Fade Tattoos continued is a good idea. Fade tats makes the tan lines slowly fade out over time if set to linear fade. If you apply them manually via slavetats you have to add them to the tracked tattoo's in the fade tats mcm. If there is a mod for race menu overlays to do that I'm not aware of it.
My idea was to get them applied randomly with Rape Tattoos Continued and then have them fade out with fade tats because I dont like having to go in and out and in various mcm menus to apply things manually, but you can just use it with slavetats if you think it makes no sense to have a chance to get a random tan line applied after sex.
Requirements:
Slavetats
Sunstarved Overlays by Domainwolf
Fade Tattoos continued (not required, but recommended to have the tan fade out over time)
Rape Tattoos Continued (not required, but can apply the tan and directly adds tattoo's to the tracked tattoo's in fade tats)
Installation:
-Install my "mod" with a mod manager, pick from the fomod options what overlays you want to have available in the slavetats mcm.
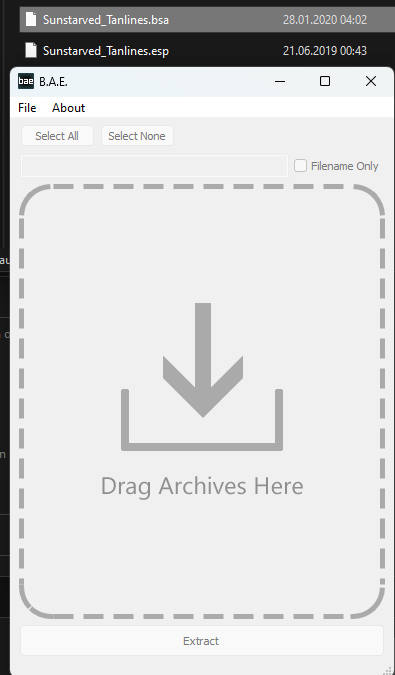
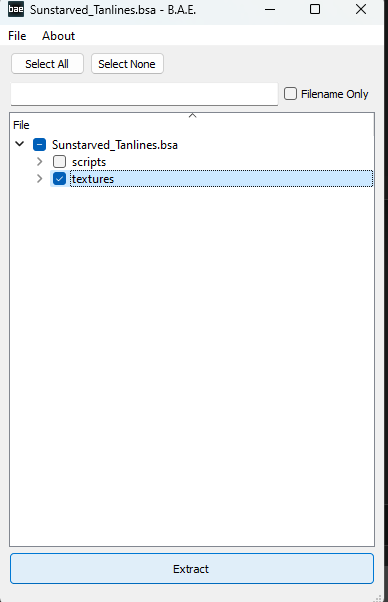
-Download and extract the textures from the original mod with Bsa Extractor to some folder where you find them again.
For this you just start the bsa extractor, open the sunstarved folder and drag and drop the bsa file into the bsa extractor. It'll ask you where to extract just extract in a folder that you'll find.
- Open my mod click through till you folders called "fresh" "update" or "worn" just copy the matching folders from the folders you extracted in the previous step into there.
Depending which fomod options you picked you may not need all folders, but you can just copy all 3 it doesnt hurt. Only thing that matters is that the .dds files from "worn" go into "worn" etc.
Edited by Alpia
What's New in Version 12/20/2023 03:24 PM
Released
added a missing entry