Search the Community
Showing results for tags 'tk17'.
-

Community Updates April 2024
hdiddy posted a blog entry in The Klub 17: Klub Exile Portal's The KE Blog
Hey folks Community Update time. Yes a little late but better late than never. There are a bunch of things going on so lets start with the most important one. Game updates!!! THE KLUB 17 VX - KE Update 2 Some folks have asked bout updates so figured instead of responding to individual PMs we can provide some color here. We had a lot of success with KE Update 1 that enabled butt sliders and brought in some other features. That said we are currently working on KE Update 2 to continue to expand the feature set. The focus areas will be the following: EXPANSION OF PE MORPH SLOTS PACKAGING We are hoping to roll this out within the next months but stay tuned for when the beta is announced.Special thanks to Driver aka Hootie and Tipsy who have been instrumental in getting the code correct for this update to be possible. For more information on updates or to learn more about coding and script modding for TK17 check out the Codework Lab CONTENT UPDATES We have a couple of new video tutorials live. vi363R provided a basic tutorial of how he ports clothes from Daz to add to Smoke's existing tutorial for making clothing. We also added a new tutorial walking through the process of creating H5 Object Rooms using CTK. NEW MODS There has been a flood of all sorts of new(not reposted) content so lets get into it. Over 150 new mods including, addons, poses, re-textures, and script mods Below where added since the last update. Below are the featured content since the last update. As a reminder you can always track new downloads on the KE Discord Server, anyway until next time folks. Fap responsibly. LOL Find TK17 Mods, Images, Comics, Videos and more on www.Klubexile.com -
Community Updates March 2024
hdiddy posted a blog entry in The Klub 17: Klub Exile Portal's The KE Blog
Ahhhh HAAAA guess who's back....with another update. It's been a while, and I have been lazy soooo yeah. That said lets get into it. For starters, seems like there has been a lot of goings with the TK17 space. Namely a certain site has not been able to keep their doors open after only a year of being open. While that is unfortunate...WE ARE ON YEAR 4 folks!!!! Seems like we are not going anywhere soon so don't worry yourselves on that front. The community has been great with yearly donations and because of them all 22K ish of you members, we continue to strive. Klub Exile will continue to be your number 1 premier site for new fresh content, updates to TK17 VX - Hook5, and whatever else comes in this space. INTRODUCING..... That is right folks. We have updated the Videos system to something...well, a lot better. Thanks to the donations we had some extra and was able to get some custom applications developed for a better videos experience. So if you are looking to upload your little TK17 videos somewhere. We got you covered. We are working on moving videos over but we pretty much have all the Tutorials on the new platform, so check it out and tell us what you think. We have already transferred over 200 videos to the new platform thanks to Lans Damon for all his efforts. EXILE COMICS That is right. We now have a dedicated comics platform for all you creators out there. I did not get a chance to add this to the F95 post so I am adding it here. If you create comics you now have a dedicated space and viewer to show your comics in all its...well...comic glory, LOL COMPETITIONS ARE FIXED!! Yes I know they broke in October and it left that competition hanging but things seems to be back to normal. We have 2 March Competitions Currently in Progress NEW SHIT Ok there is simply wayyyyyyy to much stuff to post here since my last update, so just going to give you folks a taste of the latest featured mods. Smoke has been on a mission updating damn near everything...heels, rooms, clothes...TOYS!!! So make sure you take a look at those goods. IBE and vi363r also has some new hotness for you, so grab those while your at it. -
So I don't know we will ever be able to get all the terabytes of contact that was on MG into this club. However, nothing stopping us from getting as mush as we can from folks within the community. To keep this organized and not hundreds of post requesting content. The idea of this thread is simple. Any content you are looking for that was posted on ModsGarden please request that content here. Try to be as detailed as possible so folks know what you want. Please don't request content that you know people have on a Patreon site. That is just asking for drama. For those fulfilling the request, please upload it to the proper files areas and respond back to the request with a link. This will help keep the files where the files need to be and also let others know where the files are if they are looking for it too. Cheers!!
-
tk17 Community Updates October Edition
hdiddy posted a blog entry in The Klub 17: Klub Exile Portal's The KE Blog
Another month another update. So first and fore most we hit a Milestone this past month KE passed the 20,000 Member mark which I have to say is insane. October marks 3 years of Klub Exile being open and I have to say the level of support and goodwill from almost the entire TK17 community has been huge. SEPTEMBER COMPETITION WINNERS There was quite a few competitions running for the month of September. Congrats to the winners. Images are below MONTHLY LEADERBOARD This month leaderboard for the site is as follows. These folks have posted quality content from forum post to files to images IMAGES FILES DONATION CAMPAIGN The Annual Donation Campaign will launch this month. Please stay tuned and check for an announcement on the main site. REMINDERS So if you are ever wondering about KE site status. Many folks are not aware we do have a downtime tracker at https://status.klubexile.com. This will provide you real time status on any downtime. XBODY UPDATES XBody was updated this month to include Drivers new Latona Body and Kraegar's Face Morphs as well as some quality of life updates. MODDER SHOUT OUT I just want to give a big shout out to Driver aka Hootie (From MG). For those of you who are know and do not know, many of of your favorite bodies and Skins where all developed by Driver. His assets ability to bring out the best of your models is something special. From a KE standpoint Hootie is Memeber #8, that is he is the first Non-Member of the admin team, and not going to lie he has been a crucial piece of KE's success. Also he made the sweet KE Banner and the KE Launch Image. That said Drivers has rolled out a Master Piece in Body Making with his Latona Body, that is taking the community by storm. I mentioned it here before but it is truly a work of art. In Driver fashion he is also modifying many of the popular clothing items for it, not to mention other modders creating morphs for it. Oh did I mention it is XBody enabled? LOL, yes all 545 XBody Morphs are available for the body. Check it out: https://www.klubexile.com/files/file/7487-latona/ FEATURED MEMBERS BLOG This months featured Member's Blog is Trapp's Corner of Leisure. Trapp creates some great comics using TK17, but if you want to get some behind the scenes view into his content creation process definately checkout his blog. FEATURED CONTENT Ok what probably most of you have been waiting for. This months featured content. A little bit of everything, clothes, hair, rooms, and toys. -
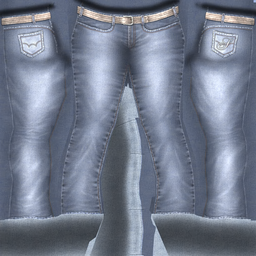
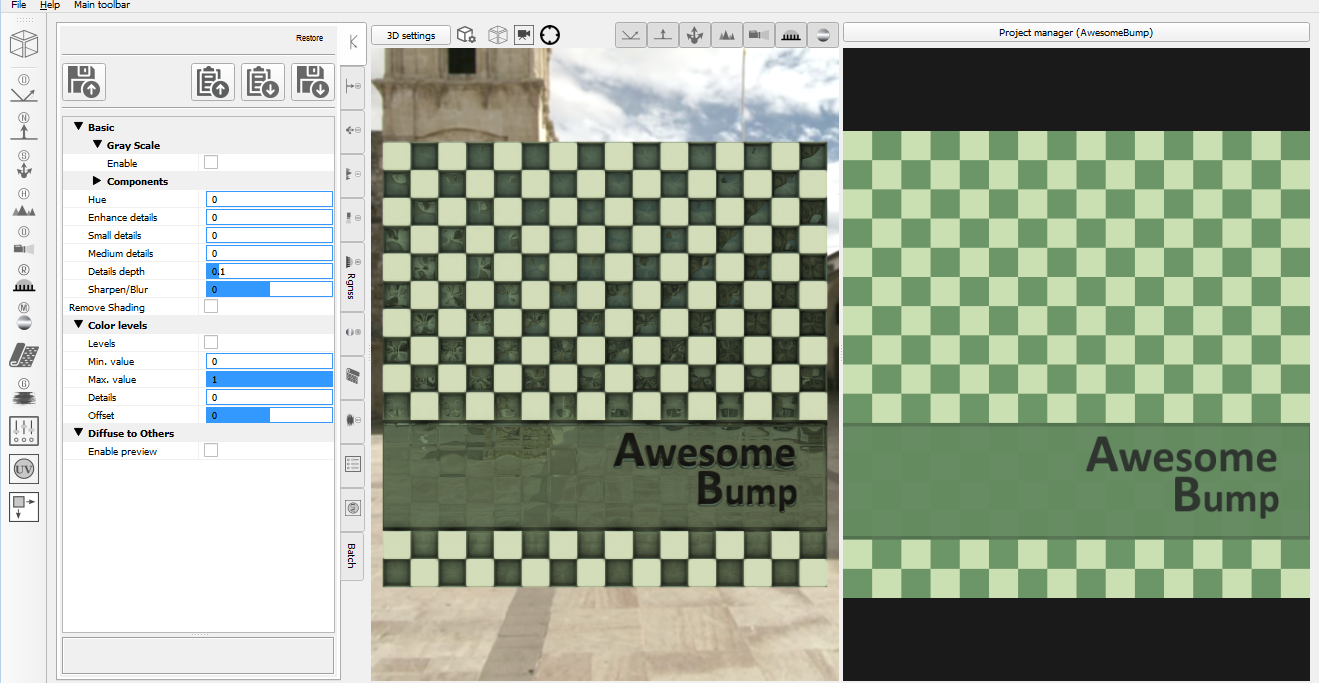
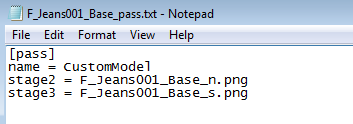
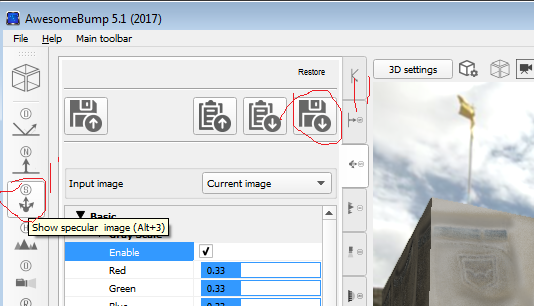
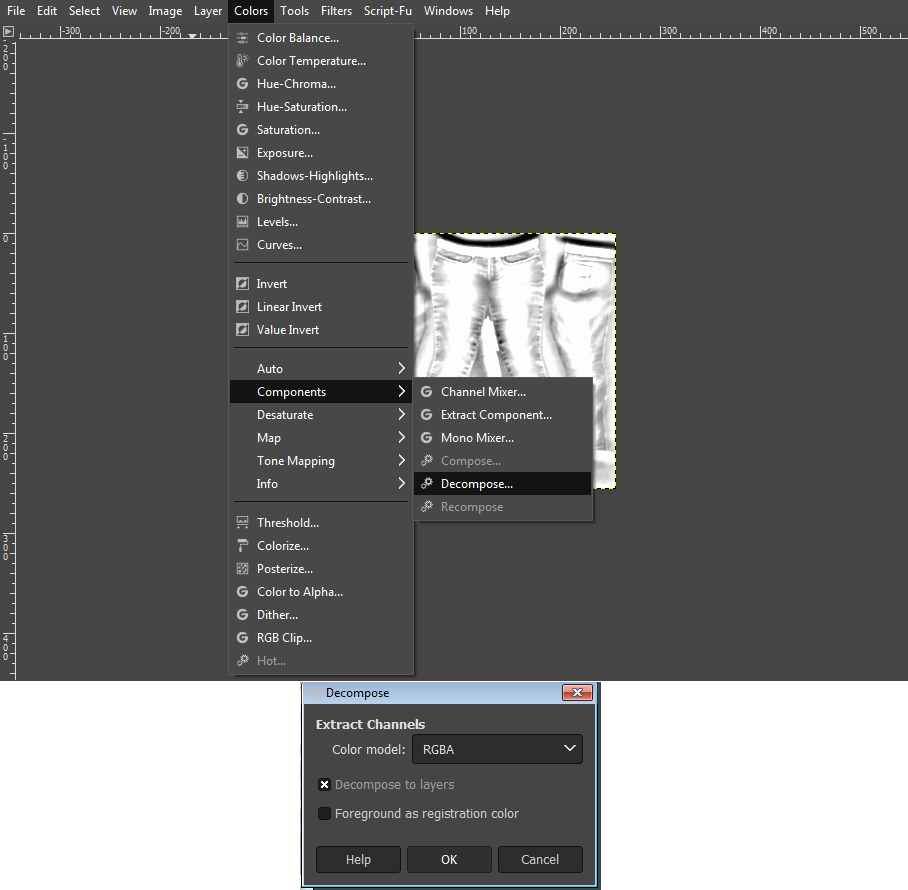
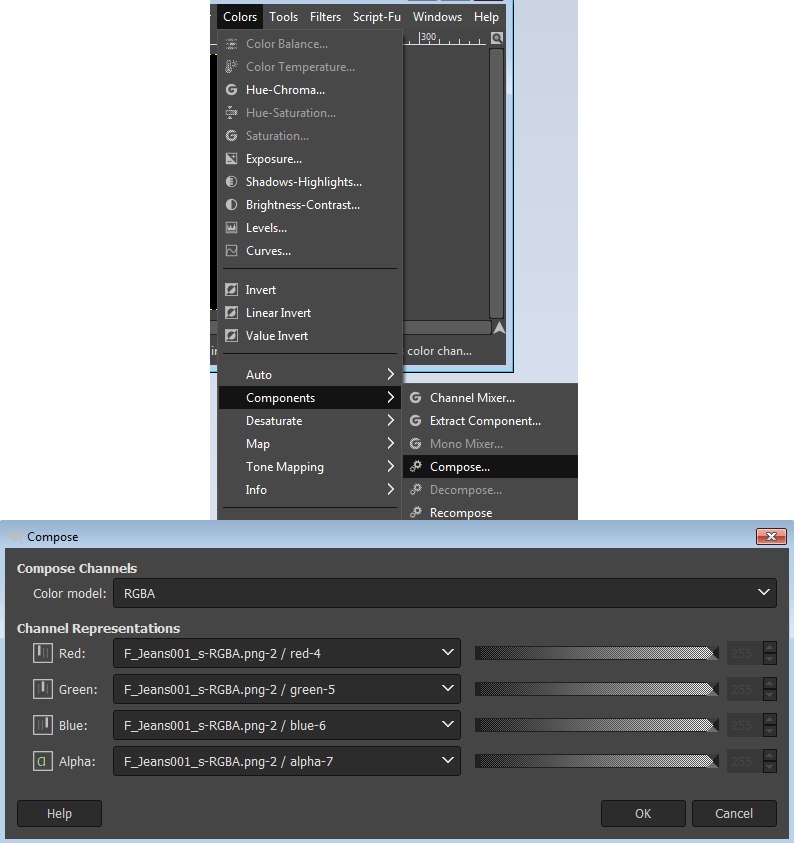
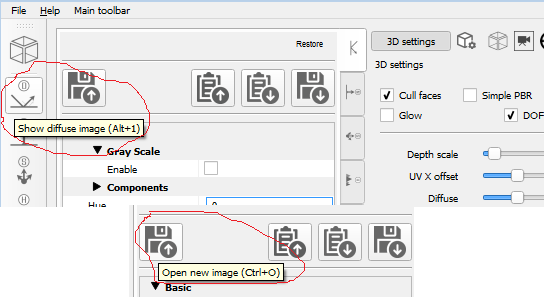
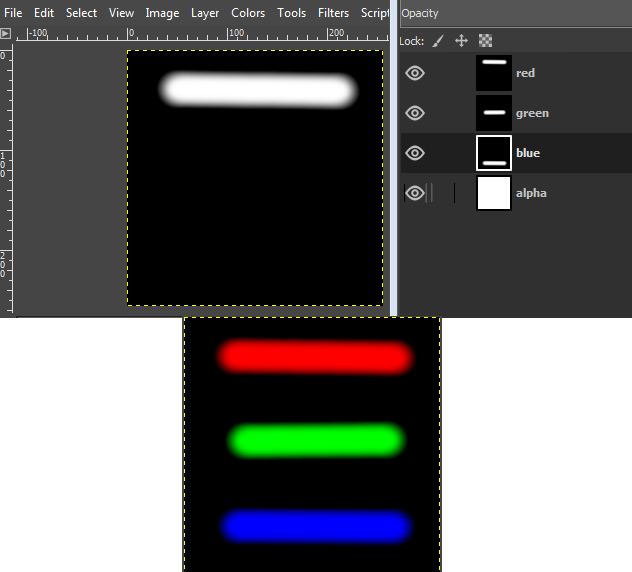
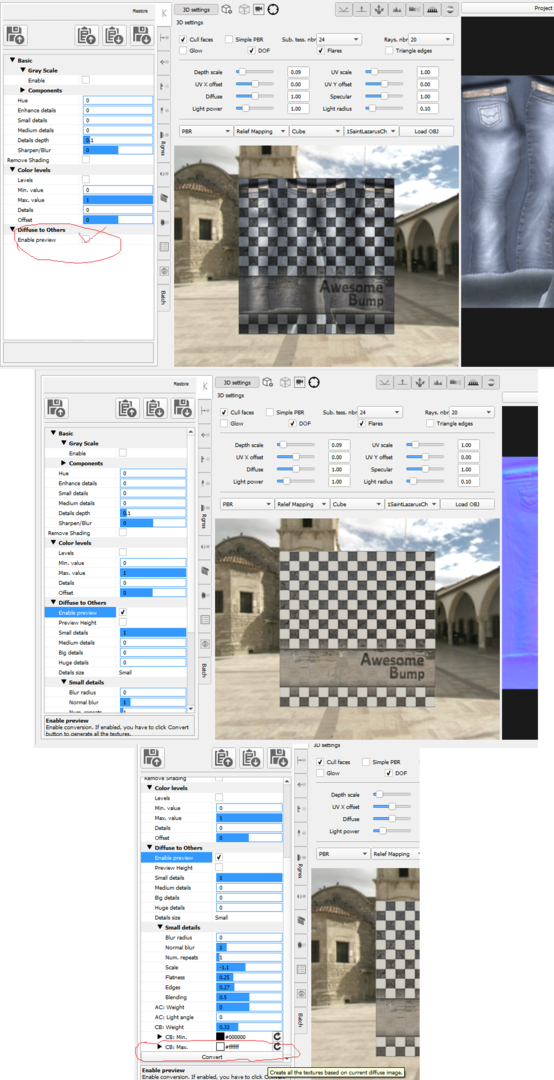
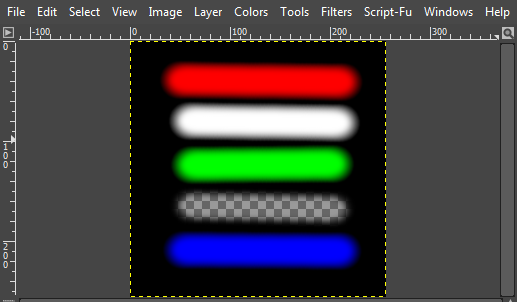
 Custom H5 Norm and Spec map (bump) creation with AwesomeBump and Gimp 4.10 By arse22 Mar 2021 Intro This will be a brief introductory guide to creating your own bumps (normals and spec maps) for Hook5 TK17, using free software you can find online. When it comes to 3d and image manipulation, these topics can be daunting and overwhelming, so I will steer clear of much technical aspects or details and dive straight to practical, as it pertains to Hook 5 and this game. Once you get the hang of it, you will agree that the artistic and technical knowledge required for baseline bumping is actually very low and maybe even limited. I would go as far as to say that a good portion of it is grunt work, so everyone can learn it and be contributing. Pre-Requisite -Any working version of TK17/SV with working Hook5(free or paid.) -Installed GIMP 4.10 or latest https://www.gimp.org -Installed AwesomeBump latest https://sourceforge.net/projects/awesomebump.mirror/ Basics of Bumping, Spec and Normal Maps So, long ago on Hook4 everyone used BumpMaps to create nice visuals for rooms, clothes, skin, anything with a texture, sometimes even without. Later, in Hook5, it has been replaced by Normals and Specular (norm and spec) maps, so this should clear up any confusion about those terms. They are not compatible, but achieve the same thing as far as improving your textures through Hook5, everyone still calls it bumps though. Typically the most common format you will see is [texture name]_n for normal and [texture name]_s for specs. They are placed in the same folder as the texture in ActiveMod, alongside a [texture name]_pass .txt file which points to the norm and spec. All of these you have to create for H5 to interpret in the game. Selecting a Texture to Work On The first step is to select a texture you would like to work on, let’s take a base game texture like Jeans (F_Jeans001_Base.png) . Typically cloth, hair, room texture, object texture is simple and straightforward, best for this guide. Skin is a little more advanced so maybe save that for after since there is more room for error and the process is not plug and play, there is much more room to improvise but this basic knowledge is still required. AwesomeBump Quick Guide to Normal Maps AwesomeBump is a popular free choice, it’s a little heavy on features and confusing to many, but good to have in your arsenal, especially if you plan to branch out into other 3d things. We will use it minimally as an excuse for you to install it. When you first load up this program, it looks like this: First thing to do is click on the top left icon with “D” for Diffuse and make sure you are on that, I believe it’s on it by default so nothing will happen usually. Then you click “Open New Image,” and find the texture we are working on. Looks kind of weird right now, so you must check “Enable preview”. Then, scroll to the bottom of this window and click on “Convert.” So, now what the software did is use the image we put in as the Diffuse and created various bumps for it which you can select on the left. N for normal, S for spec, H for height, O for occlusion, R for roughness etc. We’re not actually going to use much of that, for now just click on the N icon so we can make a normal. One thing to note about this program, although you can rotate and look at the result in the preview window in the middle, don’t click on the window in the right because it actually has an effect on the later result. I am yet to figure out how to reset it to neutral position, short of reloading. This is a good place to trial and error, but some of the things the sliders do can easily be done with a paint program later, there is no difference and we are trying to only make a basic bump or PBR as it’s called. So for now let’s just load it in game and see if it works. Leave the settings to default and select “Save Current Image.” Save it in the folder you have your texture, note that the _n suffix is already added in (the program knows what you want.) Testing In-Game If you looked around, you noticed the preview window in AwesomeBump doesn’t tell you much if you’re not already familiar with what you’re looking at and it’s not really made for Hook. So, if you have not already, create a “TestJeans” folder or something like that in ActiveMod and place both the texture and the normal in. If you load the game right now, it will look bad without a spec, so let’s use a generic spec for now just to test the normal. Just right click and download the below green image and place it with the other two files in your new folder in ActiveMod. Make sure it's named F_Jeans001_s.png Now you just need to make a pass file, create a new text file named “F_Jeans001_Base_pass.txt” in the folder with this info: So, when you load it in game it will be under “TestJeans” or whatever you named the folder. From this point it’s a bit of guess work, if you want to experiment with normal, you can change the sliders in AwesomeBump, overwrite the normal file and press Alt+R to reload in-game, to see the result. It’s a good idea to try it out if you never done this, but I will attempt to save you some trial and error and try to explain what the sliders do: Enhance Details - This is basically stronger normal effect (if you used the default settings from the program, you will note that the difference between that and a basic texture is fairly subtle, unless you mess around with lights, because this is set to 0.) Small and Medium Details – Well, below is a slider called Details Depth and these are just a means to fine tune it. Details Depth – This is self-explanatory, it’s how deep the crevices and such should appear (I think you can do this with contrast in any image program.) In more complex objects, an advanced technique involves making multiple depths and combining them together into one normal map to try to paint the object more accurately. Sharpen/Blur – It’s more or less sharp and blur from any image editing program, however the effect is really strong here, probably better to do subtle work in such a program, but it can save you time situationally. Normal Step – Honestly I don’t even know what this does. It seems to be more depth tweaking, but you should leave it at 1. Setting it to 0 makes the image disappear entirely and -1 inverts the normal, I prefer to invert in a separate program later if needed, since you rarely need to invert the whole thing, just specific parts that ended up wrong. Advanced Normals From here honestly, how good you want to make your normal is in your hands, you can leave it as is or you can tweak it a bit, or you can go in and make multiple normal, merge and crop them or merge with normal of other images to create weird effects or a textile effect for clothing etc. It will entirely depend on your skill with image manipulation and how much detail you put in. There is much more technical info on best practice and usage of normal maps elsewhere on the web, using this as your base method to build from is a great way to begin the journey of learning. The key concept to understand, also true for specs, that the image you put in for the bump will be what the game interprets, so using the base texture is only the foundational step, you are not required or limited to this. For example if I took some small HD image of human skin and made a normal of that, I can pass it as a normal for an actual skin, it will repeat the normal across the whole thing. That won’t look great, but it’s an idea. However, for something like a skin, you can’t just throw something in and expect good results because in the case of this game, the skin texture used by the game engine does not properly convey a lot of the complex curvature of a body, especially when it comes to details. The normal produced will have a lot of wrong depths (the outline for the body for example) and many missing ones too. So making a real good one would require a lot of extra work, if only to clean the normal a program like this would produce, which would be but a baseline starting point and maybe not the best one. This can absolutely be true for clothes, room textures etc as well, depending on the subject and what you are trying to accomplish. Editing Specular Map So we have a passable normal map made and everything works in game, time to look into making a custom spec map. This a lot more open-ended, easier but also more choice in approach. Normals are very similar across many 3d program, but the specs in Hook5 are unique to it, so it doesn’t hurt to look over the Hook5 guide before or after this. It sort of goes hand-in-hand with this guide on how to make a spec in Gimp. Specs are even more broad I would say, many content creators just use that default green image I provided (it actually comes with hook generic textures) and don’t bother looking into it. There are many ways to approach it and frankly I don’t even use AwesomeBump for specs at all. But, hopefully this method will offer a good place to start. Back in AwesomeBump, as example, let’s switch to the Spec Map tab and create a default settings spec map, the method is the same, just select the tab and click “Save Current Image.” Now, you want to take this new _s file that was created and load it in GIMP. In GIMP, select Colors->Components->Decompose. In the drop down select RGBA and hit ok. If you don’t have this option in GIMP, you should download a plug-in, I am not 100% sure it comes with GIMP by default. GIMP will create a new image with 4 layers corresponding to the RGBA colors. From here, any white on a specific layer will turn that color when we recombine them, so if that makes sense, the image is only there to guide you in your creative journey. In general you want the red (metallic) layer to be black and the glow (blue) to be black, while the alpha to be white. The green is the most commonly used layer since it makes things shiny and that’s a large percentage of hook usage. So, for now select the red layer, then Colors->Levels and set the Output to black. Do this for the Blue layer as well and leave the other two unchanged (the alpha should be white already.) Now select Colors->Components->Compose. In the Compose window make sure to select RGBA again and make sure each layer aligns with the corresponding channel. Hit ok and yet another image will be created. Now just File->Export this new image overriding the _s file in your folder and Alt+R in-game, I am assuming you already know this part from when we did it for normal map in this guide. If you followed the steps, the composed image will look like this, a working custom spec: Color Channel Details One thing to note when you test this result is that our custom item became very shiny, that’s because the Green channel is actually gloss in Hook5 and we did not change the spec made by AwesomeBump and because it’s mostly white, the effect is very strong. You can go back in and adjust the levels of that channel to your liking and compose again if you’d like. Another thing to do is to try out the other channels in the same way (actually all Black and all White is the simplest test, to see the extremes of each channel in-game.) The thing about metallic (RED) channel, it’s not that commonly used, often times a fine detail on metallic parts. Usually a high gloss (green) setting is plenty for actual metal parts and accomplishes the same effect and usually you will want a combination of the two anyway (since red isn’t shiny by default.) To make good specs, just like with normals, manual editing and fine tuning of specific parts is necessary. A note about the blue channel is that it will not do anything unless you have paid version of hook5, have enabled glow in settings and added the line “glow_intensity = 1 or another number, 2 is a good testing number” into the pass file, so again it isn’t used that much. On a more practical note, often glowing objects are futuristic things like data pads and the like, so again, like red, it will be in combination with the red and green channel and not nearly that strong as we are doing here. If all of this is confusing, a good exercise to try is this: decompose the original spec again and this time turn all 3 channels black and paint white with a brush in different spots on each layer before composing, as I did in the pic below (look at the layers previews:) It should compose to the lower image: You can even export and Alt+R and hopefully my notes on channels Red and Blue make more sense once you see how that looks in-game. Only the Green (gloss) channel is pronounced unless you have enabled glow for blue, red is much more subdued. An overwhelming majority of specs made for Hook5 will just be adjusted green channels, since most just want a nice gloss on their objects. So, one last thing experimental thing to try, is to add to the test composition is manually paint a strip of white and erase a strip (alpha,) directly on the composed image, just to see how they look in game. Well, what did we learn? It seems white is also glow (if you have Glow turned on and added the line into the pass file on paid hook, if you don’t it will just look super glossy/shiny.) While alphaed-out areas will create an absence of light (though this is only true for hook light, I’m assuming, the in-game light engine still tries to light the area but the in-game light engine is bad so why worry about it.) That should cover the basics on how to compose a specular map and how details and in-depth you want to be with it is up to you (just like with norms) and up to your image manipulation skills. You can paint directly with white or gray on the decomposed layers, or just copy paste from somewhere, since the layers are grayscale, it will work out. Advanced Spec, Hook5 and Beyond From here, I would look deeper into other Hook5 guides for more advanced ideas and experiment with different settings you can apply to textures (besides glow_intensity, there is many more.) Once you know this basic steps, you can see it is easy to begin learning more Hook5 tricks easily. For example, in the Hook5 guide it says messing around with the alpha color channel can produce more interesting effects, I didn’t really try so I didn’t cover it in the guide, so it could be a good place to start. More-so than normal, specs can really be anything and can have a major impact on the final image so it’s sort of like playing with fire in some cases, especially when it comes to glow and high gloss. I didn’t even begin to describe how a good normal map works in tandem with a good spec map, so you are really aiming for something good between those two and seeing how different types combine together is where a lot of the experience comes in. Worth noting, if you have already read the Hook5 guides and are familiar, the norm and spec we are making are specifically for CustomModel shader which is the most common. Room things often use CustomStatic, CustomSkin is for skins, but there is also EyePass and EyePass2 specific to eyes. Quick FAQ Q: What about subs? A: Subs, or SS or subsurface scatter is kind beyond this guide. Since it’s for CustomModel shader, I don’t even think there is a stage4 parameter. Basically, it’s used on skin to create an illusion of realistic skin, because real skin is semi-translucent, visually the eye catches a second layer (at least.) Essentially it achieves the same thing, but a lot of times, you don’t need a program for it, you just take the original texture or the diffuse and make it darker. If you want to become proficient with it and want to create realistic skin, you are better off looking into Customizable Skin in H5 which offers much more robust options for achieving this effect and more (I think it works for clothes too, but Ive never seen it.) Q: What about sizes? Things are different sizes? A: Size doesn’t matter really, you will see most norm and spec maps in .dds format because of mipmaps. In general though, Hook5 will accept larger and smaller norms and specs without problem. Q: What is a good way to work with .dds files, since many of norms and spec are? A: GIMP should be sufficient and handles the format well, loading existing and converting pngs, make sure to generate mipmaps when saving. Another good alternative is Paint.net but I had mixed results with it, it just loads faster for 1 minute edits. Q: Is the specular map created by AwesomeBump just a greyscale image of the texture? A: I’m pretty sure that’s all it does, but I didn’t bother to test, there is some sliders to make adjustments too and those are definitely applying various adjustments to it. I don’t actually know the details but it seems ok to use it since it’s where your normal will come from. I highly doubt it’s the optimal method, I’m 100% sure Hook5 is not reading the map the same way the program that it’s intended for is, but it should work since it’s just different colors. Conclusion So, I showed how fast and easy it is to make your own norm and spec for any texture, it’s time to get to work! >:) Well, to be honest it can be a lot of work if you want to achieve certain things and want it to actually look good, it takes trial and error and I’ve most certainly avoided almost all the technical details behind how such maps are used in broader 3d software. There is plenty of info out there and the methods I showed are not the best or most optimal, they are just a simple way to get started and make your own H5 bumps today.
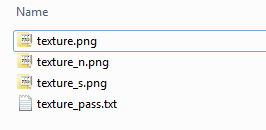


-
Custom H5 Norm and Spec map (bump) creation with AwesomeBump and Gimp 4.10 By arse22 Mar 2021 Intro This will be a brief introductory guide to creating your own bumps (normals and spec maps) for Hook5 TK17, using free software you can find online. When it comes to 3d and image manipulation, these topics can be daunting and overwhelming, so I will steer clear of much technical aspects or details and dive straight to practical, as it pertains to Hook 5 and this game. Once you get the hang of it, you will agree that the artistic and technical knowledge required for baseline bumping is actually very low and maybe even limited. I would go as far as to say that a good portion of it is grunt work, so everyone can learn it and be contributing. Pre-Requisite -Any working version of TK17/SV with working Hook5(free or paid.) -Installed GIMP 4.10 or latest https://www.gimp.org -Installed AwesomeBump latest https://sourceforge.net/projects/awesomebump.mirror/ Basics of Bumping, Spec and Normal Maps So, long ago on Hook4 everyone used BumpMaps to create nice visuals for rooms, clothes, skin, anything with a texture, sometimes even without. Later, in Hook5, it has been replaced by Normals and Specular (norm and spec) maps, so this should clear up any confusion about those terms. They are not compatible, but achieve the same thing as far as improving your textures through Hook5, everyone still calls it bumps though. Typically the most common format you will see is [texture name]_n for normal and [texture name]_s for specs. They are placed in the same folder as the texture in ActiveMod, alongside a [texture name]_pass .txt file which points to the norm and spec. All of these you have to create for H5 to interpret in the game. Selecting a Texture to Work On The first step is to select a texture you would like to work on, let’s take a base game texture like Jeans (F_Jeans001_Base.png) . Typically cloth, hair, room texture, object texture is simple and straightforward, best for this guide. Skin is a little more advanced so maybe save that for after since there is more room for error and the process is not plug and play, there is much more room to improvise but this basic knowledge is still required. AwesomeBump Quick Guide to Normal Maps AwesomeBump is a popular free choice, it’s a little heavy on features and confusing to many, but good to have in your arsenal, especially if you plan to branch out into other 3d things. We will use it minimally as an excuse for you to install it. When you first load up this program, it looks like this: First thing to do is click on the top left icon with “D” for Diffuse and make sure you are on that, I believe it’s on it by default so nothing will happen usually. Then you click “Open New Image,” and find the texture we are working on. Looks kind of weird right now, so you must check “Enable preview”. Then, scroll to the bottom of this window and click on “Convert.” So, now what the software did is use the image we put in as the Diffuse and created various bumps for it which you can select on the left. N for normal, S for spec, H for height, O for occlusion, R for roughness etc. We’re not actually going to use much of that, for now just click on the N icon so we can make a normal. One thing to note about this program, although you can rotate and look at the result in the preview window in the middle, don’t click on the window in the right because it actually has an effect on the later result. I am yet to figure out how to reset it to neutral position, short of reloading. This is a good place to trial and error, but some of the things the sliders do can easily be done with a paint program later, there is no difference and we are trying to only make a basic bump or PBR as it’s called. So for now let’s just load it in game and see if it works. Leave the settings to default and select “Save Current Image.” Save it in the folder you have your texture, note that the _n suffix is already added in (the program knows what you want.) Testing In-Game If you looked around, you noticed the preview window in AwesomeBump doesn’t tell you much if you’re not already familiar with what you’re looking at and it’s not really made for Hook. So, if you have not already, create a “TestJeans” folder or something like that in ActiveMod and place both the texture and the normal in. If you load the game right now, it will look bad without a spec, so let’s use a generic spec for now just to test the normal. Just right click and download the below green image and place it with the other two files in your new folder in ActiveMod. Make sure it's named F_Jeans001_s.png Now you just need to make a pass file, create a new text file named “F_Jeans001_Base_pass.txt” in the folder with this info: So, when you load it in game it will be under “TestJeans” or whatever you named the folder. From this point it’s a bit of guess work, if you want to experiment with normal, you can change the sliders in AwesomeBump, overwrite the normal file and press Alt+R to reload in-game, to see the result. It’s a good idea to try it out if you never done this, but I will attempt to save you some trial and error and try to explain what the sliders do: Enhance Details - This is basically stronger normal effect (if you used the default settings from the program, you will note that the difference between that and a basic texture is fairly subtle, unless you mess around with lights, because this is set to 0.) Small and Medium Details – Well, below is a slider called Details Depth and these are just a means to fine tune it. Details Depth – This is self-explanatory, it’s how deep the crevices and such should appear (I think you can do this with contrast in any image program.) In more complex objects, an advanced technique involves making multiple depths and combining them together into one normal map to try to paint the object more accurately. Sharpen/Blur – It’s more or less sharp and blur from any image editing program, however the effect is really strong here, probably better to do subtle work in such a program, but it can save you time situationally. Normal Step – Honestly I don’t even know what this does. It seems to be more depth tweaking, but you should leave it at 1. Setting it to 0 makes the image disappear entirely and -1 inverts the normal, I prefer to invert in a separate program later if needed, since you rarely need to invert the whole thing, just specific parts that ended up wrong. Advanced Normals From here honestly, how good you want to make your normal is in your hands, you can leave it as is or you can tweak it a bit, or you can go in and make multiple normal, merge and crop them or merge with normal of other images to create weird effects or a textile effect for clothing etc. It will entirely depend on your skill with image manipulation and how much detail you put in. There is much more technical info on best practice and usage of normal maps elsewhere on the web, using this as your base method to build from is a great way to begin the journey of learning. The key concept to understand, also true for specs, that the image you put in for the bump will be what the game interprets, so using the base texture is only the foundational step, you are not required or limited to this. For example if I took some small HD image of human skin and made a normal of that, I can pass it as a normal for an actual skin, it will repeat the normal across the whole thing. That won’t look great, but it’s an idea. However, for something like a skin, you can’t just throw something in and expect good results because in the case of this game, the skin texture used by the game engine does not properly convey a lot of the complex curvature of a body, especially when it comes to details. The normal produced will have a lot of wrong depths (the outline for the body for example) and many missing ones too. So making a real good one would require a lot of extra work, if only to clean the normal a program like this would produce, which would be but a baseline starting point and maybe not the best one. This can absolutely be true for clothes, room textures etc as well, depending on the subject and what you are trying to accomplish. Editing Specular Map So we have a passable normal map made and everything works in game, time to look into making a custom spec map. This a lot more open-ended, easier but also more choice in approach. Normals are very similar across many 3d program, but the specs in Hook5 are unique to it, so it doesn’t hurt to look over the Hook5 guide before or after this. It sort of goes hand-in-hand with this guide on how to make a spec in Gimp. Specs are even more broad I would say, many content creators just use that default green image I provided (it actually comes with hook generic textures) and don’t bother looking into it. There are many ways to approach it and frankly I don’t even use AwesomeBump for specs at all. But, hopefully this method will offer a good place to start. Back in AwesomeBump, as example, let’s switch to the Spec Map tab and create a default settings spec map, the method is the same, just select the tab and click “Save Current Image.” Now, you want to take this new _s file that was created and load it in GIMP. In GIMP, select Colors->Components->Decompose. In the drop down select RGBA and hit ok. If you don’t have this option in GIMP, you should download a plug-in, I am not 100% sure it comes with GIMP by default. GIMP will create a new image with 4 layers corresponding to the RGBA colors. From here, any white on a specific layer will turn that color when we recombine them, so if that makes sense, the image is only there to guide you in your creative journey. In general you want the red (metallic) layer to be black and the glow (blue) to be black, while the alpha to be white. The green is the most commonly used layer since it makes things shiny and that’s a large percentage of hook usage. So, for now select the red layer, then Colors->Levels and set the Output to black. Do this for the Blue layer as well and leave the other two unchanged (the alpha should be white already.) Now select Colors->Components->Compose. In the Compose window make sure to select RGBA again and make sure each layer aligns with the corresponding channel. Hit ok and yet another image will be created. Now just File->Export this new image overriding the _s file in your folder and Alt+R in-game, I am assuming you already know this part from when we did it for normal map in this guide. If you followed the steps, the composed image will look like this, a working custom spec: Color Channel Details One thing to note when you test this result is that our custom item became very shiny, that’s because the Green channel is actually gloss in Hook5 and we did not change the spec made by AwesomeBump and because it’s mostly white, the effect is very strong. You can go back in and adjust the levels of that channel to your liking and compose again if you’d like. Another thing to do is to try out the other channels in the same way (actually all Black and all White is the simplest test, to see the extremes of each channel in-game.) The thing about metallic (RED) channel, it’s not that commonly used, often times a fine detail on metallic parts. Usually a high gloss (green) setting is plenty for actual metal parts and accomplishes the same effect and usually you will want a combination of the two anyway (since red isn’t shiny by default.) To make good specs, just like with normals, manual editing and fine tuning of specific parts is necessary. A note about the blue channel is that it will not do anything unless you have paid version of hook5, have enabled glow in settings and added the line “glow_intensity = 1 or another number, 2 is a good testing number” into the pass file, so again it isn’t used that much. On a more practical note, often glowing objects are futuristic things like data pads and the like, so again, like red, it will be in combination with the red and green channel and not nearly that strong as we are doing here. If all of this is confusing, a good exercise to try is this: decompose the original spec again and this time turn all 3 channels black and paint white with a brush in different spots on each layer before composing, as I did in the pic below (look at the layers previews:) It should compose to the lower image: You can even export and Alt+R and hopefully my notes on channels Red and Blue make more sense once you see how that looks in-game. Only the Green (gloss) channel is pronounced unless you have enabled glow for blue, red is much more subdued. An overwhelming majority of specs made for Hook5 will just be adjusted green channels, since most just want a nice gloss on their objects. So, one last thing experimental thing to try, is to add to the test composition is manually paint a strip of white and erase a strip (alpha,) directly on the composed image, just to see how they look in game. Well, what did we learn? It seems white is also glow (if you have Glow turned on and added the line into the pass file on paid hook, if you don’t it will just look super glossy/shiny.) While alphaed-out areas will create an absence of light (though this is only true for hook light, I’m assuming, the in-game light engine still tries to light the area but the in-game light engine is bad so why worry about it.) That should cover the basics on how to compose a specular map and how details and in-depth you want to be with it is up to you (just like with norms) and up to your image manipulation skills. You can paint directly with white or gray on the decomposed layers, or just copy paste from somewhere, since the layers are grayscale, it will work out. Advanced Spec, Hook5 and Beyond From here, I would look deeper into other Hook5 guides for more advanced ideas and experiment with different settings you can apply to textures (besides glow_intensity, there is many more.) Once you know this basic steps, you can see it is easy to begin learning more Hook5 tricks easily. For example, in the Hook5 guide it says messing around with the alpha color channel can produce more interesting effects, I didn’t really try so I didn’t cover it in the guide, so it could be a good place to start. More-so than normal, specs can really be anything and can have a major impact on the final image so it’s sort of like playing with fire in some cases, especially when it comes to glow and high gloss. I didn’t even begin to describe how a good normal map works in tandem with a good spec map, so you are really aiming for something good between those two and seeing how different types combine together is where a lot of the experience comes in. Worth noting, if you have already read the Hook5 guides and are familiar, the norm and spec we are making are specifically for CustomModel shader which is the most common. Room things often use CustomStatic, CustomSkin is for skins, but there is also EyePass and EyePass2 specific to eyes. Quick FAQ Q: What about subs? A: Subs, or SS or subsurface scatter is kind beyond this guide. Since it’s for CustomModel shader, I don’t even think there is a stage4 parameter. Basically, it’s used on skin to create an illusion of realistic skin, because real skin is semi-translucent, visually the eye catches a second layer (at least.) Essentially it achieves the same thing, but a lot of times, you don’t need a program for it, you just take the original texture or the diffuse and make it darker. If you want to become proficient with it and want to create realistic skin, you are better off looking into Customizable Skin in H5 which offers much more robust options for achieving this effect and more (I think it works for clothes too, but Ive never seen it.) Q: What about sizes? Things are different sizes? A: Size doesn’t matter really, you will see most norm and spec maps in .dds format because of mipmaps. In general though, Hook5 will accept larger and smaller norms and specs without problem. Q: What is a good way to work with .dds files, since many of norms and spec are? A: GIMP should be sufficient and handles the format well, loading existing and converting pngs, make sure to generate mipmaps when saving. Another good alternative is Paint.net but I had mixed results with it, it just loads faster for 1 minute edits. Q: Is the specular map created by AwesomeBump just a greyscale image of the texture? A: I’m pretty sure that’s all it does, but I didn’t bother to test, there is some sliders to make adjustments too and those are definitely applying various adjustments to it. I don’t actually know the details but it seems ok to use it since it’s where your normal will come from. I highly doubt it’s the optimal method, I’m 100% sure Hook5 is not reading the map the same way the program that it’s intended for is, but it should work since it’s just different colors. Conclusion So, I showed how fast and easy it is to make your own norm and spec for any texture, it’s time to get to work! >:) Well, to be honest it can be a lot of work if you want to achieve certain things and want it to actually look good, it takes trial and error and I’ve most certainly avoided almost all the technical details behind how such maps are used in broader 3d software. There is plenty of info out there and the methods I showed are not the best or most optimal, they are just a simple way to get started and make your own H5 bumps today.
-
Here you will find the game plus update, you only need the last update (r), found in the next post. The Klub 17 V10.1.00; https://mega.nz/file/dtoG0KhI#cU51Uxg0tViXezudQ6bCpJJ5WgdOFu71vLtPd48FZXA Hook 5 basic (optional); https://mega.nz/file/psxQAIKC#VElVWXkoCGGbMXnZfy85LbG60uyn5adet4etskNeOFw
-
How can I get rid of these lines in the background sky? It only happens when I use DirectX.
-

How to get started? (Beginners|New players)
Guest posted a topic in The Klub 17: Klub Exile Portal's Help
Hello TK17 Community, I am new to this stuff and have heard good things about The Klub 17 but could never find anything useful about it. Does anyone know where I can find tutorials or video instructions on how all of this works? I downloaded The Klub 17 version 10 but the update and Hook5 did not show up in my downloads folder which has left me confused. If anyone can point me in the right direction I'd appreciate it. Thank you for your time. -
 I have Klub 17 version 7.5 but i want to update it to version 10.
 -
TK17 Install on Linux with Hook5: Source: The Klub 17 Comprehensive Guide: Klub Exile Edition Requirements: GPU must support Vulkan API. Step 1: Install Vulkan Libraries Step 2: Set up Mesa Step 3: Download Hook5 Files and the TK17 installer Step 4: Install Lutris https://lutris.net/ Step 5: Create a new TK17 configuration in Lutris Step 6: Install a Wine runner that has esync and vulkan by entering Install Runners and Manage Versions for Wine Step 7: Create a new Wine Prefix Step 8: Select RUN from the Lutris menu, and select the TK17 installer Step 9: Cancel the Wine-Gecko installer Step 10: Create a symlink in a terminal Step 11: In Lutris, set the working directory for TK17 as its binaries, and the executable as TK17_Launcher.exe Step 12: Enable DXVK Step 13: In Winetricks, select and install the packages d3dcompiler_43 and d3xd11_43 Step 14: In Winetricks, set d3d8 as (native, builtin) With that, you should have a working TK17 install with H5. Launch it normally through Lutris
-
im new here. how and from where can i download custom animations?
-
i don't know if my tk17 has hook5 because when i press f4 nothing happens . can anyone help me figure out how i can see this?
-
Some rooms don't let you move the models around. How do I fix this? Video Example
-
So this club is currently over 400 Members so I just wanted to get a better read of how people got here and what pulled them in. Created a 6 question poll that would help to understand what the membership here is looking like. Feel free to comment on anything else. Cheers!!
-
Some sites on the inter webs with a shit ton of TK17 content, most likely copied from the Garden over time. Leechers or not. If you need old content here are some options for you. Have fun. Most if not all use Keep2Share to store the files. It seems like it could have been the same user posting across multiple adult forums. Who knows. There is 76 pages of content here from 2017 to January 2020. Might be a god spot to find obscure rooms pose packs. It does require K2S to download. Anyone looking for 7.5 of the game may be able to find it here https://www.intporn.org/threads/the-klub-17-3d-sexvilla-updates-every-day-rooms-textures-poses-models.994079/page-76 This is another one like above but 30 pages of content that seems to not have been updated since 2018. Also needs K2S https://www.pornbb.org/the-klub-17-3d-sexvilla-updates-every-day-rooms-textures-t7208005-435.html 54 pages of content here updated up till the end of January 2020. Also uses K2S for downloading https://vipergirls.to/threads/2476823-The-Klub-17-3D-SexVilla-Updates-every-day-Rooms-Textures-Poses-Models/page54?s=931758f36c36eed2608276a219846b61 39 Pages of content here. Author seemed to have done a model drop in June 2020. All other content last update is January 2020. Also requires K2S http://www.sexfetishforum.com/hentai/the-klub-17-3d-sexvilla-updates-every-day-rooms-textures-poses-models/570/ 19 Pages of content here similar content to the above sites: http://www.xxxfetishforum.com/hentai/the-klub-17-3d-sexvilla-updates-every-day-rooms-textures-poses-models/255/
-
Where can I find the 4gb patch for VX?
-
 Help me please! The game sees the room, but does not see its texture. What to do? ps game tk v7.5
 -
This mega folder has all the game installer and all update patches. https://mega.nz/folder/TegDVCjb#iRO_zBJ7pHk_sSBaEoAPQg UPDATE: The folder now includes all Hook 5 Basic install files including starter content. The Graphics files tab will be removed as it seems it is not really necessary at this point and time.
-
I'm new and don't know how to use this site. I want to post content from http://modsgarden.cc/ since the site isn't working. 1.How do I change my profile pic and banner? 2. How do I make a club? 3. How do I send messages it says: You are only allowed to send 0 messages per day. Please try again later. Thanks In advance for the help
-
Hey guys. I am looking for a room to play TK17. It is called <russian ghetto room>. Can someone share? ps I can also share mods for the game for you ...
-
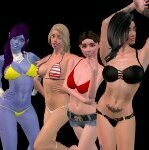
----Super Fighter Slaves X - -Episode 15 To The Victors...---- Length ----------------- Normal: 1:04:04 Extended Sex: 1:33:12 (Synopsis) The Battle is over and our Heroes became the Victors... Now with the world at peace, and the nightmare over... They finally have a chance to reap the rewards, of all their hard work... But what happened To Nova!? --------------------- ? Hentai : 65% ? Action : 5% ?️ Story : 30% --------------------- Google Drive Link: Episode 15------Extended Sex Version Episode Images
-
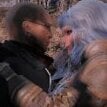
----Super Fighter Slaves X - -Extra Episode 2 The Sex Demon---- Length: 40:40 (Synopsis) The Sex Demon forces battles the Divine in their ongoing war. ⚠️Warning Has Violence and Gore ⚠️ --------------------- ? Hentai : 55% ? Action : 20% ?️ Story : 25% --------------------- Google Drive Link: Extra Episode 2 Episode Images
-
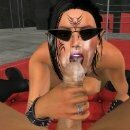
----Super Fighter Slaves X - -Extra Episode 1 Eve's Fate---- Length: 30:59 (Synopsis) After the events of the battle on earth, Eve was teleported by Vats to his sisters torture room. 16 days have past since then, what has Eve been going through in those days? ⚠️Warning Has Violence and Gore ⚠️ --------------------- ? Hentai : 85% ? Action : 5% ?️ Story : 10% --------------------- Google Drive Link: Extra Episode 1 Episode Images
-
----Super Fighter Slaves X - -Episode 14 Ultimate Power---- Length: 54:57 (Synopsis) Using the cube to give them a second chance, our heroes have to overcome the evil that they faced for so long. Will they be able to defeat them? Or will they fall again... This is the final battle!!! ⚠️Warning Has Violence and Gore ⚠️ --------------------- ? Hentai : 5% ? Action : 80% ?️ Story : 15% --------------------- Google Drive Link: Episode 14 Episode Images