Search the Community
Showing results for tags 'normalmap'.
Found 10 results
-
 Better 'Skill Based Muscle' Normalmaps View File This is a set of normalmaps ONLY, to replace those in the wonderful mod Skill Based Muscle! The assets are transformative content of other users' original work, used with permission. These normalmaps were modified, after which "in-between" steps were created with a GIMP plugin that lets you animate still images or smoothly morph between two images. Sorry for the bad gif quality! Changelog v2.0 Far more muscle at higher stages Mostly back, arms and legs Rectus abdominis made narrower, more realistic (the six-pack abs) Much better seams v1.0 had some bad seams on the butt, all fixed now Smoother, more realistic stage 1-5 transition Stage 1 still ultra-flat, now transitions smoothly to stage 5 as opposed to sudden "normal" boobs at stage 2 If you prefer the look of v1.0 at higher muscle stages, you can copy femalebody_6_msn.dds to femalebody_10_msn.dds carefree to v2.0 folder structure. Stages 1 and 5 look the same with improved transitions v3.0! Far better 5-10 transition. Watch your muscles grow smoothly! Better deltoid shading, matches sliders well and is more realistic Fixed small seam problems Edited v2 abs to not be quite so narrow. Somewhere between v1 and v2 now. Fits perfectly with abs sliders and looks good! Uncompressed filesize is a bit bigger now. My BC7 compressor plugin for GIMP broke MADE AN OOPSIE WITH THE 2 GIFS SAYING "Stages 1-5". ITS SUPPOSED TO SAY "Stages 5-10"!!! Too lazy to fix REQUIREMENTS Skill Based Muscle - and its requirements & whatever optional mods you want (check their mod page for tips and notes) SKSE SkyUI RaceMenu PapyrusUtil SE Optionally dw's CBBE 3BA with UBE Anus - check in-game if you need to move anus texture. Can be done with RaceMenu Optionally use my SBM .json BetterSBMv3.json so your character grows nicely along the changing normalmaps! It uses great new sliders from Mimir Ebonic Body (mostly to make the butt a bit nicer at higher muscle stages), but is totally optional. Works well without the extra sliders. Insert into SKSE\plugins\SkillBasedMuscle Recommended: Body Builder SE! An amazing mod with good synergy! Check out the first comment of my mod here for a bit more info and better 3BAv2 scripts for Body Builder. I’ve made even better scripts lately, to be uploaded here at a later date! COMPATIBILITY Anything, HOWEVER This texture set is created with BnP (1.7 or 2.0 young & old) and/or Diamond skin head, hand and foot normalmaps in mind As such, this is compatible with any other skin mods that have the exact same normals at the seams. eg. Bijin Skin WILL HAVE SUBTLE SEAMS Please report any problems To work with Racial Skin Variance, simply delete the _DISTR.ini that comes with SBM INCOMPATIBLE with Pregnancy Normalmap Swapper. Nothing will break, but they compete with each other to add a normalmap to the player. In general, I would stay away from this mod, it breaks NPCs and your presets if you remove it. MY REQUEST TO YOU Please recommend your favourite muscular normalmaps (with screenshots preferably), so that I could some day make an even better version of this mod! I personally wasn't the biggest fan of Muscle Solution, but if people want it I could see myself making something similar to this mod with MS. Screenshots! At request I may create neck seam patches for popular mods, but can you call yourself a real modder if you don't at least TRY DOING IT YOURSELF?! If you need help, ask ChatGPT and Google like I did, but in short: Step 1: Take what ever body normalmap that doesn't have a neck, hand and foot seam with your setup and import it into an editing program of your choosing. Step 2: Add your desired body normalmap on top as a new layer. Step 3: Select the new layer as active layer and select the eraser tool. Modify the "hardness" of the eraser to medium-low. Step 4: Erase at the neck, foot and hand sections to "reveal" the non-problematic normal from underneath, while smoothly blending it with yours, á la: GUIDE NEEDS REDOING ^ (Works, but uses bad practice) READ KEEP IN MIND: You have to jump through lots of hoops to get GIMP to play nice with BC7 compressed files, which a lot of SkyrimSE modders use, including me. Photoshop will work out of the box afaik and so might many others. Consider erasing a bit more around the neck than what I encircled if you still have a seam. Be mindful of what normalmap is shown to you in-game while troubleshooting seams. SBM will not "turn on" out of the box, but needs to be configured. Until then your default normalmap will be shown which is provided by your winning skin mod, not SBM. Read SBM description Also has 3BA Puffy Vagina Credits: PepperoniB01 for normals M4MK203 for normals and of course @jjabrams420 for creating a must have, Skill Based Muscle Submitter Neyri LL Submitted 12/07/2023 Category Adult Mods Requires Regular Edition Compatible No
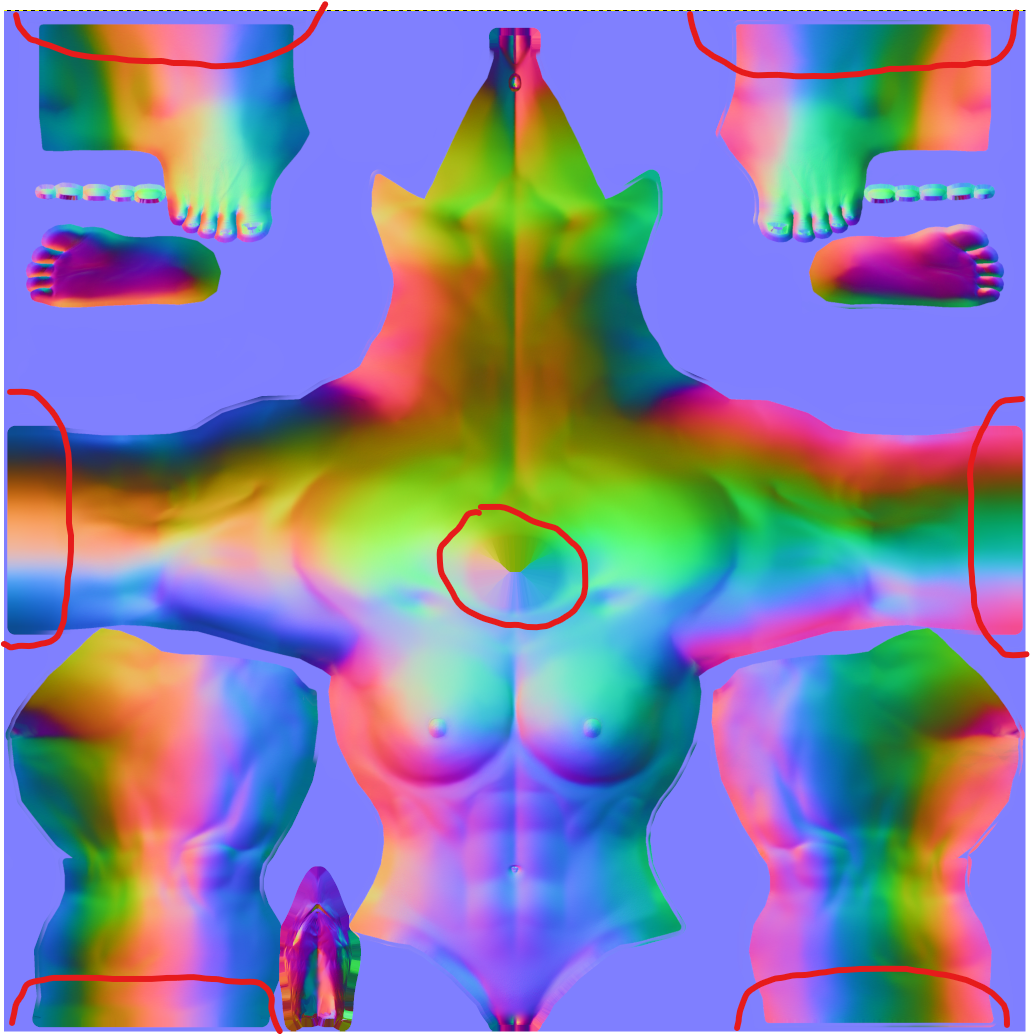
-
Version 3.0
1,932 downloads
This is a set of normalmaps ONLY, to replace those in the wonderful mod Skill Based Muscle (SBM)! SBM swaps to up to 10 different normalmaps and morphs bodies according to expertise in configurable skills! Morphing amplitude is configurable, and more morphs can be added with .ini tweaks. Works for both player and NPCs. Compatible with Racial Skin Variance (check compatibility section for required steps!). The assets are transformative content of other users' original work, used with permission. These normalmaps were modified, after which "in-between" steps were created with a GIMP plugin that lets you animate still images or smoothly morph between two images. Sorry for the bad gif quality! MADE AN OOPSIE WITH THE 2 GIFS SAYING "Stages 1-5". ITS SUPPOSED TO SAY "Stages 5-10"!!! Too lazy to fix REQUIREMENTS Skill Based Muscle - and its requirements & whatever optional mods you want (check their mod page for tips and notes) SKSE SkyUI RaceMenu PapyrusUtil SE SPID if you want NPC support Optionally use my SBM .json BetterSBMv3.json so your character grows nicely along my changing normalmaps, as demonstrated in a GIF above! It uses great new sliders from Mimir Ebonic Body (mostly to make the butt a bit nicer at higher muscle stages), but is totally optional. Works well without the extra sliders. Insert .json into SKSE\plugins\SkillBasedMuscle and select it in the MCM Recommended if you want separate boob growth: Body Builder SE! An amazing mod with good synergy if using my updated scripts! The ones I've created focus (nearly) solely on the breasts, as SBM cannot grow your body part by part according to specific skills. The attached scripts make it so all mage skills (+ speechcraft) enlarge breasts. In Body Builder MCM: I'd recommend turning OFF weight gain, especially for NPCs (there would be no actual weight gain, only visual growth, but the scripts make the growth really ugly, and I haven't bothered to redo them). I HIGHLY recommend playing around with the other MCM options to see what it does to your character. A mod that lets you set levels to anything you like is useful. Body Builder SE 3BAv2 - Boobs only scripts.7z download & install as any other mod COMPATIBILITY Technically speaking anything, but keep in mind: Created with BnP - Female Skin in mind. Other skin mods will have different head & hand normalmaps, and as such you will see seams. Ask and you shall receive patches for other skin mods (maybe, if I have the time) To work with Racial Skin Variance, select "RSV - Vanilla" in it's FOMOD, then delete the _DISTR that comes with Skill Based Muscle. This stops RSV from touching the player and SBM from touching NPCs! PNS (Pregnancy Normalmap Swapper) will compete with SBM to apply a normalmap to the player, so while nothing breaks, you will not see the effect of both mods at the same time, just the winning mod. In general, I would stay away from PNS, as it >will< break your saves if you remove it. Afaik there is a known fix for it somewhere on the interwebs! MY REQUEST TO YOU Please recommend your favourite muscular normalmaps (with screenshots preferably), so that I could some day make an even better version of this mod! Screenshots of your characters! READ Study the SBM description to know more about customisation, i.e. adding your own morph sliders or creating your own normalmaps. This mod also has 3BA Puffy Vagina integrated in every normalmap. Simple preference of mine, would be a huge hassle to remove atm. YOU WILL LIKELY HAVE NECK SEAMS ON INITIAL CHARACTER CREATION. CONFIGURE MCM TO START SBM. If you're creating your own/editing these normalmaps keep in mind These files are BC7 compressed (except for a few in 3.0 as my compressor plugin broke) - you will need an image editor that can handle such files. Photoshop and paint.net should be able to handle these out of the box. I use GIMP, which needs a plugin. You need to jump through a bunch of hoops to make it work in GIMP. When troubleshooting seams in game, SBM will not do anything until configured in the MCM. Until then, it will show you the standard normalmap that comes with your winning skin mod. This, again, means that you will have neck & wrist seams while you're initially creating your character. Credits: PepperoniB01 for normals M4MK203 for normals and of course @jjabrams420 for creating a must have, Skill Based Muscle -
Skill Based Muscle View File What this mod does Adds Muscle stat derived from skill levels. Changes normal maps of female/male bodies depending on Muscle for all vanilla races except Khajiit and Argonians (all that's missing is textures). Changes body morphs of female body depending on Muscle. Has modifiers to apply at a higher rates for higher Actor weight. Adds option to have Actor weight dependent on Actor level. Adds MCM to configure nearly every option. Hard Requirements SKSE SkyUI, for MCM RaceMenu, for NetImmerse Override (script functions that change body morphs / normal maps) PapyrusUtil SE, absolutelty necessary, all mod settings are enabled by json. Flaccid Requirements CBBE 3BA, the json/textures are set up for this, script may need small adjusts for different bodies. HIMBO, same as above. Vera Skin -CBBE 8K- , the included female textures use this as a base, I recommend my darker edit Tempered Skins for Males, the included male textures use the SOS version as a base. SPID, for NPC support Notes SPID The SPID file is set up to distribute to all eligible NPCs, so males and females. If you want only females to affected, use this line instead. Spell = 0x838~Skill Based Muscle.esp|NONE|-00000013,-00013279,-0002E894,-0010760A|NONE|F|NONE|100 Textures This mod supports up to 10 levels of body/hand normal maps for all playable vanilla races, male or female. So that's a total of 60 potential textures. Any missing textures will simply be ignored, no override will be applied. I've only included 10 body normal maps and 1 hand normal map for male/female human/elf races. To have argonians/khajiit be affected, or to have more hand normal map levels, simply place your favorite normal maps following the naming convention of the existing texture files. If you are using different textures than what this mod is based on, you may need to make your own. This requires an image editor like Photoshop or GIMP, and some basic knowledge of layers. To do this I've included a psd file to help. The textures are BC7 dds files, so you may need to download the "Intel® Texture Works Plugin for Photoshop*". Body Morphs To add more body morphs, go to one of the profile json file (SKSE\Plugins\SkillBasedMuscle\filename.json), add the slider name as it appears in the body's xml file (CalienteTools\BodySlide\SliderCategories\filename.xml) Any invalid body morphs will have no effect. Up to 63 body morphs for each sex can exist. Same for the weight modifiers. To have argonians/khajiit be affected you need a body with bodyslides for them. Mod updating Should be fine to just update, but uninstall and run a save cleaner if you're unsure. For upgrading to 5.0 running a save cleaner is a good idea. Known Bugs / To-do When WeightLevel is updated armor meshes don't update with new Actor weight. Problem is solved by reequipping armor. Ideas in order of likelihood (probably won't do any of these) Implement skill specific body morph options (e.g. Restoration increases only breasts, might require a matrix of textures for normal map support, ehhhh...). Convert to SKSE plugin (after Anniversary Edition, hard maybe). Replace SetSkin() with some NiOverride function to replace only normal map textures (someone link some documentation please). BLESS THIS MAN Implement male support (don't feel like looking for male textures). Done. Implement Khajiit / Argonian support (don't really care to, unless I can find a mod that replaces their heads and some good body textures, the framework in the esp is set up tho). Implemented, all that's needed is to drop the textures in their respective folder. Implement male body morphs (Not quite sure how to access the ones in RaceMenu). Thanks/Credits This fucking guy for being the only person to ever document NiOverride and for this post Suzutsuki3 for Skill Based Status, wouldn't be able to make this without referencing that. ousnius for WeightMorphs SE, again, good reference Lunyra for Fitness Body, normal map muscle overlays veracruze for Vera Skin -CBBE 8K-, normal map base sds1 for showing me the json implementation and advice on Beast Forms Submitter jjabrams420 Submitted 10/13/2021 Category Adult Mods Requires Regular Edition Compatible
-
https://imgur.com/a/d8ykgCT Her hair looks weird! Can anyone tell me how to fix this? Her hair is supposed to be black!!
-
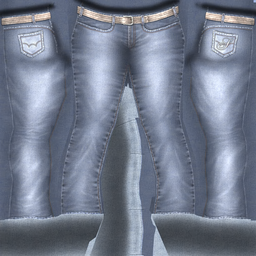
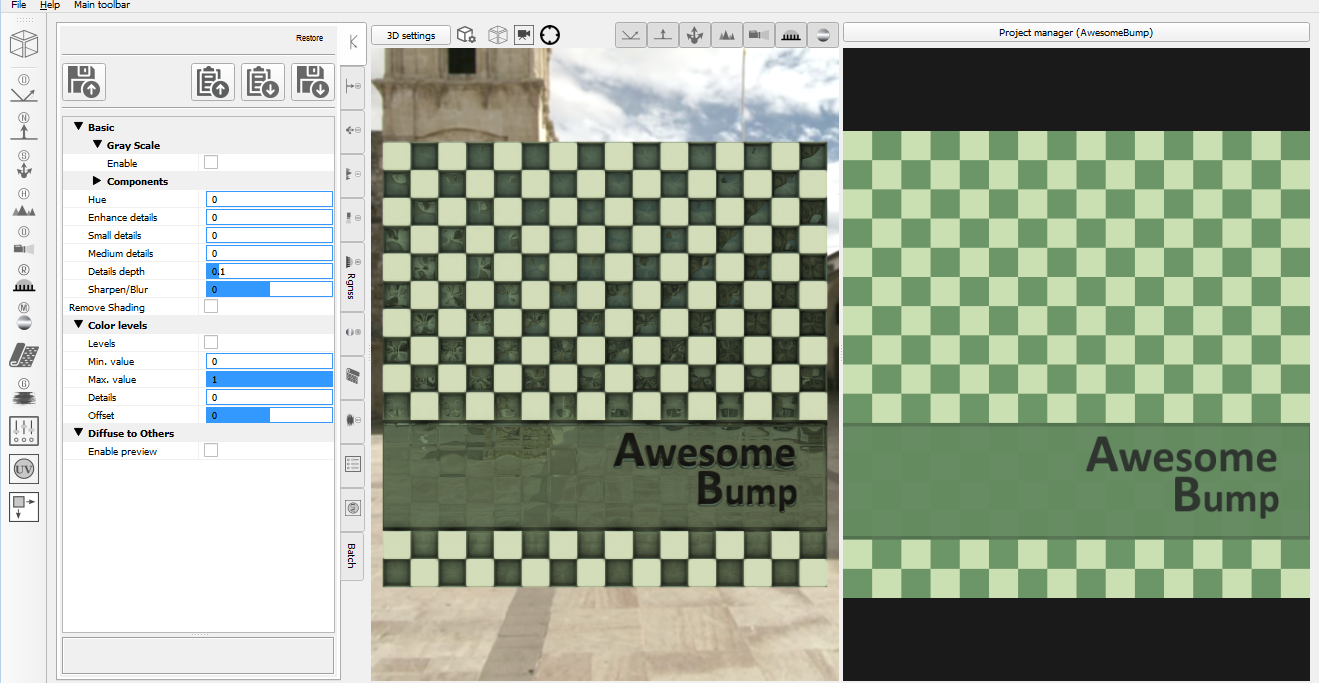
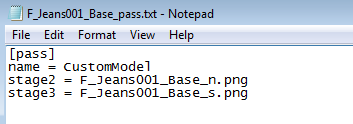
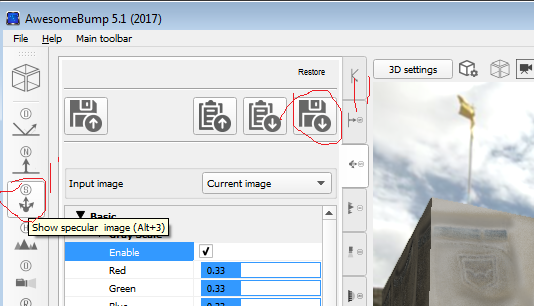
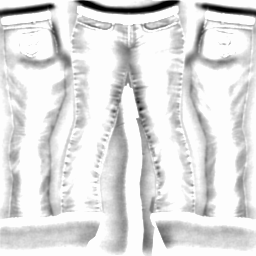
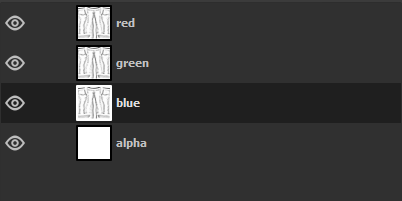
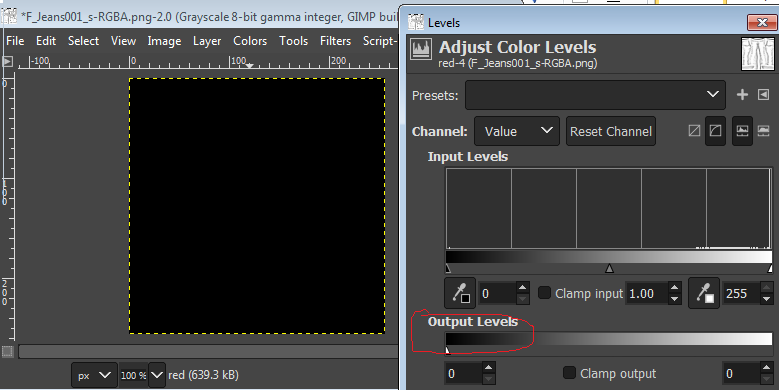
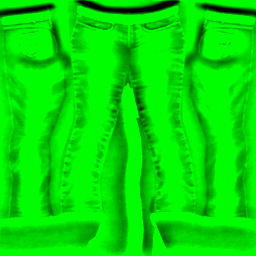
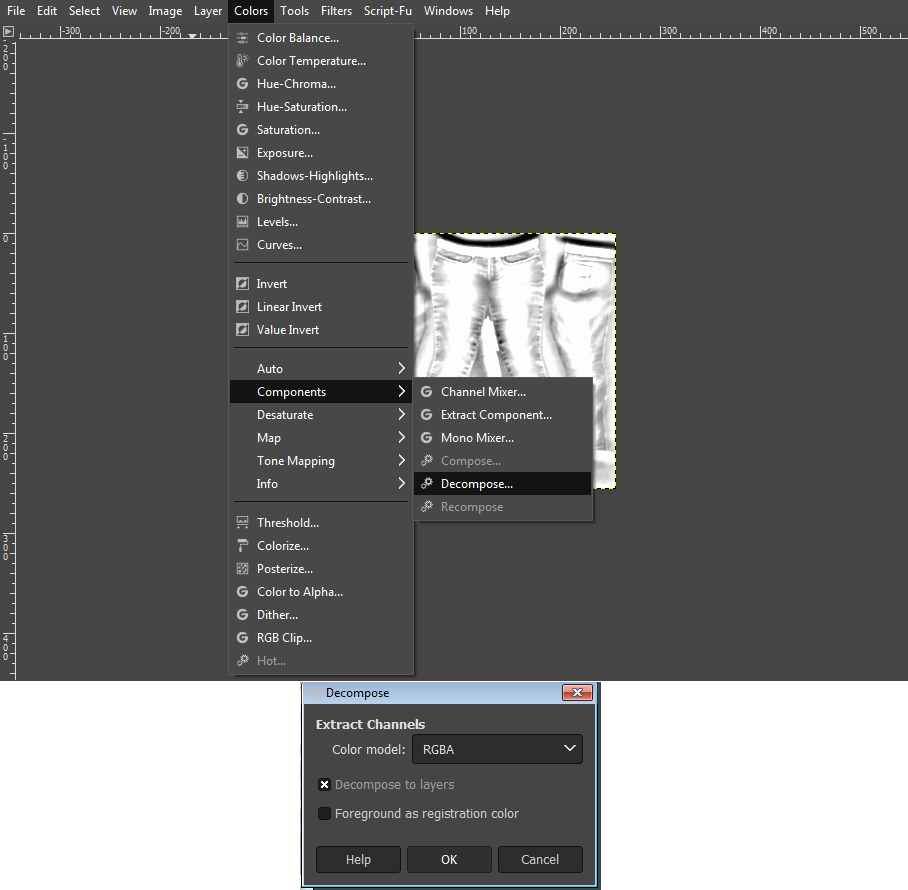
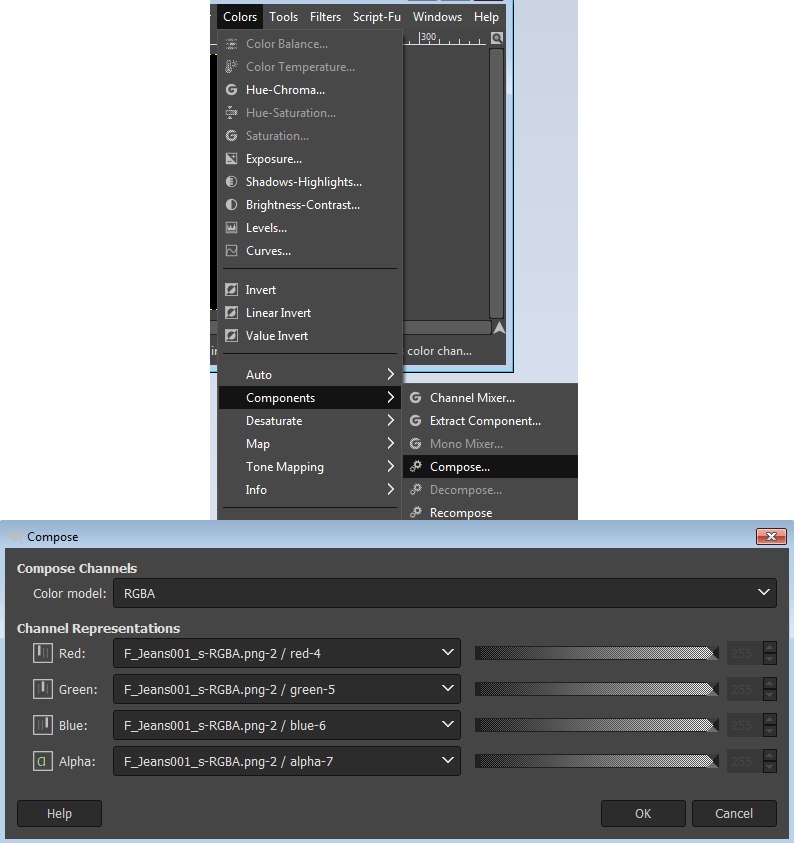
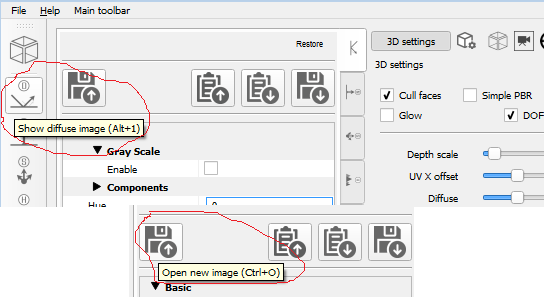
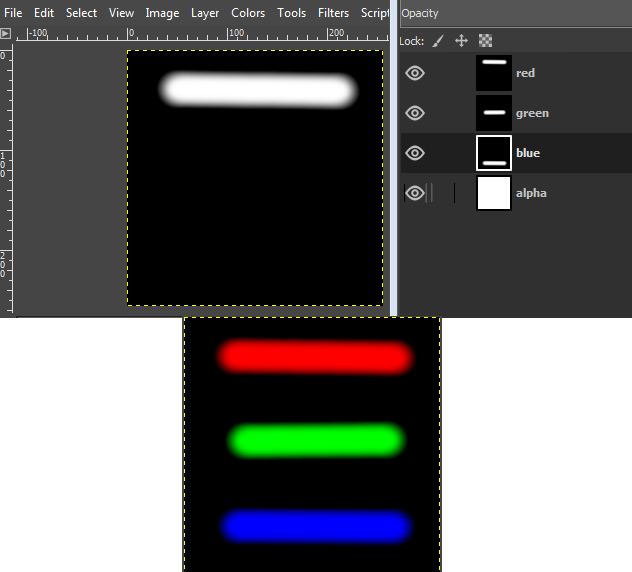
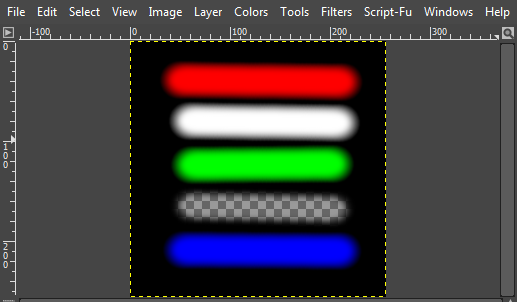
 Custom H5 Norm and Spec map (bump) creation with AwesomeBump and Gimp 4.10 By arse22 Mar 2021 Intro This will be a brief introductory guide to creating your own bumps (normals and spec maps) for Hook5 TK17, using free software you can find online. When it comes to 3d and image manipulation, these topics can be daunting and overwhelming, so I will steer clear of much technical aspects or details and dive straight to practical, as it pertains to Hook 5 and this game. Once you get the hang of it, you will agree that the artistic and technical knowledge required for baseline bumping is actually very low and maybe even limited. I would go as far as to say that a good portion of it is grunt work, so everyone can learn it and be contributing. Pre-Requisite -Any working version of TK17/SV with working Hook5(free or paid.) -Installed GIMP 4.10 or latest https://www.gimp.org -Installed AwesomeBump latest https://sourceforge.net/projects/awesomebump.mirror/ Basics of Bumping, Spec and Normal Maps So, long ago on Hook4 everyone used BumpMaps to create nice visuals for rooms, clothes, skin, anything with a texture, sometimes even without. Later, in Hook5, it has been replaced by Normals and Specular (norm and spec) maps, so this should clear up any confusion about those terms. They are not compatible, but achieve the same thing as far as improving your textures through Hook5, everyone still calls it bumps though. Typically the most common format you will see is [texture name]_n for normal and [texture name]_s for specs. They are placed in the same folder as the texture in ActiveMod, alongside a [texture name]_pass .txt file which points to the norm and spec. All of these you have to create for H5 to interpret in the game. Selecting a Texture to Work On The first step is to select a texture you would like to work on, let’s take a base game texture like Jeans (F_Jeans001_Base.png) . Typically cloth, hair, room texture, object texture is simple and straightforward, best for this guide. Skin is a little more advanced so maybe save that for after since there is more room for error and the process is not plug and play, there is much more room to improvise but this basic knowledge is still required. AwesomeBump Quick Guide to Normal Maps AwesomeBump is a popular free choice, it’s a little heavy on features and confusing to many, but good to have in your arsenal, especially if you plan to branch out into other 3d things. We will use it minimally as an excuse for you to install it. When you first load up this program, it looks like this: First thing to do is click on the top left icon with “D” for Diffuse and make sure you are on that, I believe it’s on it by default so nothing will happen usually. Then you click “Open New Image,” and find the texture we are working on. Looks kind of weird right now, so you must check “Enable preview”. Then, scroll to the bottom of this window and click on “Convert.” So, now what the software did is use the image we put in as the Diffuse and created various bumps for it which you can select on the left. N for normal, S for spec, H for height, O for occlusion, R for roughness etc. We’re not actually going to use much of that, for now just click on the N icon so we can make a normal. One thing to note about this program, although you can rotate and look at the result in the preview window in the middle, don’t click on the window in the right because it actually has an effect on the later result. I am yet to figure out how to reset it to neutral position, short of reloading. This is a good place to trial and error, but some of the things the sliders do can easily be done with a paint program later, there is no difference and we are trying to only make a basic bump or PBR as it’s called. So for now let’s just load it in game and see if it works. Leave the settings to default and select “Save Current Image.” Save it in the folder you have your texture, note that the _n suffix is already added in (the program knows what you want.) Testing In-Game If you looked around, you noticed the preview window in AwesomeBump doesn’t tell you much if you’re not already familiar with what you’re looking at and it’s not really made for Hook. So, if you have not already, create a “TestJeans” folder or something like that in ActiveMod and place both the texture and the normal in. If you load the game right now, it will look bad without a spec, so let’s use a generic spec for now just to test the normal. Just right click and download the below green image and place it with the other two files in your new folder in ActiveMod. Make sure it's named F_Jeans001_s.png Now you just need to make a pass file, create a new text file named “F_Jeans001_Base_pass.txt” in the folder with this info: So, when you load it in game it will be under “TestJeans” or whatever you named the folder. From this point it’s a bit of guess work, if you want to experiment with normal, you can change the sliders in AwesomeBump, overwrite the normal file and press Alt+R to reload in-game, to see the result. It’s a good idea to try it out if you never done this, but I will attempt to save you some trial and error and try to explain what the sliders do: Enhance Details - This is basically stronger normal effect (if you used the default settings from the program, you will note that the difference between that and a basic texture is fairly subtle, unless you mess around with lights, because this is set to 0.) Small and Medium Details – Well, below is a slider called Details Depth and these are just a means to fine tune it. Details Depth – This is self-explanatory, it’s how deep the crevices and such should appear (I think you can do this with contrast in any image program.) In more complex objects, an advanced technique involves making multiple depths and combining them together into one normal map to try to paint the object more accurately. Sharpen/Blur – It’s more or less sharp and blur from any image editing program, however the effect is really strong here, probably better to do subtle work in such a program, but it can save you time situationally. Normal Step – Honestly I don’t even know what this does. It seems to be more depth tweaking, but you should leave it at 1. Setting it to 0 makes the image disappear entirely and -1 inverts the normal, I prefer to invert in a separate program later if needed, since you rarely need to invert the whole thing, just specific parts that ended up wrong. Advanced Normals From here honestly, how good you want to make your normal is in your hands, you can leave it as is or you can tweak it a bit, or you can go in and make multiple normal, merge and crop them or merge with normal of other images to create weird effects or a textile effect for clothing etc. It will entirely depend on your skill with image manipulation and how much detail you put in. There is much more technical info on best practice and usage of normal maps elsewhere on the web, using this as your base method to build from is a great way to begin the journey of learning. The key concept to understand, also true for specs, that the image you put in for the bump will be what the game interprets, so using the base texture is only the foundational step, you are not required or limited to this. For example if I took some small HD image of human skin and made a normal of that, I can pass it as a normal for an actual skin, it will repeat the normal across the whole thing. That won’t look great, but it’s an idea. However, for something like a skin, you can’t just throw something in and expect good results because in the case of this game, the skin texture used by the game engine does not properly convey a lot of the complex curvature of a body, especially when it comes to details. The normal produced will have a lot of wrong depths (the outline for the body for example) and many missing ones too. So making a real good one would require a lot of extra work, if only to clean the normal a program like this would produce, which would be but a baseline starting point and maybe not the best one. This can absolutely be true for clothes, room textures etc as well, depending on the subject and what you are trying to accomplish. Editing Specular Map So we have a passable normal map made and everything works in game, time to look into making a custom spec map. This a lot more open-ended, easier but also more choice in approach. Normals are very similar across many 3d program, but the specs in Hook5 are unique to it, so it doesn’t hurt to look over the Hook5 guide before or after this. It sort of goes hand-in-hand with this guide on how to make a spec in Gimp. Specs are even more broad I would say, many content creators just use that default green image I provided (it actually comes with hook generic textures) and don’t bother looking into it. There are many ways to approach it and frankly I don’t even use AwesomeBump for specs at all. But, hopefully this method will offer a good place to start. Back in AwesomeBump, as example, let’s switch to the Spec Map tab and create a default settings spec map, the method is the same, just select the tab and click “Save Current Image.” Now, you want to take this new _s file that was created and load it in GIMP. In GIMP, select Colors->Components->Decompose. In the drop down select RGBA and hit ok. If you don’t have this option in GIMP, you should download a plug-in, I am not 100% sure it comes with GIMP by default. GIMP will create a new image with 4 layers corresponding to the RGBA colors. From here, any white on a specific layer will turn that color when we recombine them, so if that makes sense, the image is only there to guide you in your creative journey. In general you want the red (metallic) layer to be black and the glow (blue) to be black, while the alpha to be white. The green is the most commonly used layer since it makes things shiny and that’s a large percentage of hook usage. So, for now select the red layer, then Colors->Levels and set the Output to black. Do this for the Blue layer as well and leave the other two unchanged (the alpha should be white already.) Now select Colors->Components->Compose. In the Compose window make sure to select RGBA again and make sure each layer aligns with the corresponding channel. Hit ok and yet another image will be created. Now just File->Export this new image overriding the _s file in your folder and Alt+R in-game, I am assuming you already know this part from when we did it for normal map in this guide. If you followed the steps, the composed image will look like this, a working custom spec: Color Channel Details One thing to note when you test this result is that our custom item became very shiny, that’s because the Green channel is actually gloss in Hook5 and we did not change the spec made by AwesomeBump and because it’s mostly white, the effect is very strong. You can go back in and adjust the levels of that channel to your liking and compose again if you’d like. Another thing to do is to try out the other channels in the same way (actually all Black and all White is the simplest test, to see the extremes of each channel in-game.) The thing about metallic (RED) channel, it’s not that commonly used, often times a fine detail on metallic parts. Usually a high gloss (green) setting is plenty for actual metal parts and accomplishes the same effect and usually you will want a combination of the two anyway (since red isn’t shiny by default.) To make good specs, just like with normals, manual editing and fine tuning of specific parts is necessary. A note about the blue channel is that it will not do anything unless you have paid version of hook5, have enabled glow in settings and added the line “glow_intensity = 1 or another number, 2 is a good testing number” into the pass file, so again it isn’t used that much. On a more practical note, often glowing objects are futuristic things like data pads and the like, so again, like red, it will be in combination with the red and green channel and not nearly that strong as we are doing here. If all of this is confusing, a good exercise to try is this: decompose the original spec again and this time turn all 3 channels black and paint white with a brush in different spots on each layer before composing, as I did in the pic below (look at the layers previews:) It should compose to the lower image: You can even export and Alt+R and hopefully my notes on channels Red and Blue make more sense once you see how that looks in-game. Only the Green (gloss) channel is pronounced unless you have enabled glow for blue, red is much more subdued. An overwhelming majority of specs made for Hook5 will just be adjusted green channels, since most just want a nice gloss on their objects. So, one last thing experimental thing to try, is to add to the test composition is manually paint a strip of white and erase a strip (alpha,) directly on the composed image, just to see how they look in game. Well, what did we learn? It seems white is also glow (if you have Glow turned on and added the line into the pass file on paid hook, if you don’t it will just look super glossy/shiny.) While alphaed-out areas will create an absence of light (though this is only true for hook light, I’m assuming, the in-game light engine still tries to light the area but the in-game light engine is bad so why worry about it.) That should cover the basics on how to compose a specular map and how details and in-depth you want to be with it is up to you (just like with norms) and up to your image manipulation skills. You can paint directly with white or gray on the decomposed layers, or just copy paste from somewhere, since the layers are grayscale, it will work out. Advanced Spec, Hook5 and Beyond From here, I would look deeper into other Hook5 guides for more advanced ideas and experiment with different settings you can apply to textures (besides glow_intensity, there is many more.) Once you know this basic steps, you can see it is easy to begin learning more Hook5 tricks easily. For example, in the Hook5 guide it says messing around with the alpha color channel can produce more interesting effects, I didn’t really try so I didn’t cover it in the guide, so it could be a good place to start. More-so than normal, specs can really be anything and can have a major impact on the final image so it’s sort of like playing with fire in some cases, especially when it comes to glow and high gloss. I didn’t even begin to describe how a good normal map works in tandem with a good spec map, so you are really aiming for something good between those two and seeing how different types combine together is where a lot of the experience comes in. Worth noting, if you have already read the Hook5 guides and are familiar, the norm and spec we are making are specifically for CustomModel shader which is the most common. Room things often use CustomStatic, CustomSkin is for skins, but there is also EyePass and EyePass2 specific to eyes. Quick FAQ Q: What about subs? A: Subs, or SS or subsurface scatter is kind beyond this guide. Since it’s for CustomModel shader, I don’t even think there is a stage4 parameter. Basically, it’s used on skin to create an illusion of realistic skin, because real skin is semi-translucent, visually the eye catches a second layer (at least.) Essentially it achieves the same thing, but a lot of times, you don’t need a program for it, you just take the original texture or the diffuse and make it darker. If you want to become proficient with it and want to create realistic skin, you are better off looking into Customizable Skin in H5 which offers much more robust options for achieving this effect and more (I think it works for clothes too, but Ive never seen it.) Q: What about sizes? Things are different sizes? A: Size doesn’t matter really, you will see most norm and spec maps in .dds format because of mipmaps. In general though, Hook5 will accept larger and smaller norms and specs without problem. Q: What is a good way to work with .dds files, since many of norms and spec are? A: GIMP should be sufficient and handles the format well, loading existing and converting pngs, make sure to generate mipmaps when saving. Another good alternative is Paint.net but I had mixed results with it, it just loads faster for 1 minute edits. Q: Is the specular map created by AwesomeBump just a greyscale image of the texture? A: I’m pretty sure that’s all it does, but I didn’t bother to test, there is some sliders to make adjustments too and those are definitely applying various adjustments to it. I don’t actually know the details but it seems ok to use it since it’s where your normal will come from. I highly doubt it’s the optimal method, I’m 100% sure Hook5 is not reading the map the same way the program that it’s intended for is, but it should work since it’s just different colors. Conclusion So, I showed how fast and easy it is to make your own norm and spec for any texture, it’s time to get to work! >:) Well, to be honest it can be a lot of work if you want to achieve certain things and want it to actually look good, it takes trial and error and I’ve most certainly avoided almost all the technical details behind how such maps are used in broader 3d software. There is plenty of info out there and the methods I showed are not the best or most optimal, they are just a simple way to get started and make your own H5 bumps today.
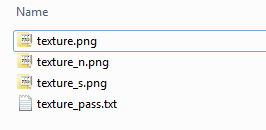


-
 Hello guys. Today I was trying to make MouseBell Body Preset. I've got all the recommended mods just one thing which makes things complicated for me. Normalmap Based on SG skin with Innie Pussy, Under Belly, More Puffy Nipple, CBBE 3BA (3BBB) Custom Normalmap PSD File The problem here is I don't really know what to do with this file after I download it I'm not looking for the perfect thing here. but the pussy without the innie pussy normalmap feels really wrong. I just want to make the innie pussy normalmap can someone tell me how to do this? or maybe there is download link for it? I would love any help I've never done something like this before. I tried looking it up in google but I didn't see anything that could help me. I will try and ask him on his nexus page maybe he can help will see how things go. sorry for the good english <3<3
 -
Version x
1,041 downloads
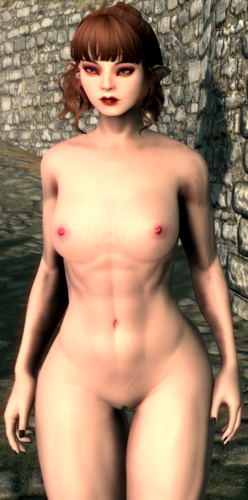
DorkDiva's Female body unp~uunp normalmap This is the normal map I made and use in all of my screenshots for the presets I have made. It is often asked and requested so here it is for everyone to use. Thanks to: Cell, Dimon, Bringthenose, Caliente, LL community, Henry, and you. Requires: fairskincomplexion UNP, you can use other unp textures, but you will have to texblend them. -
Version 5.4
9,096 downloads
What this mod does Adds Muscle stat derived from skill levels. Changes normal maps of female/male bodies depending on Muscle for all vanilla races except Khajiit and Argonians (all that's missing is textures). Changes body morphs of female body depending on Muscle. Has modifiers to apply at a higher rates for higher Actor weight. Adds option to have Actor weight dependent on Actor level. Adds MCM to configure nearly every option. Hard Requirements SKSE SkyUI, for MCM RaceMenu, for NetImmerse Override (script functions that change body morphs / normal maps) PapyrusUtil SE, absolutelty necessary, all mod settings are enabled by json. Flaccid Requirements CBBE 3BA, the json/textures are set up for this, script may need small adjusts for different bodies. HIMBO, same as above. Vera Skin -CBBE 8K- , the included female textures use this as a base, I recommend my darker edit Tempered Skins for Males, the included male textures use the SOS version as a base. SPID, for NPC support Notes SPID The SPID file is set up to distribute to all eligible NPCs, so males and females. If you want only females to affected, use this line instead. Spell = 0x838~Skill Based Muscle.esp|NONE|-00000013,-00013279,-0002E894,-0010760A|NONE|F|NONE|100 Textures This mod supports up to 10 levels of body/hand normal maps for all playable vanilla races, male or female. So that's a total of 60 potential textures. Any missing textures will simply be ignored, no override will be applied. I've only included 10 body normal maps and 1 hand normal map for male/female human/elf races. To have argonians/khajiit be affected, or to have more hand normal map levels, simply place your favorite normal maps following the naming convention of the existing texture files. If you are using different textures than what this mod is based on, you may need to make your own. This requires an image editor like Photoshop or GIMP, and some basic knowledge of layers. To do this I've included a psd file to help. The textures are BC7 dds files, so you may need to download the "Intel® Texture Works Plugin for Photoshop*". Body Morphs To add more body morphs, go to one of the profile json file (SKSE\Plugins\SkillBasedMuscle\filename.json), add the slider name as it appears in the body's xml file (CalienteTools\BodySlide\SliderCategories\filename.xml) Any invalid body morphs will have no effect. Up to 63 body morphs for each sex can exist. Same for the weight modifiers. To have argonians/khajiit be affected you need a body with bodyslides for them. Mod updating Should be fine to just update, but uninstall and run a save cleaner if you're unsure. For upgrading to 5.0 running a save cleaner is a good idea. Known Bugs / To-do When WeightLevel is updated armor meshes don't update with new Actor weight. Problem is solved by reequipping armor. Ideas in order of likelihood (probably won't do any of these) Implement skill specific body morph options (e.g. Restoration increases only breasts, might require a matrix of textures for normal map support, ehhhh...). Convert to SKSE plugin (after Anniversary Edition, hard maybe). Replace SetSkin() with some NiOverride function to replace only normal map textures (someone link some documentation please). BLESS THIS MAN Implement male support (don't feel like looking for male textures). Done. Implement Khajiit / Argonian support (don't really care to, unless I can find a mod that replaces their heads and some good body textures, the framework in the esp is set up tho). Implemented, all that's needed is to drop the textures in their respective folder. Implement male body morphs (Not quite sure how to access the ones in RaceMenu). Thanks/Credits This fucking guy for being the only person to ever document NiOverride and for this post Suzutsuki3 for Skill Based Status, wouldn't be able to make this without referencing that. ousnius for WeightMorphs SE, again, good reference Lunyra for Fitness Body, normal map muscle overlays veracruze for Vera Skin -CBBE 8K-, normal map base sds1 for showing me the json implementation and advice on Beast Forms -
 View File DorkDiva's Female body unp~uunp normalmap This is the normal map I made and use in all of my screenshots for the presets I have made. It is often asked and requested so here it is for everyone to use. Thanks to: Cell, Dimon, Bringthenose, Caliente, LL community, Henry, and you. Requires: fairskincomplexion UNP, you can use other unp textures, but you will have to texblend them. Submitter DorkDiva Submitted 10/01/2015 Category Models & Textures Requires Fair skin complexion is best used with this and unp~uunp meshes that use unp~uunp compatible textures. Special Edition Compatible
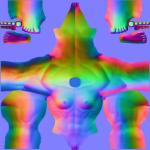

-
 View File Description: Simple but useful light setup to render body normalmaps for skyrim. Can used for all body parts with a "world coordinate" normal map file. (non flat normalmap) Hands Head Body SoS Schlongs ... Usage: Just open the file and import your model, put a plain white material on it and use "render to texture" to export the "lightmap". (sample body is in the file) Submitter EvilReFlex Submitted 08/19/2015 Category Modders Resources Requires 3DSMax 2012 or newer Special Edition Compatible


