Search the Community
Showing results for tags 'how to'.
Found 10 results
-
I wanna make some blender stuff using Haydee outfits but I don't know how to import them to blender or Unity, looking it up I don't know if it is even possible to do. So just to clarify is there any way to import haydee outfits into blander? I really wanna use one called Mega Haydee which I believe can be found on the Steam work shop(?) either way thanks in advanced :3
-
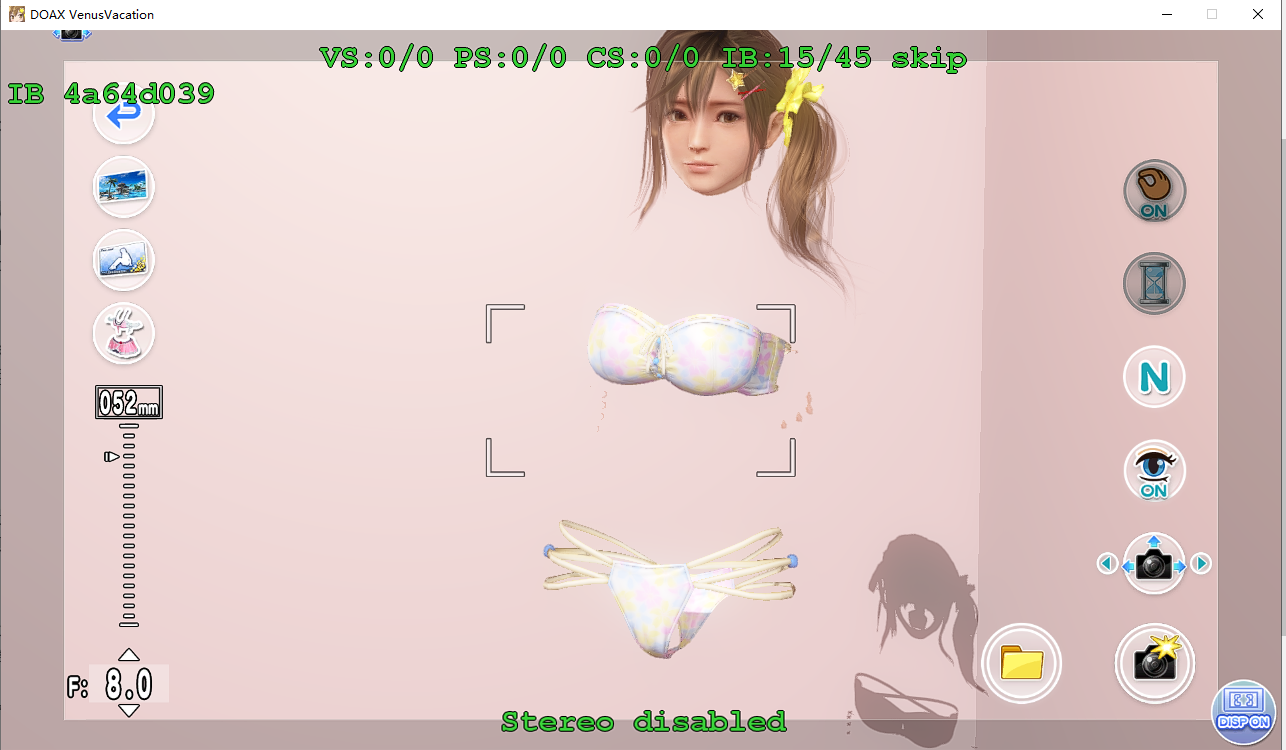
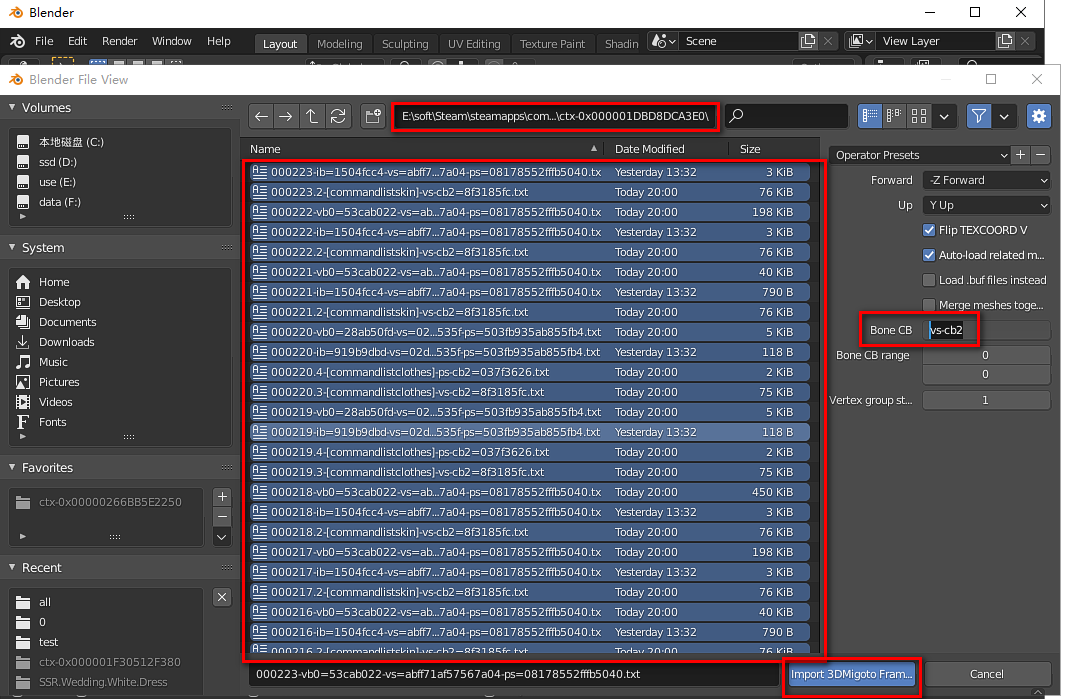
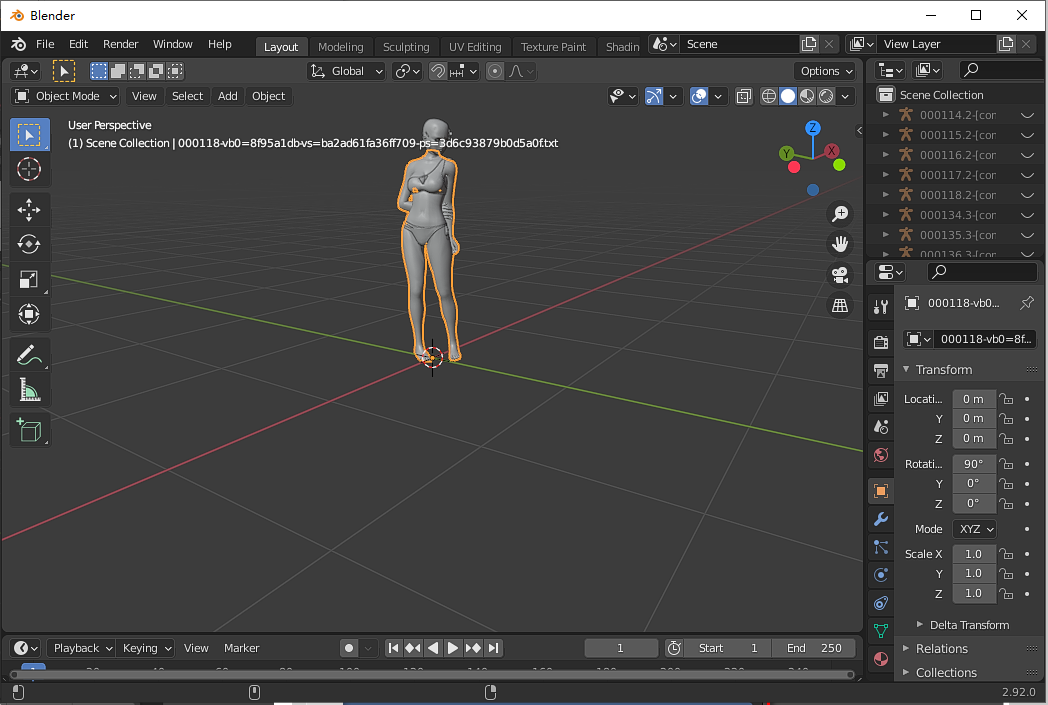
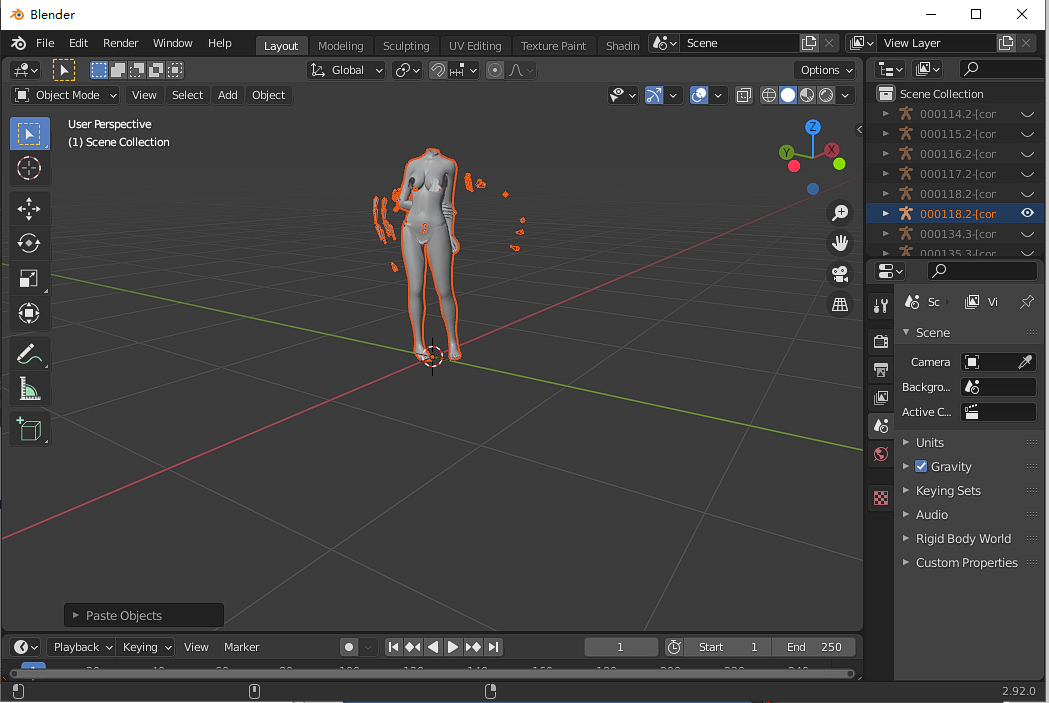
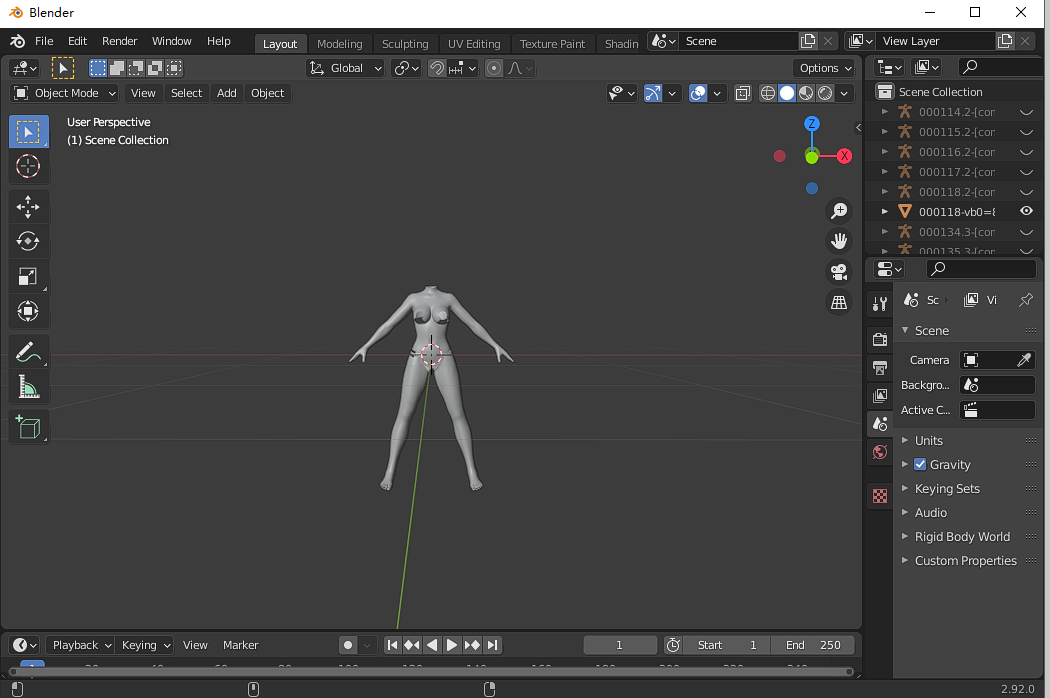
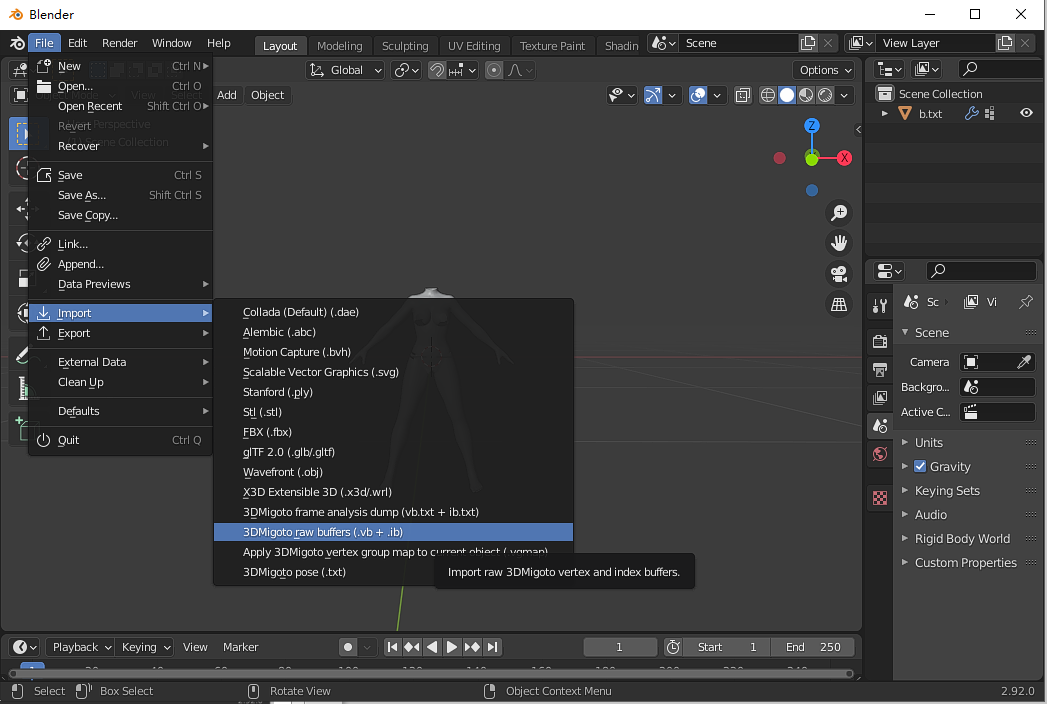
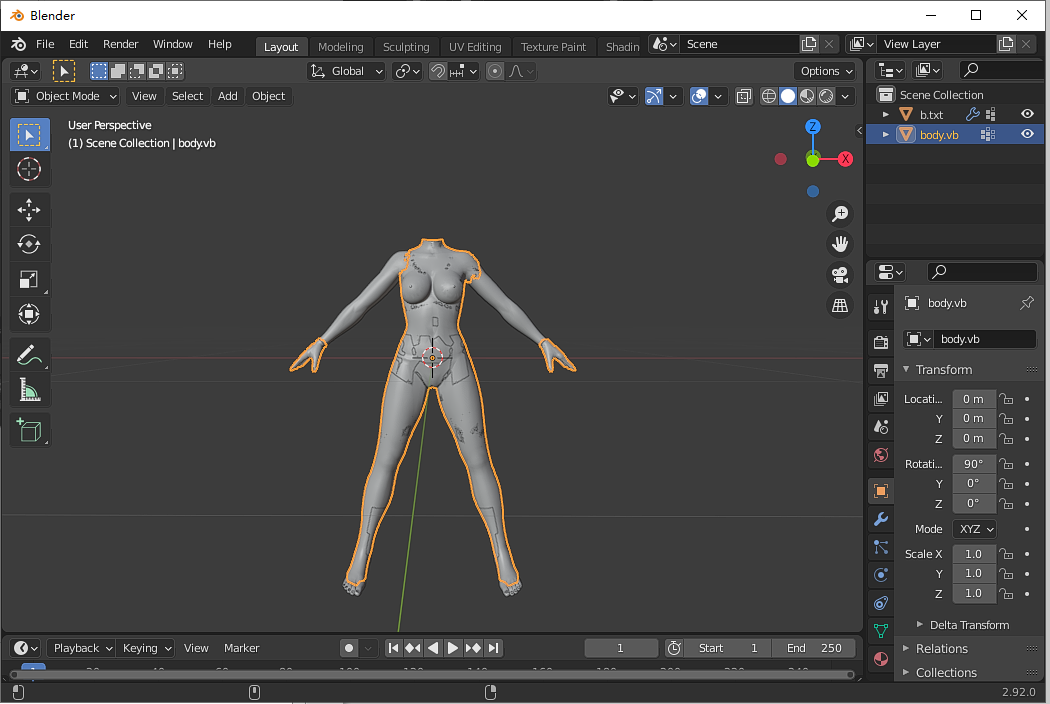
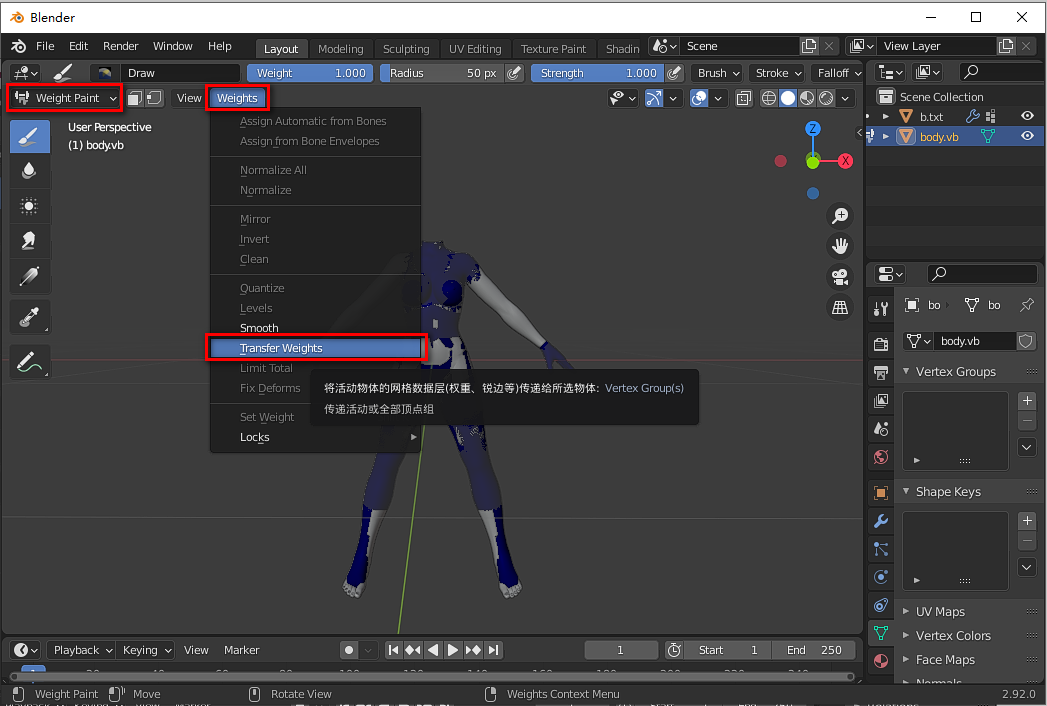
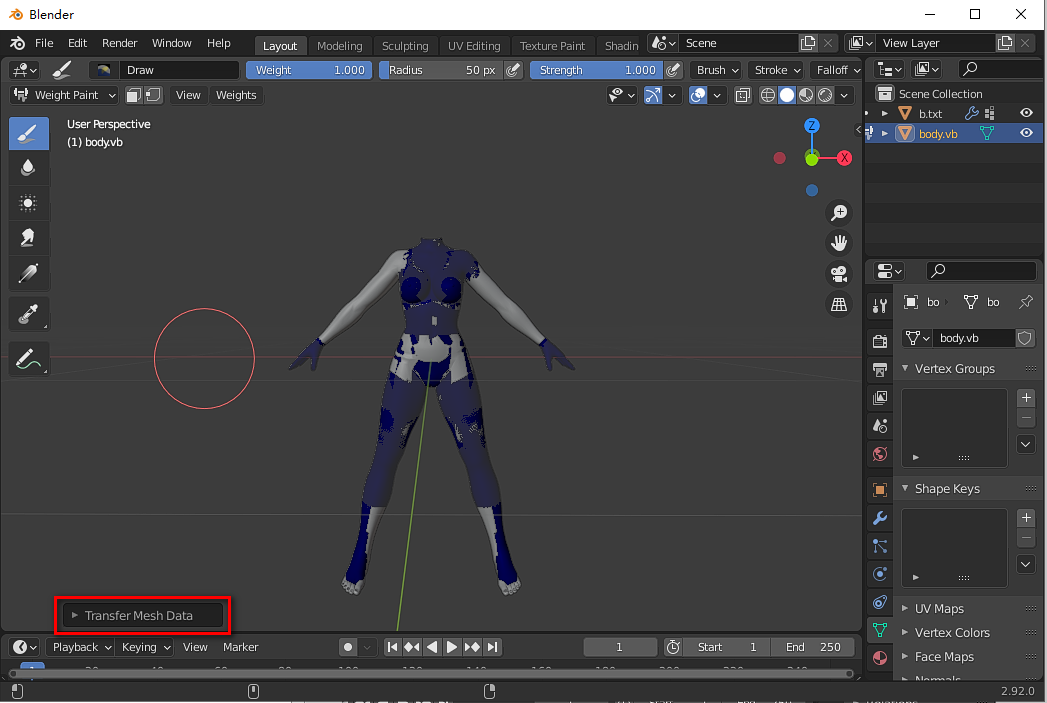
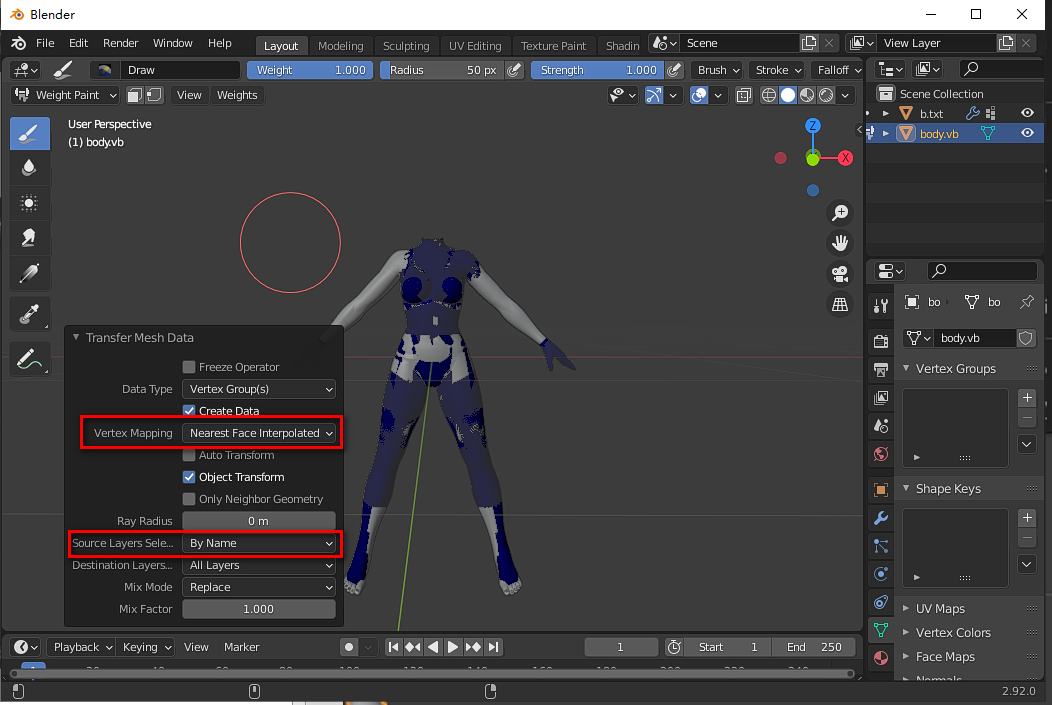
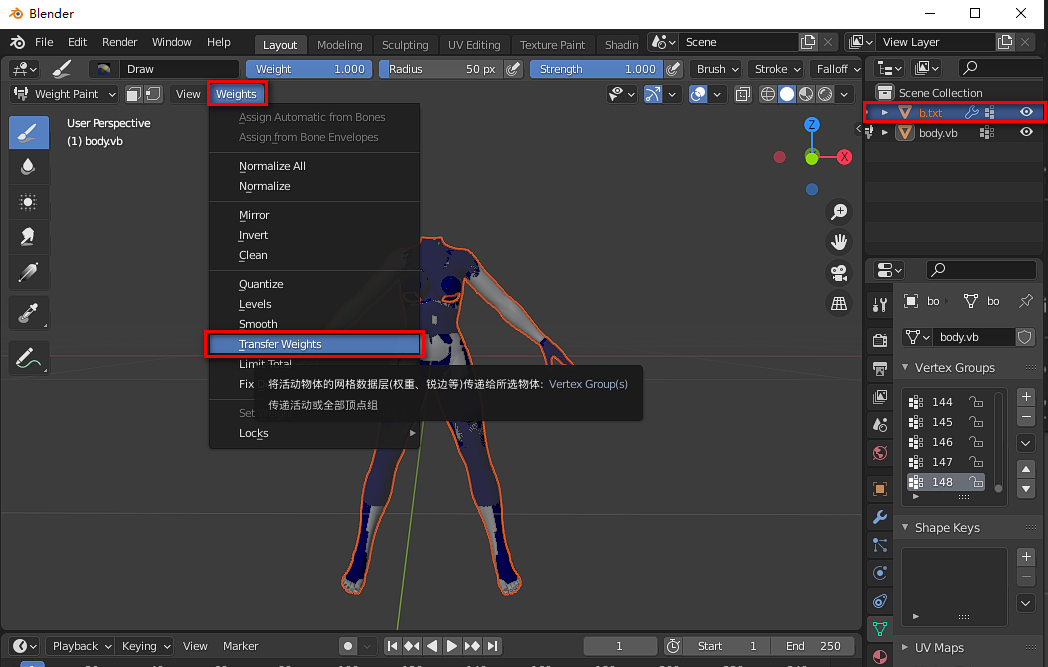
 A guide to solving common MOD problems suitable for pure newcomers (a guide to making MOD) 适合纯新人的常见MOD问题解决指南(MOD制作入门指南) First of all, introduce a detailed introduction video of MOD production made by a big guy. You can read the article while watching the video. 首先,介绍一个大佬制作的MOD制作的详细介绍视频,大家可以边看视频边看文章。 https://www.youtube.com/watch?v=zWE0xP4MgR8&feature=youtu.be A. Reason I play the Steam version, and many of the MODs in the forum are based on the DMM version. Because of the difference between the two versions, various problems may arise when using the MOD. As a pure novice, many detours have been taken in the process of solving these problems. The purpose of writing this guide is to save the time of those in need. A、缘由 我玩的是Steam版,很多论坛里的MOD是根据DMM版制作的。因为这两者版本的差异,MOD使用起来会出各种问题。作为一个纯新手,解决这些问题的过程中走了不少弯路。写这篇指南就是希望节约有需要的人的时间。 B. Problems that can be solved 1. The MOD is invalid or partially effective 2. Damaged body 3. The body appears strangely shaped B、能解决的问题 1、MOD无效或部分生效 2、身体破损 3、身体出现诡异形状 C. Specific method C、具体方法 First, I will introduce my conjecture about the principle of MOD implementation: MOD shields or replaces the original clothing and body. 首先介绍下我对MOD实现的原理猜想:MOD对原始服装和身体进行屏蔽或替换。 a. Solutions to invalid or partially effective MOD a、MOD无效或部分生效的解决方法 According to my guess of the principle, this situation is caused by the difference of the version which causes the MOD to be unable to find the corresponding original part. The following is a common paragraph in the MOD ini file: [TextureOverrideCommonAlLRangeTop01] hash = ade9ee4b handling = skip The function of the above program is to not display the part whose hash is ade9ee4b. The reason why the MOD is invalid or partially effective is that the hash in the Steam version of the same costume is different from that in the DMM version. The solution is to modify the hash. 根据我的原理猜想,这种情况是因为版本的差异导致MOD无法找到其对应的原始部分。下面是MOD的ini文件中常见的一段: [TextureOverrideCommonAlLRangeTop01] hash = ade9ee4b handling = skip 上面的程序作用就是不显示hash为ade9ee4b的部分。 MOD无效或部分生效的原因就是同一服装Steam版中的hash和DMM版中不同,解决方法就是修改hash。 Now, how to find the correct hash: 1. Modify the d3dx.ini file in the game folder and change the value of "hunting=" to "2", that is, "hunting=2". 2. Enter the game, select the camera mode, and change the scene to "Studio" 3. Press the number "0", and then press 7 or 8, and the following similar graphics will appear. The hexadecimal number after IB in the red box in the figure below is the hash. 现在就介绍如何找到正确的hash: 1、修改游戏文件夹中的d3dx.ini文件,将“hunting=”的值改为“2”,即“hunting=2”。 2、进入游戏、选择拍照模式、将场景改为”摄影棚“ 3、按下数字“0”,然后按7或8,会出现下面类似的图形,下图中红框中IB后的16进制数字就是hash。 Then continue to press 7 or 8, you will find that a part of the screen disappears every time you press it, and the hash of the disappeared part is the number in the red box above. For example, see the picture below 然后继续按动7或8,你会发现每按一次画面中有一部分消失,而消失部分的hash就是上图红框中的数字。举例,见下图 Comparing the first one, you will find that the jacket is missing, and the 2b65da04 on the upper left is the hash of the jacket. 对比第一张,你会发现外套不见了,而此时左上的2b65da04正是外套的hash。 b. Solutions for body damage b、身体破损的解决方法 Sometimes it is found that the body is damaged as shown in the figure below, that is, the hash of the body is wrong 有时会发现身体破损的情况如下图,就是body的hash错了 Using the above method, when the body is found to be missing (see the figure below), the hash of the body part is found, and then the mod ini file can be modified. 运用上面的方法,当发现身体不见时(见下图),就找到了body部分的hash,然后修改mod的ini文件即可。 c. The solution to the strange shape of the body c、身体出现诡异形状的解决方法 解决方法操作有点复杂 The solution operation is a bit complicated 产生原因:Steam版和DMM版中body的weight属性不同。 Cause: The weight attribute of the body in the Steam version and the DMM version is different. 工具:blender(我使用的是2.92版) Tool: blender (I use version 2.92) 1、安装blender,再安装3dmigoto.py插件(我已上传至附件) 点击edit-preferences 1. Install blender, and then install the 3dmigoto.py plug-in (I have uploaded it to the attachment) Click edit-preferences 点击Add-on,再点击install,选择下载的3dmigoto.py,点击 install Add-on Click Add-on, then click install, select the downloaded 3dmigoto.py, click install Add-on 2、根据之前的方法进入hunting模式,然后按F8 程序会将全部素材导出之下图中的文件夹 2. Enter hunting mode according to the previous method, and then press F8 The program will export all the materials to the folder in the figure below 3、打开blender,删除起始的cube、camera、light 3. Open blender and delete the initial cube, camera, light 4、导入file-import-vb.txt+ib.txt 4. file-import-vb.txt+ib.txt 5、选择素材文件夹中的ctx-开头的文件夹,全选所有文件,在“Bone CB”栏中填入“vs-cb2”,然后选择导入 5. Select the folder starting with ctx- in the material folder, select all files, fill in "vs-cb2" in the "Bone CB" column, and then select import 6、这时会出现一面墙,这是正常的,将所有墙面和地面删掉就剩下穿着衣服的人物了 6. At this time, a wall will appear. This is normal. Delete all the walls and the ground to leave the characters in clothes. 点击身体部分(注意:不要点服装) Click on the body part (note: don't Click on clothing) 7、复制,快捷键Ctrl+c;然后按住左键框选整个人物删除;最后粘贴Ctrl+v 7. Copy, shortcut key Ctrl+c; then hold down the left button and select the entire character to delete; finally paste Ctrl+v 8、点选漂浮在身体周围的小点,删除;身体会变成如下状态,红框里的就是对应的名字,建议改名(我改为b.txt),方便下一步操作 8. Click the small dot floating around the body to delete; the body will become the following state, the corresponding name in the red box, it is recommended to change the name (I changed it to b.txt) to facilitate the next operation 9、从问题MOD的文件夹中导入body的vb+ib。(你也可以从其他mod导入同类型的身体) 9. Import the vb+ib of the body from the folder of the problem MOD. (You can also import the same type of body from other mods) 身体类型分3种,具体如下 There are 3 types of body types, as follows 1. "Common_Body" "Kasumi", "Kokoro", "Tamaki" etc. Many are of this type. 2. "Honoka_Body" "Honoka", "Sayuri", "Tukushi", Four people of "Luna". 3. "Marie_Body" "Marie", "Kanna", "Nagisa", Four people of "Marie". 导入后 After import 10、最重要的操作开始:从原始的破损身体将weight参数传到新载入的完整身体(这一步我也不熟练,可能大家要多尝试) 10. The most important operation starts: transfer the weight parameter from the original damaged body to the newly loaded complete body (I am not proficient in this step, maybe you have to try more) 选择刚导入的完整身体(我这里是body.vb),删除原始weight数据 Select the complete body just imported (I am body.vb here) and delete the original weight data 将红框中改为“Weight Paint”模式,选择 “Weight - Transfer Weights” Change the red box to "Weight Paint" mode and select "Weight-Transfer Weights" 点击“transfer mesh data” Click "transfer mesh data" 将“vertex mapping”选项改为“nearest face interpolated”; 将“source layers sele...”选项改为“by name” Change the "vertex mapping" option to "nearest face interpolated"; Change the "source layers sele..." option to "by name" 点击右上角里的原始身体名,再点击左上角的“Weight - Transfer Weights” Click the original body name in the upper right corner, and then click "Weight-Transfer Weights" in the upper left corner 操作完毕。验证方法:点击右上角的完整身体名(body.vb),如果右边中间的“vertex groups”中又有数据出现,就表示成功。 The operation is complete. Verification method: Click on the complete body name (body.vb) in the upper right corner. If there is data in the "vertex groups" in the middle on the right, it means success. 11、保存完整身体(body.vb)回mod文件夹 11. Save the complete body (body.vb) back to the mod folder 12、回到游戏,按下F10,试试身体是否正常 12. Go back to the game, press F10, and try to see if your body is normal D, other 1. Thanks to tyaonyann and racing9041 for their enthusiastic and patient answers to the low-level questions of my pure newcomer. 2. Please reply to the mistakes and omissions The above English comes from Google Translate D、其他 1、感谢tyaonyann和racing9041对我这个纯新人的低级问题热心而耐心的回答。 2、错误与疏漏之处,请回帖 以上英语来自于谷歌翻译 3dmigoto.py
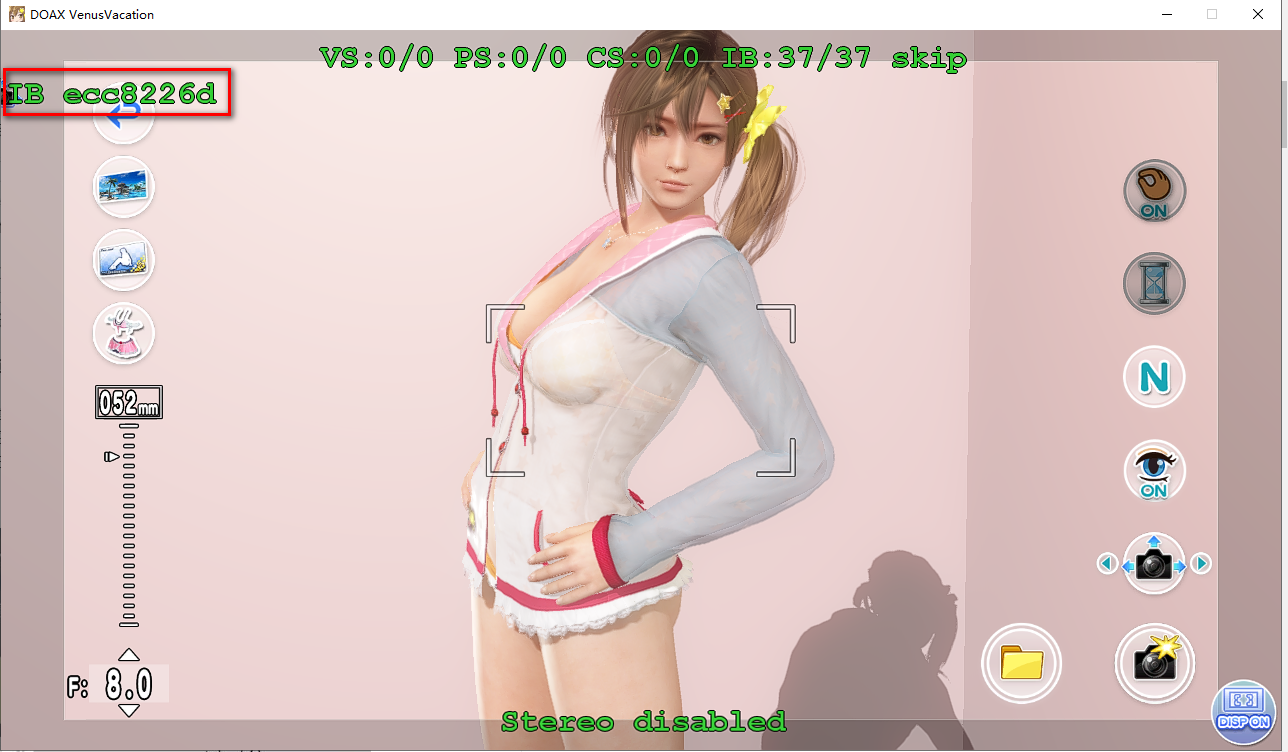


-
 Hello Everyone, New to LoversLab. I am looking for recommendations on how to maintain a "regular" and "LoversLab" installation of Skyrim. That is, I want to be able to play Skyrim normally, without worrying about nude animations and sounds appearing unexpectedly. Yet also to be able to go down the full "LoversLab" route of multiple mods. Sometimes I forget, go to "Sleep" and <Bam>, a Skyrim Follower initiates a scene I wasn't expecting. No issues so far, but I'd rather they not play to the wrong audience. I have currently: * One Skyrim Special Edition (Anniversary edition) Steam account with hundreds of hours against one character. * Several dozen mods, mostly standard ones that I would keep using. Also Flower Girls and Amorous Adventures. Just one LoversLab mod at present, which was a pre-req to a costume mod. * Two computers available. * Use Vortex as my Mod Manager, and I am happy with it. I have dabbled in some of the other utility tools, but not in a big way - just enough to make sure things all run. Ideally, I would like to make one computer the "regular" one, and one just for SexLab use. If possible - and I don't know if it is practical - to keep using the SAME MAIN character. On the regular computer, I have my default mods, and play regular Skyrim content. However, on the other computer, I would like to take the same character and play the SexLab content. Is this just asking for trouble? I can imagine breaking the Steam link, and copying my Skyrim install over to the second computer. Then I can imagine installing a different mod. set to each computer. But I don't know the best way of getting the main character Save file across, or even if that is wise. I'd rather not start a session, and receive a scrolling list of "<Mod ABC not found>". Does creating a new character on the second computer with LoversLab get around any issues? Or is the only real way to achieve good separation to purchase Skyrim again, create a new Vortex account, and start fresh? Obviously that costs more, and I can't maintain "the one character" across the two computers, but it seems cleanest. Open to any suggestions. I'm hoping that this has come up before. TLDR: How to have a clean Skyrim and a sexy Skyrim on two separate computers? Preferably with the one Skyrim character, or one Steam account. Or closest approximation. Apologies if this is in a FAQ somewhere, or in the wrong group. Thank you!
 -
Hello everyone! I am looking to start an orgy and need some help. I have almost everyone's animations installed so I know im not missing any of them. I am on a different location with a club and want to start an orgy upstairs. i have clicked on the floor, benches, bar top, table top, added a bed and i can not get the option to invite a sim. I also cant get the NPC sex option to work. i click on a bench then see NPC sex. i click on it and it allows me to choose teasing etc etc. i choose and then it allows me to select the sims. i choose the people i want and then ok and it doesn't do anything, they just stand there. Is there something im doing wrong?
-
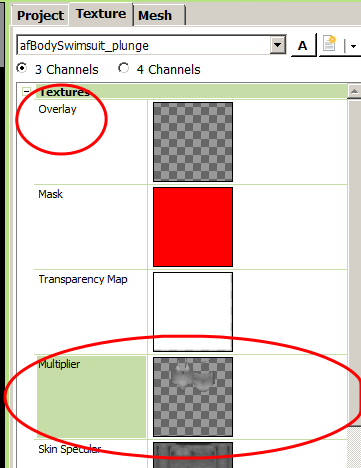
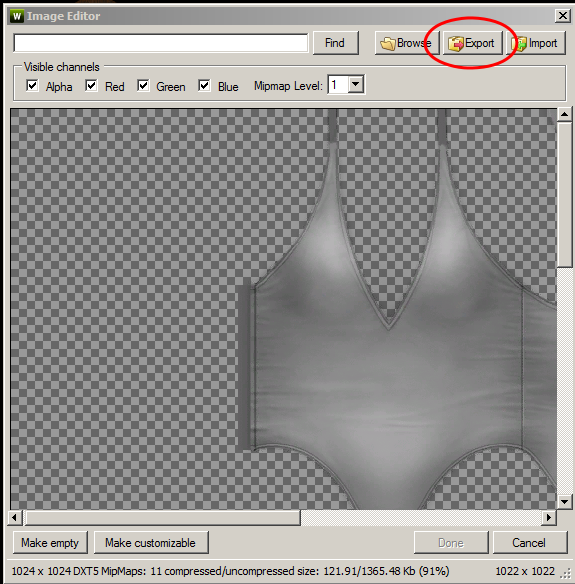
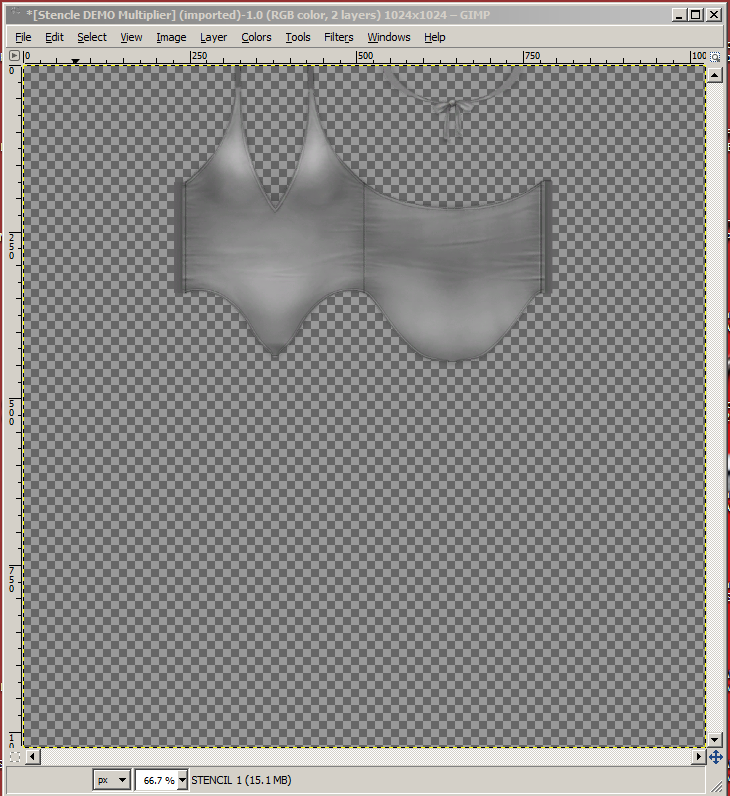
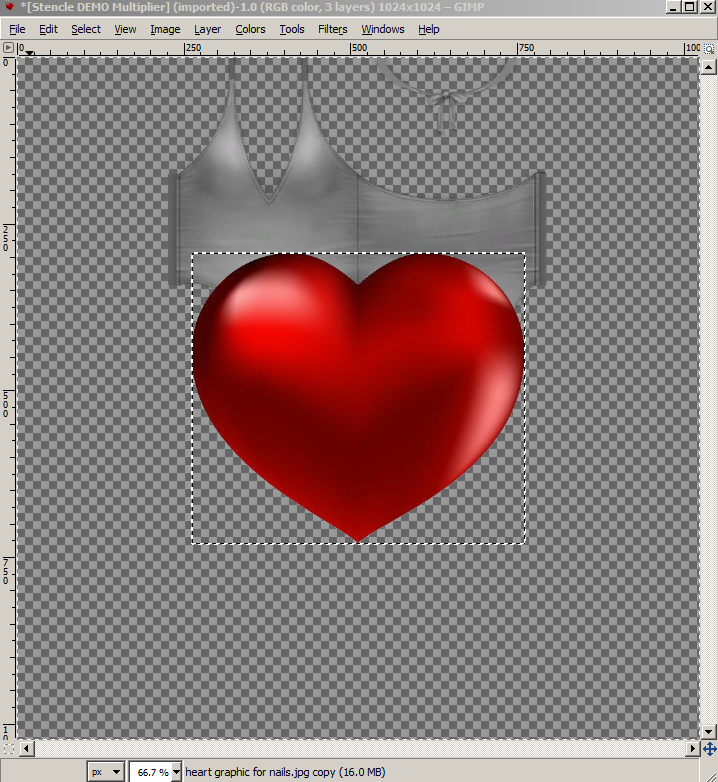
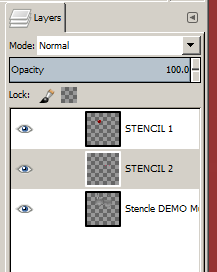
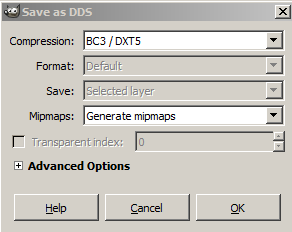
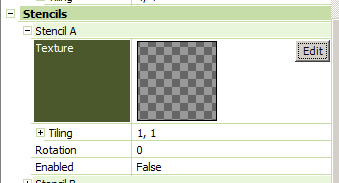
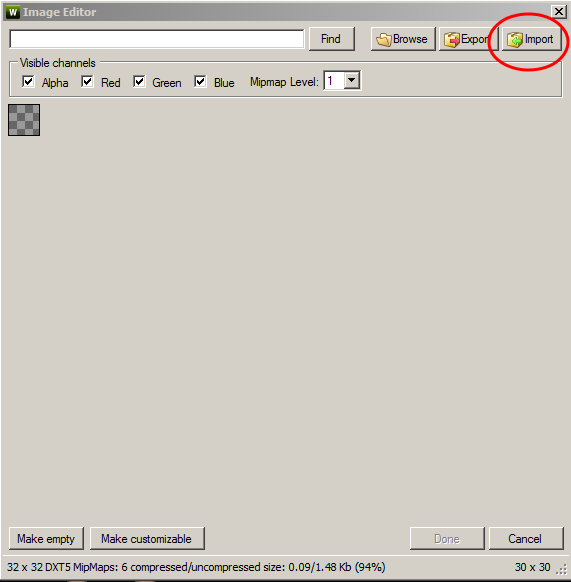
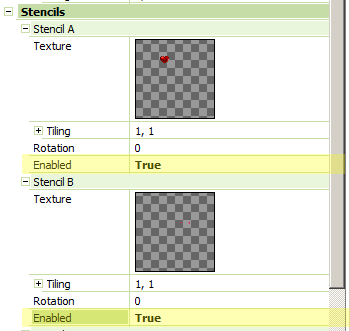
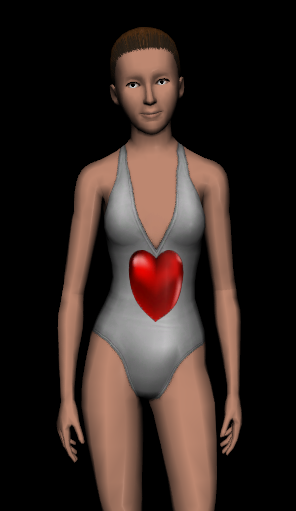
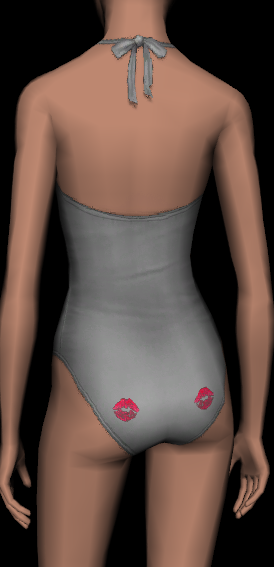
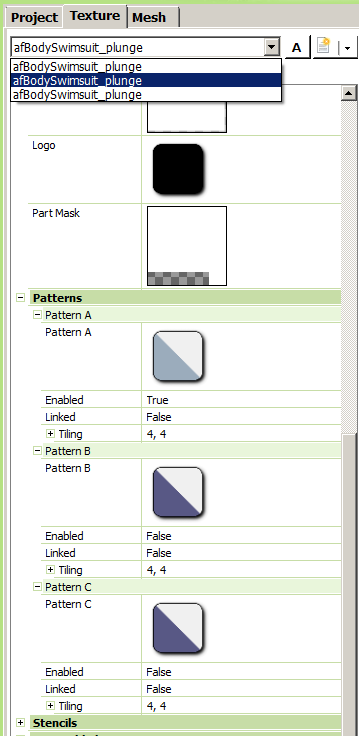
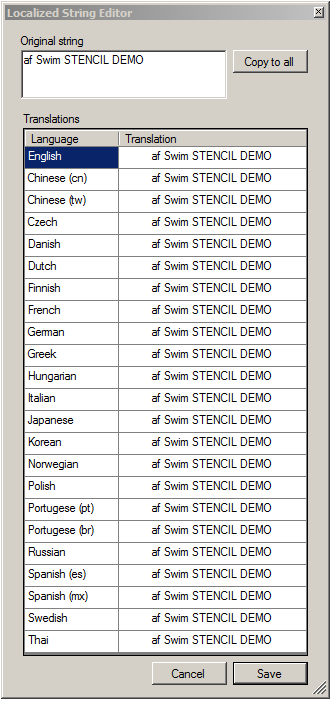
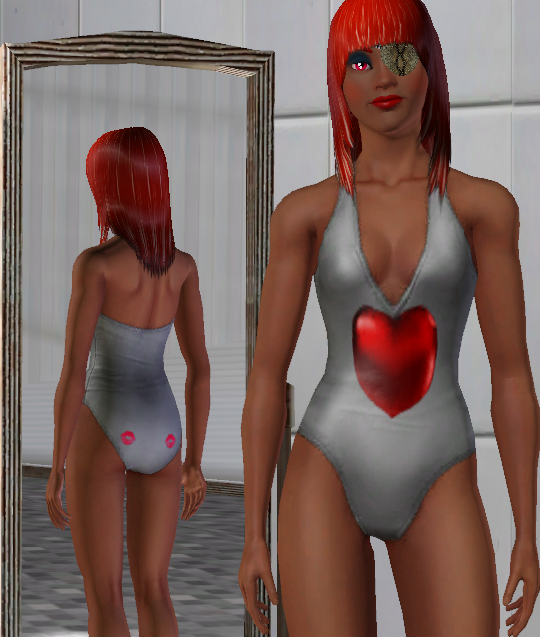
 Absolute Beginner's Guide Making modifications to Sims 3 garments Actual Modifications to the Sims3pack/Package Adding Stencils & Overlays This document is intended to get your feet wet with TRSW by Creating and applying a Stencil using your Graphics’ Editor. It does not attempt to show mesh alterations. It is designed for the Absolute Beginner. Who would like to make a unique creation but not get into the nuts & bolts of the Mesh. You will need: 1. TSRW: found at https://www.thesimsresource.com/workshop/ 2. Graphics Editor: https://www.gimp.org/downloads/ What you DO NOT Need: 3. Sims3Pack File Generate Tool: For converting to and from Sims3pack.https://modthesims.info/d/473766/sims3pack-file-generate-tool-package-to-sims3pack-8-27-2012-update-to-v1-4-1-36.html 4. Meshing Toolkit: Not needed. For fixing this on Mesh https://modthesims.info/d/481950/meshing-toolkit-version-1-4-9-uploaded-12-20-2018.html 5. A 3D mesh Editor like Milkshape or Blender. Your Graphics Editor needs the ability to save as a DDS file so look for a Plug-in if it doesn’t. If you’re the average person – you don’t change much on EA or CC garments, except what Color Channels are offered in CAS to change the Pattern. There is no way to move or change the pattern size in CAS. In the last installment I showed how to add a color channel on a standard 3-color channel garment and how to scale the pattern and position to a particular point. This installment focuses on probably the simplest customization of a garment – Adding a Stencil Overlay. I’ll show you: · How to create a simple OVERLAY. · Using the OVERLAY as an Overlay and/or Stencil. Making a CLONE of the garment you want to change: The first thing you need to do is clone your garment. Any change to a package will need new internal numbering and TSRW does that for you. For this DEMO – I’ll be using the af body swimsuit_plunge. You can use the EA full-body af body swimsuit_plunge for this exercise as well. Open TSRW and select New Clothing. Then select: Human>Young Adult>Female>Swimwear. Look for full body swimsuit with a V-plunge. Be sure to give it a unique name in both boxes. Before OKAY. Or… Open TSRW and select Import. In the type box select Sims3pack (or package file) and select the garment you want to change. Be sure to change the Projects NAME in both boxes. It works the same regardless of what garment you bring in so, what you start with doesn’t matter as much as where you have space on the garment to put something. A complicated piece or one with no area for a patch or logo is a bad candidate. One of the reasons for using the full-body plunge swimsuit – lots of area front and back. Once your garment is loaded: Example 1: Go to the Texture Tab. Scroll down to Stencils, then expand the category and expand Stencil A. (Example 1). Example 2: Here’s how the Stencils work. The OVERLAY circled on Example 2 and ALL of the Stencils can be active at the same time. They will act as layers with the one circled in Example 2 above being the 1st one. Any and all overlays/stencils can be on or off – doesn’t matter. All it is – is an image layered on top of all the others. You just need to know where to put the image. First, you need to Export a copy of the Multiplier. This will be a reference guide. Click on the right side of the Multiplier image to show the EDIT button. Example 3: Example 3 shows the Multipliers Edit window. Export. Be sure to give it a unique name like “[Project Name] Original Multiplier” At this point – SAVE your TSRW Project. The name will automatically be given for you this time. It’s generated from the Project name when you first loaded it. Graphics: For this I’ll be using GIMP 2.8 Any good Graphics editor will work, as long as it can save as a DDS (BC3/DXT5). If it does NOT – you need a plug-in or a better graphics program. Load your saved Multiplier into your graphics editor. Be sure NOT to load the MipMaps – they will be generated when you save. (Example 4). Example 5: You should have the Multiplier image looking like Example 5. Create a new Transparency Layer – I’ve named mine STENCIL 1. Now, Load your favorite Image – the one you want of go on the garment as a Stencil. In my case it was an image of a HEART. Scale that Image (Heart in my case) and move it so it fits where you want it to show. Example 9: With me – I placed the Heart at the bottom of the V-Plunge at the front of the Swimsuit. Make your image “Image Sized” and Merge it into your “STENCIL 1” layer. That’s it for Stencil 1… WAIT… we are going to make a second Stencil – STENCIL 2. Repeat the same procedure for adding the 2nd Stencil. Add the image (must have an Alpha Cannel) Scale and position where your want – that’s it. In my case – for the 2nd Stencil… I’ll be using a Lipstick Kiss (a couple of them). Example 10: Example 11: Okay – both Stencils are done – what do you do with them… You have Stencil 1 (Heart) and Stencil 2 (kisses) each as a separate Layer. Save your File… In your Editors native format. Discard the Multiplier – it was only a guide. Now, Save each Stencil as an individual DDS. With only one stencil active – merge visible layers, Layer to Image Size, and Export as DDS (BC3/DXT5). Example 12: Undo - back to show both Stencils and make the other Stencil active. Again, Merge Visible Layers, Layer to Image Size, and Export as DDS (BC3/DXT5). In each case make sure you choose a unique name for each Stencil. You now have both Stencils saved and can assemble into TSRW. Exit your Graphic Editor and load TSRW. Load your Stencil Project. In the Textures Tab of TSRW scroll down to the Stencils section and expand the category. Also, expand Stencil A & B. to the right of Stencil A image (Checkerboard pattern) click to show the EDIT button. Example 14: Import your Stencil 1 into TSRW’s Stencil A – do the same for your Stencil 2 into TSRW’s Stencil B. With me Stencil A is the Heart, and Stencil B is the Kisses. Example 15: Make sure you set Enabled True for each of the Stencils you want to show. (Example15). Click on the area of TRUE to show the Selection box and select True. Example 16: Example 17: With both Stencils Enabled=True both the Heart and Kisses show. So, you see, you can have quite a lot of Bling - if you want - with the Overlay and all the Stencils. Any image you can get small enough so it doesn't lose much detail (starts Pixalating) is fair game. I need to warn you that TSRW defaults to Variation 1. As we have done this – none of the other variations have any stencil showing. The stencils you loaded are for that variation ONLY. You will need to load your Stencils for each variation you want to have showed them. The advantage to that is you can have up to a set of 6 or 7 Stencils for each variation. The drawback: Stencils are only carried when you duplicate an existing variation. Otherwise – got to load them into each variation… Remember – the OVERLAY section at the top of the Textures Tab is basically the same. When replacing any of these images you are asked if a replacement or not. If you want to replace All variations that use that particular image – REPLACE - will update all to the new “REPLACEMENT image. Otherwise – if you want to keep a variation – use Make a unique reference. Example 18: Variations Export: You’re DONE: Save the TSRW Project file. Example 19: Example 20: When saving as a Sims3pack – it won’t automatically put the file name in for you. You should get into a practice of going to the Title area under the Project Tab. Click on the name to show the EDIT button (Example 19). This brings up the Edit window (Example 20). Highlight the info in the “Original String” box at the top, copy this, and then SAVE (even for just copying – save). Now you can go to FILE on the main menu and export as a Sims3pack. Its ready to put in your Sims3/Downloads folder and install – or – you can use the File Generator Tool to convert to a Package file which you copy to your Mods/Packages folder. Example 21: Example 22: Notice the image I made in Example 9 is “Stretched” vertically on the garment. This distortion is somewhat random and tends to depend of the image shape and how the Faces of the garment are set up (Something we wont go into). Only a little Trial & Error will find the best shape. Or keep both TSRW active and your Graphics Editor and go back and forth distorting your created image until it looks correct in TSRW (don't forget to make sure you make Layer to Image size - DDS is temperamental on correct size). You need to check in CAS when done to make sure. Sometimes - what you see in TSRW in not what you see in CAS and can be different again in-game. As the distortion of the Heart image shows. In a Nut Shell: Export the Multiplier Image to use as a template. Place that Stencil image on top the multiplier where you want it to show. Make the picture to Image size so its the same size as the Multiplier. Delete everything but your new image Save as DDS and load into TSRW Stencils or Overlay. Anyway, You now know how to add an image as an overlay or Stencil on a garment. So, be it you name, a personal logo, or something silly – you can put it on a garment. You can literally BEDAZZLE anything. ENJOY!


-
Hi everyone! If you are a mod author, I would love to hear how you got started in modding? What I mean is, a story of sorts; your story from first you heard of modding to point you had completed your first (hopefully working) mod. Did you have prior programming experience? Is programming experience required? Was the learning curve steep? I'm not asking for a how-to guide, per se. I'm trying to get a feel for navigating around getting started, maybe pitfalls to avoid, if it contains explicit instructions then great but more about your background in gaming, computers and the like and how it lead to your becoming a mod author. Maybe you work in programming or are an artist in another area? I'll start (but not a mod author, yet): I had no gaming experience on PC prior to about 4-5 years ago. Was a console gamer in the 80s, stopped gaming in the 90s, then started again with PS2/3. I in fact never touched a computer beyond word processing for school assignments until I had to learn to type over two weeks in 2007 for a job opportunity. From there, I started to dabble a bit in computers, badly, until about 2014 when I discovered the world of microcontrollers. If you could call them mods (I'm really reaching here), I taught myself to code and build real world working video game props: to date I've built laser mazes, a working Sentry Bot, a Fallout Terminal, a lockpick safe deposit box, and some other less complicated items. I like to think of these as mods in a way, except that I'm modding the real world to reflect problems we encounter in Fallout 3/4: namely, cracking a safe via terminal, "defeating" a Sentry Bot (turned out like a 300 pound, mobile robot/arcade video game cabinet with a game installed I wrote in Processing called "Threat Matrix"), etc, if that makes sense. I realize I'm really reaching here but microcontrollers (Arduino specifically) are so far the only real coding I've done. As for Fallout 4 (the only modded game I play), it's very bare bones: typing in custom commands in the console to call various bat files in my Fallout folder (materials cheats and the like). I also long for the day when physical computing starts bleeding into the PC gaming space much more. I love to see things like custom dashboards for American Truck Simulator, stuff like that. Ultimately, I would like to build my own workshop in my garage, inspired by the opening title sequence in Fallout 4. I just happened to start with the security machines (tripwires, robot guard, safe) because what damn fool would leave all his power armor, tools and Pip Boy just sitting there waiting to be looted without a little security? What's your story?
-
-
 A while back I wrote a long angsty post about getting Papyrus Compiling to work within Sublime Text 3 via MO. That was a trip. Today I follow that up with a new build script that is easier to edit. In addition, this version of the script has a privacy hack built in to strip the personal metadata about your user name and computer's hostname that the compiler embeds into scripts. The instructions are targeted for SSE modders, but it will work for Oldrim too just make the appropriate changes to my instructions [as well as use 32bit Sublime, and have the edited PapyrusCompiler.exe]. I cannot be arsed to reformat the entire thing for this site and maintain two copies, so just visit the version on my Tumblr lol. https://darkconsole.tumblr.com/post/171714629789/compiling-scripts-for-sse-with-sublime-text-3
 -
 Hello all my wonderful people I am looking for assistance on a couple of animation related issues that have been plaguing me for a long time and I am hoping that we can come up with some info or ideas to beat this problems. So before moving on the first thing I want to say is I am NOT a noob when it comes to Modeling or Animation so please no "Start with the basics and work your way up from there..." That's the useless advice that plagues other threads on the subject and doesn't help unless the original asker is actually 100% clueless about a program and even still most of what is needed here is better solved via very specific techniques that no matter how much you try to "Work your way up" you may never get to a point of doing unless pointed in the right direction... Okay let's start: Actual Mesh Penetration and Push Pull Physics: Firstly If we are working in a program like blender that is capable of soft body, cloth and collision sims it seems like we should be able to form a close to real time simulation for let's say a Vagina or Anus expanding or opening when a object is pushed inwards on it. Much like the HDT Sex mods you see currently on here but instead repurposed for animation in Blender or SFM. I have tried so many things when It comes to soft bodies and collisions but have never worked out a good way to do this. I know it can be done as HDT Sex on here has shown and many other sex based games that have been coming out have done in a much more advanced ways but I am lost. The second part of this is achieving Push/Pull physics such as the Hole being penetrated in question pushing inward a little before giving and pulling back out a little when object is pulled back. Any ideas or experience? Realistic Bulges During Penetration: Okay so this is another one I have been able to find zero good info on at all and it is driving me crazy... Being able to simulate a good, realistic bulge during a penetration. For example a throat bulge during deep throating. A slight abdominal bulge during certain sex positions and a large 'Object' being inserted or even Urethral Bulging during Ejaculation... I feel like there is some stupid simple answer I am missing for all of this... I have tried making the 'Object' a 'Brush' that can displace the mesh when in contact so for example it will push out a mesh a certain amount but that always lead to weird clipping issue, errors or whatever it touches suddenly rippling like water no mater how I play with the settings... Cloth and Softbody with Collision Object have too given me little success... Like I said it seems like it should be simple but it never is... What I see most people do is use a shape key with a generic bulge that is both poor to look at and a waste of time manually animating. Realistic Breast and But Jiggle: So this is the only thing on the list that has been touched on a bit but I still have not found a good solution for in Blender. SFM has Jiggle bones which can be done pretty okay but for Blender well I don't know. This is the best example I have been able to find so far and though it's not bad the setup seems a bit ridiculous https://www.youtube.com/watch?v=-nkhXESF0jI and it looks like to make the hands interact as they do he actually has a separate collision object in the shape of the hands parented to the real hands which is fine when unanimated but as soon as you start bending fingers on the actual mesh the collision object will no longer line up... What a headache... Anyone came across anything better? Unless I am missing something for some reason you can't have just part of a mesh in Blender have no physics applied meaning you need to jumpp through a ton of Mesh deform hoops to do something simple like add a jiggle... Realistic Phallus bend and Ball Swing: Once again we come across an issue I have not seen addressed at all... Making a erect penis have the ability to stay semi rigid yet bend and squish a bit if it contact with resistance of an object. Yes I realize this can be simulated manually with an IK rig but it seems like there should be a way to do so with an automated collision sim. Besides IKs tend to bend the whole rig equally, that's no good in many situations where like in real life a penis will not bend in equal, perfectly angled segments. This can partially be remedied with adjusting the IK bones influence on the others in the chain though. Maybe an IK sim can be made by parenting the end of the rig on a collision object you can make invisible and that when the object contacts something else with collision will be pushed back thereby bending the IK? Problem then though is how do you keep the collision object in the right place after collision is removed? It needs to spring back after all... Two video of possible interest here first is on bendy bones https://nimblecollective.com/bendy-bones/ and the second https://vimeo.com/92538044 (Good for simple tails.) Secondly is ball swing which I think is pretty self explanatory I am figuring if we can figure out how to do breast and but physics well we can do ball swing too though... I will add to the list if there are more things we can try and figure out and if we can find good solutions I will update the thread to included them and credit those that came up with it. Hell if we work some of these out I will even make tutorial videos for others to follow and do themselves as NSFW porn How To videos are sorly lacking... Anyways looking forward to what you all have to say!ffff
 -
 Hi, i have been looking at various mods and have been around the forum. Schlongs of skyrim mentioned i should download it through the nexus mod manager and having used the manager this seemed like a great idea. Only problem is i have no clue how to and it was not explicitly said on the mod page. So i am asking for some pointers and/or general help on how i could download these adult mods through the manager and not have to fuck with them in general. Please and thanks!