Search the Community
Showing results for tags 'gimp'.
Found 13 results
-
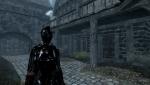
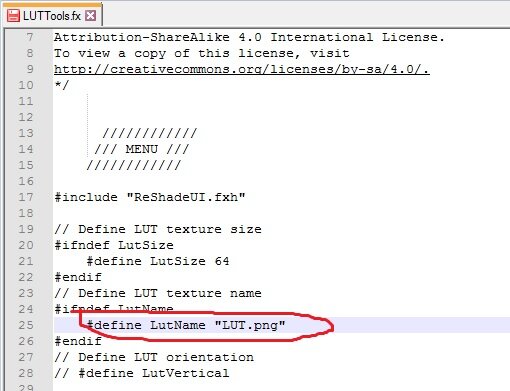
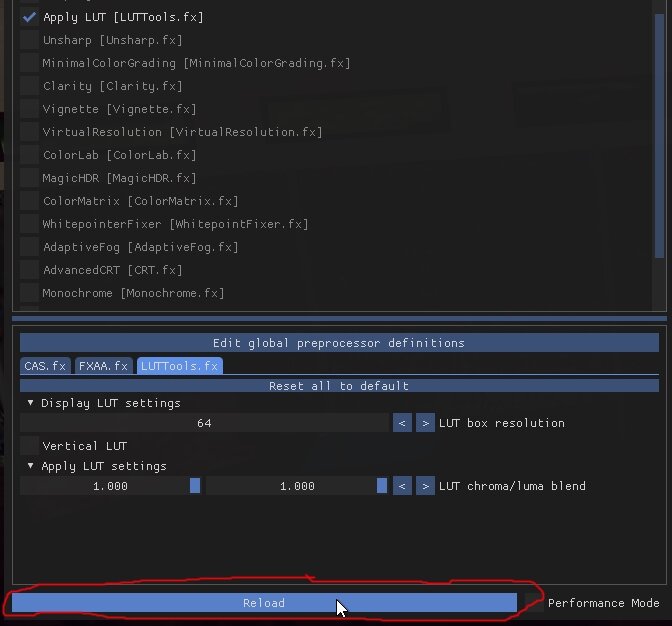
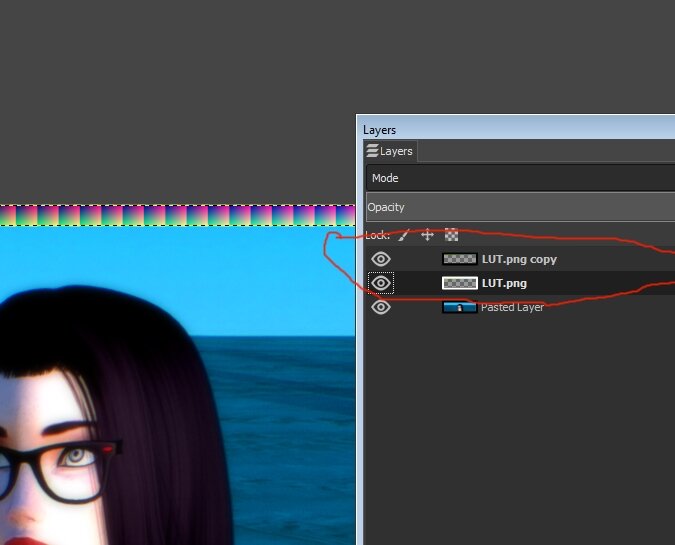
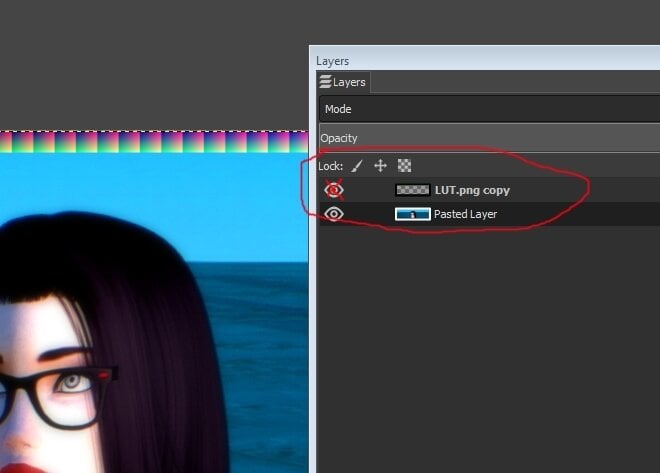
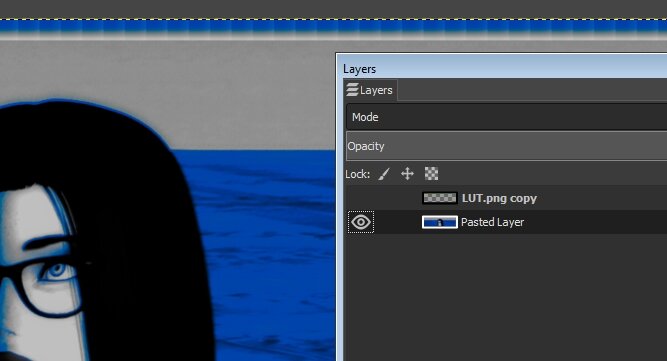
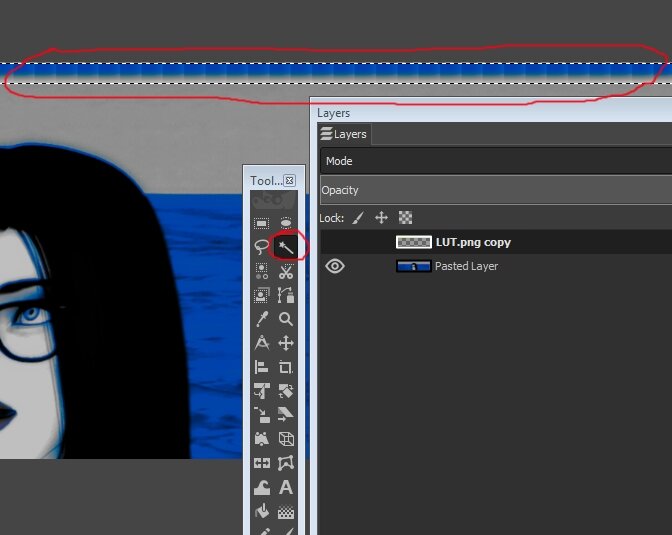
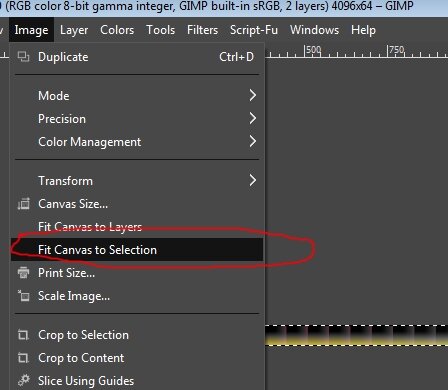
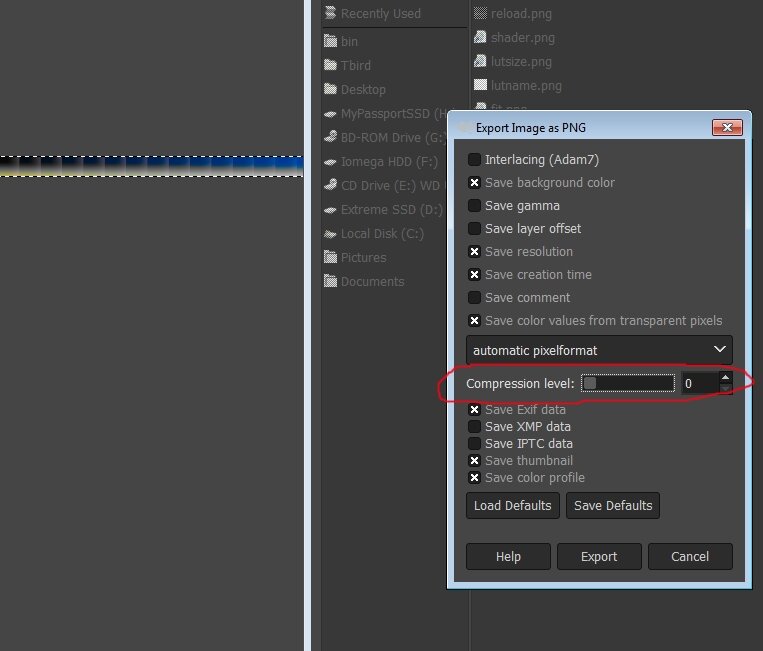
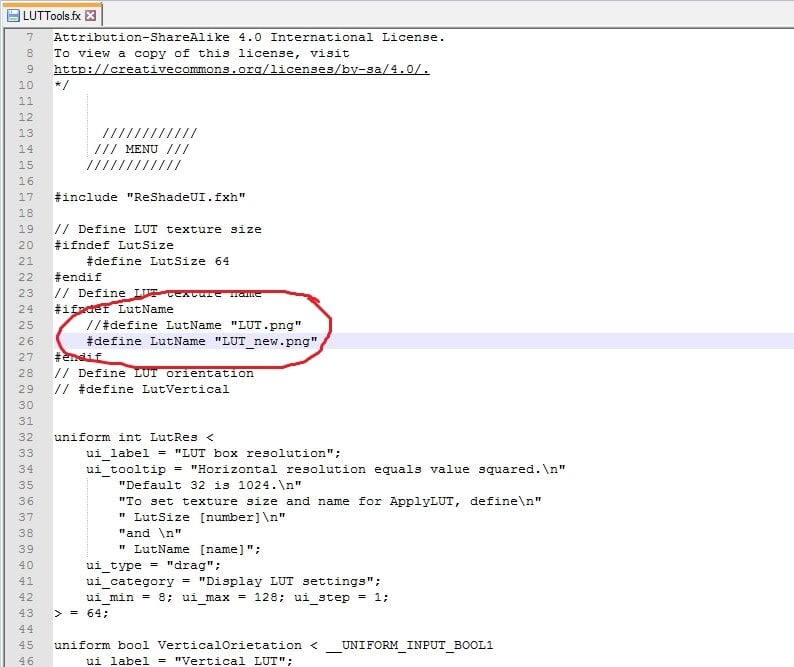
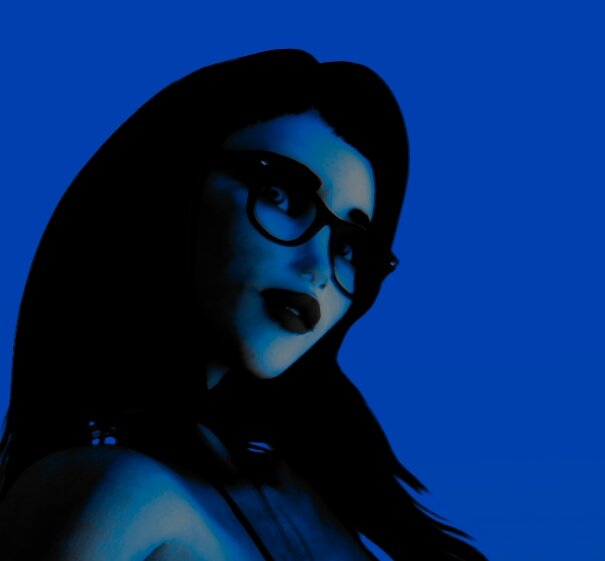
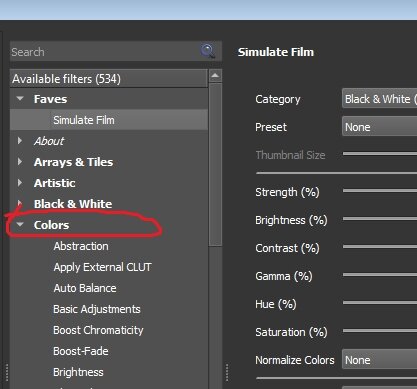
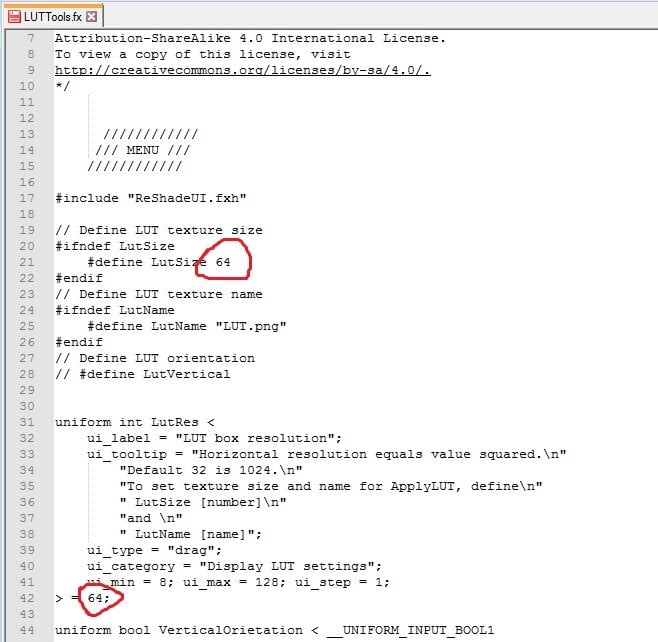
 Custom LUT creation with ReShade and Gimp 4.10 By arse22 on Oct 30,2020 Intro First I will cover some basics, for those who don’t know what a LUT is and why you would want to use it as part of your Hook/ReShade setup. A LUT is a .png file which contains color information used by the game. Using a ReShade shader we can change the default and override with our own settings, creating changes we want in-game without any cost to FPS. In fact, the strain on your system is greatly reduced on account of the fact that only the color itself is changed and color-related shaders do not need to be loaded at all. You can of course, load some to make further tweaks, but personally I prefer to make such edits afterwards and in another program. Why would you want to do this? Besides saving you FPS, the power it offers you is easy to underestimate. In truth, everything is color, even shadow and light are created by color and modify color that produces any image. The color changes that can be made are fairly complex and remain uniform, saving you time to have to mess with the settings in-game. Essentially you will create a ‘preset’ of color in your favorite image or photo editing software and apply it directly in game, while giving you performance boost. Pre-Requisite -Image/Photo editing software such as GIMP or Photoshop. I am using Gimp 4.10. -Latest Hook and ReShade installed and working. I am using H5free and ReShade 4.8.1. Basic LUT LUTs can come in different configurations and sizes, but the most common is 32x 32x32. That is 32 tiles of 32x32 pixels. For this tutorial I will provide and use 64x 64x64 LUT and show how to configure the shader to use it. Here is the default LUT we will be using. I don’t know the technical details but 64 creates a nice 4k LUT and I read that any higher is supposedly ineffective in current games. This is a basic LUT, when you enable the shader that applies it, no change will be made because it’s the default colors. It is a good idea to test this in your game. So, download LUT.png above and place it into your reshade-shaders/Textures folder. Make sure the LUT you downloaded is 4096x64 dimensions. Backup and overwrite the existing one if you already have one in there. Then, make sure that in your reshade-shaders/Shaders folder, you have a shader named “LUTTools.fx” and if you don't have such a shader, search the Shaders folder that ReShade installed and move it in. This puts it into the active shaders to be loaded by the game and this is the shader we will be using. In my version, it was originally installed into a sub-folder called Fubax. If you still can’t find it, you can probably download it through Google, directly from the author. Open the file LUTTools with a good text editor like Notepad++, because it’s hard to see in Notepad. This is the changes we need to make, so that the shader reads our LUT file as 64 tiles. Change the name and both instance of 32 to 64. After you made these changes, save the file. You are ready to load the game. Loading LUT with ReShade Once it is loaded, hit F5 or whatever you have configured your ReShade window key-binding to be. Then create a new ReShade preset or just turn everything off in your current one if you don’t care about it. You will see two options for [LUTTools.fx] : ‘Display LUT [LUTTools.fx]’ and ‘Apply LUT [LUTTools.fx]’ You can safely ignore ‘Display LUT’ because that is used to create LUTs through the shader and this tutorial uses a different method and we will not be using it at all. Enable ‘Apply LUT [LUTTools.fx]’ instead. You won’t see any change and that’s good, as I previously explained, the LUT provided is a ‘default’ one that you will want to make a backup of if you don’t want to rename the one you will apply into game. I prefer to name my LUTs different things and change the name inside LUTTools.fx. When you make changes to the shader .fx in this way in text, all you have to do to apply the changes in-game is hit reload at the bottom of the ReShade window. Finally, what you want to do is take a picture or two with ReShade shaders turned off, just some screencaps of your game with just your basic Hook settings and no other shaders, as we will be using it to create a new LUT in the next section. Creating a New LUT Open the screenshot in your favorite image editor in its own layer and place the LUT.png you downloaded earlier into another layer. Adjust the screenshot so the LUT is at the top if you want (I did this in the pictures,) but it doesn’t matter, whatever is convenient for you. Then make a copy of the LUT layer. Now merge the LUT layer with your screenshot and hide the copy. You are ready to make changes to your LUT and you will use the screenshot as reference. Remember, only COLOR changes can be made, that means no blurring or outlines or any other such effects will work and may potentially mess up the LUT. So, only change colors and saturation and settings of the sort until the picture looks good to you or what you want to achieve with your LUT. Now that the LUT has been changed, we are ready to crop it out. In GIMP I used Magic Tool on the hidden copied layer to get the exact size and then selected “Image->Fit Canvas To Selection” Finally, you are ready to “File->Export” the LUT and name it. When you are exporting you want to make sure you export as .PNG and that there is NO compression of any kind. Name it “LUT_new.png” and export into the reshade-shaders/Textures folder. Make sure the LUT is 4096x64 png and in the proper location. Here is the LUT that I created in the pictures of this tutorial: Loading the New LUT Just in case, here again is where you would change the name in the LUTTools.fx to have the shader load it, instead of the one we changed it to in the beginning of this tutorial. When you apply the new LUT, your UI will change color too, this is normal. And here is an example of how it looks applied in-game. It is never 100% exact for me, I’m not a pro, because the LUT is very sensitive and applies every change and even the slightest changes by the saving process or something like that. The changes the coloring of the LUT are relative to the image used, so any difference between the screenshot and the game will be reflected in the applied LUT. In the case of the example picture, the lighting I used is darker, the actual LUT worked perfectly because I only did some basic steps to turn everything blue. This aside, we can see the potential power of using this method to apply LUT. Graphical changes straight from your GIMP or image editing program, directly into game through only color. Tips Not every LUT needs to be as dramatic as the one in this tutorial. I only did this to make things more clear. When you use a screenshot to compare while you color the LUT like we did in this tutorial, it's good idea to use a collage of multiple screenshots, preferably from various settings and Hook lighting setups. Hook and backgrounds can add color too, so it has to be taken account. The more extreme the LUT, the more likely it will not work in every scene, causing color errors and if you have multiple picture for reference while you’re making changes and be able to detect the problem. In particular I would try to use as many different shades of color that are usually in your most used settings, to try to adjust the LUT to fit as many of them as you can. This is not really a requirement, it’s just something to experiment with. In general though, I would say it depends on what you are trying to achieve. Some LUTs can be used to create a nighttime effect, another for a de-saturated “mech” setting and yet another can be more general and work with most scenes, or an old photograph, or maybe you like the particular color errors you found and want a “glitched-out” effect for some pictures. Ideally you have a LUT for every job, they allow your pictures to look uniform and unique in appearance without having to guess by hand every time since the color adjustments are applied with code. Which brings me to the last thing: Another powerful tool for GIMP is a filter suite called G’MIC, which can be downloaded free : https://gmic.eu/ It also includes a filter called “Simulate Film” which actually allows you to apply exact color presets from a wide variety of cameras, consumer to pro, rather than making changes by hand using this method. You can find the filter in G’MIC under Colors section, once you have it installed. The LUTs you create with it will give your screenshots a more professional quality. Also it has other color-related filters, including various “color transfer” effects which allows mimicking the specific color scheme of any photo, screenshot or painting to some degree. Things to Remember When customizing a LUT, make sure to only use color settings and filters, many experienced users only use ‘Levels’ to make their LUTs and nothing else, but anything color-related is ok. The LUT is PNG color data, it cannot record and interpret code of things like blur. Color changes made to the LUT are relative, so if you change your screenshot a lot before using it as reference to the LUT, you may get unexpected results, without those exact settings in-game. Rooms can have unique Hook lighting that apply color and potentially not work with a LUT if you didn’t use it as reference. Other things like ReShade settings, such as ones that change color. As long as you are using it in the reference screenshot, you can make sure the LUT will work, but depending on the changes you made, it may not work that well without. When creating a collage of screenshots to use for reference in creating new LUT, it is a good idea to include a variety of colors, lighting and maybe even shaders that you want to test out. This allows you to more easily see where the LUT can be best utilized and where it will have problems or won’t look good. If you made a new LUT, don’t forget to change the name in the shader .fx file and hit reload in the ReShade window if you already opened the game. Conclusion I created this tutorial because I noticed that a lot of Hook presets do not have this shader included or any LUT shaders for that matter. There is a way to do it through H5 as well, but I prefer to use Reshade since that is the settings I work with most, I never touch my H5 settings at all. Hopefully it was helpful to someone who may not be familiar with the power of such a common and IMHO fundamental method of graphic enhancement.


-
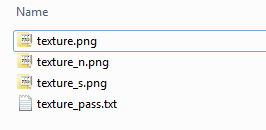
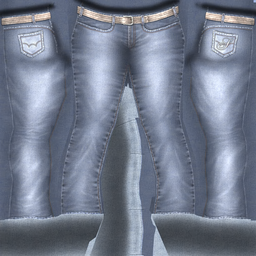
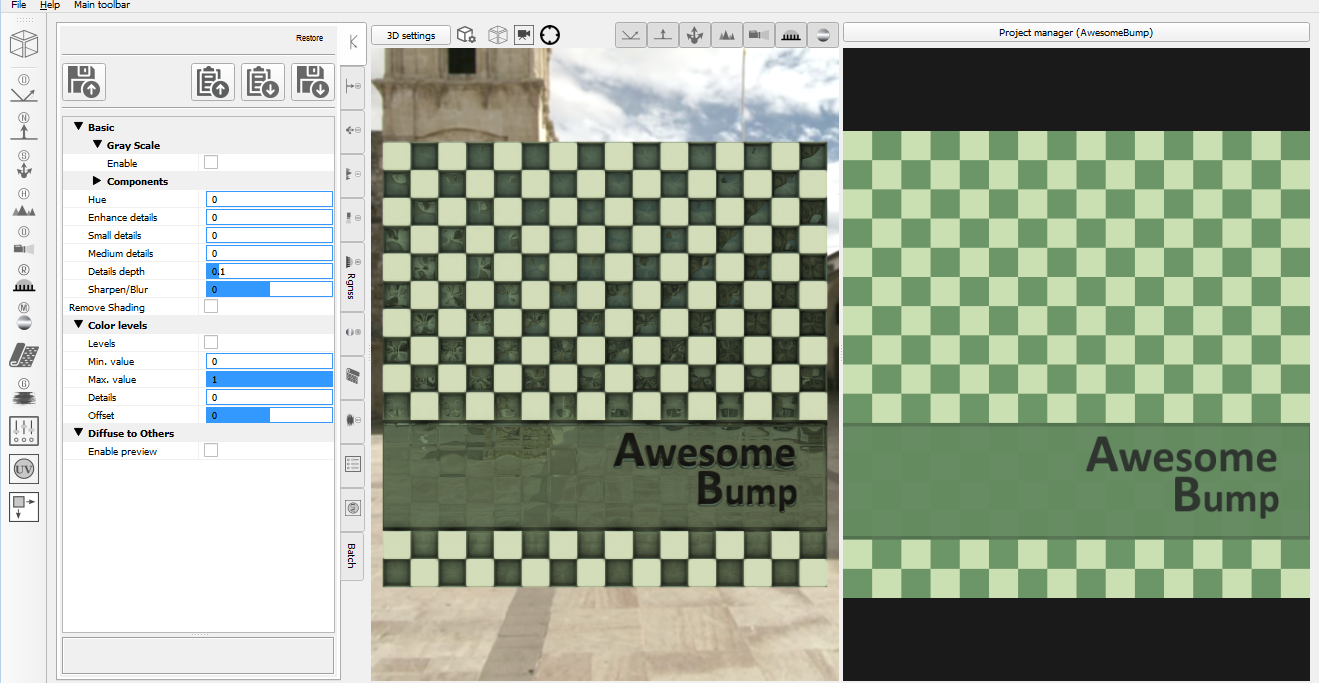
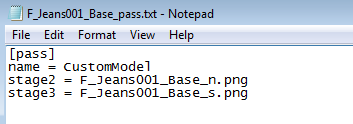
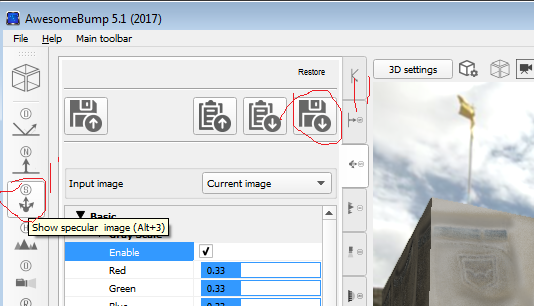
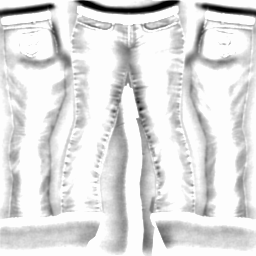
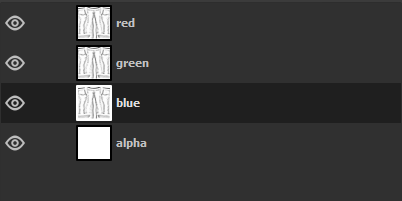
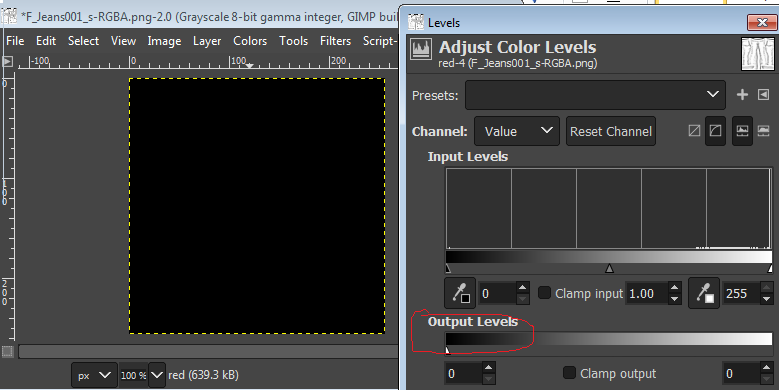
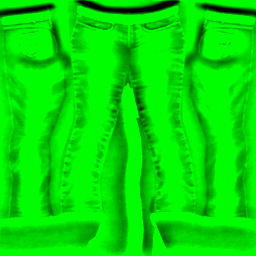
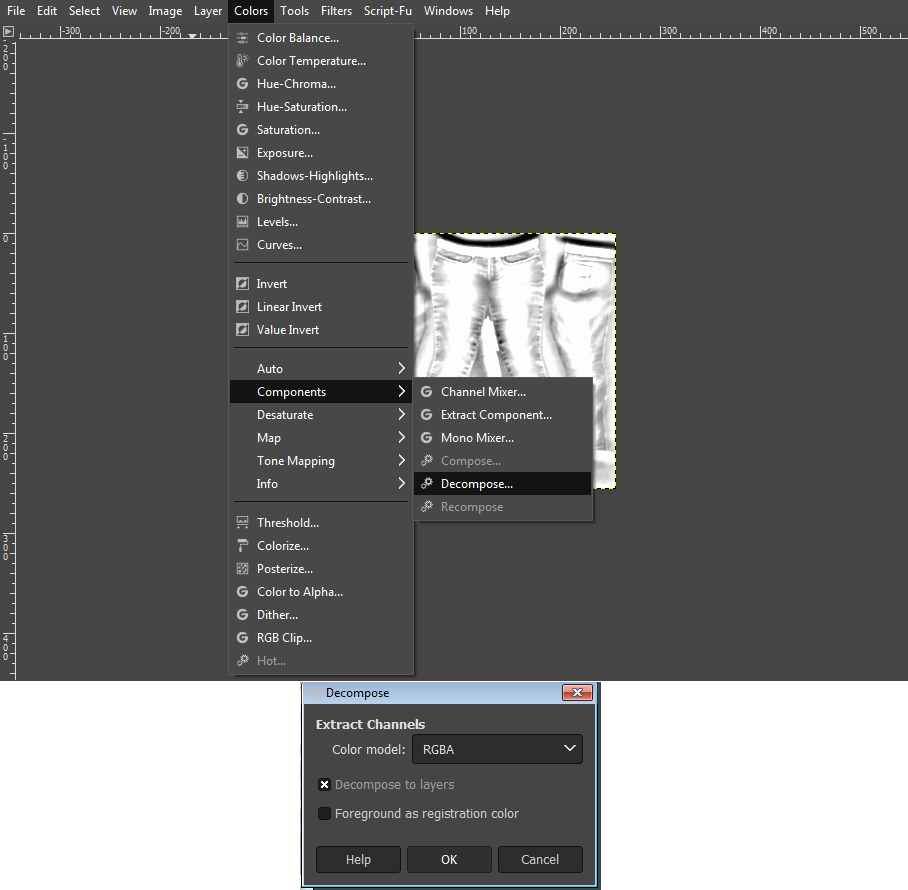
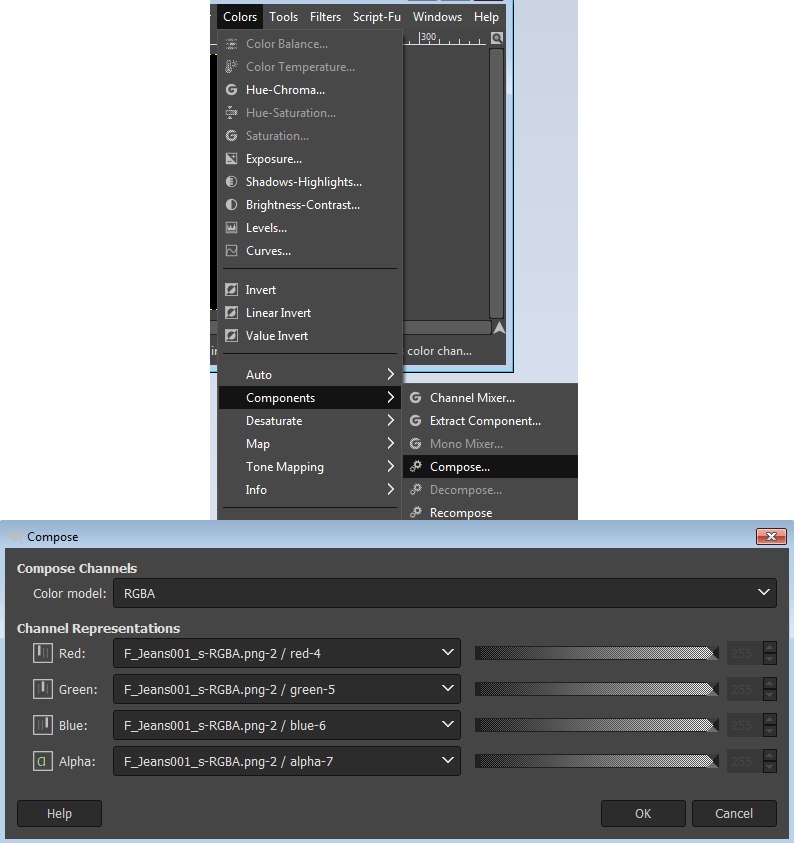
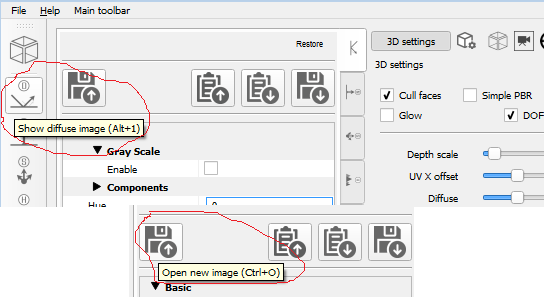
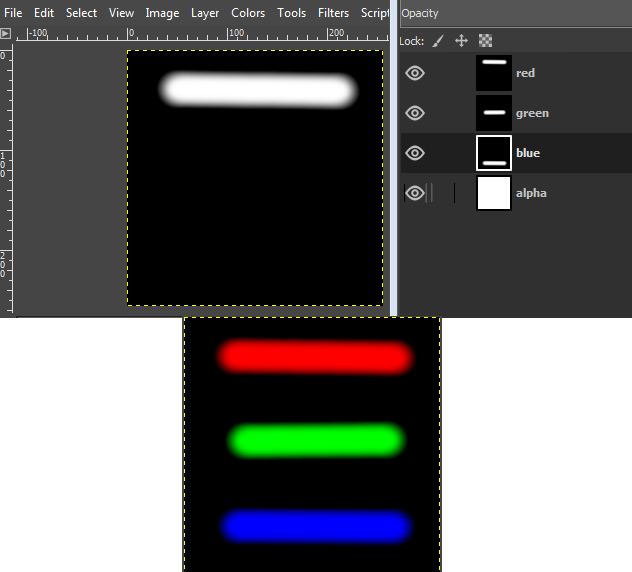
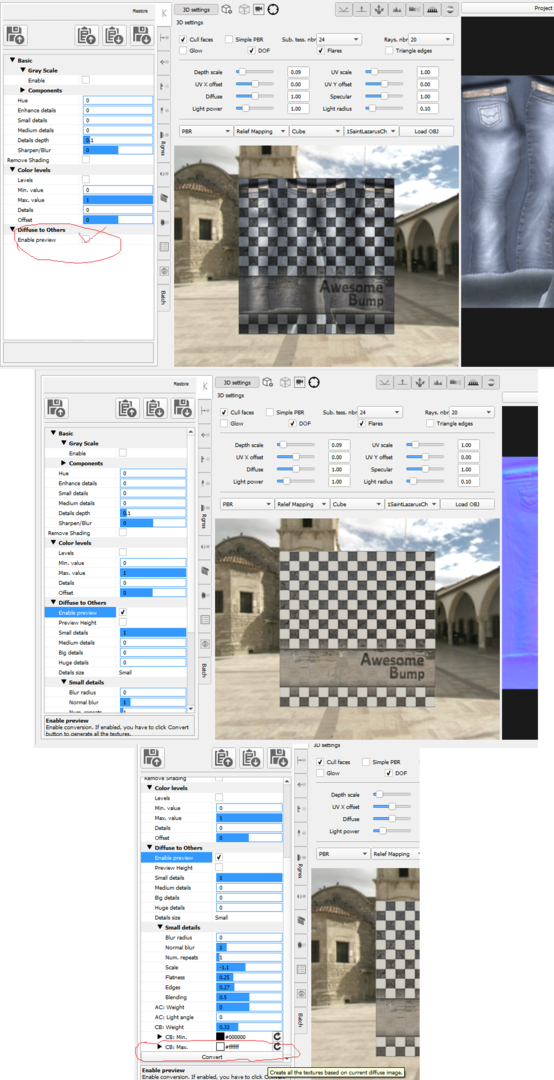
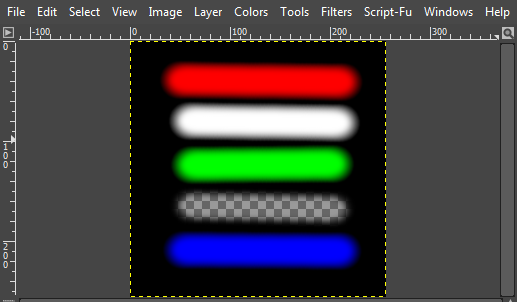
Custom H5 Norm and Spec map (bump) creation with AwesomeBump and Gimp 4.10 By arse22 Mar 2021 Intro This will be a brief introductory guide to creating your own bumps (normals and spec maps) for Hook5 TK17, using free software you can find online. When it comes to 3d and image manipulation, these topics can be daunting and overwhelming, so I will steer clear of much technical aspects or details and dive straight to practical, as it pertains to Hook 5 and this game. Once you get the hang of it, you will agree that the artistic and technical knowledge required for baseline bumping is actually very low and maybe even limited. I would go as far as to say that a good portion of it is grunt work, so everyone can learn it and be contributing. Pre-Requisite -Any working version of TK17/SV with working Hook5(free or paid.) -Installed GIMP 4.10 or latest https://www.gimp.org -Installed AwesomeBump latest https://sourceforge.net/projects/awesomebump.mirror/ Basics of Bumping, Spec and Normal Maps So, long ago on Hook4 everyone used BumpMaps to create nice visuals for rooms, clothes, skin, anything with a texture, sometimes even without. Later, in Hook5, it has been replaced by Normals and Specular (norm and spec) maps, so this should clear up any confusion about those terms. They are not compatible, but achieve the same thing as far as improving your textures through Hook5, everyone still calls it bumps though. Typically the most common format you will see is [texture name]_n for normal and [texture name]_s for specs. They are placed in the same folder as the texture in ActiveMod, alongside a [texture name]_pass .txt file which points to the norm and spec. All of these you have to create for H5 to interpret in the game. Selecting a Texture to Work On The first step is to select a texture you would like to work on, let’s take a base game texture like Jeans (F_Jeans001_Base.png) . Typically cloth, hair, room texture, object texture is simple and straightforward, best for this guide. Skin is a little more advanced so maybe save that for after since there is more room for error and the process is not plug and play, there is much more room to improvise but this basic knowledge is still required. AwesomeBump Quick Guide to Normal Maps AwesomeBump is a popular free choice, it’s a little heavy on features and confusing to many, but good to have in your arsenal, especially if you plan to branch out into other 3d things. We will use it minimally as an excuse for you to install it. When you first load up this program, it looks like this: First thing to do is click on the top left icon with “D” for Diffuse and make sure you are on that, I believe it’s on it by default so nothing will happen usually. Then you click “Open New Image,” and find the texture we are working on. Looks kind of weird right now, so you must check “Enable preview”. Then, scroll to the bottom of this window and click on “Convert.” So, now what the software did is use the image we put in as the Diffuse and created various bumps for it which you can select on the left. N for normal, S for spec, H for height, O for occlusion, R for roughness etc. We’re not actually going to use much of that, for now just click on the N icon so we can make a normal. One thing to note about this program, although you can rotate and look at the result in the preview window in the middle, don’t click on the window in the right because it actually has an effect on the later result. I am yet to figure out how to reset it to neutral position, short of reloading. This is a good place to trial and error, but some of the things the sliders do can easily be done with a paint program later, there is no difference and we are trying to only make a basic bump or PBR as it’s called. So for now let’s just load it in game and see if it works. Leave the settings to default and select “Save Current Image.” Save it in the folder you have your texture, note that the _n suffix is already added in (the program knows what you want.) Testing In-Game If you looked around, you noticed the preview window in AwesomeBump doesn’t tell you much if you’re not already familiar with what you’re looking at and it’s not really made for Hook. So, if you have not already, create a “TestJeans” folder or something like that in ActiveMod and place both the texture and the normal in. If you load the game right now, it will look bad without a spec, so let’s use a generic spec for now just to test the normal. Just right click and download the below green image and place it with the other two files in your new folder in ActiveMod. Make sure it's named F_Jeans001_s.png Now you just need to make a pass file, create a new text file named “F_Jeans001_Base_pass.txt” in the folder with this info: So, when you load it in game it will be under “TestJeans” or whatever you named the folder. From this point it’s a bit of guess work, if you want to experiment with normal, you can change the sliders in AwesomeBump, overwrite the normal file and press Alt+R to reload in-game, to see the result. It’s a good idea to try it out if you never done this, but I will attempt to save you some trial and error and try to explain what the sliders do: Enhance Details - This is basically stronger normal effect (if you used the default settings from the program, you will note that the difference between that and a basic texture is fairly subtle, unless you mess around with lights, because this is set to 0.) Small and Medium Details – Well, below is a slider called Details Depth and these are just a means to fine tune it. Details Depth – This is self-explanatory, it’s how deep the crevices and such should appear (I think you can do this with contrast in any image program.) In more complex objects, an advanced technique involves making multiple depths and combining them together into one normal map to try to paint the object more accurately. Sharpen/Blur – It’s more or less sharp and blur from any image editing program, however the effect is really strong here, probably better to do subtle work in such a program, but it can save you time situationally. Normal Step – Honestly I don’t even know what this does. It seems to be more depth tweaking, but you should leave it at 1. Setting it to 0 makes the image disappear entirely and -1 inverts the normal, I prefer to invert in a separate program later if needed, since you rarely need to invert the whole thing, just specific parts that ended up wrong. Advanced Normals From here honestly, how good you want to make your normal is in your hands, you can leave it as is or you can tweak it a bit, or you can go in and make multiple normal, merge and crop them or merge with normal of other images to create weird effects or a textile effect for clothing etc. It will entirely depend on your skill with image manipulation and how much detail you put in. There is much more technical info on best practice and usage of normal maps elsewhere on the web, using this as your base method to build from is a great way to begin the journey of learning. The key concept to understand, also true for specs, that the image you put in for the bump will be what the game interprets, so using the base texture is only the foundational step, you are not required or limited to this. For example if I took some small HD image of human skin and made a normal of that, I can pass it as a normal for an actual skin, it will repeat the normal across the whole thing. That won’t look great, but it’s an idea. However, for something like a skin, you can’t just throw something in and expect good results because in the case of this game, the skin texture used by the game engine does not properly convey a lot of the complex curvature of a body, especially when it comes to details. The normal produced will have a lot of wrong depths (the outline for the body for example) and many missing ones too. So making a real good one would require a lot of extra work, if only to clean the normal a program like this would produce, which would be but a baseline starting point and maybe not the best one. This can absolutely be true for clothes, room textures etc as well, depending on the subject and what you are trying to accomplish. Editing Specular Map So we have a passable normal map made and everything works in game, time to look into making a custom spec map. This a lot more open-ended, easier but also more choice in approach. Normals are very similar across many 3d program, but the specs in Hook5 are unique to it, so it doesn’t hurt to look over the Hook5 guide before or after this. It sort of goes hand-in-hand with this guide on how to make a spec in Gimp. Specs are even more broad I would say, many content creators just use that default green image I provided (it actually comes with hook generic textures) and don’t bother looking into it. There are many ways to approach it and frankly I don’t even use AwesomeBump for specs at all. But, hopefully this method will offer a good place to start. Back in AwesomeBump, as example, let’s switch to the Spec Map tab and create a default settings spec map, the method is the same, just select the tab and click “Save Current Image.” Now, you want to take this new _s file that was created and load it in GIMP. In GIMP, select Colors->Components->Decompose. In the drop down select RGBA and hit ok. If you don’t have this option in GIMP, you should download a plug-in, I am not 100% sure it comes with GIMP by default. GIMP will create a new image with 4 layers corresponding to the RGBA colors. From here, any white on a specific layer will turn that color when we recombine them, so if that makes sense, the image is only there to guide you in your creative journey. In general you want the red (metallic) layer to be black and the glow (blue) to be black, while the alpha to be white. The green is the most commonly used layer since it makes things shiny and that’s a large percentage of hook usage. So, for now select the red layer, then Colors->Levels and set the Output to black. Do this for the Blue layer as well and leave the other two unchanged (the alpha should be white already.) Now select Colors->Components->Compose. In the Compose window make sure to select RGBA again and make sure each layer aligns with the corresponding channel. Hit ok and yet another image will be created. Now just File->Export this new image overriding the _s file in your folder and Alt+R in-game, I am assuming you already know this part from when we did it for normal map in this guide. If you followed the steps, the composed image will look like this, a working custom spec: Color Channel Details One thing to note when you test this result is that our custom item became very shiny, that’s because the Green channel is actually gloss in Hook5 and we did not change the spec made by AwesomeBump and because it’s mostly white, the effect is very strong. You can go back in and adjust the levels of that channel to your liking and compose again if you’d like. Another thing to do is to try out the other channels in the same way (actually all Black and all White is the simplest test, to see the extremes of each channel in-game.) The thing about metallic (RED) channel, it’s not that commonly used, often times a fine detail on metallic parts. Usually a high gloss (green) setting is plenty for actual metal parts and accomplishes the same effect and usually you will want a combination of the two anyway (since red isn’t shiny by default.) To make good specs, just like with normals, manual editing and fine tuning of specific parts is necessary. A note about the blue channel is that it will not do anything unless you have paid version of hook5, have enabled glow in settings and added the line “glow_intensity = 1 or another number, 2 is a good testing number” into the pass file, so again it isn’t used that much. On a more practical note, often glowing objects are futuristic things like data pads and the like, so again, like red, it will be in combination with the red and green channel and not nearly that strong as we are doing here. If all of this is confusing, a good exercise to try is this: decompose the original spec again and this time turn all 3 channels black and paint white with a brush in different spots on each layer before composing, as I did in the pic below (look at the layers previews:) It should compose to the lower image: You can even export and Alt+R and hopefully my notes on channels Red and Blue make more sense once you see how that looks in-game. Only the Green (gloss) channel is pronounced unless you have enabled glow for blue, red is much more subdued. An overwhelming majority of specs made for Hook5 will just be adjusted green channels, since most just want a nice gloss on their objects. So, one last thing experimental thing to try, is to add to the test composition is manually paint a strip of white and erase a strip (alpha,) directly on the composed image, just to see how they look in game. Well, what did we learn? It seems white is also glow (if you have Glow turned on and added the line into the pass file on paid hook, if you don’t it will just look super glossy/shiny.) While alphaed-out areas will create an absence of light (though this is only true for hook light, I’m assuming, the in-game light engine still tries to light the area but the in-game light engine is bad so why worry about it.) That should cover the basics on how to compose a specular map and how details and in-depth you want to be with it is up to you (just like with norms) and up to your image manipulation skills. You can paint directly with white or gray on the decomposed layers, or just copy paste from somewhere, since the layers are grayscale, it will work out. Advanced Spec, Hook5 and Beyond From here, I would look deeper into other Hook5 guides for more advanced ideas and experiment with different settings you can apply to textures (besides glow_intensity, there is many more.) Once you know this basic steps, you can see it is easy to begin learning more Hook5 tricks easily. For example, in the Hook5 guide it says messing around with the alpha color channel can produce more interesting effects, I didn’t really try so I didn’t cover it in the guide, so it could be a good place to start. More-so than normal, specs can really be anything and can have a major impact on the final image so it’s sort of like playing with fire in some cases, especially when it comes to glow and high gloss. I didn’t even begin to describe how a good normal map works in tandem with a good spec map, so you are really aiming for something good between those two and seeing how different types combine together is where a lot of the experience comes in. Worth noting, if you have already read the Hook5 guides and are familiar, the norm and spec we are making are specifically for CustomModel shader which is the most common. Room things often use CustomStatic, CustomSkin is for skins, but there is also EyePass and EyePass2 specific to eyes. Quick FAQ Q: What about subs? A: Subs, or SS or subsurface scatter is kind beyond this guide. Since it’s for CustomModel shader, I don’t even think there is a stage4 parameter. Basically, it’s used on skin to create an illusion of realistic skin, because real skin is semi-translucent, visually the eye catches a second layer (at least.) Essentially it achieves the same thing, but a lot of times, you don’t need a program for it, you just take the original texture or the diffuse and make it darker. If you want to become proficient with it and want to create realistic skin, you are better off looking into Customizable Skin in H5 which offers much more robust options for achieving this effect and more (I think it works for clothes too, but Ive never seen it.) Q: What about sizes? Things are different sizes? A: Size doesn’t matter really, you will see most norm and spec maps in .dds format because of mipmaps. In general though, Hook5 will accept larger and smaller norms and specs without problem. Q: What is a good way to work with .dds files, since many of norms and spec are? A: GIMP should be sufficient and handles the format well, loading existing and converting pngs, make sure to generate mipmaps when saving. Another good alternative is Paint.net but I had mixed results with it, it just loads faster for 1 minute edits. Q: Is the specular map created by AwesomeBump just a greyscale image of the texture? A: I’m pretty sure that’s all it does, but I didn’t bother to test, there is some sliders to make adjustments too and those are definitely applying various adjustments to it. I don’t actually know the details but it seems ok to use it since it’s where your normal will come from. I highly doubt it’s the optimal method, I’m 100% sure Hook5 is not reading the map the same way the program that it’s intended for is, but it should work since it’s just different colors. Conclusion So, I showed how fast and easy it is to make your own norm and spec for any texture, it’s time to get to work! >:) Well, to be honest it can be a lot of work if you want to achieve certain things and want it to actually look good, it takes trial and error and I’ve most certainly avoided almost all the technical details behind how such maps are used in broader 3d software. There is plenty of info out there and the methods I showed are not the best or most optimal, they are just a simple way to get started and make your own H5 bumps today.


-
Custom H5 Norm and Spec map (bump) creation with AwesomeBump and Gimp 4.10 By arse22 Mar 2021 Intro This will be a brief introductory guide to creating your own bumps (normals and spec maps) for Hook5 TK17, using free software you can find online. When it comes to 3d and image manipulation, these topics can be daunting and overwhelming, so I will steer clear of much technical aspects or details and dive straight to practical, as it pertains to Hook 5 and this game. Once you get the hang of it, you will agree that the artistic and technical knowledge required for baseline bumping is actually very low and maybe even limited. I would go as far as to say that a good portion of it is grunt work, so everyone can learn it and be contributing. Pre-Requisite -Any working version of TK17/SV with working Hook5(free or paid.) -Installed GIMP 4.10 or latest https://www.gimp.org -Installed AwesomeBump latest https://sourceforge.net/projects/awesomebump.mirror/ Basics of Bumping, Spec and Normal Maps So, long ago on Hook4 everyone used BumpMaps to create nice visuals for rooms, clothes, skin, anything with a texture, sometimes even without. Later, in Hook5, it has been replaced by Normals and Specular (norm and spec) maps, so this should clear up any confusion about those terms. They are not compatible, but achieve the same thing as far as improving your textures through Hook5, everyone still calls it bumps though. Typically the most common format you will see is [texture name]_n for normal and [texture name]_s for specs. They are placed in the same folder as the texture in ActiveMod, alongside a [texture name]_pass .txt file which points to the norm and spec. All of these you have to create for H5 to interpret in the game. Selecting a Texture to Work On The first step is to select a texture you would like to work on, let’s take a base game texture like Jeans (F_Jeans001_Base.png) . Typically cloth, hair, room texture, object texture is simple and straightforward, best for this guide. Skin is a little more advanced so maybe save that for after since there is more room for error and the process is not plug and play, there is much more room to improvise but this basic knowledge is still required. AwesomeBump Quick Guide to Normal Maps AwesomeBump is a popular free choice, it’s a little heavy on features and confusing to many, but good to have in your arsenal, especially if you plan to branch out into other 3d things. We will use it minimally as an excuse for you to install it. When you first load up this program, it looks like this: First thing to do is click on the top left icon with “D” for Diffuse and make sure you are on that, I believe it’s on it by default so nothing will happen usually. Then you click “Open New Image,” and find the texture we are working on. Looks kind of weird right now, so you must check “Enable preview”. Then, scroll to the bottom of this window and click on “Convert.” So, now what the software did is use the image we put in as the Diffuse and created various bumps for it which you can select on the left. N for normal, S for spec, H for height, O for occlusion, R for roughness etc. We’re not actually going to use much of that, for now just click on the N icon so we can make a normal. One thing to note about this program, although you can rotate and look at the result in the preview window in the middle, don’t click on the window in the right because it actually has an effect on the later result. I am yet to figure out how to reset it to neutral position, short of reloading. This is a good place to trial and error, but some of the things the sliders do can easily be done with a paint program later, there is no difference and we are trying to only make a basic bump or PBR as it’s called. So for now let’s just load it in game and see if it works. Leave the settings to default and select “Save Current Image.” Save it in the folder you have your texture, note that the _n suffix is already added in (the program knows what you want.) Testing In-Game If you looked around, you noticed the preview window in AwesomeBump doesn’t tell you much if you’re not already familiar with what you’re looking at and it’s not really made for Hook. So, if you have not already, create a “TestJeans” folder or something like that in ActiveMod and place both the texture and the normal in. If you load the game right now, it will look bad without a spec, so let’s use a generic spec for now just to test the normal. Just right click and download the below green image and place it with the other two files in your new folder in ActiveMod. Make sure it's named F_Jeans001_s.png Now you just need to make a pass file, create a new text file named “F_Jeans001_Base_pass.txt” in the folder with this info: So, when you load it in game it will be under “TestJeans” or whatever you named the folder. From this point it’s a bit of guess work, if you want to experiment with normal, you can change the sliders in AwesomeBump, overwrite the normal file and press Alt+R to reload in-game, to see the result. It’s a good idea to try it out if you never done this, but I will attempt to save you some trial and error and try to explain what the sliders do: Enhance Details - This is basically stronger normal effect (if you used the default settings from the program, you will note that the difference between that and a basic texture is fairly subtle, unless you mess around with lights, because this is set to 0.) Small and Medium Details – Well, below is a slider called Details Depth and these are just a means to fine tune it. Details Depth – This is self-explanatory, it’s how deep the crevices and such should appear (I think you can do this with contrast in any image program.) In more complex objects, an advanced technique involves making multiple depths and combining them together into one normal map to try to paint the object more accurately. Sharpen/Blur – It’s more or less sharp and blur from any image editing program, however the effect is really strong here, probably better to do subtle work in such a program, but it can save you time situationally. Normal Step – Honestly I don’t even know what this does. It seems to be more depth tweaking, but you should leave it at 1. Setting it to 0 makes the image disappear entirely and -1 inverts the normal, I prefer to invert in a separate program later if needed, since you rarely need to invert the whole thing, just specific parts that ended up wrong. Advanced Normals From here honestly, how good you want to make your normal is in your hands, you can leave it as is or you can tweak it a bit, or you can go in and make multiple normal, merge and crop them or merge with normal of other images to create weird effects or a textile effect for clothing etc. It will entirely depend on your skill with image manipulation and how much detail you put in. There is much more technical info on best practice and usage of normal maps elsewhere on the web, using this as your base method to build from is a great way to begin the journey of learning. The key concept to understand, also true for specs, that the image you put in for the bump will be what the game interprets, so using the base texture is only the foundational step, you are not required or limited to this. For example if I took some small HD image of human skin and made a normal of that, I can pass it as a normal for an actual skin, it will repeat the normal across the whole thing. That won’t look great, but it’s an idea. However, for something like a skin, you can’t just throw something in and expect good results because in the case of this game, the skin texture used by the game engine does not properly convey a lot of the complex curvature of a body, especially when it comes to details. The normal produced will have a lot of wrong depths (the outline for the body for example) and many missing ones too. So making a real good one would require a lot of extra work, if only to clean the normal a program like this would produce, which would be but a baseline starting point and maybe not the best one. This can absolutely be true for clothes, room textures etc as well, depending on the subject and what you are trying to accomplish. Editing Specular Map So we have a passable normal map made and everything works in game, time to look into making a custom spec map. This a lot more open-ended, easier but also more choice in approach. Normals are very similar across many 3d program, but the specs in Hook5 are unique to it, so it doesn’t hurt to look over the Hook5 guide before or after this. It sort of goes hand-in-hand with this guide on how to make a spec in Gimp. Specs are even more broad I would say, many content creators just use that default green image I provided (it actually comes with hook generic textures) and don’t bother looking into it. There are many ways to approach it and frankly I don’t even use AwesomeBump for specs at all. But, hopefully this method will offer a good place to start. Back in AwesomeBump, as example, let’s switch to the Spec Map tab and create a default settings spec map, the method is the same, just select the tab and click “Save Current Image.” Now, you want to take this new _s file that was created and load it in GIMP. In GIMP, select Colors->Components->Decompose. In the drop down select RGBA and hit ok. If you don’t have this option in GIMP, you should download a plug-in, I am not 100% sure it comes with GIMP by default. GIMP will create a new image with 4 layers corresponding to the RGBA colors. From here, any white on a specific layer will turn that color when we recombine them, so if that makes sense, the image is only there to guide you in your creative journey. In general you want the red (metallic) layer to be black and the glow (blue) to be black, while the alpha to be white. The green is the most commonly used layer since it makes things shiny and that’s a large percentage of hook usage. So, for now select the red layer, then Colors->Levels and set the Output to black. Do this for the Blue layer as well and leave the other two unchanged (the alpha should be white already.) Now select Colors->Components->Compose. In the Compose window make sure to select RGBA again and make sure each layer aligns with the corresponding channel. Hit ok and yet another image will be created. Now just File->Export this new image overriding the _s file in your folder and Alt+R in-game, I am assuming you already know this part from when we did it for normal map in this guide. If you followed the steps, the composed image will look like this, a working custom spec: Color Channel Details One thing to note when you test this result is that our custom item became very shiny, that’s because the Green channel is actually gloss in Hook5 and we did not change the spec made by AwesomeBump and because it’s mostly white, the effect is very strong. You can go back in and adjust the levels of that channel to your liking and compose again if you’d like. Another thing to do is to try out the other channels in the same way (actually all Black and all White is the simplest test, to see the extremes of each channel in-game.) The thing about metallic (RED) channel, it’s not that commonly used, often times a fine detail on metallic parts. Usually a high gloss (green) setting is plenty for actual metal parts and accomplishes the same effect and usually you will want a combination of the two anyway (since red isn’t shiny by default.) To make good specs, just like with normals, manual editing and fine tuning of specific parts is necessary. A note about the blue channel is that it will not do anything unless you have paid version of hook5, have enabled glow in settings and added the line “glow_intensity = 1 or another number, 2 is a good testing number” into the pass file, so again it isn’t used that much. On a more practical note, often glowing objects are futuristic things like data pads and the like, so again, like red, it will be in combination with the red and green channel and not nearly that strong as we are doing here. If all of this is confusing, a good exercise to try is this: decompose the original spec again and this time turn all 3 channels black and paint white with a brush in different spots on each layer before composing, as I did in the pic below (look at the layers previews:) It should compose to the lower image: You can even export and Alt+R and hopefully my notes on channels Red and Blue make more sense once you see how that looks in-game. Only the Green (gloss) channel is pronounced unless you have enabled glow for blue, red is much more subdued. An overwhelming majority of specs made for Hook5 will just be adjusted green channels, since most just want a nice gloss on their objects. So, one last thing experimental thing to try, is to add to the test composition is manually paint a strip of white and erase a strip (alpha,) directly on the composed image, just to see how they look in game. Well, what did we learn? It seems white is also glow (if you have Glow turned on and added the line into the pass file on paid hook, if you don’t it will just look super glossy/shiny.) While alphaed-out areas will create an absence of light (though this is only true for hook light, I’m assuming, the in-game light engine still tries to light the area but the in-game light engine is bad so why worry about it.) That should cover the basics on how to compose a specular map and how details and in-depth you want to be with it is up to you (just like with norms) and up to your image manipulation skills. You can paint directly with white or gray on the decomposed layers, or just copy paste from somewhere, since the layers are grayscale, it will work out. Advanced Spec, Hook5 and Beyond From here, I would look deeper into other Hook5 guides for more advanced ideas and experiment with different settings you can apply to textures (besides glow_intensity, there is many more.) Once you know this basic steps, you can see it is easy to begin learning more Hook5 tricks easily. For example, in the Hook5 guide it says messing around with the alpha color channel can produce more interesting effects, I didn’t really try so I didn’t cover it in the guide, so it could be a good place to start. More-so than normal, specs can really be anything and can have a major impact on the final image so it’s sort of like playing with fire in some cases, especially when it comes to glow and high gloss. I didn’t even begin to describe how a good normal map works in tandem with a good spec map, so you are really aiming for something good between those two and seeing how different types combine together is where a lot of the experience comes in. Worth noting, if you have already read the Hook5 guides and are familiar, the norm and spec we are making are specifically for CustomModel shader which is the most common. Room things often use CustomStatic, CustomSkin is for skins, but there is also EyePass and EyePass2 specific to eyes. Quick FAQ Q: What about subs? A: Subs, or SS or subsurface scatter is kind beyond this guide. Since it’s for CustomModel shader, I don’t even think there is a stage4 parameter. Basically, it’s used on skin to create an illusion of realistic skin, because real skin is semi-translucent, visually the eye catches a second layer (at least.) Essentially it achieves the same thing, but a lot of times, you don’t need a program for it, you just take the original texture or the diffuse and make it darker. If you want to become proficient with it and want to create realistic skin, you are better off looking into Customizable Skin in H5 which offers much more robust options for achieving this effect and more (I think it works for clothes too, but Ive never seen it.) Q: What about sizes? Things are different sizes? A: Size doesn’t matter really, you will see most norm and spec maps in .dds format because of mipmaps. In general though, Hook5 will accept larger and smaller norms and specs without problem. Q: What is a good way to work with .dds files, since many of norms and spec are? A: GIMP should be sufficient and handles the format well, loading existing and converting pngs, make sure to generate mipmaps when saving. Another good alternative is Paint.net but I had mixed results with it, it just loads faster for 1 minute edits. Q: Is the specular map created by AwesomeBump just a greyscale image of the texture? A: I’m pretty sure that’s all it does, but I didn’t bother to test, there is some sliders to make adjustments too and those are definitely applying various adjustments to it. I don’t actually know the details but it seems ok to use it since it’s where your normal will come from. I highly doubt it’s the optimal method, I’m 100% sure Hook5 is not reading the map the same way the program that it’s intended for is, but it should work since it’s just different colors. Conclusion So, I showed how fast and easy it is to make your own norm and spec for any texture, it’s time to get to work! >:) Well, to be honest it can be a lot of work if you want to achieve certain things and want it to actually look good, it takes trial and error and I’ve most certainly avoided almost all the technical details behind how such maps are used in broader 3d software. There is plenty of info out there and the methods I showed are not the best or most optimal, they are just a simple way to get started and make your own H5 bumps today.
-
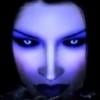
 Hello everyone, hope you all are doing great and staying safe in this times. I come to you all today asking for help or even better to provide me with a teaching about the tools im trying to use some days ago i found, a mod that add Jill and Carlos as a race and follower, i decided to install the race, i was able to add the my Meshes and Textures to said mod, and everything looked good but a neck seam, which the mod author informed, and provided a way to somewhat mask. the instruction, says that, i can choose a image editor of my choosing i deciced to go with Gimp, the instruction seems fairly simple: 3. Open the included “_FemaleBody_Neckseams.psd” (Jill) or “_Body_Seams.psd” (Carlos); 4. Open femalebody/malebody textures in a graphic editor of your choice; 5. Copy-paste seam files, save the end result; 6. If you get discoloration between the body and the seam, or the specular is too strong/faint, or whatever - adjust that first to better fit the seam color; 7. Save the files i have followed several tutorials and youtube videos, yet it seems im missing a step, because no matter how i do it, it does not change. so what im asking if someone has used or done this process before, with GIMP, do i need to do an extra step do i have to merge layers, the closest i gotten, has been to mess up the entire texture by putting the neck seam file on top i guess, so it replaces the entire texture instead of just cover a layer. what i am doing wrong 1.It's the save format wrong meaning instead of xcf it should be dds? 2.Am i missing the option to merge the layers? 3.Am i suppose to degrade a layer? Please Help, its not even about playing with the character anymore, i mean i started doing this thing on my free days and now i come from work and start doing it, it bothers me that i cant do it. For reference this is where i am. Thank for any teaching. English is not my native lenguage so, im sorry for any misspelling If i poster this on the wrong place, i am sorry and will be more than glad to move it accordingly
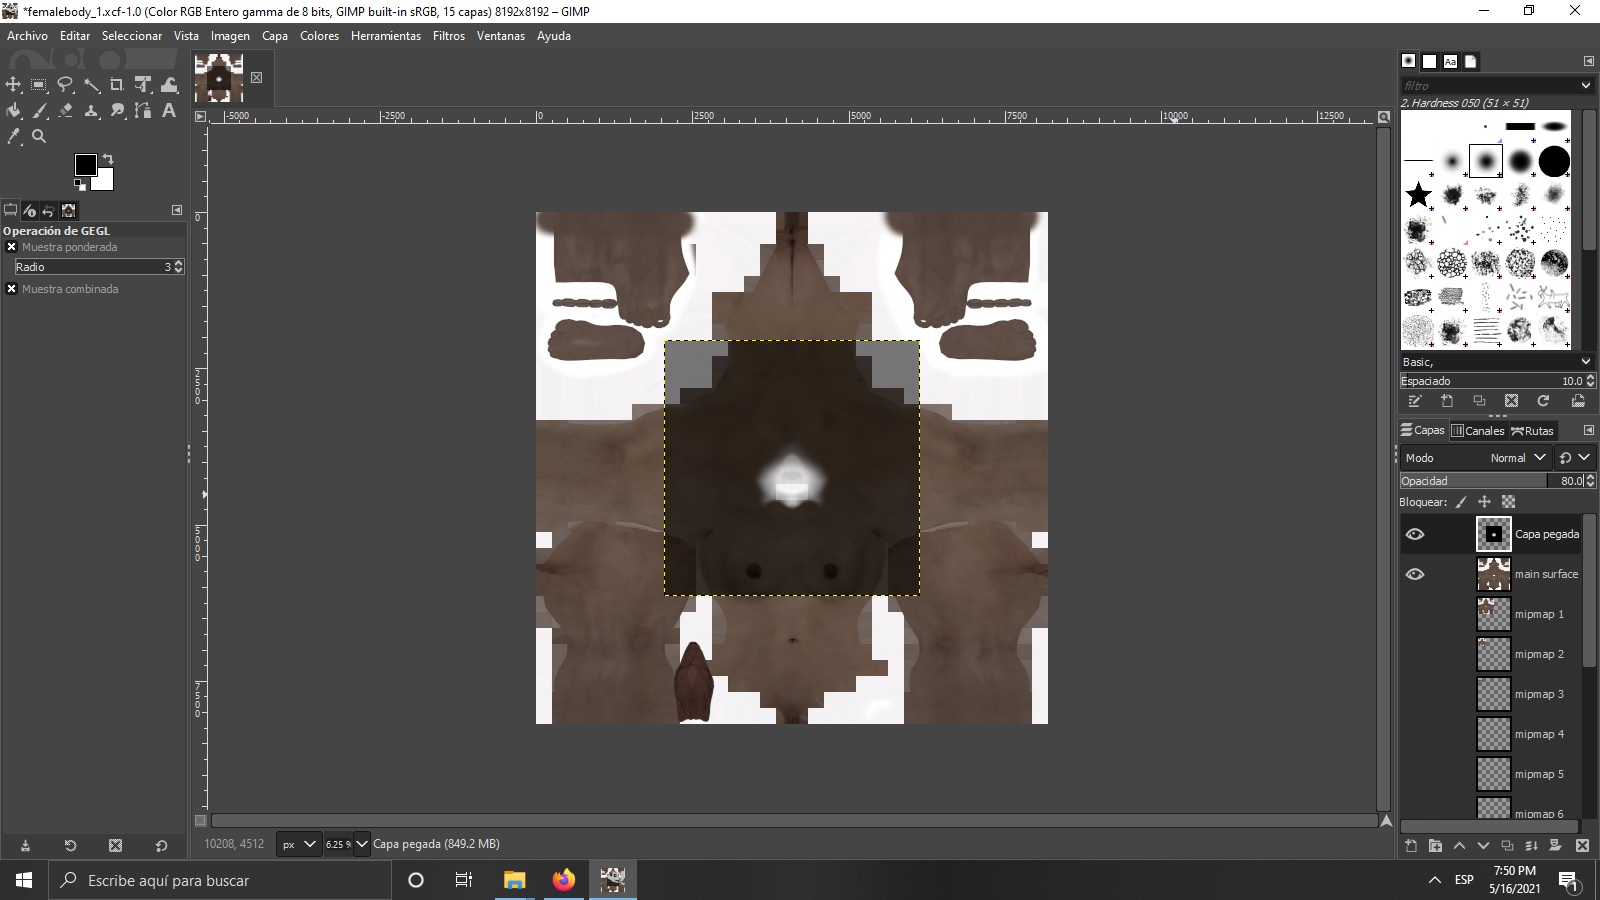
-
 First of all, I'm using Paint.net. Second, I'm not a professional, so all of this is new to me. I'll be very grateful if you explain it to me like I was a 5 y/o kid. I have never worked with dds files before. I was told BC7 Linear was for SSE, but I don't have any clue about LE version. Also I was wondering if there's any setting that lets both LE and SE reads the same dds format. I'm trying to figure out what setting should I pick for tattoo overlays. I don't know if that matters. Is there a difference between overlays with transparencies and body textures? Thank you in advance.
-
 Today’s Oblivion how-to is how to do icons in GIMP, both basic item icons as well as quest icons. There are two good icon tutorials that I’m aware of. One for Photoshop is here, and one for GIMP is here. Both cover inventory items, but not quests. Inventory Icons: Before you do anything else, fire up GIMP or Windows Texture Viewer, and have a look at a few of the icons for whatever item you’re making. You can find them in Textures/Menus/Icons/. Most items are positioned a certain way, and it’s best to mimic that when creating your icon. Having done that, let’s make an icon. 1. Open up GIMP if it’s not already open, then open up the .nif file for whatever you’re making the icon for in Nifskope. 2. In Nifskope, zoom out until you can comfortably fit the entire item in the view window. Rotate it around until you have it in the proper pose. Make sure that your background color is something that contrasts with the item, but not too strongly. Grey is usually good. High contrast colors are bad, because it’s hard to get all traces of, say, magenta out of the picture you’re going to take, leaving a halo or noise around the item. If you have the axes, havoc, or anything else showing, turn it off under the Render menu. 3. Hit Printscreen to take a picture of your item. Switch over to your empty GIMP window and hit Ctrl+V to paste. You now have a snapshot of your desktop. 4. Using the box select tool (top left corner of your toolbox), select a perfectly square area around the item. This should be exactly how you want your icon to look – don’t leave extraneous space, make rectangles, or cut the item off. It doesn’t particularly matter how big the selection is, since we’ll be resizing it later anyway. You should end up with something like this: The green box is my selection, the red arrow is the precise size in pixels of said selection. Don’t worry about framing the selection perfectly, as you can click and drag to move it around once you get the size right. Once you have a selection that you want, Ctrl+C to copy, Ctrl+Shift+V to paste as a new image. You’re done with the other image, and you can close it now. Note that if you’re making icons for multiple items, there’s a handy trick you can use. Open several Nifskope windows, scale them and pose them the same (middle mouse button makes this easy), then line them all up in a row. After you screenshot the entire screen, go through this step, but don’t close the window after pasting the new image – go back to the screenshot, and simply move your selection box over to the next item and repeat the process, then stash the windows you want to work on later out of the way until you want them. 5. Now, in the new image, click the magic wand tool (second from the right in the top row of the toolbox), then click the grey area of the image. Hit Delete, and everything that was grey should be replaced by the checkered pattern GIMP uses for transparency. You should have this: So far so good. Now, go to Image/Scale Image. Change the height and width to 64×64 pixels (just change one, the other should change automatically). Hit the Scale button. Your image just got really small. 6. Next, over in the Layers, Channels, Paths toolbar, right click under your current layer (probably called Pasted Layer), and click New Layer. Make sure it’s 64×64 pixels and transparent. Hit ok. If it appears above the layer with your image on it in the list, drag it below. Then switch back to the image layer by clicking it. 7. Now, go click your foreground color in the toolbox to bring up the color picker dialogue. Where it says HTML notation, change whatever’s there to EFE7AD, and hit ok. Now select the magic wand tool, and click the transparent area to select it. MAKE SURE YOUR IMAGE LAYER IS SELECTED, or you’ll get unhappy results. If a dotted line appears around the image, things are going well. 8. Now go to Select/Invert to invert the selection – now you have the item and just the item selected. Then, go to Select/Grow, make sure it’s set to 1 pixel, and hit ok. Now, and this is important, go over to the Layers toolbar and select your new layer, which is probably called New Layer. 9. Select the Pencil tool (looks like a pencil), and change the brush to something really big. Now color in the entire area under the item. You should see an outline appear around the item. 10. Now go back to the Layers toolbar, right click it, and select Merge Visible Layers with the default settings. Hit Merge. What you have should look like this (mine is zoomed in): 11. Now save the image. Icons MUST go somewhere in Textures/Menus/Icons/. Accepted practice is to make a folder with the name of your mod (or one with your name, then another folder with the name of your mod), and then organize your icons however you like in there. Call it some descriptive name and make sure you’re saving as a DDS file. When you hit Save, a menu will pop up with options. Icons should be saved as DXT3, WITHOUT mipmaps – if your icon has mipmaps, the CS will complain loudly. Hit ok, and you’re almost done. We just need to create the Menus80 and Menus50 versions. 12. To create a Menus50 icon (32×32 pixels), go to Image/Scale Image, and change width and height to 32. Hit scale. Now, save it in the precise same spot you saved your icon before, only instead of under Textures/Menus/Icons/, you’re going to put it in Textures/Menus50/Icons/. Make sure you get the right directory, or this won’t work. Also make sure to not save over your 64×64 icon. If you DO save over your 64×64 icon, just keep hitting Ctrl+Z until you get back to it, then save again. 13. Now hit Ctrl+Z to undo the scale change. It’s time to make the Menus80 icon. Same deal as the Menus50 icon, except a different location and a bit more annoying. 14. Use Image/Scale Image to change the size of the icon to 51×51 pixels. Then, go to Image/Canvas Size, and change things back to 64×64 pixels. Your image should now occupy the top left corner. This is good. Hit Resize. Now go to Layer/Layer to image size. If you don’t do this, you’ll get an error when saving. Now save the image. Same deal as before, but it needs to go under Textures/Menus80/Icons/. Now you’re done. It should be noted that it’s not entirely certain if you really need to go through the motions of creating the Menus80 and Menus50 icons, but it doesn’t take long, and won’t hurt anything. Quest Icons: Rather unlike the inventory icon process, creating quest icons is a lot more of an art form. What this means is that while I’m going to tell you some things here, you should treat them as guidelines or helpful suggestions, rather than laws of the land. That having been said, to start with, open up GIMP, and load up a good 3-4 quest icons, which live in Textures/Menus/Icons/Quest/. The Settlement Quest icon is particularly good for this because it has a nice border we can steal. 1. With Icon_Settlements_Quest_Icon selected, go to View/Zoom and pick something nice and big like 4:1. Now, using the box select tool, select the area inside the border, roughly like this: Note that the dark area around the border is NOT included in my selected area. 2. Now, use Select/Invert to invert the selection, Ctrl+C to copy, and Ctrl+Shift+V to paste to a new image. This will one day be the border to our icon. 3. Still in Icon_Settlements_Quest_Icon, select the eyedropper tool (second from the right on the second row), and click somewhere in the sort of medium blue area near the top to change our foreground color, which we’ll need in a second. 4. In your new untitled image with just the border, create a new transparent layer, and make sure it’s under the Pasted Layer. Select the bucket fill tool (looks like a bucket), and with the new layer selected, click to fill it. Everything will go blue, and you should have something like this: This is going to be our base image. We’ll come back here later. For now, we need something to put in the center. There are a couple of rules of thumb here: – You want a balance between blue and tan in the image. Too much empty blue space looks bad, but so does too much tan. Pick something that will be able to balance these out. – At the same time, don’t get too intricate. This is a 64×64 icon, and you simply can’t get a lot of detail at this resolution. 5. That having been said, go find some stuff you want to make up your image. There’s no particular need to draw anything here – symbols from in-game, clip art, and the like can be combined to make a good icon image. For our purposes, we’re going to use .nif models – ARStatue01 and ARArch02. Just like you did for the inventory icons, open up your model in Nifskope, get it to a zoom distance and angle that you want, and Printscreen and Ctrl+Shift+V to get an image. Then copy out the bits you want and magic wand + delete to get rid of the background. Unlike inventory icons, it’s not overly important to make things precisely 64×64 – if you need something smaller, bigger, rectangular, whatever, do it so long as the image you wind up with will fit in a roughly 55×55 interior area. As you create and resize new images, go back to your base image and use Edit/Paste as new layer to paste things in. Reorder the layers in the order you want them to appear in. You may have to do this a few times in order to get something that looks ok. What I wound up with was this: Make sure to keep all your old image windows open all during this process, because there’s a good chance you’ll need them again. 6. Now you’re going to create a whole bunch of new transparent layers. For each actual image you paste in as a layer, you’re going to need 3 transparent layers, organized like so: – Transparent Layer #1: this will eventually be for blue detailing. – Transparent Layer #2: this will be for making a tan version of your image. – Your pasted image. – Transparent Layer #3: this will be for dark blue shadowing later. If it helps, you can rename layers by double clicking their names in the Layers bar. You can also hide layers by clicking the eye icon next to a layer. This will become important later. When you get done, you should have something like this: This looks like a lot, but taken in steps it’s not bad. 7. Now, hide everything except one of your image layers and its tan layer. In the statue layer, use the magic wand to select the transparent area, then Select/Invert to invert the selection. Now switch to the tan layer. Remember this bit from the inventory icons? Yeah. Now, change your foreground color to some sort of tan – e9d6b0 works well enough, or click somewhere in the brighter tan area of one of the icons you opened for reference with the eyedropper tool, and give yourself a nice large paintbrush with the paintbrush tool. Color in the entire selected area over your image. If you get any color outside the area you want, use the eraser tool to fix it. 8. Now, use Select/Grow to grow the selection by 1 or 2 pixels. Use the eyedropper tool to select a pretty dark blue from one of the shadowed areas of another icon (but not the darkest blue), then change to the paintbrush tool. Change the opacity to 50 or 60. You want a small brush for this, Circle 05 or so. Now switch to the shading layer under the image (make sure to unhide it), and outline the image with blue. It’s ok to have some fading and blotches in spots, but try to keep things reasonably uniform. Now repeat the process for the other images. When you get done, you should have something like this: So far so good, but that’s way too much tan. We can fix that by adding in detailing. 9. Pick an image, either image. Hide the tan and shadow layers, make sure the image is visible, and unhide and switch to the details layer. Switch to the paintbrush tool at a very small brush size (usually 1) and 80 opacity or so. Find dark, regular areas of the image. Joints between bricks, wooden posts, anywhere you can break up the tan. In my case, I’m going to be using the arch joints and the wing feathers of the statue. Run the brush a pass or two over the areas. Try not to make entirely straight lines – click a couple of times along the sides to make things uneven if you need to. Every so often unhide the tan layer to see how you’re doing. And here’s our mostly complete image. Still a bit too much tan in the arch though. We can be a bit more subtle in fixing this. 10. Create a new layer, and position it between the tan and details layer. In this case, I’ll put it between the arch tan and details layers. Hide the tan layer and switch to your new layer. Go to the color picker tool and get a slightly darker tan shade. Then, get a mid-sized paintbrush (Circle 05 or 07 work well) and change to 50 or so opacity. Then find areas in the original image you might create a few blotches, and do so. In my case, the mossy areas of the arch are perfect. You may want to use the magic wand to select the transparent parts of your tan layer, then invert the selection to use as a guide. Sometimes you just have too big of a tan area and need to rethink what you’re doing, but for the moment we’ll believe otherwise. Ultimately, your final icon might look like this: From here, make sure all layers are visible, merge visible layers, and save as .dds in Menus, Menu80, and Menus50. Remember to do the Layer/Layer to image size command, or you’ll encounter problems. You might also wish to save a copy with layers unmerged as an .xcf file somewhere OTHER than Menus so that you have a backup you can work on if need be.
 -
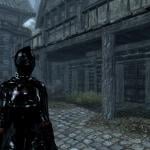
Version 0.1
3,065 downloads
A mod I made for myself ages ago, however Nalessa requested something like this on my enhanced catsuit page so thought I would be fluffy and upload it as you never know, someone else might also want it. Simple mod - rubber gimp hood which works on both males and females - craftable at the forge under ebony and can be tempered also if you feel the inclination. Hope y'all enjoy Kisses, TS -
How-To: Add Transparency to an Outfit
NIND (jimmyyu) posted a blog entry in Introduction to Modding with NIND
This tutorial goes over how to add transparency to a mesh in an existing .NIF file. Tools Needed: BodySlide and Outfit Studio (v) GIMP - GNU Image Manipulation Program* GIMP DDS Plugin NifSkope setup for use with your textures *There is also a DDS plugin for Photoshop Methods: There are currently two methods I know of for applying transparency to armors ingame: Mesh Segment-based: Easy and straightforward Transparency is based on the mesh segment in the NIF Cannot make a non-transparent retexture of a transparent mesh segment Texture-based: Highly Customizable Can be used to make cutouts without removing mesh (or when removing the mesh would give you an ugly cutout) Can be used as a retexture Takes more time and iteration I will go over both methodologies in this post using transparent outfits made with the same method: Before doing either of these methods, however you will require a working copy of nifskope setup to work with your textures. Please take a look at this video for setup instructions if needed. Mesh Segment Transparency: As with all bodyslide edits, this should be done to the .NIF file within the ShapeData folder for your project if you want all built meshes to keep the transparency. Using this method will also mean that all subsequent retextures applied to the mesh segment (the leotard in this case) will also be transparent to the same degree. Texture-Based Transparency: (OPTIONAL): A tip for Increased Accuracy (Exporting UV Lines) (OPTIONAL): A tip for Easier Prototyping ( Ctrl +E ) Hotkey -
HDT vagina textures, the manual way (with Photoshop/GIMP) + Template PSD
Rattlesnark posted a blog entry in RS's Content Dump
Here's a step-by-step-ish tutorial I've written for others like me who for some reason would prefer to add the vagina texture(s) to body textures manually, instead of using TexBlend or getting a set of prepared textures from a compilation mod (e.g. All-in-One). Additionally, I have also prepared template .psd files that you can use to quickly insert your own body textures, vagina-fy them up, and export them as .dds textures. The vagina textures included in the template are from BodySlide & Outfit Studio (UUNP), Clams of Skyrim (CBBE), and inner vagina textures for use with Bazinga's Naturalistic HDT Chinese UUNP meshes. This guide, in PDF format, as well as the templates are available for download here: MEDIAFIRE LINK Part 1: Preparing the Tools & Materials What you are expected to have before we begin. Part 2: Working the Textures Adding the vagina textures to the body textures, the “hard” way. The procedure is the same for both UUNP and CBBE/CoS. Extra: Using the ‘HDT Vagina Template’ PSD -
Custom LUT creation with ReShade and Gimp 4.10 By arse22 on Oct 30,2020 Intro First I will cover some basics, for those who don’t know what a LUT is and why you would want to use it as part of your Hook/ReShade setup. A LUT is a .png file which contains color information used by the game. Using a ReShade shader we can change the default and override with our own settings, creating changes we want in-game without any cost to FPS. In fact, the strain on your system is greatly reduced on account of the fact that only the color itself is changed and color-related shaders do not need to be loaded at all. You can of course, load some to make further tweaks, but personally I prefer to make such edits afterwards and in another program. Why would you want to do this? Besides saving you FPS, the power it offers you is easy to underestimate. In truth, everything is color, even shadow and light are created by color and modify color that produces any image. The color changes that can be made are fairly complex and remain uniform, saving you time to have to mess with the settings in-game. Essentially you will create a ‘preset’ of color in your favorite image or photo editing software and apply it directly in game, while giving you performance boost. Pre-Requisite -Image/Photo editing software such as GIMP or Photoshop. I am using Gimp 4.10. -Latest Hook and ReShade installed and working. I am using H5free and ReShade 4.8.1. Basic LUT LUTs can come in different configurations and sizes, but the most common is 32x 32x32. That is 32 tiles of 32x32 pixels. For this tutorial I will provide and use 64x 64x64 LUT and show how to configure the shader to use it. Here is the default LUT we will be using. I don’t know the technical details but 64 creates a nice 4k LUT and I read that any higher is supposedly ineffective in current games. This is a basic LUT, when you enable the shader that applies it, no change will be made because it’s the default colors. It is a good idea to test this in your game. So, download LUT.png above and place it into your reshade-shaders/Textures folder. Make sure the LUT you downloaded is 4096x64 dimensions. Backup and overwrite the existing one if you already have one in there. Then, make sure that in your reshade-shaders/Shaders folder, you have a shader named “LUTTools.fx” and if you don't have such a shader, search the Shaders folder that ReShade installed and move it in. This puts it into the active shaders to be loaded by the game and this is the shader we will be using. In my version, it was originally installed into a sub-folder called Fubax. If you still can’t find it, you can probably download it through Google, directly from the author. Open the file LUTTools with a good text editor like Notepad++, because it’s hard to see in Notepad. This is the changes we need to make, so that the shader reads our LUT file as 64 tiles. Change the name and both instance of 32 to 64. After you made these changes, save the file. You are ready to load the game. Loading LUT with ReShade Once it is loaded, hit F5 or whatever you have configured your ReShade window key-binding to be. Then create a new ReShade preset or just turn everything off in your current one if you don’t care about it. You will see two options for [LUTTools.fx] : ‘Display LUT [LUTTools.fx]’ and ‘Apply LUT [LUTTools.fx]’ You can safely ignore ‘Display LUT’ because that is used to create LUTs through the shader and this tutorial uses a different method and we will not be using it at all. Enable ‘Apply LUT [LUTTools.fx]’ instead. You won’t see any change and that’s good, as I previously explained, the LUT provided is a ‘default’ one that you will want to make a backup of if you don’t want to rename the one you will apply into game. I prefer to name my LUTs different things and change the name inside LUTTools.fx. When you make changes to the shader .fx in this way in text, all you have to do to apply the changes in-game is hit reload at the bottom of the ReShade window. Finally, what you want to do is take a picture or two with ReShade shaders turned off, just some screencaps of your game with just your basic Hook settings and no other shaders, as we will be using it to create a new LUT in the next section. Creating a New LUT Open the screenshot in your favorite image editor in its own layer and place the LUT.png you downloaded earlier into another layer. Adjust the screenshot so the LUT is at the top if you want (I did this in the pictures,) but it doesn’t matter, whatever is convenient for you. Then make a copy of the LUT layer. Now merge the LUT layer with your screenshot and hide the copy. You are ready to make changes to your LUT and you will use the screenshot as reference. Remember, only COLOR changes can be made, that means no blurring or outlines or any other such effects will work and may potentially mess up the LUT. So, only change colors and saturation and settings of the sort until the picture looks good to you or what you want to achieve with your LUT. Now that the LUT has been changed, we are ready to crop it out. In GIMP I used Magic Tool on the hidden copied layer to get the exact size and then selected “Image->Fit Canvas To Selection” Finally, you are ready to “File->Export” the LUT and name it. When you are exporting you want to make sure you export as .PNG and that there is NO compression of any kind. Name it “LUT_new.png” and export into the reshade-shaders/Textures folder. Make sure the LUT is 4096x64 png and in the proper location. Here is the LUT that I created in the pictures of this tutorial: Loading the New LUT Just in case, here again is where you would change the name in the LUTTools.fx to have the shader load it, instead of the one we changed it to in the beginning of this tutorial. When you apply the new LUT, your UI will change color too, this is normal. And here is an example of how it looks applied in-game. It is never 100% exact for me, I’m not a pro, because the LUT is very sensitive and applies every change and even the slightest changes by the saving process or something like that. The changes the coloring of the LUT are relative to the image used, so any difference between the screenshot and the game will be reflected in the applied LUT. In the case of the example picture, the lighting I used is darker, the actual LUT worked perfectly because I only did some basic steps to turn everything blue. This aside, we can see the potential power of using this method to apply LUT. Graphical changes straight from your GIMP or image editing program, directly into game through only color. Tips Not every LUT needs to be as dramatic as the one in this tutorial. I only did this to make things more clear. When you use a screenshot to compare while you color the LUT like we did in this tutorial, it's good idea to use a collage of multiple screenshots, preferably from various settings and Hook lighting setups. Hook and backgrounds can add color too, so it has to be taken account. The more extreme the LUT, the more likely it will not work in every scene, causing color errors and if you have multiple picture for reference while you’re making changes and be able to detect the problem. In particular I would try to use as many different shades of color that are usually in your most used settings, to try to adjust the LUT to fit as many of them as you can. This is not really a requirement, it’s just something to experiment with. In general though, I would say it depends on what you are trying to achieve. Some LUTs can be used to create a nighttime effect, another for a de-saturated “mech” setting and yet another can be more general and work with most scenes, or an old photograph, or maybe you like the particular color errors you found and want a “glitched-out” effect for some pictures. Ideally you have a LUT for every job, they allow your pictures to look uniform and unique in appearance without having to guess by hand every time since the color adjustments are applied with code. Which brings me to the last thing: Another powerful tool for GIMP is a filter suite called G’MIC, which can be downloaded free : https://gmic.eu/ It also includes a filter called “Simulate Film” which actually allows you to apply exact color presets from a wide variety of cameras, consumer to pro, rather than making changes by hand using this method. You can find the filter in G’MIC under Colors section, once you have it installed. The LUTs you create with it will give your screenshots a more professional quality. Also it has other color-related filters, including various “color transfer” effects which allows mimicking the specific color scheme of any photo, screenshot or painting to some degree. Things to Remember When customizing a LUT, make sure to only use color settings and filters, many experienced users only use ‘Levels’ to make their LUTs and nothing else, but anything color-related is ok. The LUT is PNG color data, it cannot record and interpret code of things like blur. Color changes made to the LUT are relative, so if you change your screenshot a lot before using it as reference to the LUT, you may get unexpected results, without those exact settings in-game. Rooms can have unique Hook lighting that apply color and potentially not work with a LUT if you didn’t use it as reference. Other things like ReShade settings, such as ones that change color. As long as you are using it in the reference screenshot, you can make sure the LUT will work, but depending on the changes you made, it may not work that well without. When creating a collage of screenshots to use for reference in creating new LUT, it is a good idea to include a variety of colors, lighting and maybe even shaders that you want to test out. This allows you to more easily see where the LUT can be best utilized and where it will have problems or won’t look good. If you made a new LUT, don’t forget to change the name in the shader .fx file and hit reload in the ReShade window if you already opened the game. Conclusion I created this tutorial because I noticed that a lot of Hook presets do not have this shader included or any LUT shaders for that matter. There is a way to do it through H5 as well, but I prefer to use Reshade since that is the settings I work with most, I never touch my H5 settings at all. Hopefully it was helpful to someone who may not be familiar with the power of such a common and IMHO fundamental method of graphic enhancement.
-
 I hope this manual will be helpful for people who are usually using TexBlend to apply various png overlays to their textures. Though TexBlend is wonderful and really easy-to-use tool, especially for a novice, there is a couple of flaws at how it works: Issue #1: Resulting textures has the same resolution as the png overlay. Just imagine, like you have one of those extremely detailed 8192x8192 diffuse maps from ThePure/Demoniac/Bjin/whatever texture sets. It looks great, but you want to attach some pubic hair or different color for vagina or nipples using TexBlend. The truth is, most png overlays has the resolution as 4096x4096 or 2048x2048, so after you blend the texture and the overlay together, you'll see that resulting texture had shrunken from 8192x8192 to 4096x4096 or even less than that, depending on the overlay applied. Issue #2: TexBlend's textures are always has 24bit RGB8 format, that is pretty much uncompressed. You cannot choose the type of compression. The uncompressed hi-res textures were originally created for better quality as references and probably for people with hi-end hardware to play with. For example, original ThePure diffuse map with a resolution 8192x8192 compressed as DXT1 and it's file size is roughly 42 Mb. If you apply some 4096x4096 overlay to this texture, the resolution will shrunken to 4K, but the file size will be roughly 50 Mb! Lower resolution, more GPU memory used... Kind of sad, eh? Besides, there is no point to turn DXT1 texture into uncompressed. The quality of already compressed texture will not change that way. So in short, what this manual covers? 1. How to rescale png overlays using GIMP 2. 2. How to edit hi-res texture without resolution loss. 3. How to compress/export dds textures using GIMP 2. Required tools: 1. GIMP 2 2. DDS plug-in for GIMP 2 You can find everything here, along with an installation guide: https://www.youtube.com/watch?v=21-U-4Ul4zM Step #1: Rescaling png overlay to match texture resolution 1. Start GIMP 2 2. Press "File" -> "Open..." in main window of GIMP 2. 3. Browse your folders and find the overlay you want to rescale. Select it and press "Open" button. 4. After an overlay file is loaded, press "Image" -> "Scale Image..." 5. New window named "Scale Image" has appeared. You can change overlay resolution by editing two values: "Width" and "Height". Edit them to match texture resolution. For example, if you want to edit 1K, 2K, 4K or 8K textures with this overlay, set the values as 1024, 2048, 4096 or 8192 accordingly. After values is set, press "Scale" button. The program will ask for confirmation, press "Scale" button again. 6. After rescale process are completed, you can either save this overlay using "File" -> "Overwrite" or "File" -> "Export As..." options. However, if you decide to export the overlay, make sure to use the file format that supports alpha channel (I suggest to leave it as png image). Just do not export it as jpeg or something like that. Aside from that, go on with default settings while exporting overlay. Step #2: Merging the overlay with the texture 1. Load the dds texture you want to apply an overlay on into GIMP 2 using "File" -> "Open..." command. 2. Load the png overlay you're previously changed. Make sure you're loaded it into different window. 3. Press "Edit" -> "Copy" or "Edit" -> "Copy Visible" (doesn't really matter now) in png overlay window. 4. Move to dds texture window and press "Edit" -> "Paste". An overlay should appear in a moving frame over the texture. 5. Now press "Layer" -> "Anchor Layer" to merge the overlay with the texture. 6. It's almost done! Off to step #3... Step# 3: Saving the dds texture 1. So, you have successfully edited your texture. Press "File" -> "Export As..." to continue. 2. Name your texture whatever you like or leave the old file name. The file extension should be .dds (well of course). 3. Press "Export" button. The window named "Save as DDS" should appear. There are several compression methods here. I suggest to use compression or format type the original dds texture has. For Skyrim, most common compression types are DXT1, DXT3 and DXT5, uncompressed formats - 24bit RGB8 and 32bit RGBA8. Make sure to choose "Generate mipmaps" into "Mipmaps" field. Oh, and if you want to know the exact type of compression the original texture has, use some programs like WTV DDS File Viewer that show their full properties. Thanks for reading, hope this information was helpful. P.S. And I hope you'll pardon my stupid English.
 -
 Hello, I was messing with an eye texture in GIMP and exported it using DXT5 (BC3) compression with no mipmaps but when I tested it in game the eyelash textures were very sharp and pixelated compared to the unedited textures. I tried exporting with no compression but that didn't fix it and I tried using Ordenador on it too but that didn't work either. Here is a picture to show what I mean. The one on the right is edited and the one on the left is not.
 -
View File A mod I made for myself ages ago, however Nalessa requested something like this on my enhanced catsuit page so thought I would be fluffy and upload it as you never know, someone else might also want it. Simple mod - rubber gimp hood which works on both males and females - craftable at the forge under ebony and can be tempered also if you feel the inclination. Hope y'all enjoy Kisses, TS Submitter turbosnowy Submitted 01/02/2014 Category Armor & Clothing Requires Special Edition Compatible