Search the Community
Showing results for tags 'blender'.
-
En esta segunda entrada referida a los nuevos modelos 3d para Carpa 1408 ire un poco atras y volvere a los trabajos que hice antes de parar su desarrollo hace ya algun tiempo. De momento, comienzo esta entrada con una de las paginas que he concluido esta semana y cerrare la entrada con otra de ellas. Google translator: In this second entry referring to the new 3D models for Carpa 1408 I will go a little back and return to the work I did before stopping its development some time ago. For now, I start this entry with one of the pages that I have completed this week and I will close the entry with another of them. Como los lectores habituales del blog ya saben, Carpa 1408, estara dedicado a presentar el trabajo realizado por Amparo y Teresa para el catalogo de la primera primavera tras concluir la guerra y que, este, por diferentes motivos, nunca fue publicado y solo se encontro en el baul de Amparo el material archivado por ella misma. Como las fotografias de nuestras amigas deberian presentar moda, complementos y diseño de interiores comencé a diseñar, en primer lugar, piezas de mobiliario como son las tres sillas de la imagen superior. As regular readers of the blog already know, Carpa 1408 will be dedicated to presenting the work done by Amparo and Teresa for the catalog of the first spring after the war ended and that, for different reasons, was never published and was only found in Amparo's trunk the material archived by herself. Since the photographs of our friends should present fashion, accessories and interior design, I began to design, first of all, pieces of furniture such as the three chairs in the image above. Todas las piezas serian fotografiadas segun el criterio de nuestras dos artistas, pero primero, realice los modelos en bruto de los diferentes muebles y sistemas de iluminacion, la verdad es que fue un trabajo muy agradable ya que, normalmente, suelo hacer modelos 3d de tematica militar. Como no quiero resultar aburrido solo subire unas pocas imagenes de las piezas realizadas hasta ahora. En la actualidad, ya he cerrado el trabajo en la seccion y practicamente, solo queda por acabar con la coleccion de alta costura de Candelaria. All the pieces would be photographed according to the criteria of our two artists, but first, I made the rough models of the different furniture and lighting systems, the truth is that it was a very pleasant job since, normally, I usually make themed 3D models. military. Since I don't want to be boring, I will only upload a few images of the pieces made so far. Currently, I have already closed the work on the section and practically, the only thing left to finish is the Candelaria haute couture collection. En la imagen aparecen algunos de los muebles realizados para la edicion. Aunque en un principio pense en reciclar algunos escenarios 3d utilizados en anteriores numeros de la revista e, incluso realice algunas revisiones a fondo de los mismos, he procurado no aprovechar este material antiguo. The image shows some of the furniture made for the edition. Although at first I thought about recycling some 3D scenarios used in previous issues of the magazine and even made some in-depth revisions of them, I have tried not to take advantage of this old material. Este interior, por eso, lo tengo reservado para las ilustraciones de la coleccion de alta costura, pero como ya utilice otro punto de vista en un Carpa anterior, no se si lo llegare a utilizar. Therefore, I have reserved this interior for the illustrations of the haute couture collection, but since I already used another point of view in a previous Carpa, I don't know if I will ever use it. Esta es la entrada que hice para representar el Pabellon florido, deje bocetadas muchas de sus habitaciones y lo he trabajado de nuevo y, como en el caso anterior, queda como reserva. Todo el mobiliario es diseño propio. This is the entry I made to represent the Flower Pavilion, I left many of its rooms sketched and I have worked on it again and, as in the previous case, it remains as a reserve. All the furniture is our own design. Esta es la guarderia donde trabaja la señorita Peteña y como me gusto mucho el resultado final, tambien esta en reserva. This is the daycare where Miss Peteña works and since I really liked the final result, it is also in reserve. Este interior es totalmente nuevo y lo hice para probar algunas piezas en un escenario completado, al final no he utilizado, de momento, ninguna de ellos. This interior is totally new and I made it to test some pieces in a completed scenario, in the end I have not used any of them so far. Este es un boceto de cocina que realice hace algun tiempo que he reformado por si me hiciera falta, en realidad, acabe con el ayer. This is a kitchen sketch that I made some time ago that I renovated in case I needed it, actually, I finished with yesterday. Estas dos escenas fueron simples pruebas para comprobar la presencia de los nuevos objetos hechos, pero como comentaba mas arriba, no he utilizado ninguno de ellos y, por el momento, estan archivados para futuros proyectos. Durante los primeros meses de trabajo en la edicion, trabaje en algunas escenas exteriores para las fotografias de la coleccion de moda. Con el paso del tiempo, preferi cambiarlas casi por completo, creo que he subido alguna imagen de la nueva escenografia. En aquel tiempo, hice varios bocetos de una de las estaciones de Agua hechicera, para ambientarlas, por eso, use material militar que tenia ya hecho. These two scenes were simple tests to check the presence of the new objects made, but as I mentioned above, I have not used any of them and, for the moment, they are archived for future projects. During the first months of working on the edit, I worked on some exterior scenes for the fashion collection photographs. As time went by, I preferred to change them almost completely, I think I have uploaded an image of the new scenery. At that time, I made several sketches of one of the Sorcerous Water stations, to set them, so I used military material that I had already made. Esta es una vista superior de uno de los andenes sin texturar y junto a las figuras, aparece el modelo de tren blindado que ya he presentado en una entrada anterior. This is a top view of one of the untextured platforms and next to the figures, the armored train model that I have already presented in a previous entry appears. Esta es otra version del mismo edificio. This is another version of the same building. Para uno de los primeros Carpa hice algunas de las calles que rodean el museo de arte moderno y la plaza de la estrella, durante un tiempo fui construyendo nuevos edificios y reformando los antiguos. For one of the first Carpa I made some of the streets surrounding the museum of modern art and the Plaza de la Estrella, for a while I was building new buildings and renovating the old ones. Aqui esta una parada de autobus frente al museo. Al final, solo aproveche unos pocos volumenes y el boceto quedo incompleto y lo suelo usar para algunos fondos secundarios. En la edicion definitiva solo aparece un detalle de la terraza del museo como fondo a una de las fotografias de la seccion optica y que creo que he subido aqui. Here is a bus stop in front of the museum. In the end, I only used a few volumes and the sketch was incomplete and I usually use it for some secondary backgrounds. In the definitive edition only a detail of the museum terrace appears as a background to one of the photographs in the optical section and which I think I have uploaded here. Esta es una de las calles que rodean la plaza de la estrella y es de nueva creacion, pero no la he acabado incluyendo en la edicion definitiva. En un principio la diseñe para una de las referencias de la seccion de complementos. This is one of the streets that surround the Plaza de la Estrella and it is newly created, but I have not ended up including it in the definitive edition. At first I designed it for one of the references in the accessories section. Este otro de los bocetos que hice a partir de material antiguo para representar las calles de Agua hechicera. This is another of the sketches I made from old material to represent the streets of Agua Hechicera. Para cerrar, aqui esta la ultima ilustracion que he hecho para la seccion "Interior" hace un par de dias y junto a una de las paginas concluidas esta semana, servira para cerrar la entrada de hoy. To close, here is the last illustration I made for the "Interior" section a couple of days ago and together with one of the pages completed this week, it will serve to close today's entry.
-
 I've just finished V1 of a Blender Import/Export tool that supports Skyrim LE & SE and Fallout 4. Yes, you can import from SE and export to LE and it just works. https://github.com/B...yNifly/releases Features Supports FO4, Skyrim LE, Skyrim SE. Import from one game and export to another with minimal twiddling (bone weights, partitions, shape keys). Handles tris and base mesh in one step. No need to separate UV seams or triangulate before exporting Handles expression and chargen tri files for Skyrim and FO4 Import tris into an existing mesh or on their own Supports Bodyslide tri files on import and export for body morphs Handles multiple bodyweights in one step. Export _0 and _1 armor weights for Skyrim from a single mesh. Handles Skyrim and FO4 partitions and also FO4 segments Handles skinned and unskinned meshes correctly. Exports head parts to SE correctly. Handles shaders correctly. Set them up in Blender and export. Import-and-forget. What you import will behave correctly on export without fiddling.
 -
Made a sample file for Blender 2.81+ which shows a easy way to make seamless textures for my Futanari CBBE SSE SOS Addon. You can download the file here: seamless_sos_textures_sample.7z Baking Tips: To bake the seam texture select first the schlong and then "shift select" the body and activate "Selected to Active" To bake the final texture just select the schlong and deactivate "Selected to Active" its very important to have the right "image texture" selected before you click "bake" ("1st Bake Target" for Seam and "2nd Bake Target" for the final texture) RGB Color Adjust Tips: The values R=1 G=1 B=1 are the default values (use them for fair skin like body textures... like the leyenda textures) If the schlong texture is to bright lower/increase all 3 values or increase to match the baked seam brightness if the tint is to "reddish" lower the red value or increase the other values. (same for other colors) Random Tips: Convert your body textures to a common image format like *.png (Blender could open the *.dds files, but it can be buggy sometimes) You can use the sample file for other sos addons. export the base meshes as *.obj with bodyslide, import them into the sample file and use the same materials. (for experienced blender users) Free tools like Gimp or Pain.net can open and save *.dds files, there are also free online image converter Made a uncommented video which shows the workflow for a complete new texture set (used "SG Female Textures Renewal") Finished textures: SG Female Textures Renewal CBBE Futanari patch.7z Video: Seamless SOS Textures.mp4 If something is unclear please ask and I will add it to the "Tips".
-
En la entrada anterior, inclui la imagen de la camara fotografica aerea que hice para Carpa 500. Abrire hoy la novena entrada con la primera version de la camara de Amparo. Un modelo 3d que realice hace algunos años y aunque he mejorado, le tengo mucho aprecio al mismo. Google translator: In the previous entry, I included the image of the aerial camera that I made for Carpa 500. I will open the ninth entry today with the first version of Amparo's camera. A 3D model that I made a few years ago and although I have improved, I really appreciate it. La camara la diseñe basandome en un sin fin de modelos reales, no utilice planos y con ella queria representar un modelo de medio formato ideal para el trabajo artistico de la protagonista. Aunque visualmente aparece en pocas viñetas quise que fuera lo mas detallada posible. En aquel tiempo comenzaba en el mundo del 3d y fue de los primeros que me dejaron contento, de ahi que le guarde tanto cariño. I designed the camera based on an endless number of real models, I did not use plans and with it I wanted to represent a medium format model ideal for the artistic work of the protagonist. Although visually she appears in just a few vignettes, I wanted it to be as detailed as possible. At that time she was starting out in the world of 3D and she was one of the first to make me happy, which is why I loved her so much. Con el tiempo, me di cuenta de los errores cometidos y realice una version mejorada de la misma. Con ella, represente una de las ediciones limitadas que "Kolia" realizo del modelo y la inclui en la revision de Carpa 1808. Mantuve las texturas para la camara de Amparo, el rojo y negro seguira siendo el protagonista. Over time, I realized the mistakes made and made an improved version of it. With it, I represented one of the limited editions that "Kolia" made of the model and included it in the review of Carpa 1808. I kept the textures for Amparo's camera, the red and black will continue to be the protagonist. Este es el modelo texturado de la serie limitada y utilice tintes planos, en su mayoria, para adecuarlo a la ilustracion que representaria una de sus campañas publicitarias. This is the textured model of the limited series and it used mostly flat tints to adapt it to the illustration that would represent one of its advertising campaigns. En la revision de Carpa 1808 represente uno de los catalogos de la firma con ilustraciones como esta para su lanzamiento en el gran certamen tecnologico. In the review of Carpa 1808 I represented one of the firm's catalogs with illustrations like this one for its launch at the great technological event. Este es el objetivo de 200mm que hice para mostrar el utilizado por Amparo, "Cachucho grande", segun sus propias palabras. Para hacerlo, me base en mi objetivo Canon de 200mm que me acompaña desde el principio de mi carrera como fotografo. This is the 200mm lens I made to show the one used by Amparo, "Big Cachucho", in his own words. To do so, I relied on my 200mm Canon lens that has been with me since the beginning of my career as a photographer. Aqui esta la maquina de Amparo y su objetivo largo, decorado por ella misma, tal y como aparecia en la revision de Carpa 1508. Here is Amparo's machine and its long objective, decorated by herself, as it appeared in the Carpa 1508 review. Esta es la version con tripode, "Tripoli", los llamaba Amparo. This is the version with tripod, "Tripoli", Amparo called them. Aunque todavia no los he utilizado, construi estos grandes teleobjetivos para su utilizacion por las unidades de reconocimiento fotografico y por la propia Amparo. para hacerlos, me base en diseños reales de la firma Leica de los años 30 y 40 y utilizados por el ejercito aleman en campaña. Although I have not used them yet, I built these large telephoto lenses for use by photographic reconnaissance units and by Amparo itself. To make them, I based them on real Leica designs from the 1930s and 1940s and used by the German army in campaign. Para las compañias de propagando hice esta filmadora portatil basada en alguinos modelos reales de los años 30, aqui aparece con librea militar, tambien hice una librea civil en rojo metalico. Este y el modelo siguiente los hice para adaptarlo a los "Cabezuelo", motores modernos, asignados a las compañias de "Sol y Justicia". For advertising companies I made this portable video camera based on some real models from the 1930s, here it appears in a military livery, I also made a civil livery in metallic red. I made this and the following model to adapt it to the "Cabezuelo", modern engines, assigned to the "Sol y Justicia" companies. Esta es la camara de rodaje cinematografico y, como la anterior, esta basada en modelo real. De momento, quiero representar para Carpa 1408 parte del material utilizado por Amparo para fotografiar el catalogo de Candelaria, pero reconozco que todavia no me he puesto a ello. This is the cinematographic filming camera and, like the previous one, it is based on a real model. At the moment, I want to represent for Carpa 1408 some of the material used by Amparo to photograph the Candelaria catalogue, but I admit that I have not yet gotten around to it. Para cerrar la primera parte de esta entrada, aqui esta Amparo y su "Kolia M". To close the first part of this entry, here is Amparo and his "Kolia M". Tras Carpa 1408 quiero comenzar con el numero 1308 que estara dedicado al grupo de combate "Alba negra" y , a ratos perdidos, voy revisando algun material militar que hice para numeros anteriores o mantuve en reserva y nunca he utilizado. La imagen superior uno de los vehiculos blindados anfibios utilizados para el cruce del gran rio y quiero utilizar en algunas ilustraciones. Como muchos de los vehiculos imperiales luce la estrella roja de Santa Teresa. After Tent 1408 I want to start with number 1308 which will be dedicated to the combat group "Alba negra" and, at odd moments, I am reviewing some military material that I made for previous issues or kept in reserve and have never used. The image above is one of the amphibious armored vehicles used for crossing the great river and I want to use it in some illustrations. Like many of the imperial vehicles, it sports the red star of Santa Teresa. Este lanza puentes basado en casco de Panzer IV fue el primer completo que realice hace muchos años. Aunque el modelado esta bien, cometi muchos errores que hacen imposible hacer las UV y solo lo pinte los materiales, lo inclui en algunas imagenes brumosas sobre la batalla de Amarillo. De el aproveche algunos elementos para realizar un lanza puentes, o mejor dicho, un puente anfibio para el ejercito imperial. This bridge launcher based on the Panzer IV hull was the first complete one I made many years ago. Although the modeling is good, I made many mistakes that made it impossible to do the UV and I only painted the materials, I included it in some hazy images about the battle of Amarillo. I took advantage of some elements to make a bridge launcher, or rather, an amphibious bridge for the imperial army. El vehiculo imperial, en lugar de lanzar el puente, el mismo se convierte en una pasarela sumergida para permitir el paso de los grandes rios occidentales. En este caso use un chasis basico que realice para toda la serie de blindados anfibios, aunque tome referencias de modelos reales, son ficticios en su mayoria. The imperial vehicle, instead of launching the bridge, becomes a submerged walkway to allow the passage of the great western rivers. In this case I used a basic chassis that I made for the entire series of amphibious armored vehicles, although I take references from real models, they are mostly fictitious. Este es el modelo barre minas sin texturar, ando pensando en cambiar su esquema mimetico. This is the untextured mine sweeper model, I'm thinking about changing its mimetic scheme. Aqui esta el vehiculo anfibio utilizado por las compañias sanitarias de Santa Teresa, le hice un esquema en gris azulado y blanco, pero posiblemente cambie su esquema. Here is the amphibious vehicle used by the Santa Teresa sanitation companies, I made a scheme in blue-gray and white, but I may change its scheme. Para cerrar la serie de los anfibios, este es el modelo de carro ligero que hice basandome en el T-70 ruso de la segunda guerra mundial. Aunque utilice planos para algunos elementos, es un vehiculo totalmente ficticio. To close the amphibian series, this is the light tank model that I made based on the Russian T-70 from World War II. Although it uses plans for some elements, it is a completely fictitious vehicle. Basandome en el diseño original del Sdkfz 3 de los años 20, diseñe el camion blindado con el que Taciana VI inspeccionara el frente junto a sus estrategas mayores. Based on the original design of the Sdkfz 3 from the 1920s, I designed the armored truck with which Taciana VI would inspect the front with her senior strategists. Para representar el vehiculo de mando de Amparo hacia el final de la campaña me base en el Sdkfz 247. Para mis ilustraciones, lo hice mucho mas grande y con un interior totalmente ficticio pero adecuado a mis intenciones. To represent Amparo's command vehicle towards the end of the campaign I based it on the Sdkfz 247. For my illustrations, I made it much larger and with a totally fictitious interior but appropriate to my intentions. Las dos imagenes muestran a Amparo y Condenacion embarcadas y una vista superior del interior del vehiculo con su aparato de radio y la mesa para los aparatos de cifra. The two images show Amparo and Condenacion boarded and a top view of the interior of the vehicle with its radio set and the table for the cipher devices. Para cerrar la entrada, subire algunas imagenes de los vehiculos diseñados para los ejercitos de Carmencita y que no inclui en la otra entrada. Para las unidades de reconocimiento, hice este vehiculo basado en el famoso "Dingo", aunque lo hice un poco mas grande de lo normal para adecuarlo a mis necesidades, utilice planos pero aumente la escalo y añadi o quite algunos detalles a mi conveniencia. To close the entry, I will upload some images of the vehicles designed for the Carmencita armies and that I did not include in the other entry. For the reconnaissance units, I made this vehicle based on the famous "Dingo", although I made it a little larger than normal to suit my needs, I used plans but increased the scale and added or removed some details at my convenience. Como segundo vehiculo de reconocimiento, hice este vehiculo de radio basandome en el "Humber" britanico, aunque me base en planos, muchos detalles son ficticios. El modelo lo use para realizar un pequeño blindado con torreta que se presenta en la imagen inferior. As a second reconnaissance vehicle, I made this radio vehicle based on the British "Humber", although I based it on plans, many details are fictitious. I used the model to make a small armored vehicle with a turret that is presented in the image below. La torreta la hice basandome en modelos historicos, pero poco tiene que ver con la realidad. Debe representar un vehiculo de reconocimiento armado. I made the turret based on historical models, but it has little to do with reality. It must represent an armed reconnaissance vehicle. Cierro la entrada con este gran semi oruga lanza cohetes, esta basado en varios vehiculos historicos, pero me deje llevar por la fantasia. Los tubos lanza raquetas, son los mismos que utilice en el ocho ruedas "Velasco". I close the entry with this large semi-tracked rocket launcher, it is based on several historical vehicles, but I let myself get carried away by the fantasy. The racket launcher tubes are the same ones used in the "Velasco" eight-wheeler.
-
La octava entrada dedicada a modelos 3d que he ido haciendo durante mi ausencia la dedicare a los modelos aereos que construi para Carpa 500, creo que algunos de los modelos que no llegue a utilizar ya han ido apareciendo. En esta entrada procurare subir imagenes que no haya mostrado anteriormente. Google translator: The eighth entry dedicated to 3D models that I have been making during my absence will be dedicated to the aerial models that I built for Carpa 500, I think that some of the models that I did not use have already appeared. In this entry I will try to upload images that I have not shown previously. Esta es una vista trasera del mismo aparato. Aunque me base en planos, acabe construyendo una version muy personal. Para el primer avion en alzar vuelo en nuestro imperio favorito, pense en basarme en alguno de los modelos diseñados por los hermanos Wright, pero realizando, logicamente un version ficticia como muestra la imagen. Quede satisfecho con el modelo, pero decidi rebuscar en la historia de la aviacion española y pense en realizar el modelo basandome en el primer avion construido en España y que realmente volara. asi que para el primer vuelo de Bonifacia me decante por el aeroplano Oliver-Brunet (1909). Aunque me base en planos y fotografias de una reconstruccion a escala 1/1, hay muchos detalles ficticios para adaptarlo a la historia de la aviacion imperial. This is a rear view of the same device. Although I based it on plans, I ended up building a very personal version. For the first plane to take flight in our favorite empire, I thought of basing it on one of the models designed by the Wright brothers, but logically making a fictional version as shown in the image. I was satisfied with the model, but I decided to look into the history of Spanish aviation and thought about making the model based on the first airplane built in Spain that really flew. So for Bonifacia's first flight I opted for the Oliver-Brunet airplane (1909). Although I based it on plans and photographs of a 1/1 scale reconstruction, there are many fictitious details to adapt it to the history of imperial aviation. Aqui presento dos vistas del modelo sin texturar. Here I present two views of the untextured model. Esta es la ilustracion final que aparecio en Carpa 500. This is the final illustration that appeared in Carpa 500. Aqui esta el modelo pilotado por Bonifacia ese aciago dia tal y como se conserva en la actualidad en la Casa del espacio. Antes de decidirme por este modelo construi una version ficticia del aeroplano con el que el aviador Fernandez encontro la muerte durante una exhibicion aerea en Francia. Here is the model piloted by Bonifacia that fateful day as it is currently preserved in the House of Space. Before deciding on this model I built a fictitious version of the airplane with which the aviator Fernandez met his death during an air show in France. Aqui esta el modelo sin las texturas. Here is the model without the textures. Este es el modelo finalizado, de momento, lo he archivado para futuros proyectos. Para representar la evolucion de la primera unidad aerea en utilizar aerostatos y su conversion en una unidad de reconocimiento aereo que participo en la campaña contra la "Bestia", construi a partir de los planos de un DH4 un avion de reconocimiento fotografico. Hioce el avion un poco mas grande y añadi un espacio para la fotografa y sus dos camaras. Aqui presento dos imagenes del avion sin texturar. This is the finished model, for now, I have filed it for future projects. To represent the evolution of the first air unit to use aerostats and its conversion into an aerial reconnaissance unit that participated in the campaign against the "Beast", I built a photographic reconnaissance aircraft from the plans of a DH4. I made the plane a little bigger and added space for the photographer and her two cameras. Here I present two images of the plane without texture. Aunque practicamente no se apreciaria en las ilustraciones, construi el modelo de la maquina fabricada por Kolia para la fotografia aerea, la hice a partir de un modelo portatil aleman de los años 40. Although it would not practically be seen in the illustrations, I built the model of the machine manufactured by Kolia for aerial photography, I made it from a German portable model from the 40s. Este es un renderizado previo con el aparato en vuelo. En un principio tenia pensado incluir un breve repaso al arma aerea imperial antes de la guerra, pero me parecio que se salia un poco del tema y, aunque realice varios modelos, los acabe rechazando y los he archivado para otros proyectos. This is a previous render with the device in flight. At first I had planned to include a brief review of the imperial air weapon before the war, but it seemed to me that it went a little off topic and, although I made several models, I ended up rejecting them and have filed them for other projects. A partir del TB3 real, construi este bombardero pesado y obsoleto que aun estaba en servicio al principio de la campaña, me base en planos para construirlo, pero como es habitual, muchos detalles son ficticios. Starting from the real TB3, I built this obsolete heavy bomber that was still in service at the beginning of the campaign. I based it on plans to build it, but as usual, many details are fictitious. El bombardero en tierra sin texturas. The bomber on the ground without textures. Y dos imagenes del avion en vuelo, tambien, sin texturar. Diseñe tambien para esa epoco un bombardero ligero, en este caso me base en el DOP-13. Me base en lineas generales en planos y fotografias, pero acabe realizando un modelo propio. And two images of the plane in flight, also, without texturing. I also designed a light bomber for that time, in this case I based it on the DOP-13. I based it broadly on plans and photographs, but I ended up making my own model. Aqui esta el modelo en vuelo y texturado, de la gran mayoria de estos modelos, solo realice, renders previos. Here is the model in flight and textured, of the vast majority of these models, I only made previous renders. Aqui esta el modelo en vuelo pero sin texturar. Here is the model in flight but without texture. Con esta imagen de las ganadoras de la copa Cebolla, lo dejo por hoy. With this image of the winners of the Onion Cup, I'll leave it for today.
-
Version 4.1.1
7,067 downloads
Additional Clothes for Heroine Rumble 2 and a Tutorial on Blender. -
Esta septima entrada de "Algunos modelos 3d", la dedicare en su totalidad a los models 3d que he hecho para los ejercitos de Carmencita en los ultimos tiempos. Algunos de ellos ya han aparecido en algunos numeros de Carpa, pero el resto, los reservo para los numeros finales de la historia de Amparo y sus compañeras. Vamos pues con el primero: Google translator: This seventh entry of "Some 3D models", I will dedicate in its entirety to the 3D models that I have made for the Carmencita armies in recent times. Some of them have already appeared in some issues of Carpa, but I reserve the rest for the final issues of the story of Amparo and her companions. So let's go with the first one: Para los combates finales, realice esta version ficticia de un mensajero del rin sobre blindado pesado, a excepcion del cphete que hice siguiendo planos, todo el vehiculo es pura ficcion. Me base en algunos planos de unidades que nunca entraron en servicio pero deje volor la imaginacion bastante. En los ejercitos de Carmencita entraria en servicio como cohete aire tierra y tierra tierra. For the final combats, I made this fictional version of a heavy armored wheel messenger, except for the cape that I made following plans, the entire vehicle is pure fiction. I based it on some plans of units that never came into service but I let my imagination run wild. In the Carmencita armies it would enter service as an air-to-ground and ground-to-ground rocket. Para complementar el vehiculo anterior realice sobre el mismo chasis un unidad de radar para la direccion de tiro, aunque me base en algunos plasnos, todo el vehiculo es totalmente ficticio. To complement the previous vehicle, I made a radar unit for the direction of fire on the same chassis, although I based it on some plans, the entire vehicle is totally fictitious. Como blindado de reconocimiento decidi construir un vehiculo basado en el Mark VI britanico y aprovechar para realizar algunas de las versiones historicas que se hicieron en su momento. La imagen pertenece al vehiculo base sin pintar y en esta ocasion procure ceñirme a los planos. As an armored reconnaissance vehicle, I decided to build a vehicle based on the British Mark VI and take the opportunity to make some of the historical versions that were made at the time. The image belongs to the unpainted base vehicle and on this occasion I tried to stick to the plans. Durante la segunda guerra mundial, el ejercito aleman utilizo los vehiculos capturados durante la campaña de Francia para construir un pequeño autopropulsado de apoyo a la infanteria. lo construi basandome en planos, pero añadi algunos detalles ficticios, sobre todo en su interior, para su servicio en el ejercito de Carmencita. During the Second World War, the German army used the vehicles captured during the French campaign to build a small self-propelled vehicle to support the infantry. I built it based on plans, but added some fictitious details, especially inside, for its service in Carmencita's army. Esta vista superior muestra el interior del mismo. This top view shows the interior of it. Y aqui, esta el vehiculo pintado. And here is the painted vehicle. Esta es la version para la direccion de tiro artillero, esta basado en el modelo historico. This is the version for artillery fire direction, it is based on the historical model. La ultima version que hice fue esta como vehiculo de municiones para el pequeño autopropulsado. Industrias velasco se convirtio en el gran grupo empresarial que fabrico muchos de los blindados utilizados por el ejercito de Carmencita. Es el responsable del diseño y fabricacion de los grandes vehiculos de 8 ruedas utilizados durante toda la campaña. The last version I made was this as an ammunition vehicle for the small self-propelled one. Industrias Velasco became the large business group that manufactured many of the armored vehicles used by the Carmencita army. He is responsible for the design and manufacture of the large 8-wheeled vehicles used throughout the campaign. Este modelo, basado en un vehiculo fabricado por Steyr en los años 30, lo realice para representar algunos de los vehiculos utilizados durante la primera parte de la campaña y me sirvio para dos versiones complementarias del mismo. This model, based on a vehicle manufactured by Steyr in the 1930s, was made to represent some of the vehicles used during the first part of the campaign and was used for two complementary versions of it. La primera version es este lanza raquetas de grueso calibre y es un diseño propio. los tubos lanzacohetes estan basados en un modelo real, pero es pura fantasia. The first version is this heavy caliber racket launcher and it is my own design. The rocket launcher tubes are based on a real model, but it is pure fantasy. La segunda version es este vehiculo de mando para batallones blindados y es un modelo totalmente ficticio. Aun no se si continuare con la serie Velasco, pero para mostrar la evolucion tecnologica del fabricante diseñe un modelo basado en el Ypf4 fabricado por Daf en una version para el transporte de tropas y otra con torreta blindada. Aunque el primero si que esta basado en planos, el segundo es un modelo totalmente ficticio. The second version is this command vehicle for armored battalions and is a completely fictitious model. I still don't know if I will continue with the Velasco series, but to show the technological evolution of the manufacturer I designed a model based on the Ypf4 manufactured by Daf in a version for transporting troops and another with an armored turret. Although the first is based on plans, the second is a completely fictitious model. Esta es la version para el transporte de tropas. This is the troop transport version. Hace un tiempo estuve trabajando en algunos modelos ficticios del M3 para las tropas de Carmencita, como estos dias he estado revisando algunos detalles, subo algunas imagenes de los mismos sin texturas. A while ago I was working on some fictional models of the M3 for the Carmencita troops, as these days I have been reviewing some details, I upload some images of them without textures. Este es el modelo de cuatro ruedas. This is the four wheel model. Y esta, la version semioruga. And the half track version. La unica version que he hecho es esta antiaerea con remolque, tenia previsto hacer alguna mas, pero de momento, esta parado. The only version I have made is this anti-aircraft gun with a trailer, I had planned to make some more, but for now, it is stopped.
-
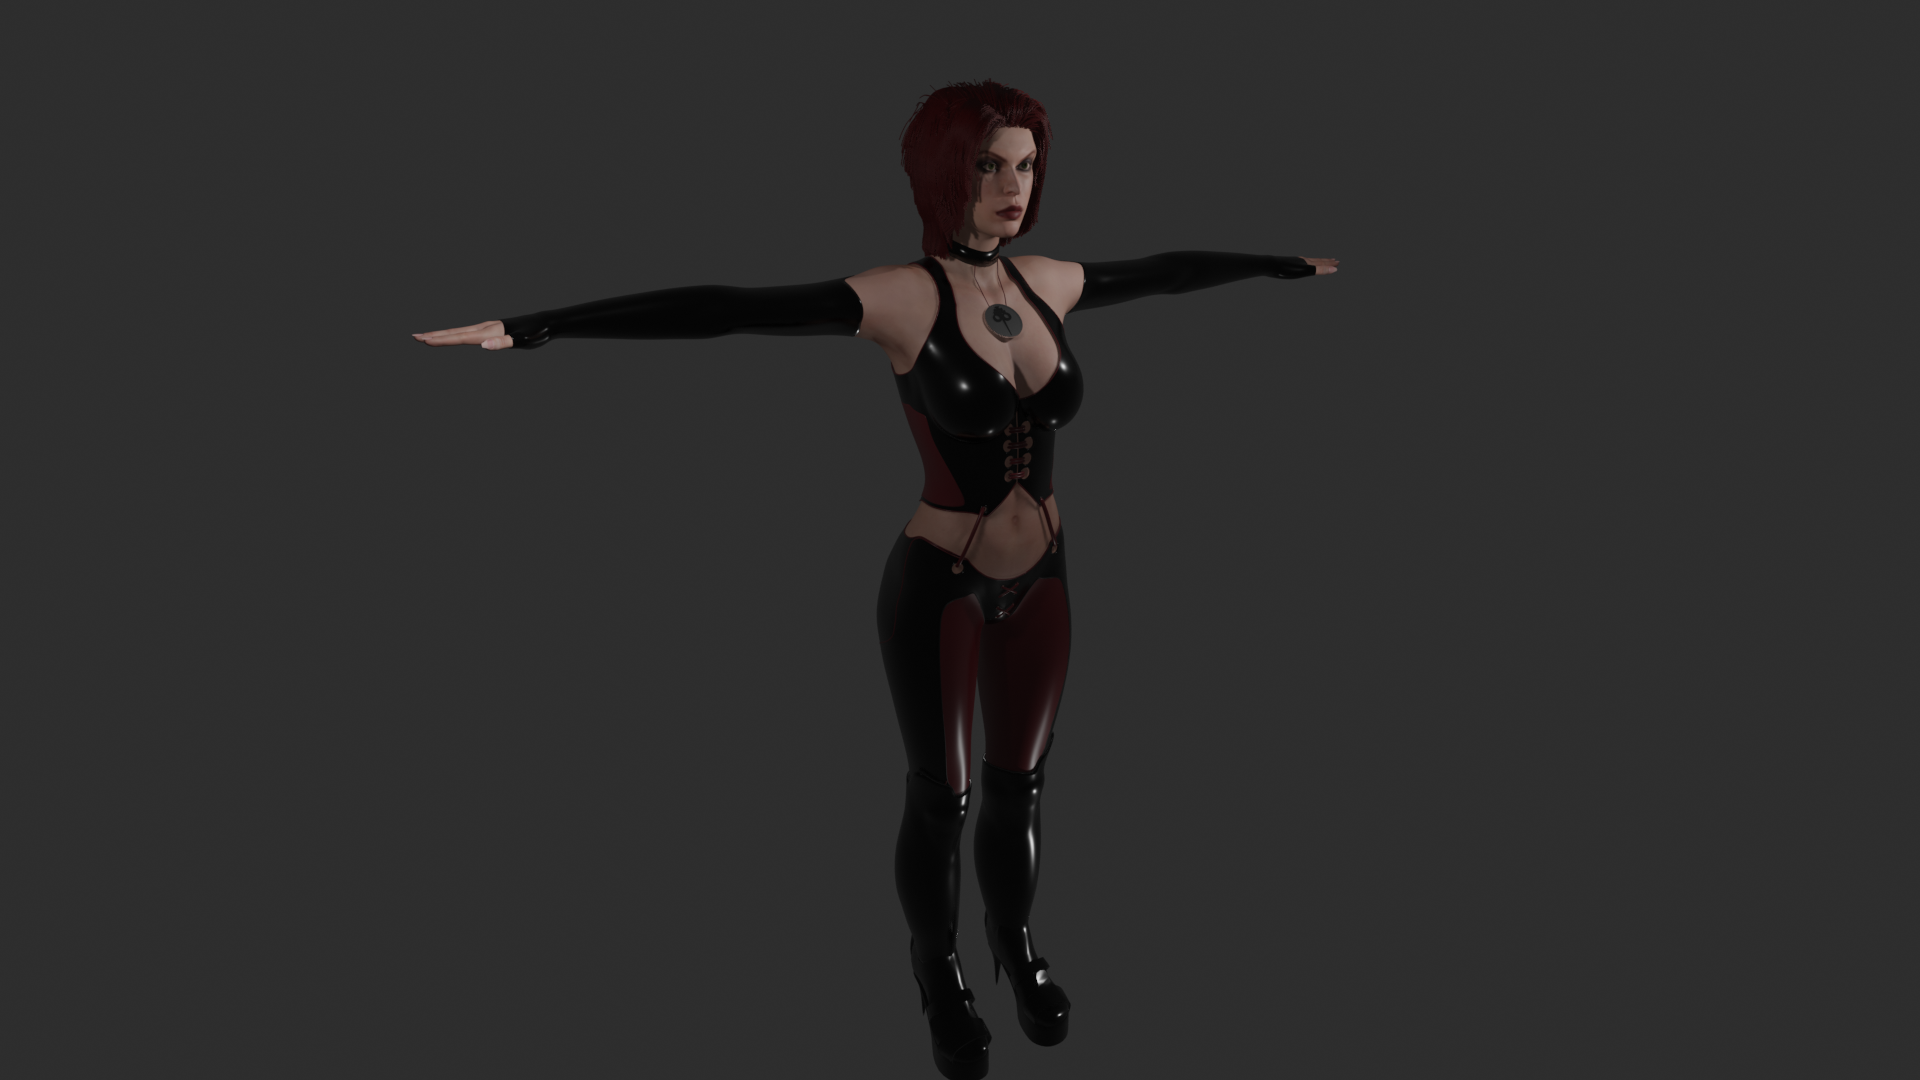
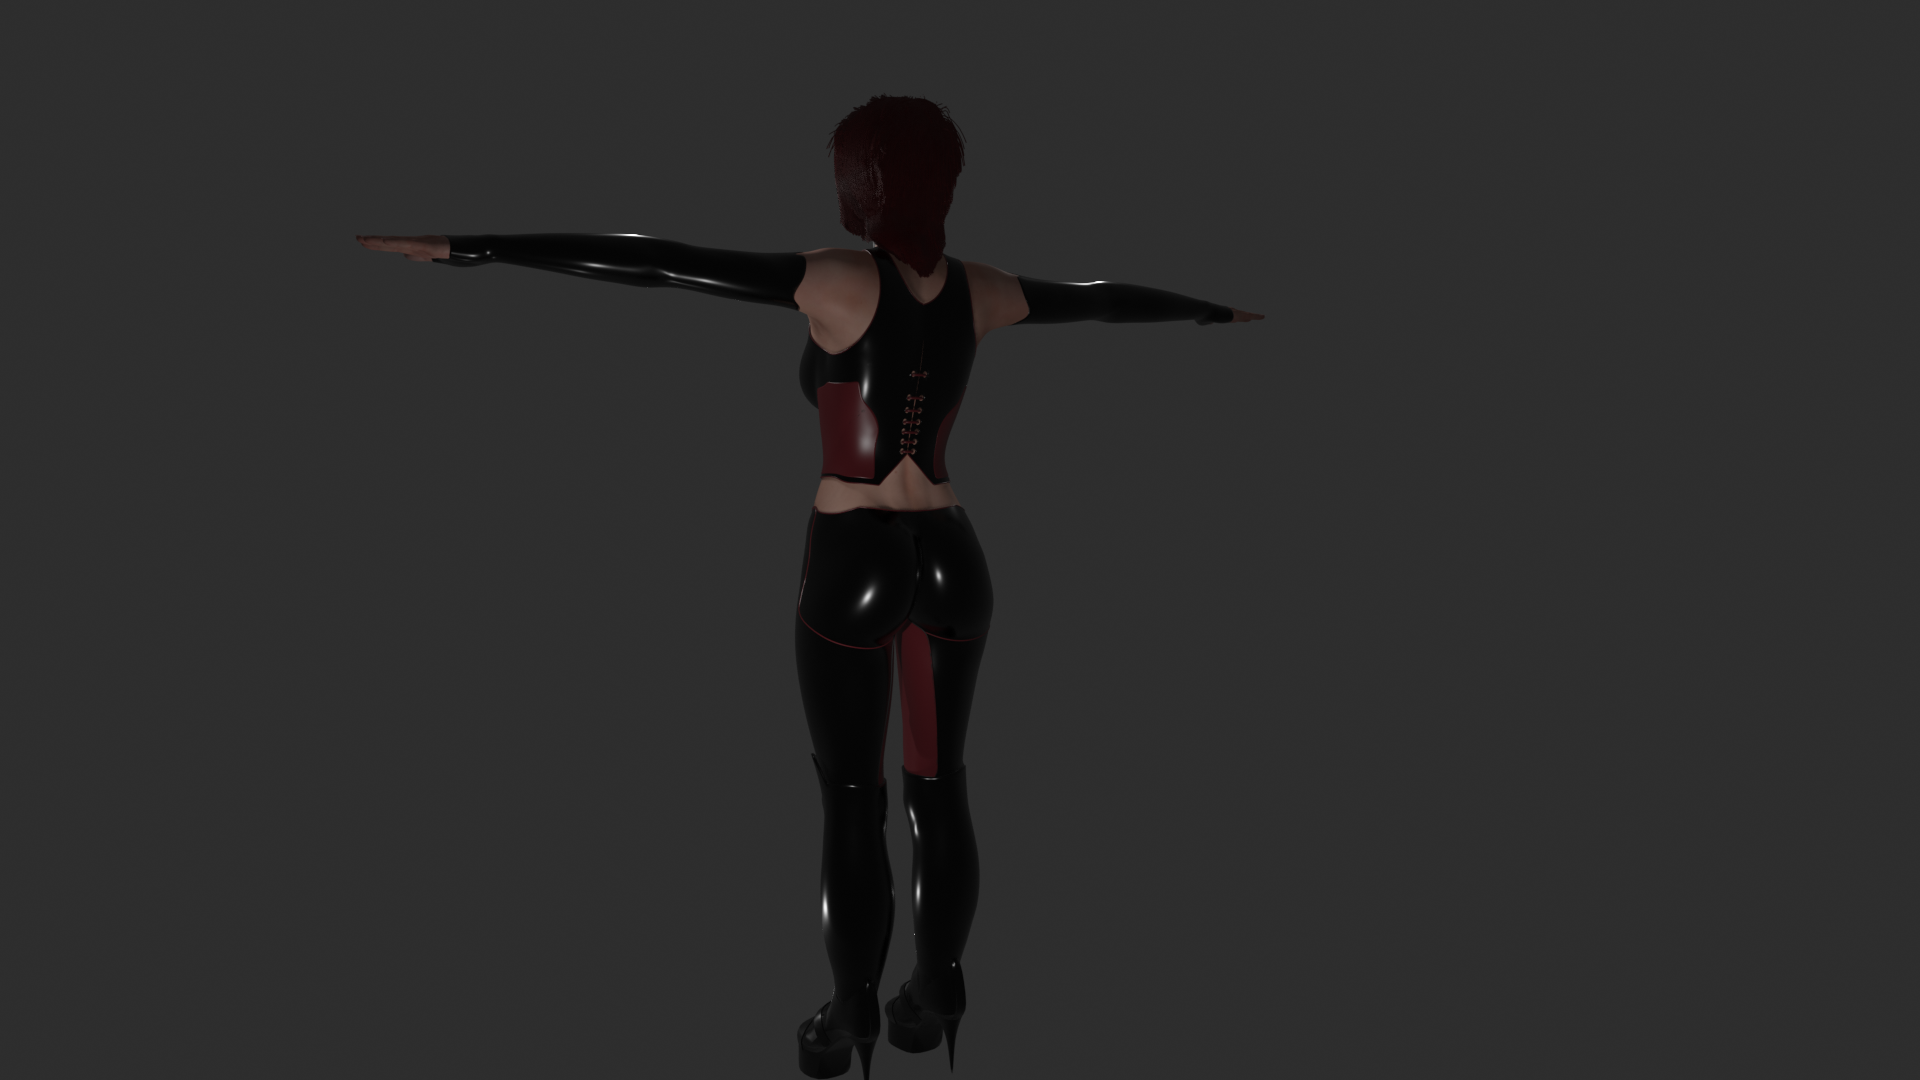
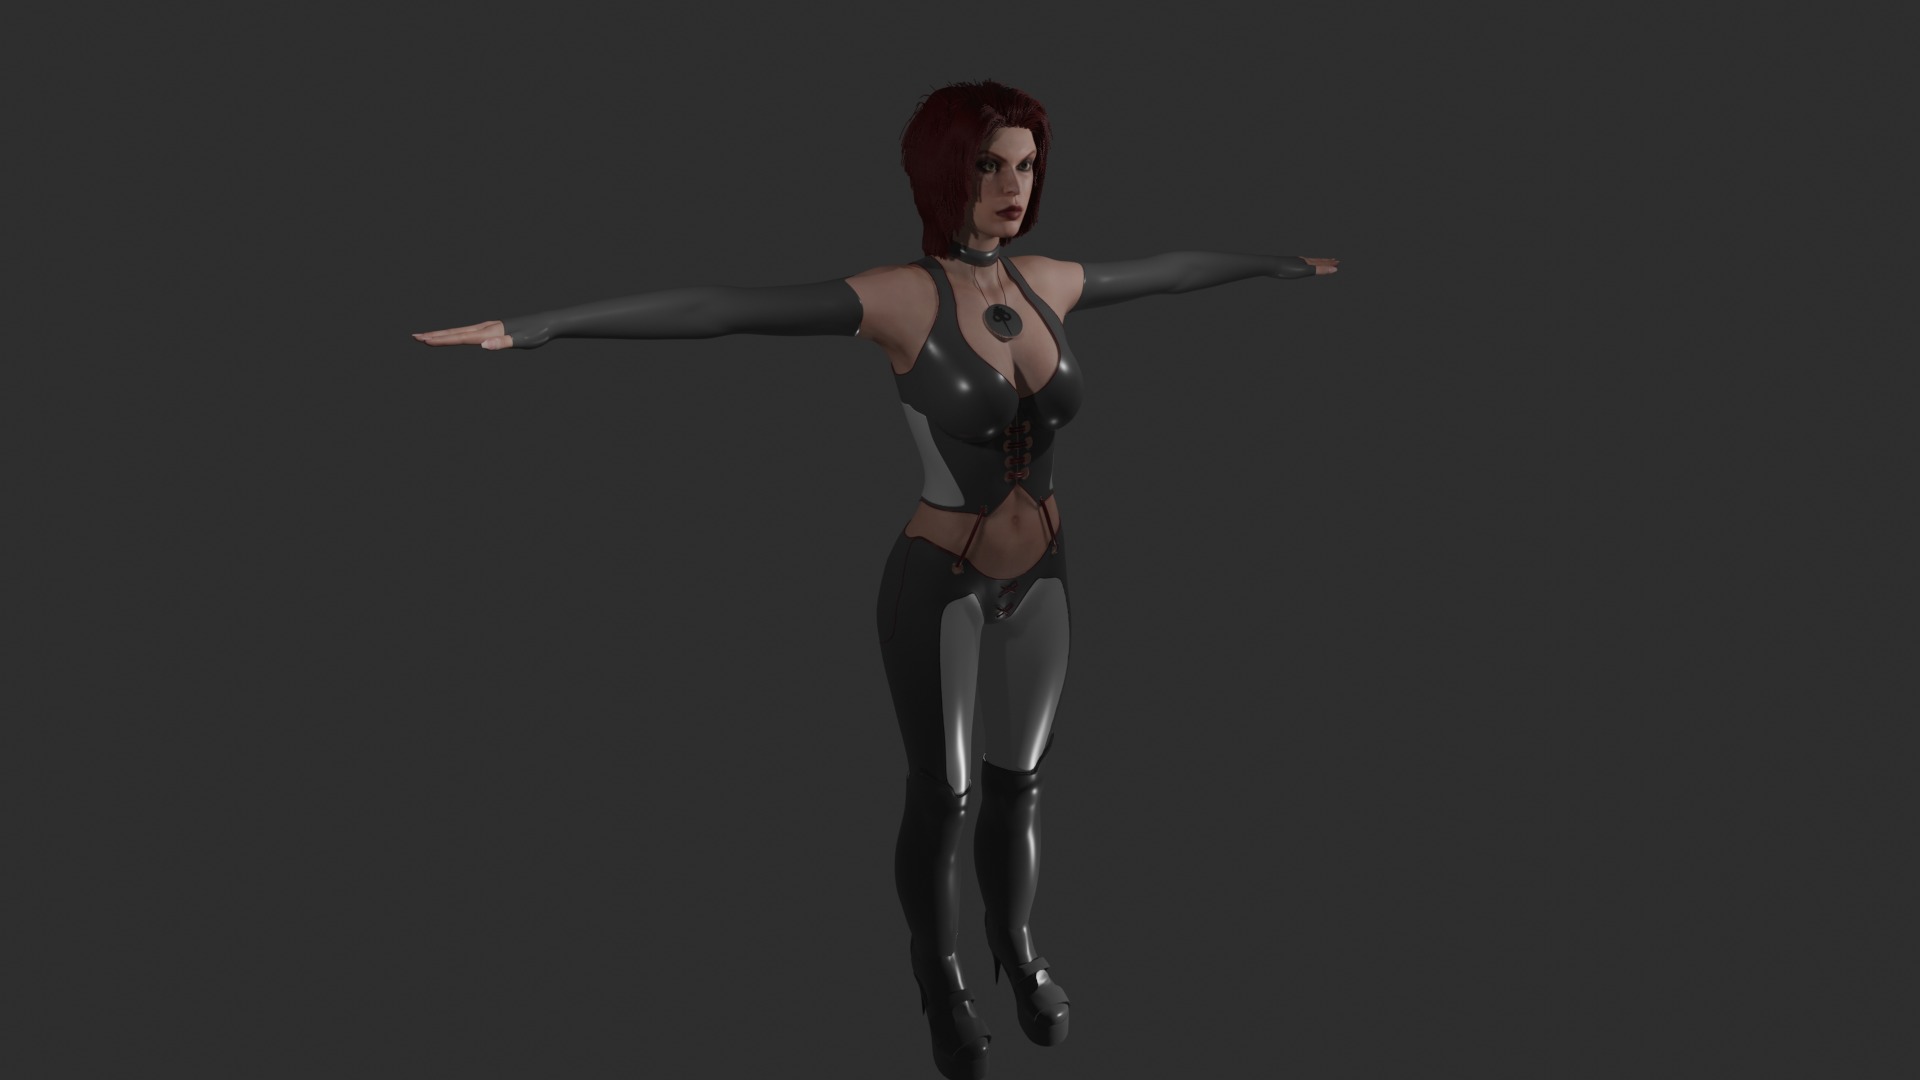
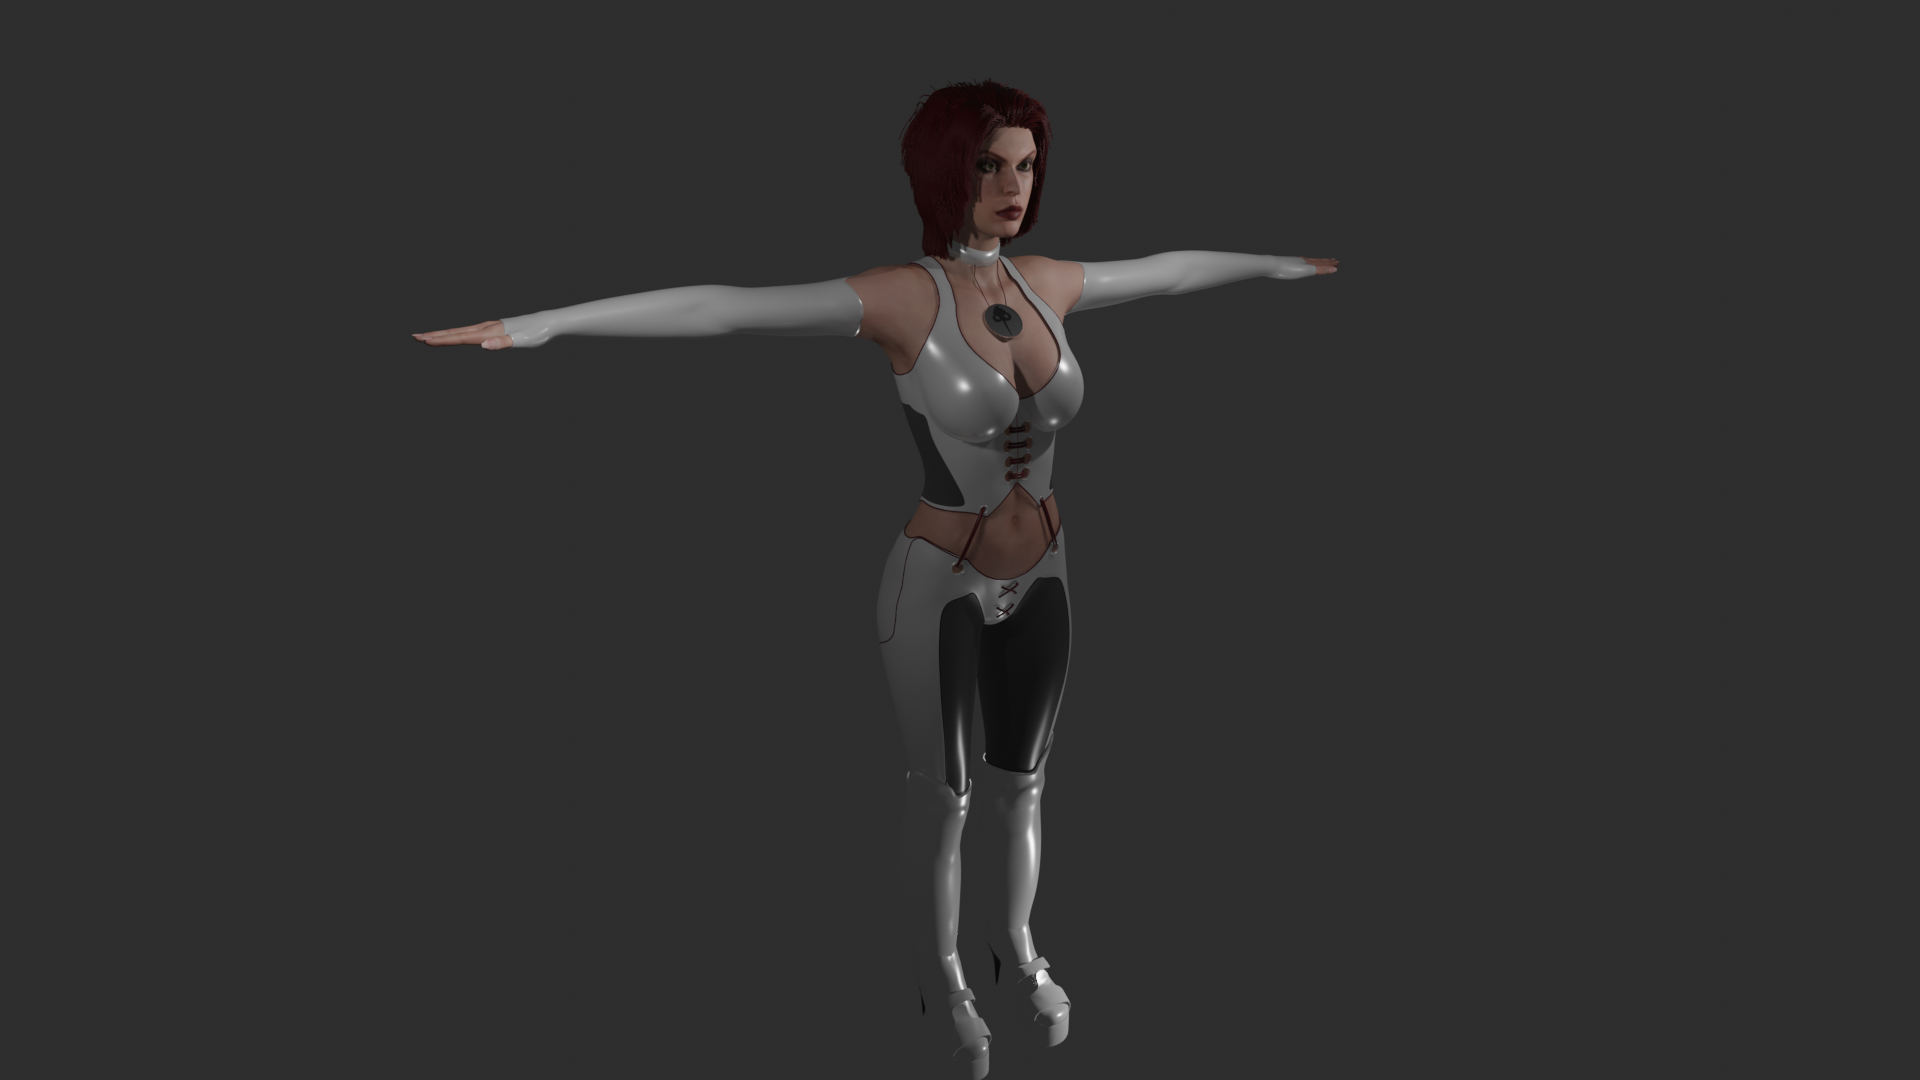
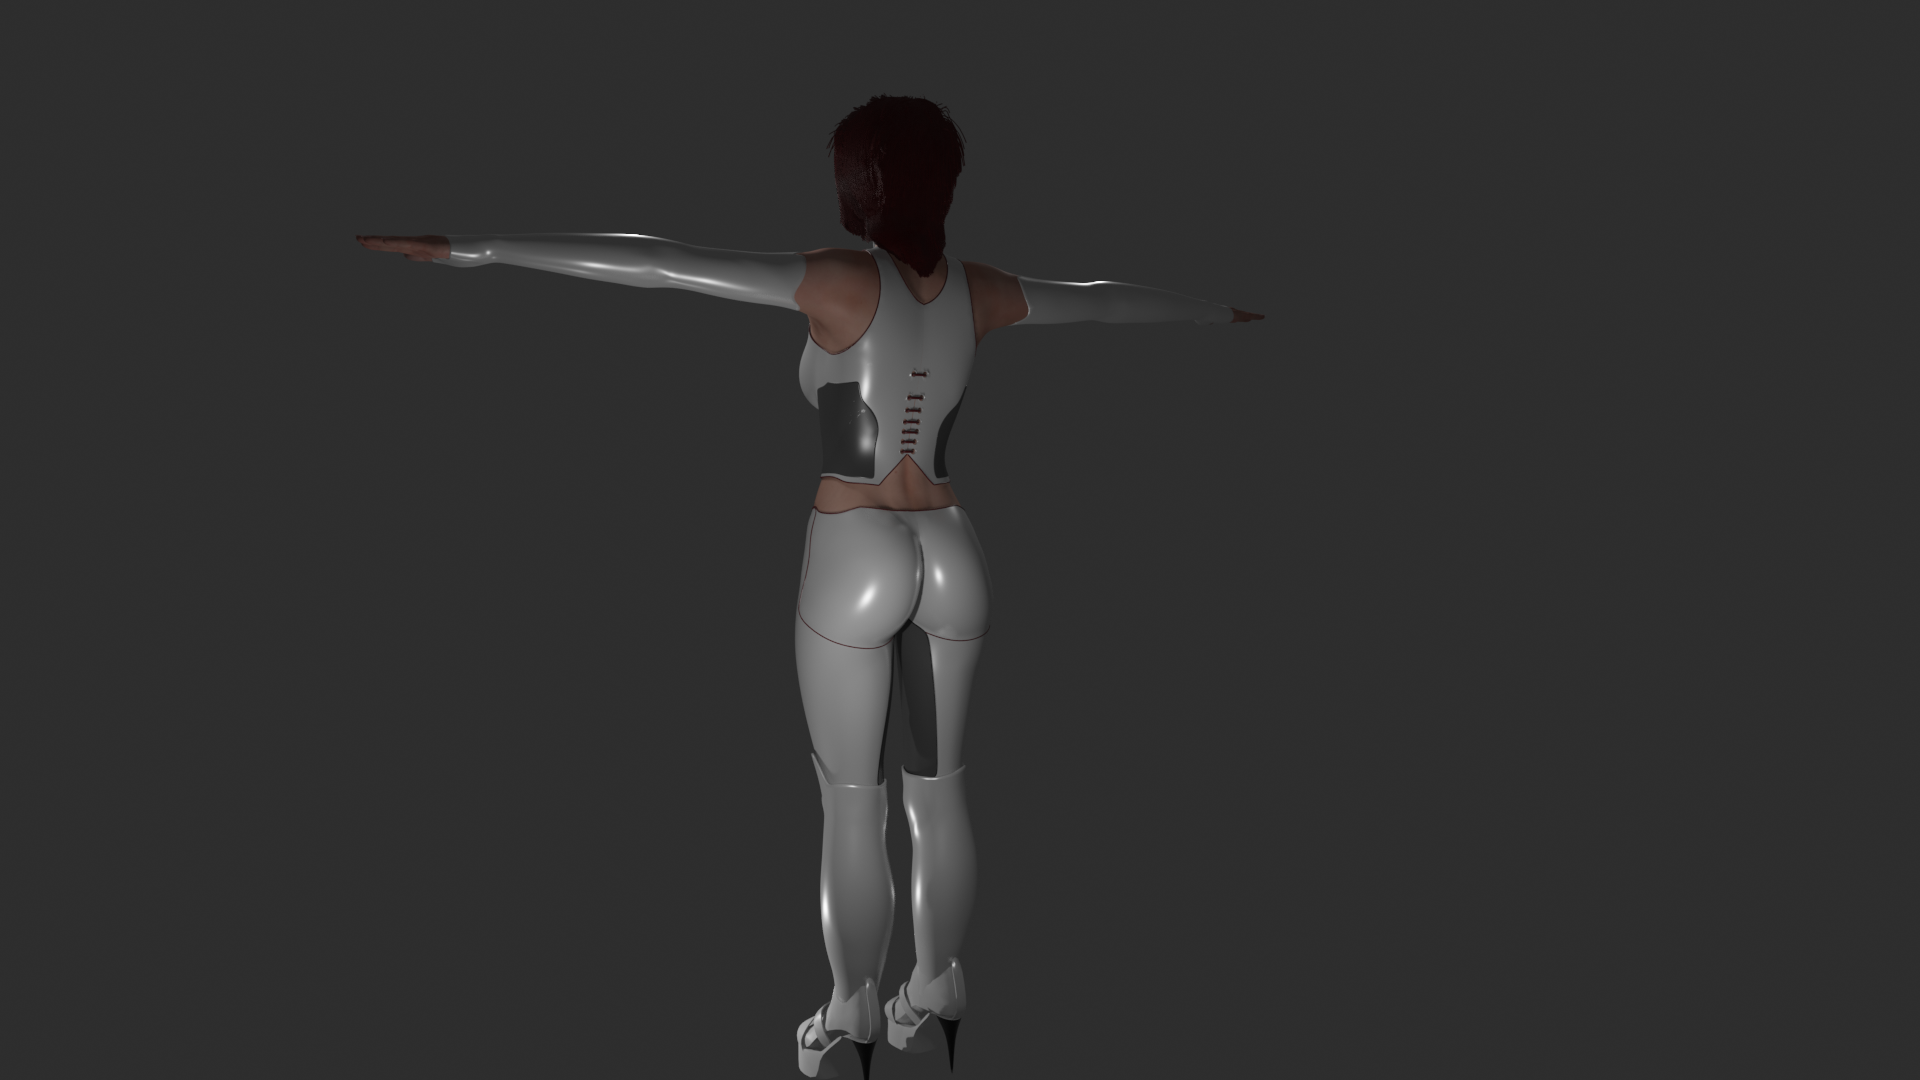
Download - Rayne_highpoly.zip 8K poster (low-poly) - 8K_poster.png Rayne from BloodRayne. Hi-poly Blender 3D model. * You can change the color of different clothers parts to white, grey, black and red. * 3 types of texture. Leather, latex, regular. Future plans: 0. Low/mid-poly model available for public download. High-poly model can't be intergrated normally to current-gen games - huge lags will be. 1. NSFW version add-on. Currently nude body not done fully - chest needs to be polished, primary sexual characteristics need to be finished, we didn't add any underwear things. Will contain: * Naked model, public hair. * Transparent clothing. * Lingerie. * Jeanette Voerman (VTMB) type of skirt and shirt. 2. Port to Resident Evil 2/3. If you want to see more mods like this you can support us by donation on: Patreon page - UnknDoomer and folks is creating SFM/NSFW 3D models and games modifications | Patreon Notice: Every our core models and mods that were originally free will be in the same state in future. Page is for folks who want to support us via this service / looking for additional mods and things. Bitcoin - 14sed2GkzDQBd4ovEA5piZkCZcnyuaK96s * PayPal - ask in PM. Buy specific things directly on: CubeBrush ArtStation Join our Discord channel - https://discord.gg/KMb7GbpfZN

-
TRX futa addon - blender file for seamless textures pathes creating
TRX_Trixter posted a blog entry in My creations
This is TRX futa addon version of ERF blender file for creating seamles textures patches. Now you can make textures compability patch for any body textures package. and TRX futa addon TRX_seamless_sample.blend My big thanks and all credits for original tool and brilliant idea to EvilReFlex Method of textures patching is completely the same, so you can read all instructions in original topic Easy way to make seamless SOS Textures. I strongly recommend you to watch a video file, attached by ERF in first post. It helps a lot. In addition to TRX blender file i post here my blending mask psd file. May be it will useful for your own creations. Dont forget about alpha channel in mask texture! MASK.psd -
 Hey, i wanted to make some custom poses for the game in blender, but anytime i open the pose ingame the character just T-Poses with very deformed face. I use Blender 3.5, Sims 4 Studio 3.2.1.1 (Star) and Daggers Rigs. If anyone knows what i am doing wrong i would appreciate the help. Thanks
-
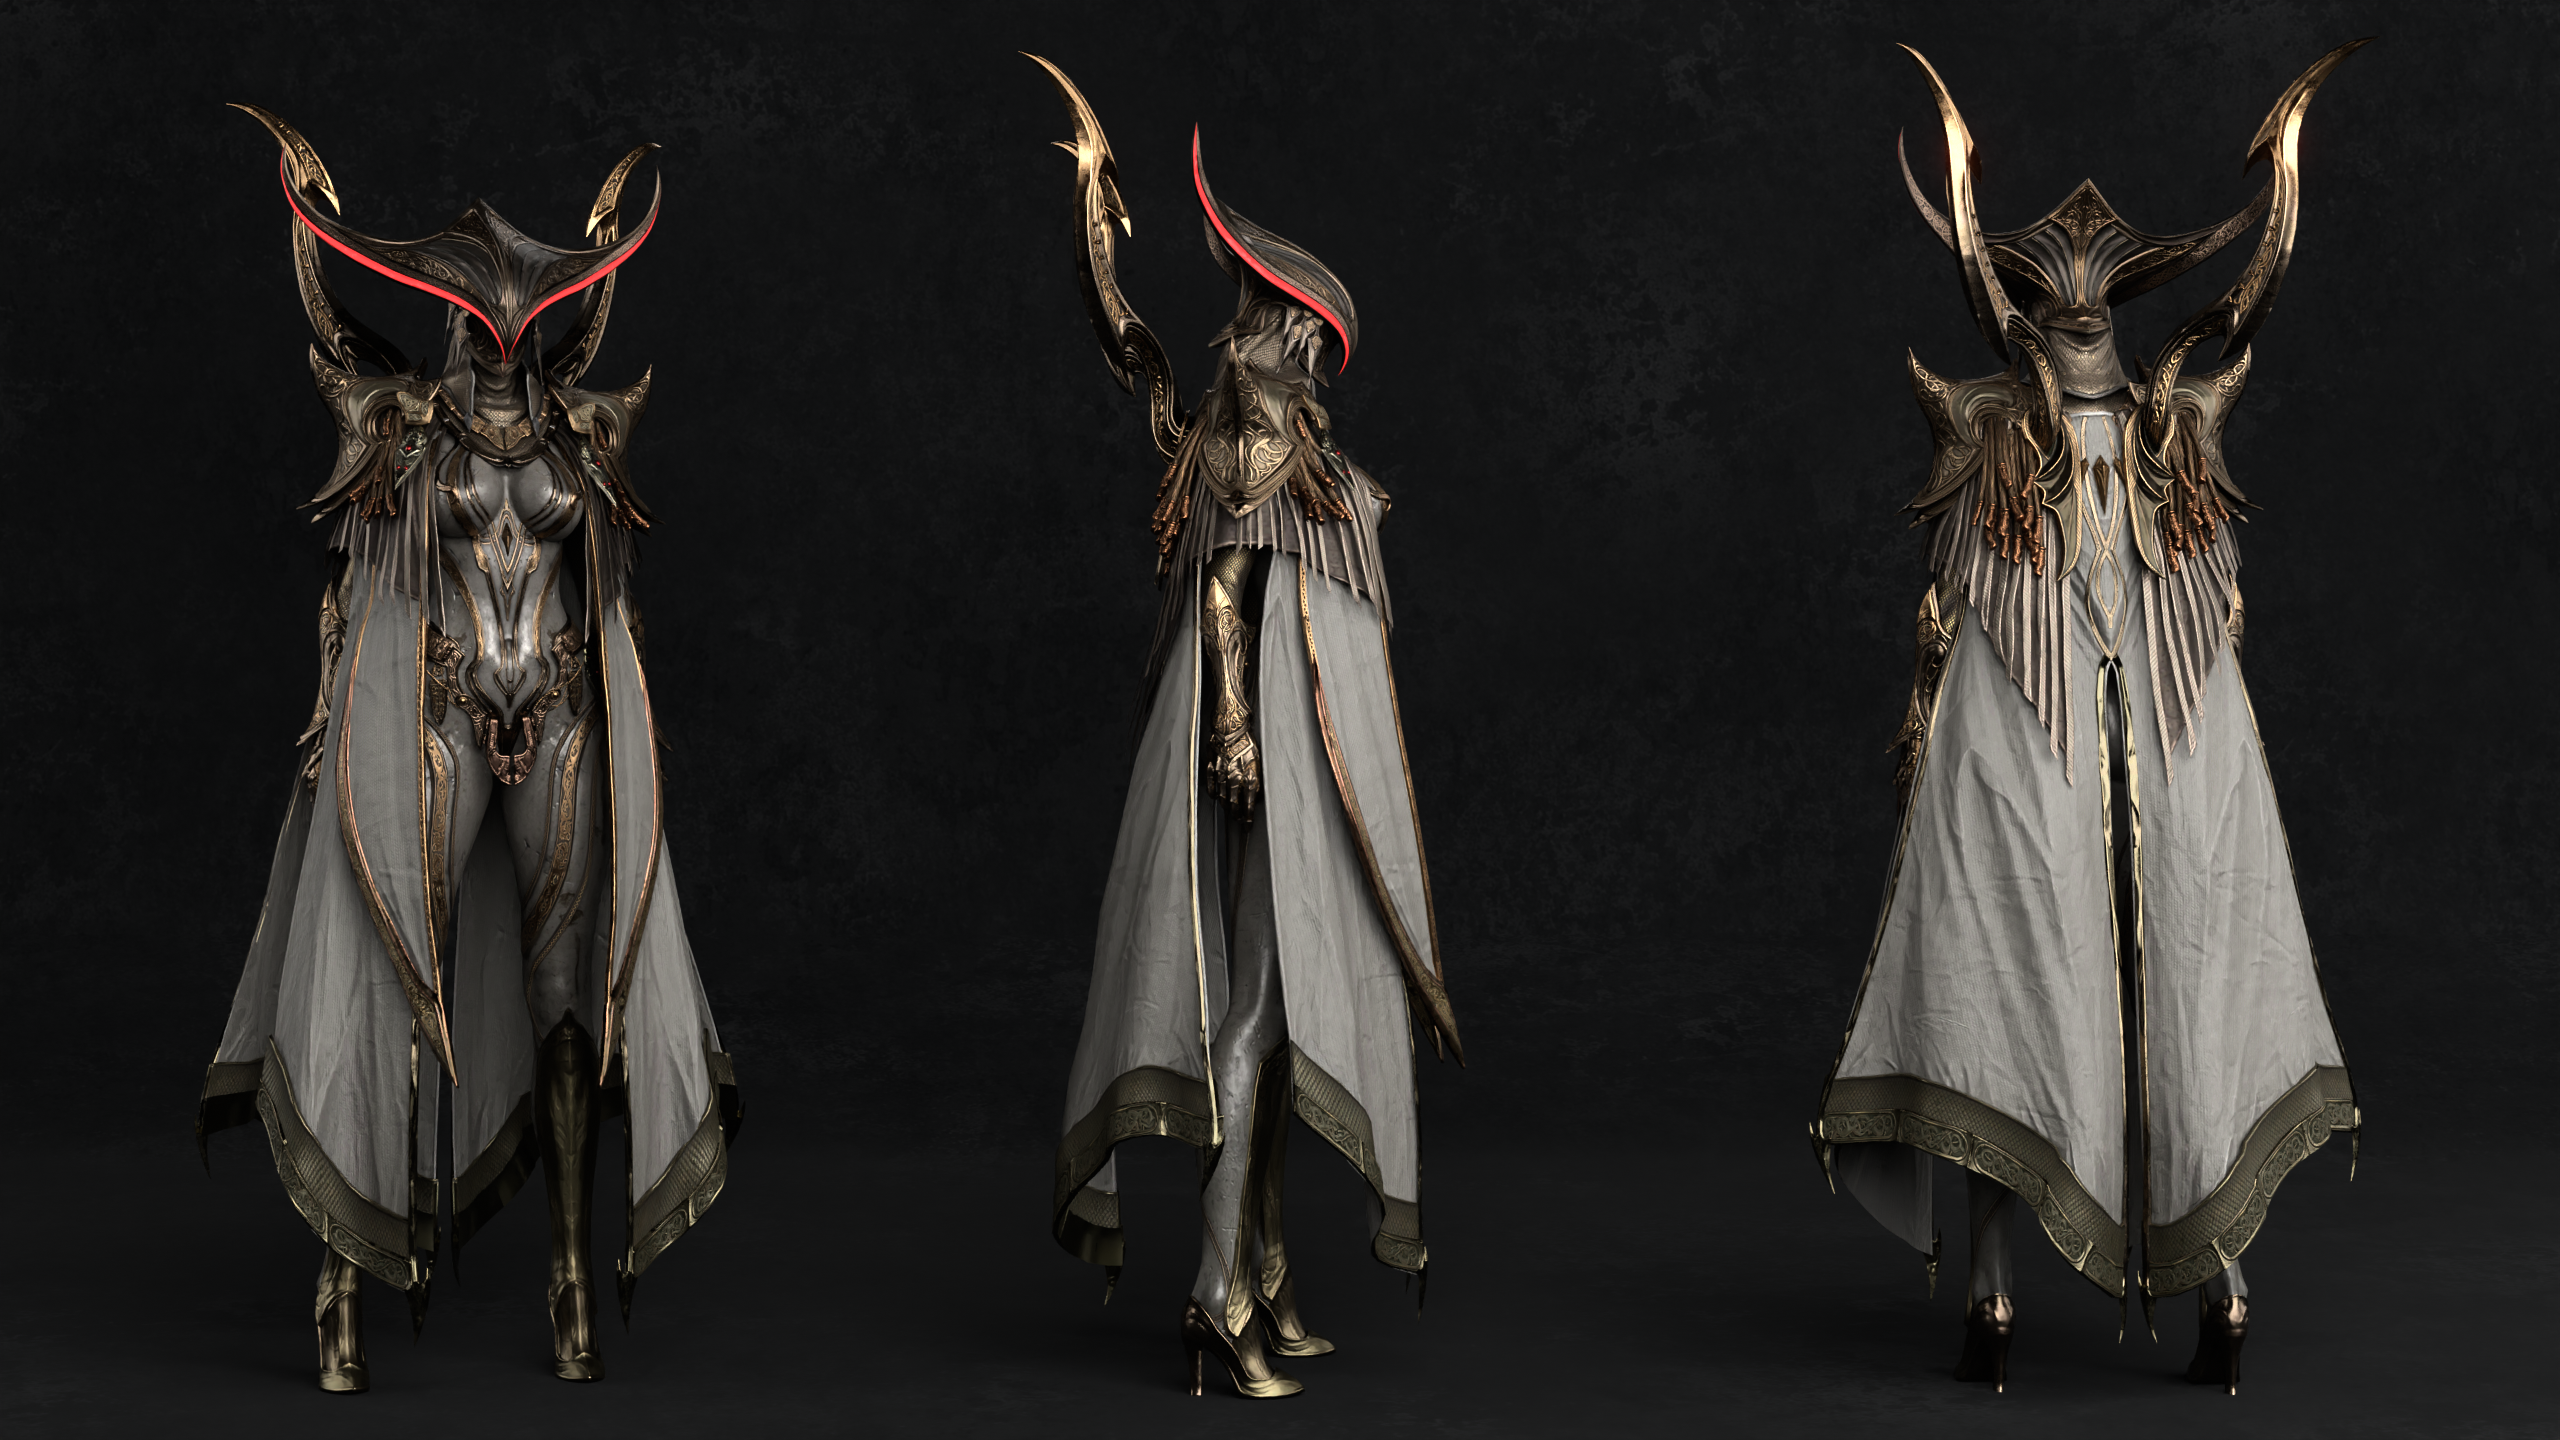
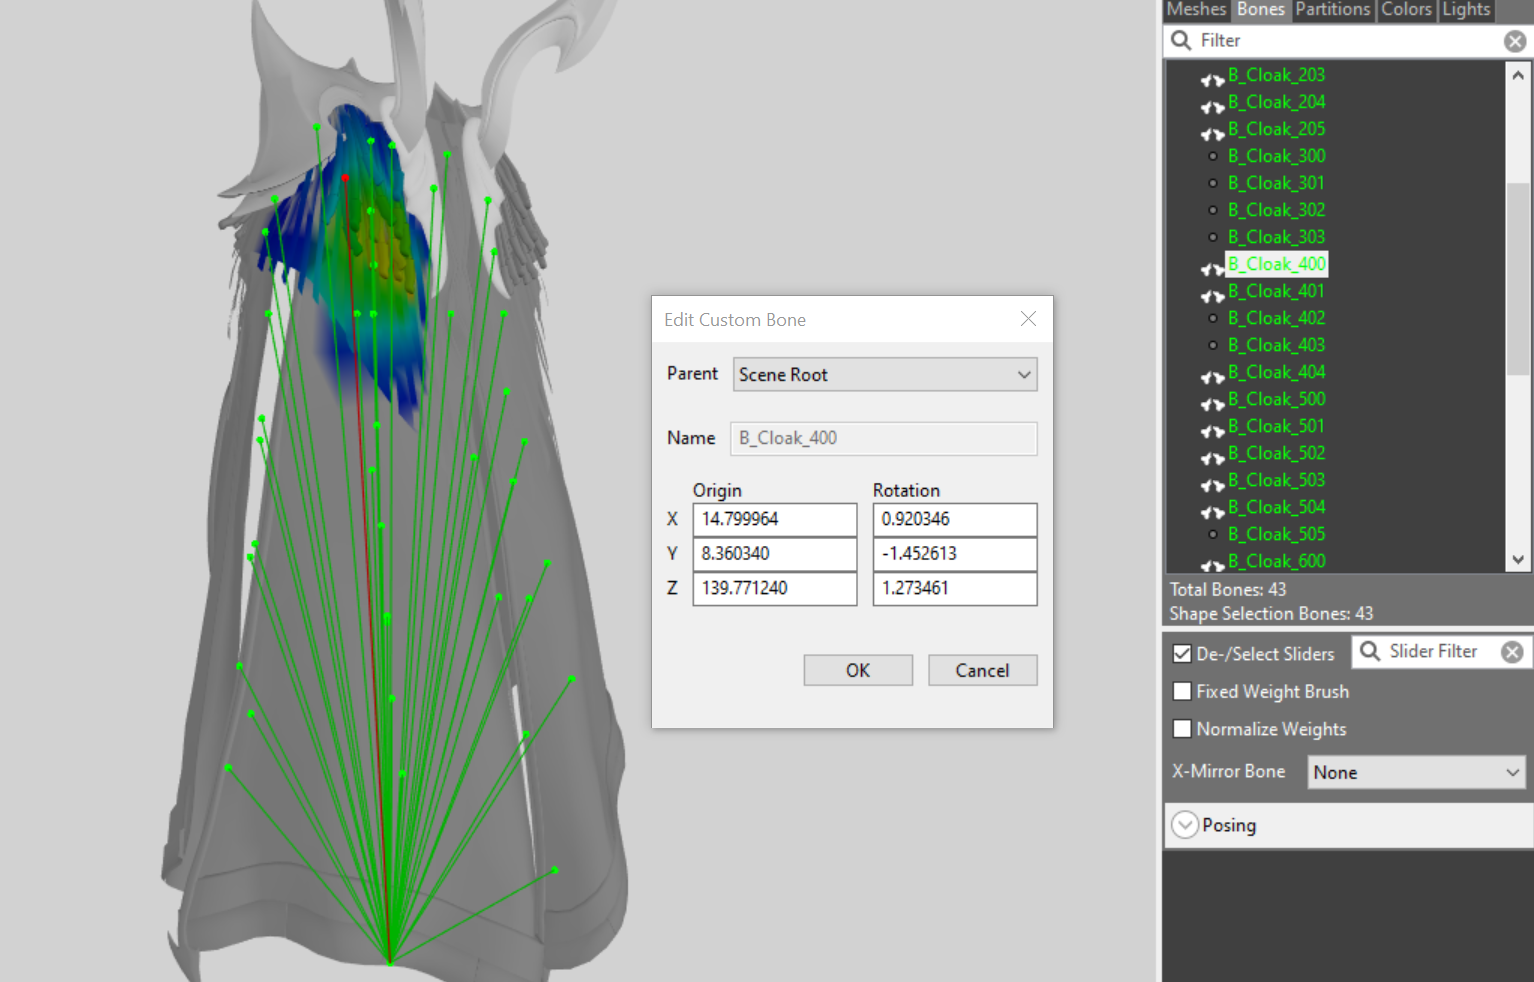
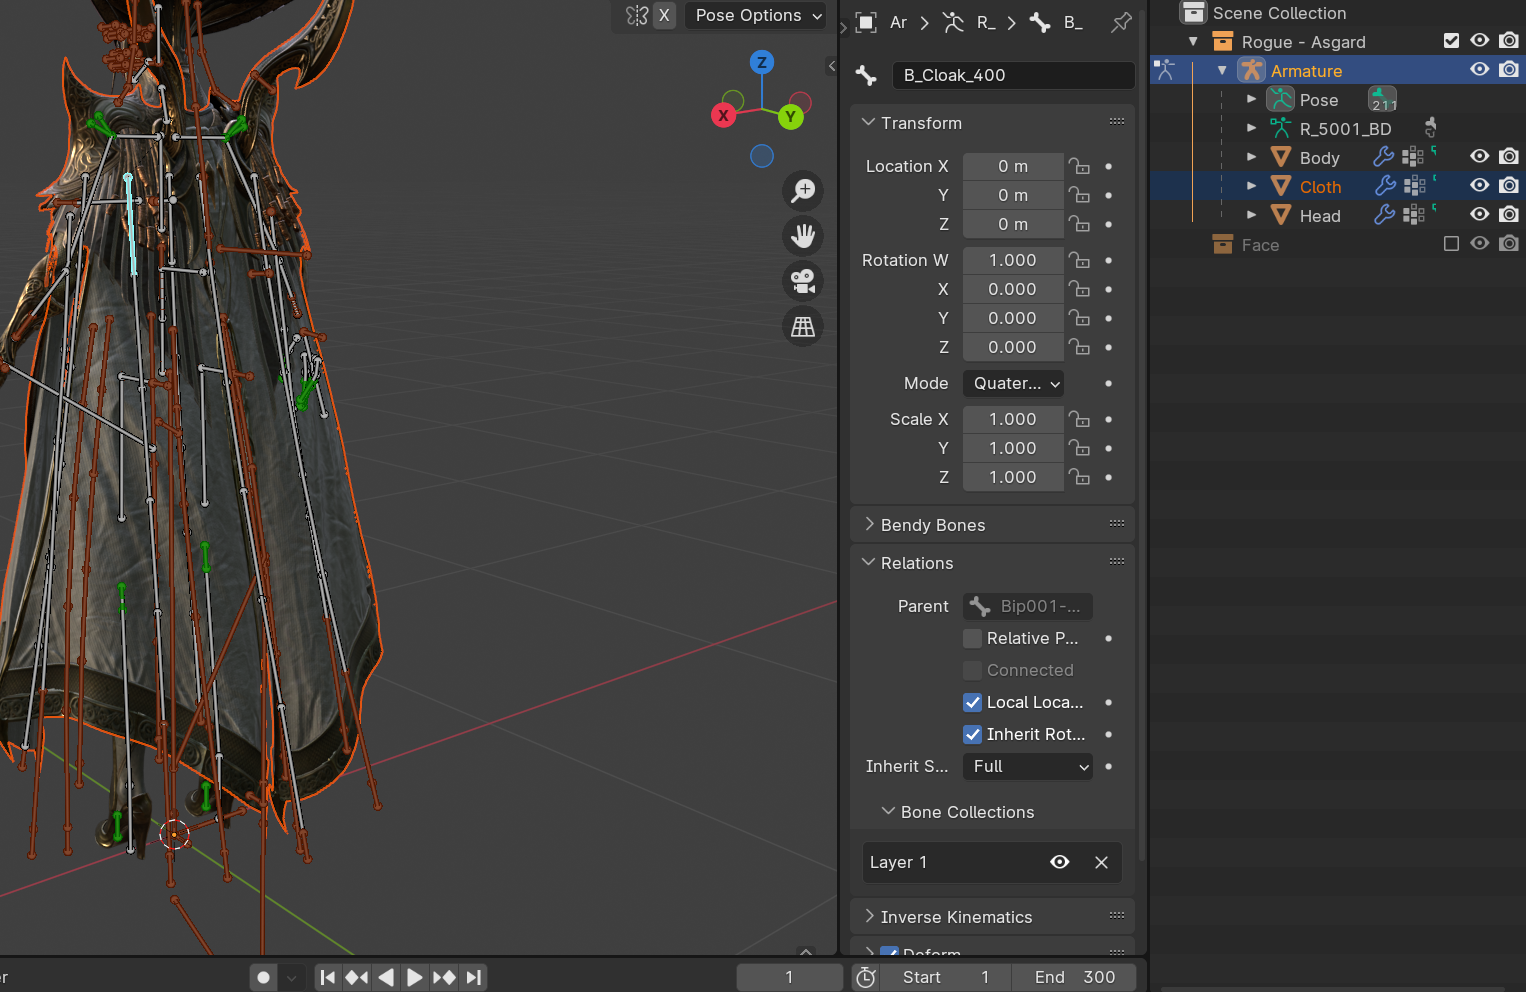
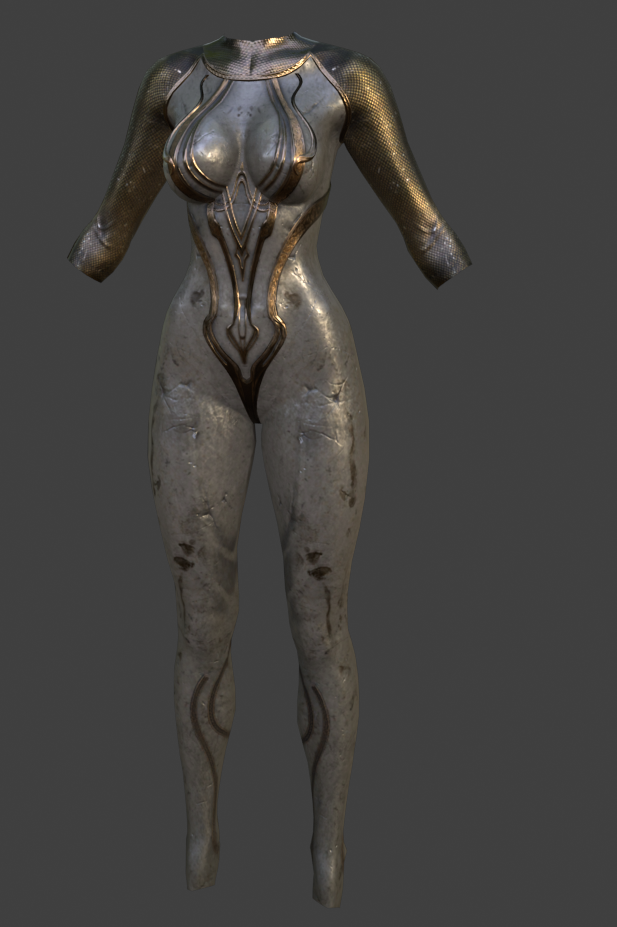
 I am trying to export the Odin Valhalla Rising Rogue-Asgard armor to Skyrim CBBE with the blender files from Knightmare-Giga. I've managed to succesfully do the main armor in outfit studio, but when it comes to exporting the cloak to support HDT I'm a bit confused on the steps I have to take. From what I can read from tutorials, you need to build the skeleton manually in outfit studio then manually weight paint and then do some XML to define the HDT. However the blender file already comes with a nice skeleton that's already weight painted, so I would like to use that for the cloak and then somehow attach the spine to the cbbe skeleton. I'm using the PlyNif to export the cloak into a nif, but when I look at the skeleton in outfit studio the bones are all the correct position and still weight painted, but they've lost their parents and are all attached to a single root, and when I try to manually set the parents their position turns crazy. I suspect that's because the positioning they have is relative to the root bone, but calculating the actual positions from there would be a pain. So is there a way to export the cloak or the skeleton in the correct state from blender into Skyrim? Or do I need to manually redefine all the bones from scratch? Another bonus question I would ask is that since the "base" armor is esentially just a body with a marble like texture applied to it, is there a way to automatically fit it to the CBBE body rather than using brushes in outfit studio? The proportions, especially between the breast and butt don't quite match the cbbe shape so I need to do some pretty heavy editing to the vertex which often results in some bad shapes once I apply sliders that causes I have to restart. Right now I've resorted to more or less keeping the original shape the same and just making sure the neck and hands fit, but a tighter fit for correct bodyslide presets would be ideal. I'm pretty new to 3D modelling and modding, this is my first time trying to do this so I'm probably missing something.
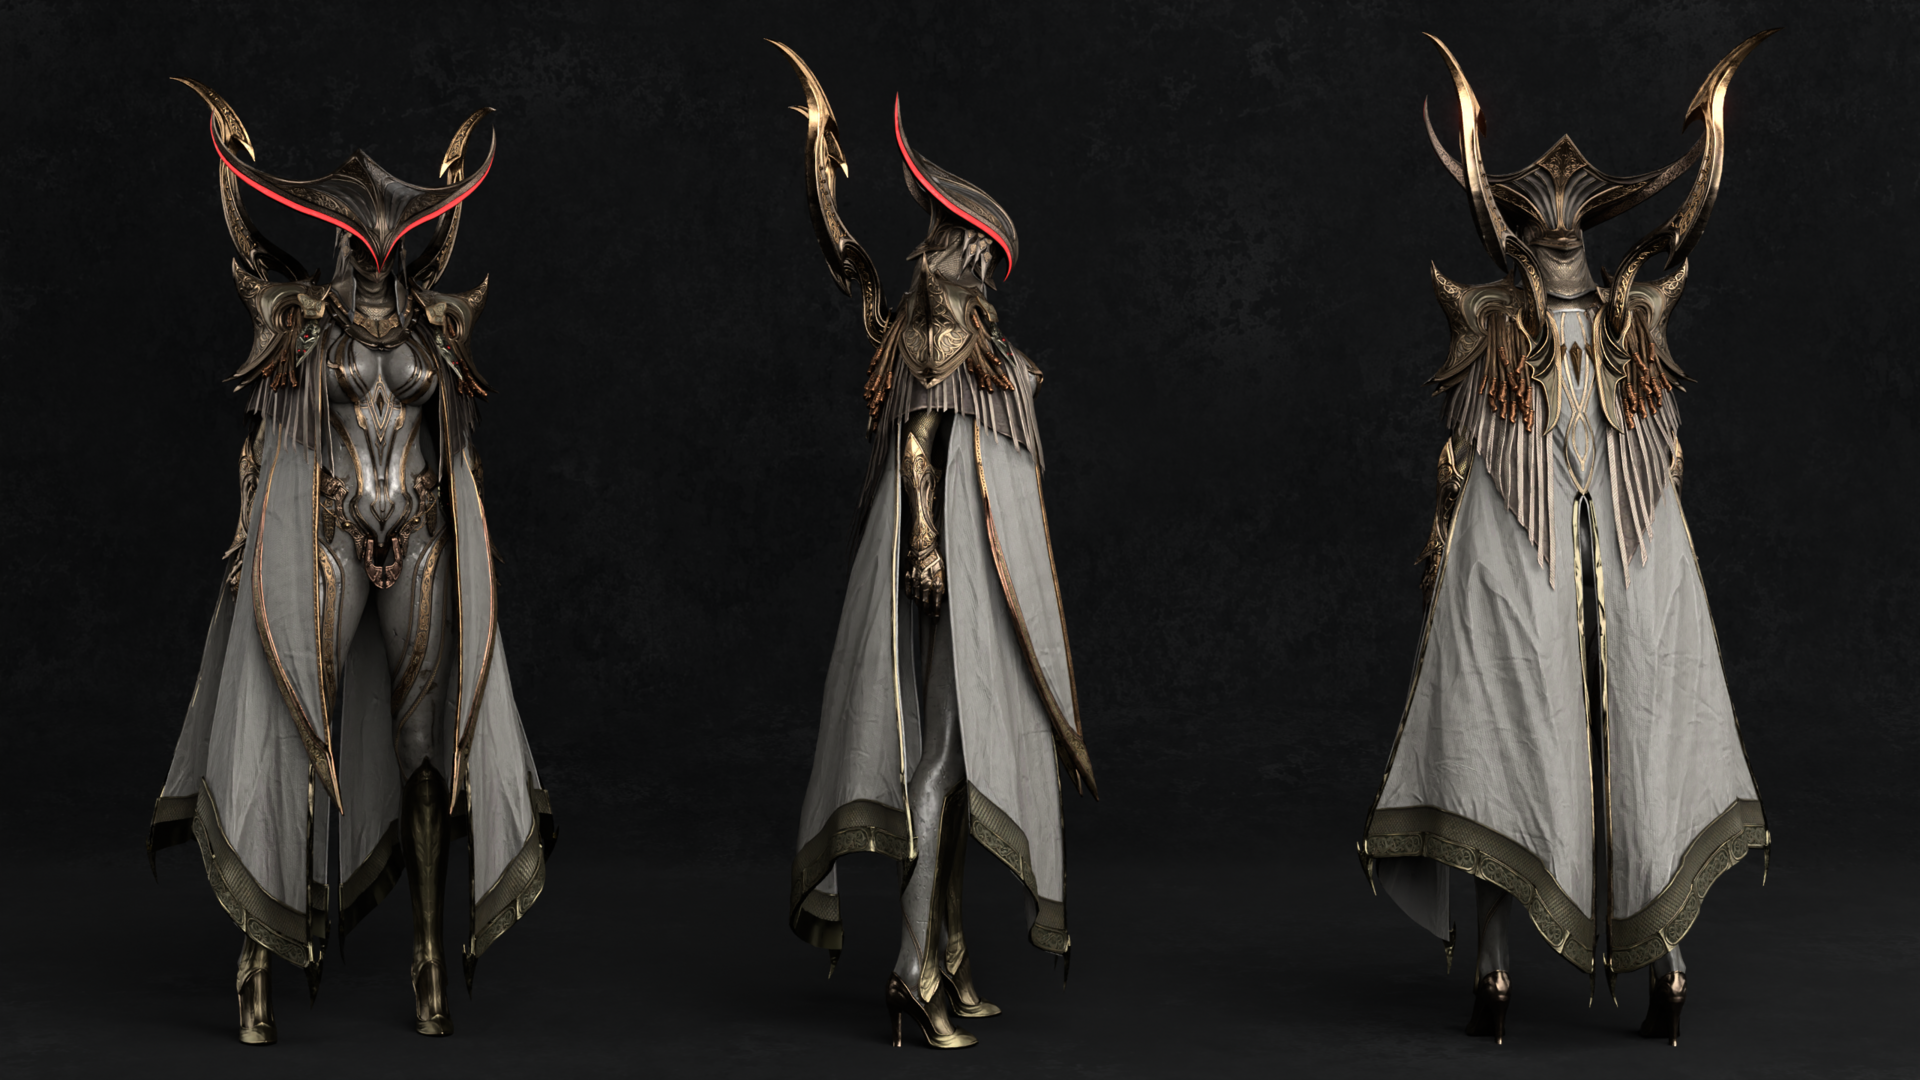
-
hi all ive been trying to make pose mods for oblivion using blender and nifskope. i was wondering if theres anyone here willing to teach me.
-
Hey everyone ive been trying to make pose mods for oblivion with blender and nifskope. is there anyone here that could help me or walkthru what i have to do to get custom poses to work
-
Hello I'm looking for a full scale tutorial for making sexlab animation via blender. The ones I found here are either for 3dsmax or for only pose making. İf someone know any good tutorial I would be very appreciated
-
View File Layla's Ripped Clothes Additional Clothes for Heroine Rumble 2 and a Tutorial on Blender. Submitter Layla2727 Submitted 10/29/2023 Category Misc Adult Mods Requires Nothing
-
 Blender 2.80+ -- Plugins for Importing and Exporting TRI files These are updated plugin files for Blender for importing and exporting Skyrim TRI files. It might work with other games that use similar morph file formats. 1) Remove "-Blender2.XX" from the end of the filename if it exists 2) EITHER: (preferred) Use the 'Install' button at the top of the Add-ons panel and select both .py files -- or -- Place both files in the addons folder of your blender installation, for example: ./blender 2.80/2.80/scripts/addons 3) Activate the new plugin using User Preferences in blender options (under Import / Export section), by checking its checkbox Multiple .tri files can be imported at once by just selecting more than one in the file dialogue. Multiple mesh objects can be exported at once, using the option in the export dialogue. They are named according to the object name. obj.name = "Head" means the file "Head.tri" is automatically created in the selected directory, overwriting any Head.tri already there. CAREFUL: It is easy to accidentally overwrite filenames if the directory selected contains names already matching any mesh objects in the blend scene. The scripts are modified versions of http://www.nexusmods.com/skyrim/mods/14589/? Permission is GPL as stated in the plugin files. The different morphs are created in Blender as "Shape Keys" in relative mode. The morphs can be shown by moving their magnitude slider between 0.0 and 1.0 (or greater by typing in a number). Shapes can be combined at different magnitude through these sliders. The morphs can be edited by clicking on a shape key and entering Edit mode. The mesh presented for editing will be the shape key position at 1.0 magnitude. The changes are saved back to the shape key when exiting Edit mode. The shape key names have some relevance. See the export header notes (listed below). As mentioned in them, the index number in the morph name actually has no effect for now, and isn't checked at all. The names of the shapekeys have relevance in the game. They are linked and used by name in the game, so don't change any pre-existing names. You'll need an .esp mod, I think, along with a plan for getting the game to make use of them somehow to make use of new morphs created. Don't ask me how, I dunno! Updates Importer This is a copy of a portion of the header from io_import_tri.py in the spoiler below: Exporter This is a copy of a portion of the header from io_export_tri.py in the spoiler below: Bonus!- Bodyslide .tri importer Only for Blender 2.63 -> 2.79 This script is dirty, and there are no plans to make it better, nor to create an 'exporter'. If you really want, you can export the morphs as .obj, then import as slider data in bodyslide. I created this more out of fun than any particular use. No one should really need this. Import the base model into blender by either importing the built .nif from bodyslide's output, or import an .obj taken from the .nif or exported from bodyslide. Select the model in blender then import the bodyslide .tri file. The morphs will be applied to the model. Noob trying to figure out the TRI file format. It might lead to clues for someone else doing the same: Note that this site requires logging in to download, otherwise there will be an error "File not found" or similar. Blender 2.80+ io_export_tri.py io_import_tri.py Blender 2.63->2.79 Note that these remain with the older capabilities they were created with.. no functionality backported from 2.X version. io_export_tri.py-Blender2.63-2.79 io_import_tri.py-Blender2.63-2.79 Silly little bodyslide importer io_import_tribodyslide.py
 -
 Hello everyone, I been trying to port a new armor to the game by starting with the boots, so i can understand how to mod and add more stuff later on. Unfortunately i can't seem to make them work, cause when i equip the boots the character appears barefooted. Still, I managed to make them appear in the game as a menu item and as a drop-able. I would like to port the Assault Armor for the Cerinian race made by ThatDefaultUser12: https://www.deviantart.com/thatdefaultuser12/art/New-Krystal-Fox-3d-Model-Download-761177452 I been reading a lot of tutorials of how to add armor to the game, but i guess I'm still not that competent to pull this off. So this is what i did even tough it didn't fully work. From 3ds max i exported the boots .obj to blender and aligned them with the feet, then port the .obj from blender to outfit studio and add the bone weights from another armor and converted the .pngs to .dds textures and added them with outfit studio and created the .NIF of the boots then modified the cerinian.esp to add them. I think the .nif looks good but I'm still missing something. Also, is there a guide of how to rig armor in blender that isn't from Skyrim? So i can align the armor with the body?
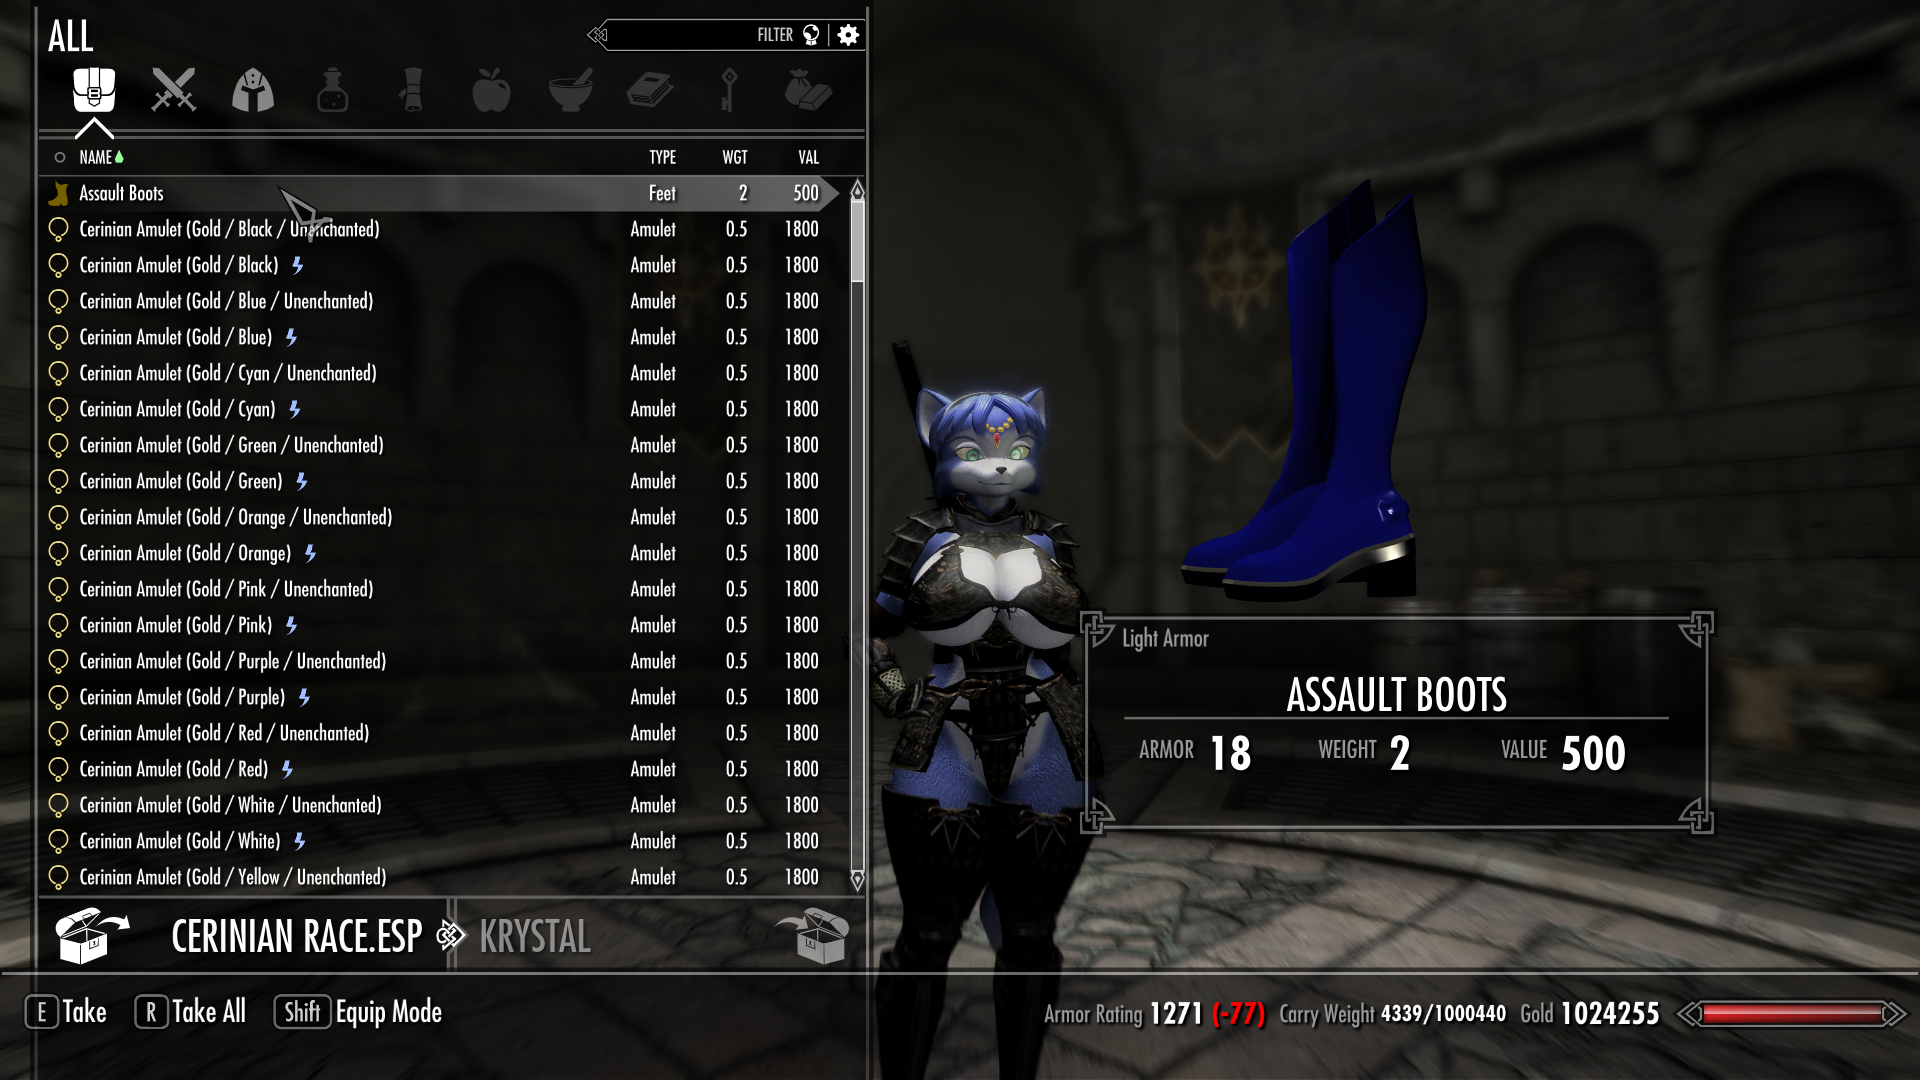
-
 I found a blender addon for Blender 2.78 but when importing any HKX animation, I get a traceback error saying unpack requires a bytes object length of 4. I tried editing the addon in Python but my changes won't save so now I'm lost. Any guides (or just a downloadable file ready to go) would be appreciated. I don't know what I'm doing so I'm lost. Here's the HKX addon in question if that matters any. https://github.com/opparco/io_anim_hkx/releases/tag/v0.0.1
 -
 View File Fallout 4 Animation Kit (F4AK) The Full animation Guide is in PDF format inside the Kit archive! Please, make sure you've read it and FAQ here, before contacting me with questions. Important! Rig version "F4AK_Rig_Final_2013.max" suffix may be outdated and broken. Will fix it in future versions. Use "F4AK_Rig_Final.max" instead. It is for max 2015. If you want to work in earlier max versions, you'll have to open it in max 2015 or 2016 and Save it for earlier version. First to mention - this will be the place I put the latest stable release. I recommend using kit downloaded from here, NOT github! Github contains a lot of trash files, scripts can be newer but with more bugs. This KIT includes: Detailed guide on working with Fallout 4 animations in PDF format. Both import and export are covered. Almost all tools and plugins you need to export or import animations. If something is not included you can find a download link in the guide. Preset files for HCT, including rig.txt files and .hko settings files. Scenes and rigs for 3ds max for Human character. In later version will add other rigs as well. Deathclaw skeleton and mesh in max format, but its not quite correct, there just an example. MaikCG is another animator working on F4 animations, who is also taking part it creating this kit. He has his own upload and rig here on nexus, called F4Biped. We work in parallel, and sometimes he can find some new information or something, before me. It will get into this guide too eventually, but if something is missing, you can check F4Biped too, sometimes it may have some additional files or more updated information. And vice versa. FAQ Q: So, we can now create animations for Fallout 4? A: Yes, we can. You can. Q: Can I make 3rd person animations using this Kit\Guide? A: Yes, you can. Q: What is not included in the kit? A: 3ds max\maya\blender are not included, HavokContentTools is also not included. You'll have to ask other modders to obtain a link for HCT. Everything else is there. But I still recommend looking for newer versions of included tools, like niftools or hkxpack. Q: Were do I get the Guide? A: Download the rar archive in the Files page here, and it will be in the root, called F4AK_AnimationGuide.pdf. You can view PDF using free Adobe Acrobat Reader, or using your web browser. Q: Will this guide teach me how to work with 3ds max, rig tech and animation theory? A: No. It is assumed that you know your way around 3ds max at least to some extent, even though I tried to described everything in as much detail as possible. You don't need to be a rigging\animation\3ds max guru, but if you never worked with 3ds max or 3d animation before - I recommend learning those things first. DigitalTutors introductions may be a good place to start. Also I highly recommend larning 12 Animation Principles. Just google it. Q: I'm a newbie in 3ds max and animation, can YOU teach me\explain to me how <stuff> works, etc? A: No, sorry, I'm not here to teach you basics of 3ds max. I can suggest you learning it first, for example using DigitalTutors. Q: CAT\Biped rig is missing some of the control joints for the game skeleton's joints i'd like to animate, can I add them? A: Yes you can. Just add additional bones using CAT or Biped tools, align it to match the joint you'd like to move, and name it the same as the joint you'd like to move, but with a correct prefix (Bip_ or F4CAT_). Now using F4AK Rig Connector, disconnect and connect everything again. If you named everything correctly, it should find the joint and connect it. It will only connect Orientation by default, so you may have to add Position Constraint manually. In later version I will add more control joints into biped and cat. Q: When i open the F4bipedimport scene , the biped bones are locked i can't move them ,is it normal? A: F4bipedimport scene is from F4Biped by MaikCG. It is there to support his animation-import workflow. The Guide has two workflows for animation importing described. For keyframe hand-animation use the main rig scene, "F4AK_Rig_Final.max" Q: 32 bit, 64bit, what this all means, do I need max 32bit or 64bit? A: You should use 3ds max 64 bit version, there is no reason for you to use max 32bit unless you're using some old 32bit processor in your PC. Autodesk does not support 3ds max 32bit version even anymore. HavokContentTool 2014 is 64bit natively too. Fallout 4 HKX files are bitcoded in 64 bit. Skyrim HKX files were bitcoded in 32 bit. HKX2FBX converted was created for Skyrim's 32 bit HKX. So the only moment you ever encounter this bit problem for now, is when you want to IMPORT existing fallout 4 animation from hkx into max. You need to first convert it from 64 to 32 bit and then use HKX2FBX converter. The process is described in the guide. CREDITS While the author behind this guide and F4AK is ShadeAnimator, it would not be possible without the help of some people. • ShadeAnimator – author of F4AK and F4AK Guide. • DexesTTP – developer of HKXPack and HKXAnim. • MaikCG – author of F4Biped, helped a lot with information, research, guides and some files. • CPU – a lot of help during research • NifTools team for NifTools plugins • JoshNZ – contribution to research TUTORIALS https://www.youtube.com/watch?v=bbR9hCcH3W8 Also available from nexus. Submitter ShadeAnimator Submitted 07/29/2016 Category Modders Resources Requires
 -
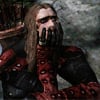
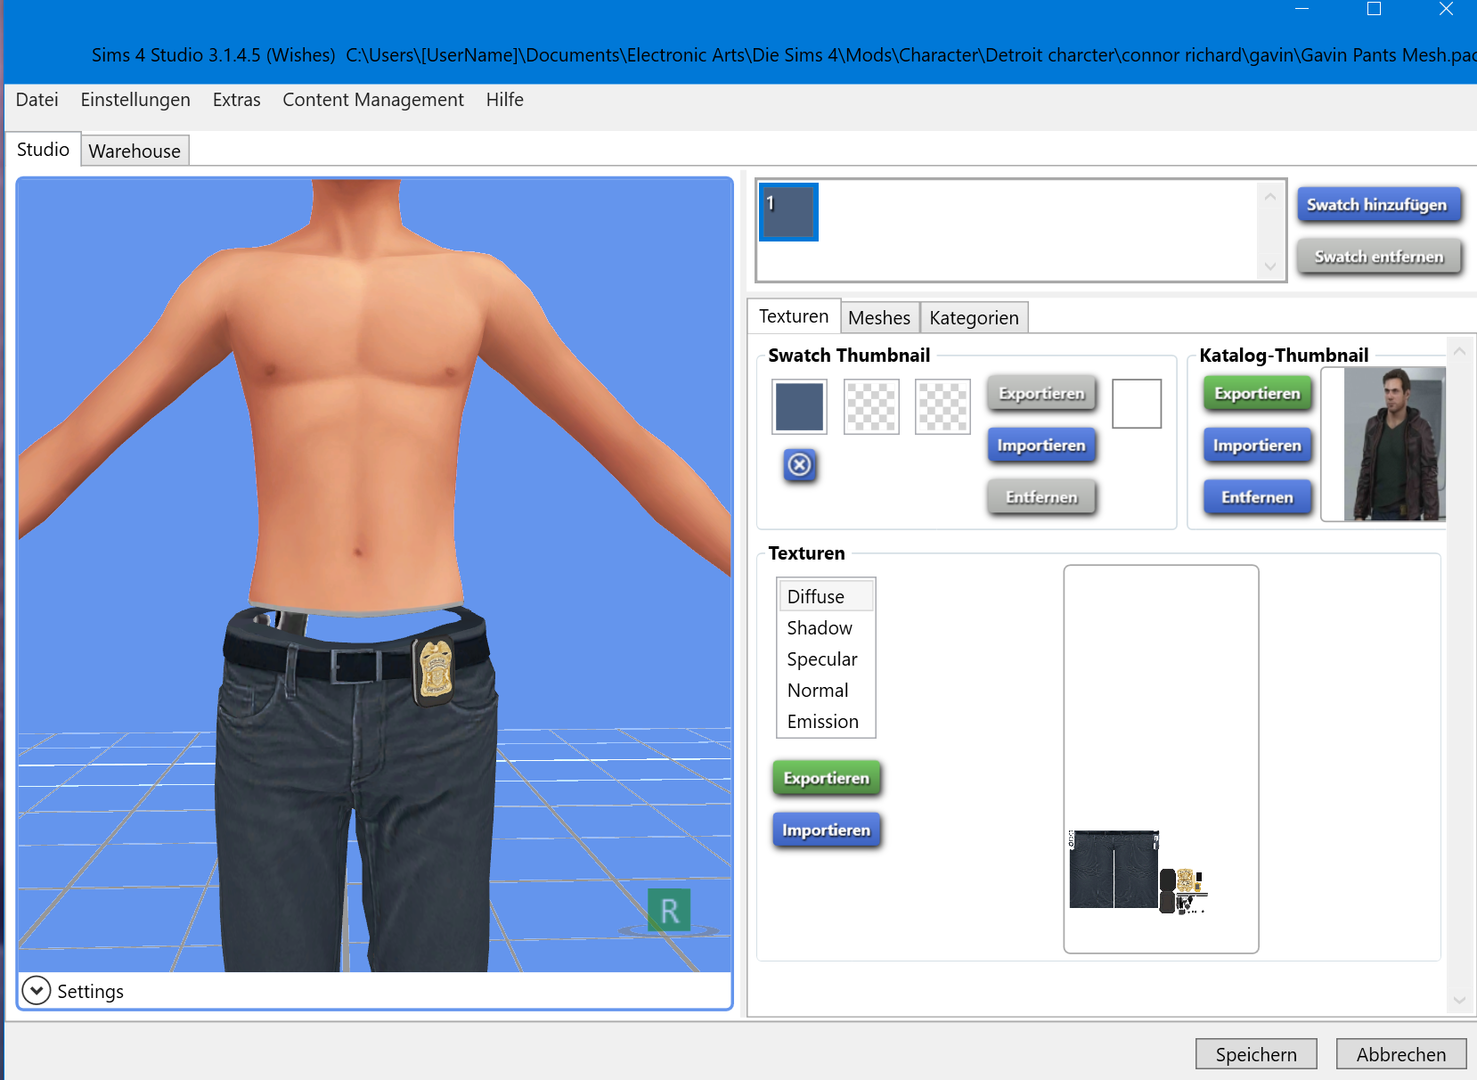
Hey guys, I found a fullbody mesh for the outfit of Gavin Reed and wanted to cut it into jacket and pants. For the jacket I had no problems at all, but the pants is to low, hence I got a hole in the sim body. I am trying for a week to solve this and found out, that the uv_1 map aperently isn't on the whole lowercase body. Does anyone know how to fix this or frankenmesh a lowercasebody in it? I tried to follow several tutorials but couldn't fix it. Thanks for your answers and help. Felina Gavin Pants Mesh.blend
-
Hey guys. Sorry if this question has already been asked for a couple of time but I couldn't find the answer for my solution anywhere. I'd like to make animations and my animations in blender are aligned correctly but in the game it's completely misaligned. I've followed turbodrivers tutorial on how to make animations but haven't found a solution for my issue. Also couldn't find it here. Hope you guys have some insight for me! Thanks a bunch again in advance!
-
Hello, recently I've learned making new animations for Skyrim from this tutorial. And I've successfully created some animations that work. But what I'm looking here is that, is there any way to start making animations from a new pose? Like the idlesit_crosslegged? In other words, is there any way if I can import Skyrim's hkx, (or .kf) files when making animation? Thanks in advanced
-
I'm trying to create a custom slider morph in Outfit Studio. I have done this quite a bit, but this particular transform is a pretty serious deformation; using just the tools in OS I can't get the final shape as clean as I would like. So I've turned to Blender to do the final clean up. I originally just exported the rough slider data as an obj, brought that into blender, did some shape clean up, and exported it back as an obj. But when I tried importing it as slider shaping data, I got a vertex count error. I assumed I just messed something up in the import/export process and lost a tri or something. Several hours later though, I'm still fighting this same problem. At this point I have brought the base shape into Blender, then re-created the slider as a shape key on that mesh. So I know it has the same vertex count; I just moved the vertices around, no fancy tricks. However, when I export the base, and the slider shape as objs, I still get two different vertex counts. Is there some silly export setting I'm missing that can cause this?
-
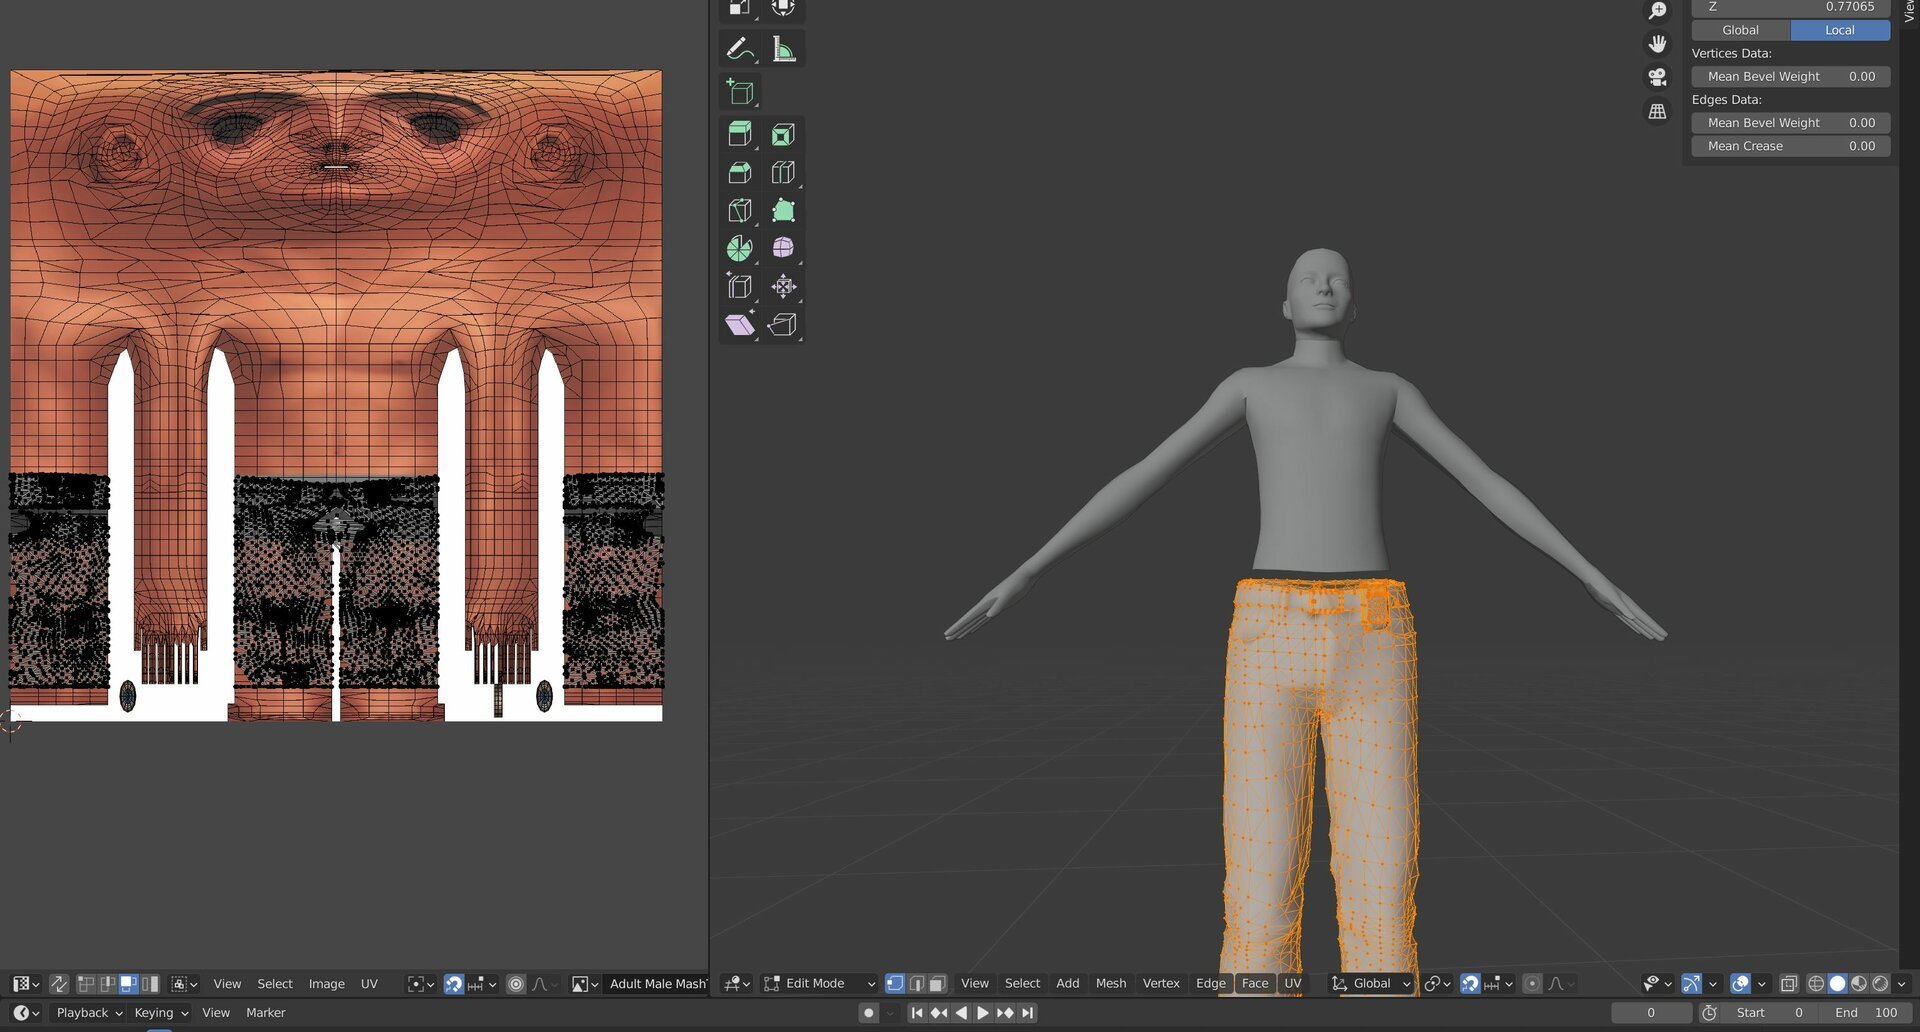
 I'm not sure if this is the right sub-forum to be posting this so I apologize in advance if it should have been posted elsewhere. I'm currently attempting to convert some of the male-exclusive Simdulgence penises to work on feminine frames. Everything looks fine in blender and s4s, however once I load it in-game the mesh breaks and warps. I attempted two different ways to "frankenmesh" the penis from the masculine frame to the feminine one. Both result in the testicles warping and stretching away from the body, which I found weird since one method kept the testicles from another of Simdulgence's penises designed for feminine frames. From what I've gathered I believe it's a problem with needing to transfer weights. I've found a couple tutorials for transferring weights between meshes but when I attempt to follow them it seem to make the mesh break more. I'm sure I'm missing a step but it's difficult to find help with my specific instance of this issue considering it's adult content. If anyone familiar with mesh editing could give some advice it'd be much appreciated. Thanks.

-
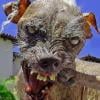
I've been exploring methods to create paired animations in blender and I stumbled into this. After some trial and error I managed to animate and export animations using the XP32 skeleton. This would make animated collisions possible in Sexlab animations. These would be TBBP animations and would require XP32 to be installed with the 'Fake Physics' option enabled, disabling SMP motion for the body. For the male parts to be animated, it would require edits to SOS for example, but they would work too. The rig uses niftools for blender, that have working kf imports. Editing existing animations to include animated collisions wouldn't be difficult. Would there be any demand for this? I feel like it wouldn't be worth it to make or edit animations if it means using them restricts SMP. Would switching between SMP enabled and TBBP assets (skeleton.nif and skeleton.hkx) mid game even be possible? If so I think it would be worth it as the SMP collisions are pretty jank. In any case, I don't think any SMP preset really utilizes the collision for anal, so those would be possible without any edits I think Here's some cursed GIFs
.gif.66f1deb076f8faa5b8b3725da08cb233.gif)
.gif.4ce9f5eef2804e08a81fabddd64124ce.gif)