Search the Community
Showing results for tags 'Tutorial'.
Found 19 results
-
This tutorial contains info on some of the parameters used in customizing HDT physics. With the Just For Fun program, it is no longer necessary to edit the .xml by hand. However the information here is valid and will help customization. By Monsto What is this? This tutorial attempts to document the hdtPhysicsExtensionsDefaultBBP.xml file that accompanies the HDT Body Physics hdtPhysicsExtensions.dll SKSE plugin. It is by no means a complete document, and needs many eyes and brains on it to keep it accurate. Please post in the main forum if you have information that could be added to this documentation. Important Note: After you make a change to the xml file, to see the changes you only have to change or reload cells in the game. Whatever cell you're in, you only have to coc to that cell again. Currently, this will reload the xml file. If it does not, then you would need to go to a completely different cell to defeat caching. coc whiterundrunkenhuntsman and then coc back to where you were would do it. Testing Environment Manipulating the file and testing the changes is time consuming. The parameters are not available to the console. If you are going to work on your own parameters, it would be best to streamline your game load as much as possible. Editor You can use any text editor to edit the xml file: Notepad, Notepad++, UltraEdit, etc. However, I would recommend an editor specifically built for xml editing as it will have conveniences that a straight text editor would not. I used XML Notepad 2007. Testing Remove all mods. Add Race Menu OR Enhanced Character Edit OR both. Add your body mesh of choice. Add your animation set of choice. Add your skeleton of choice. Start the game. From the main menu do not load a game. console: coc WhiterunDrunkenHuntsman (see below) console: showracemenu > modify the character console: save hdttest Loading a small, simple cell will dramatically reduce load time. The Drunken Huntsman is a cell that is well lit, small, has very little clutter and very few AI. Bannered Mare has a bunch of clutter, more AI and is no better lit. Dragonsreach is large with a ton of clutter and a ton more AI but has better lighting. Recommendations I recommend the following tools Review Studio . . . is a mod that adds 8 cg-studio-like rooms in white, blue, green and black. I use coc studio4 for a well lit seemingly infinite black space. Mod Organizer . . . is a mod manager than makes simple the process of different game configurations. This testing scenario the kind of situation that it was designed for. It would allow you to keep your primary Skyrim setup while having a streamlined setup only for testing your xml. With my setup, I am able to load the game, press enter twice (to load the only save game in that profile) and start the game in a black room facing the character. PS Universal PC NPC Body Changer . . . is a mod that takes the most well known body replacers and the most popular texture sets and allows you to change between them pretty much on the fly. You can see how your .xml will affect different bodies. For general setup, I recommend windowed mode with a Borderless Window mod. There's a billion of them out there, and ENB even has a parameter for it. At this point all you have to do is alt-tab between Skyrim and your editing tool. XML File layout XML files are typically read all at once into an array and then the array is queried for the information that is needed. What this means for us is that you can change the length of the file without breaking the game or the plugin. In other words, as of v9-28, you can add to the file as needed as long as it doesn't conflict with existing data. (You could probably remove data as well but I didn't test it. There's no real reason to do so.) This means that, if you are making extensive changes to the file, you could add fields describing your changes. An additional “description” field at the top and/or near where changes are made could provide information to other users or provide you bookmarks for easy searching. The file itself is broken down into primary hkobject sections. Each has a name field with a 4 digit number for data. The numbers range from #0056 - #0088 and are not sequential in the file. Each hkobject contains hkparams sections whose data configures aspects of a bone or a weighted section of the mesh. In a few cases, the hkparams contain secondary hkobjects. The Meat & Potatoes of the doc: Mod the jiggle The following information is based solely upon my own observations. Additional observation will be added as I receive it. Please post your observations! When you make a change to the xml, you do not have to exit and restart the game. Any change of game cells will reload the xml from file. If you are using 'studio4' from above, all you have to do to see your changes is to go to the console and re-enter coc studio4 again. To mod the bounce parameters Search for the word breast or the word butt. This will return 4 different results per body part (8 total). The results are actually the name of the bone in the skeleton. Each of the parameters in the section below will appear in each body part. There are a ton more parameters, but these are the only ones that I have found to have a visible effect on bounce. Physics Parameters Data is shown as: least effect ~ most effect [default value]. The effect range (least to most) is what i saw to be practical. You can exceed this range, but expect weirdness. timefactor = bounce speed .01 ~ 1.8 [1.0] this seems to be a vertical (linear) speed only. Movement is different than maxVelocity below.linearDamping = factor to affect vertical speed (bounce speed). 1 ~ -10 [0]angularDamping = factor to affect horizontal amount (sway amount). 0 ~ -500 [0]maxAngularVelocity, maxLinearVelocity This seems different timefactor.I haven't found a horizontal (angular) speed parameter. This may use pendulum math and thus cannot be changed.Range Parameters hkpGenericConstraintData appears for each butt and breast bone and contains the following block of data. There is other data that should not be disturbed. Range Parameters Block Data About the block hkparam name="data" and the block hkparam name="commands": hkparam name="data": In the comments at the end of the line, the first 2 numbers are an identifier. The last line for example (first 2 numbers = 15 2) appears in the hkparam name="commands" block as 3rd-to-last and 2nd-to-last numbers. I assume that the last number (zero) means "end of data". hkparam name="commands": This list is a direct reference to the items listed in the data block. Order requirements are unknown. Other than numelements="35" equaling the number of items in the list, the length requiremens of the list is unknown. You could probably get away with copying the list in the data block directly into your .xml (for reference; to get the comments). The data blocks affect specific areas of the mesh. #0063 = Right Butt #0075 = Left Butt #0087 = Right Breast #0099 = Left Breast Um ok great... what does all that mean?! I had to give you the basic information. You could still fuck up your config, but at least this way you have an idea what's going on. Either way, the standard "don't blame me, it's your computer" disclaimer applies here. So here's where we roll it all together. Change Range Parameters 1 Pivot A and 2 Pivot B change initial placement. They have different sensitivity and different motion. 1st number changes left-right 2nd number changes in-out 3rd number changes up-down 17 0 Angular (and 17 1 & 17 2) change the extents of the left-right physics movement. 16 0 Linear (and 16 1 & 16 2) change the extents of the up down movement. There's plenty of other things going on in that section. Experiment! Change Physics Parameters Use the Physics Parameters (section above) to tweak the physics movement. Instant Success! Or if you don't have instant success, post in the Customization forum for helpsies. Please let me know if I've missed something.
-
I moved The Sims 3 Complete Adult Guide as a new topic. So it will be easy to find rather than lucky notice it in my signature. [The Sims 3] ==Complete Adult Guide== Woohoo Mods: OnikiKay's KinkyMod (WIP): For this... no need explanation, just read the features : Non-rabbithole woohoo like Animated Woohoo... and also autonomous threesome, rape, bestiality, menstruation cycle, arousal+lust motive, naked/woohoo awareness, condom, etc. And more features in the future. But it still WIP, for stable gaming, use Kicker's Animated Woohoo. WIP Advises: - I highly recommend to try KinkyMod by start a new game and separate it with your main savegame. Error and corrupt can happen. - KinkyMod can't be run together with Animated Wohoo as there are some conflicts on certain features. - Don't use Nraas ErrorTrap. - For Nraas Overwatch, turn off delete cloth feature, as it will delete cloth sections created by KinkyMod. - Can run on the base game without expansion packs like Pets, Late Night, Into the Future. But the certain features tied with EPs will be turned off automatically if you don't have it. - Rape and Bestiality are optional. And must be turned on manually in the setting if you want that features. Alfiechan's Animated Woohoo +: AW+ is the successor of discontinued Kicker's Animated Woohoo. Basically it's the same as Kicker's Animated Woohoo, but with more features like Pregnancy, Risky Woohoo, Libido System, STD, Prostitution, many fixes and improvements. Kicker's Animated Woohoo: Was the best sex mod in TS3 before it get replaced by AnimatedWoohoo+ and KinkyWorld. No more rabbithole woohoo. Sims will have sex wherever they want: bed, sofa, chair, table, counter, window, hottub, etc, in life action! But still in development. Read carefully the link above, since it has many module and animation links, you won't miss even one. For the installation guide, check ModFrenzy's Guide. Nraas Woohooer: The best sex mod for EA style rabbithole woohoo, with tons of features to support it, from romance change, woohoo change, risky pregnancy, woohoo skill, to pay for sex. You can use it together with Animated Woohoo for the romance change and pay for sex features. Turn off all the autonomous woohoo change, since we don't need rabbithole woohoo anymore. PS: Read post #55 at page 3 for more detail about Animated Woohoo + Woohooer Graphical XTC Sexual Daydreams: Just like Kicker's Animated Woohoo but independent mod. Not as famous and big as Animated Woohoo. Additional Adult Mods: Nraas Decensor: Download this decensor mod, because it doesn't remove fish in the tank and others as the side effect. Nraas Shooless: No more shooing from peeing and take a bath. Pregnancy Mods: Cmar's Pregnancy Progress Controller: A complete pregnancy control, from instant pregnancy, set pregnancy progress, terminate pregnancy, set baby gender, pregnancy info, to even pause the pregnancy progress and stay pregnant forever. SimsMX's Hospital Overhaul: Add additional interaction to hospital: abortion, surrogate mother, sperm or egg donor, blood donor, helping suicide, etc. Additional Maternity Clothing: When you saw EA list of maternity clothes, you know that you need MOAR! Non-Adult Must Have Mods: Nraas MasterController: Control every aspect in the game. From setting sims skills, traits, family member, social relationship, career, education degree, to reedit your sims appearance again in CAS. Nraas Overwatch: A must have mod, to clean up the mess in the background. Make the game run smoother and out of problems. Body Mesh: Cmar's Morphing Penis (Male): You can change the size of the penis of each sims, from length, thickness, testicle size. Cmar's Morphing Penis (Female): The same as for male above, but for female. Cmar's Morphing Nipple (Female): 3D nipple for female, where you can change the size of the aureola and nipple length. There's also Natural Breast shape + Breast Fix version under GECK.O's Natural Breast Nude Top link below. Better Male Muscle Mesh: Bulged Male Pants and Undies: It's hugely frustrating to see how flat male bottom part in TS3, and this is the fix. Master Suite Stuff Pack version is here. Breast Fix for Sliders (Female): EA forget to add bone assignment to the bottom of the breast, bra and bikini mesh, it makes the breast shape look ugly when using breast slider to make it big. This is the fix. There's also default replacement for the nude top mesh inside and will conflict with Cmar's and GECK.O's breast mod. To fix it open the package file using S3PE and delete the afTopNude_LOD1. GECK.O's Natural Breast Nude Top (Female): Original EA nude mesh, especially the breast shape have the same breast shape as bra and bikini mesh. And this is the fix, to give natural breast shape for nude mesh that influenced by gravity. As it a default replacement, so use between this and Cmar's Morphing Nipple (3D). Update: Added Cmar's 3D Morphing Nipple for Natural Breast shape. GECK.O's Detailed Vagina and Reworked Butts: A simple reworked Female Nude Bottom, by giving a simple 3D camel toe vagina line and shape. And also reworked butts to make it more detail and rounder especially at the butt crack. Skin Texture: Skin Texture: Choose the skin textures based on your taste. Most of the latest skins already support Cmar's Morphing Penis above and correct nipple position for Buhudain's Normal Map Revision below, make sure you recheck it. If you feel lost, I can recommend some of them: --> Cmar's EA default texture with adult details. Some people like to keep their game in default style and pure. There are some variety of non-Barbie EA default skin in internet, but this is the best. It support Cmar himself made Morphing Penis above and correct nipple position for Buhudain's Normal Map Revision below. --> Ephemera's Eskin(s). For custom skin, Ephemera's Eskin(s) are the best. If you take notice, most of "skin blend" varieties are based on Ephemera's Eskin. --> Navetsea's skins. Navetsea's skin for Skyrim is one of the most popular. He also made a lot of skin for TS3, something that you should not missed. Face Overlay Fix: Default face overlay has a bit of "makeup effect" on the face, and the fix remove it. Good for custom skin texture above. There are also another varieties you can find and download from internet. Buhudain's Normal Map Revision: Keratin effect, hand detail, bumped nipple, veins on muscle, penis detail, vagina detail, camel toe, etc. Male and Female Pubic Hair Accessories: Adult sims is not complete without it. There are many textures, but for the most realistic pubic hair, Cmar's is the best, just extract and use the latest update: Real One, Real Two and Heavy, for both gender. Sliders: Shock&Shame's Complete Slider Download List: You can find all custom face and body slider links here. Breast sliders and Cmar's Sims Height slider are a must to have! Consort's Project Landslide: It's a batch command for the slider above. You can set sims height for example, to make all male sims taller and female sims shorter in entire world by just using two commands. Helping a lot. Sexy Clothes: Well, Happy Hunting at Download Site links below and elsewhere! Adult Objects: Well, Happy Hunting at Download Site links below and elsewhere! Gameplay Scenario Tips - BROTHEL OFB: http://www.loverslab.com/topic/20608-simlab/page-18?do=findComment&comment=843535 (Draft tutorial for now...) Major Download Sites: TheSims3.com Exchange: Make sure to check the forum as well, Creative Corner. ModTheSims.info: The main modding community and download site, both mods and cc. Most hardcore sims modders are hanging here. SexySims.info: Adult version of ModTheSims. TheSimsResource.com: TheSimsResource is the biggest cc download site. Hosting TSR Workshop, the major tool to create cc for TS3. SimAsylum.com: Check Simsrod and Twoftmama mods! SimLogical.com: A lot of interesting scripted objects and other mods. CC Find Sites: My Sims 3 Blog: One of the most popular, but it stopped updating their database since 31 December 2013. They are focusing on TS4 now. If you want to find specific stuff, use their search feature. As well as using tag/label to browse particular stuff, like world or skintone. Sims 3 Updates: Another most popular, they also post interesting stuffs from TheSimsResource.com. But since TS4, the site is being updated once a week. CC Caboodle: Equally interesting as two above, but still active and being updated everyday. Sunny CC Finds: Sunny CC Finds just focus on what being posted on Tumblr.com, or stuff outsite the Tumblr.com but being mentioned there. Updated everyday. Lana CC Finds: Just like Sunny CC FInds above, it's complementing each other. You will find some stuffs that doesn't posted in Sunny CC Finds and vice versa. They mixed with TS4 stuffs in standard page, but I give TS3 cc tag on the link, so it just show TS3 stuffs only. AwesomeSims: Same as Sunny CC Finds. Graphics Mods: SweetFX: It works perfectly on The Sims 3. There's some presets people made for it. Reshade: A universal-ENB-like, that can run on most games. It can run on TS3, but I heard the framerate drop from 50 fps down to 10 fps. You can try it, but I can't guarantee. Buhudain's Lighting Mods: Buhudain's lighting mod characteristic is tropical bright-strong daylight, spectacular sunset and sunrise, and aurora at dark night. There's a lot of customization to choose. BrntWaffles's Lighting Mods: BrntWaffle has a lot of Lighting Mod to choose, from Dystopian, Frozen Inspired, Perfect Day, Midnight Dream, Alien Sky, etc. I highly recommended to check another The Sims 3 Adult Guide below at post #3.
-
-
Ooh... I'll try this later. Source: 3j's Animations
-
Version 1.0
831 downloads
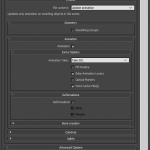
Resource for Animators and Compatibility with Devious Devices The primary use for this resource is to provide an easy and quick (less than a minute per animation) way for other animators to adapt about any of their animations to be compatible with Devious Devices like Armbinders and Yokes. This resources supports any animations created with pornphile's controller rigs, but there are also versions for direct import onto the Skyrim skeleton. The Controller Rig version obviously only works with 3ds Max. The Skeleton versions should work with any software software supporting .fbx (e.g. It should work with Blender, but I don't use it, so feedback needed). The tutorial focuses mainly on 3ds Max, so for other software some steps might be slightly different or not needed at all. If you have a problem following the steps or something doesn't work, feel free to ask. Tutorial for Importing Devious Devices Poses onto your animation options with (a) = vanilla skeleton (b )= pornphile's controller rig 1. Open your animation scene 2. Import the desired pose .fbx file 3. Use -these- settings for the import (see Import Settings picture) 4. Might need to unhide/hide certain layers again 5(a). If using vanilla skeleton merge seperated arms layer with layer including the rest of the bones again 5(b ). Make sure arms are set to FK controls and load the included .cps file for the recommended poses for fingers and apply them (or use your own) 6. Done. You can keep animating as usual or if you're ready just export the finished animation Information for scenes with multiple actors In case you have multiple controller rigs/skeletons in your scene take note of the following: For pornphile's controller rig the poses will import onto the standard controllers ending with _F If you want to import the poses onto the male controller rig, you can use the "Rename Objects..." option under "Tools". To do this correctly you should select all male controllers and then remove the last letter "M". After that just do the same thing, but add "F" as suffix instead. Similarly you can rename the female controller rig to stop the imported poses to affect her. For an import of poses directly on the skeleton you can use the same renaming method to change which actor will be affected by the pose. It will always affect the skeleton with the standard Skyrim Bone names. If you have two skeletons with the same names it affects the one that was loaded first in the scene. Supplied Poses: -Armbinder -Elbowbinder -Regular Yoke -Breastbondage Yoke -Front Cuffs (3 variations) ... More poses will be added to the resource as they are added to the Devious Devices mods. Hopefully this will motivate some of the great Sexlab animators to supply some of their cool animations with versions that work with Devious Devices. Credits to Pornphile for his controller rigs. Best way to create animations for Skyrim! ;P -
Hey guys I was recently asked by a friend how to make Frills in blender. Now if your advanced in blender obviously this method can be ignored but if your like me and always looking for simple and quick tricks to get the effect your looking for then this tutorial is for you. This tutorial is all picks and no real post just to help others who may want to know how to do this as well. Actually it is CTRL+ or - Thanks KosuKosu1 for pointing that out In game they should look more or less like these socks but higher. Remember this is a beginner tutorial so do not kill me if it is not the best looking frill in the world (hell mine is a bit rushed cause I just made time to do this) This could help with other items like bra's Shirts and skirts too Anyway I hope this may help others who want/ need it Thanks -HappySparkles. Download it here
-
View File Tutorial to Create a Follower, including SexLab This is a tutorial to create, step by step, a follower. It is composed by a Word Document that explain all the different steps, and a final ESP that you can use as reference. In this tutorial: Create a NPC Use a custom Body Use custom eyes Use custom hair Use custom armor Use custom boots with High Heels System Use custom weapons Define a combat style Setting up the NPC as follower A little bit of dialogues Use some extra body parts like horns and wings Define some light scripting that uses SexLab to make the follower a Succubus The acknowledgments go to: The idea for this tutorial is from DareDemon666 The items and the idea of the specific NPC is from dadadacool. A big thank you to @nehaberlan that had a copy of the files I lost. You can do whatever you want with this tutorial, also uploading to other sites that are open to SexLab related mods. Just send me a message. Enjoy, CPU Submitter CPU Submitted 07/11/2016 Category Other Requires Special Edition Compatible
-
INTRO: I made this thread to sort of neatly compile all the data/information over in the BodySlide Conversion Thread into a neat little guide to encourage more of you to use BodySlide and Outfit Studio correctly! The following link is all you need for most of these tutorials, it also contains official tutorials and FAQ on the main page. BodySlide 2 and Outfit Studio Fun Fact: CREDITS: Caliente - Creator of BodySlide and CBBE body cell (ousnius) - Contributor to BodySlide. You can ask him for assistance/bug reports on his thread here or the Nexus mod page stuffed_bunny - Contributor to BodySlide. Advanced users click his link for some resources and BSD slider data tools! ChronoTrigger77 - Contributor to BodySlide and creator of Remodeled Armor. Click the link for his work. Malystraza - Immortalizing this post by turning it into a professional looking PDF! Ashal - For pinning this thread so it can be used as a resource for users and modders alike. TERMINOLOGY: Read this section if you are unfamiliar with some terms in the guides. More advanced users can skip. GUIDE 0: Preparing meshes for Outfit Studio: (Not needed for newest version of Bodyslide) GUIDE 1: Any Outfit -> BodySlide (Custom Body): GUIDE 2: Loading a BodySlide Preset into Outfit Studio: GUIDE 3: Convert/Edit any outfit mesh (any body type): Guide 4: Tweak BodySlide/Outfit Studio: GUIDE 5: Outfit Studio's "Set Textures" feature: GUIDE 6: Setting up BodySlide presets to show up on your outfit: DISCLAIMER: This method should only be used for testing your own preset with the conversion, for a QUALITY release, please see guide 9. Guide 7: Creating your own sliders for an outfit: Guide 8: Adding options to your BodySlide outfits (e.g. Zaps): Guide 9: Packaging your BodySlide conversion for release (outfit groups): Guide 10: HDT/TBBP Nipple Piercing BodySlide Conversions (Video Only for Now): Guide 11: Transferring sliders via XML editing (WIP): FAQ: Q: I think I found a bug in BodySlide/Outfit Studio. A: Well, first check the official GitHub issues list to see if it's already been identified, and if it isn't, PM cell here (or ousnius on Nexus) with a description of it. Q: When I load up my conversion in-game I have these black squares or irregular textures? A: In Outfit Studio, hit "Shape" and uncheck "Smooth Seam Normals". Q: I get animation clipping issues on my conversions? (Body clipping through outfit in-game) Multiple fixes: 1. Go back in OS and create more 'space' between the mesh and the body using the brushes (hint: view in wireframe mode to double check the areas). 2. Create a zap slider and mask the belly area, invert the mask and click "Slider -> New Zap". This will 'hide' the belly underneath the armor so you will not see clipping issues. 3. Re-adjust bone weighting. Number 1 is fairly easy, number 2 is sort of a hack in my mind, but many armors and such have done this to circumvent weight clipping. Number 3 is by far the hardest, but could also potentially give the most 'quality' result (or it may not xD). Q: When I load boots/gloves the feet/hands/mesh is completely off from the body A: This is a known bug, you can try fixing this in Outfit Studio by hitting "Shape -> Move Shape" to move the ENTIRE shape back onto the body. Test if it worked by exporting to *.nif and opening in NifSkope and see if it shows up correctly. If not, then you're out of luck and should seek further assistance. Q: Help! No textures load in Outfit Studio or I have completely black textures! A: Well, check to make sure your textures are 'loose' and not packed inside a .bsa, this isn't a feature supported yet. If the textures are loose and you're still not getting any textures or black textures in Outfit Studio, then it's just a bug that others have reported. See guide 5 for quick fix.[/color] Q: I loaded my outfit into BodySlide, but I don't see my preset? A: You have to manually add your outfit to the (super) group the preset was saved in, or edit your created preset so that it links to your outfit. You can still create the outfit with your BodySlide preset, you just need to navigate to the body that you made the preset for, select the preset, then type your outfit's slider set name into the "Outfit Filter" and hit batch build. Q: When I add weights to my outfit mesh and try opening it up in NifSkope, I get a bunch of errors. A: Please see guide 0, and also make sure that all vertices of it are weighted! Q: What's that sexy text editor you use? (Okay not really asked but still...) A: Sublime Text 3 PERMISSIONS: Feel free to copy/paste or link this guide. Feel free to translate this guide. Feel free to make your own guide I've attached the images to help you! (They'll be updated for revisions/changes) If this guide helps any of you, then the best way to say thanks is to make more conversions and share with the community! Guide 1 Pics.rar Guide 2 Pics.rar Guide 3 Pics.rar Config.xml Guide 4 Pics.rar Guide 5 Pics.rar Guide 6 Pics.rar Guide 7 Pics.rar Guide 8.rar Guide 9 Pics.rar BodySlide for Dummies.pdf Guide 0 Pics.rar
-
 View File Resource for Animators and Compatibility with Devious Devices The primary use for this resource is to provide an easy and quick (less than a minute per animation) way for other animators to adapt about any of their animations to be compatible with Devious Devices like Armbinders and Yokes. This resources supports any animations created with pornphile's controller rigs, but there are also versions for direct import onto the Skyrim skeleton. The Controller Rig version obviously only works with 3ds Max. The Skeleton versions should work with any software software supporting .fbx (e.g. It should work with Blender, but I don't use it, so feedback needed). The tutorial focuses mainly on 3ds Max, so for other software some steps might be slightly different or not needed at all. If you have a problem following the steps or something doesn't work, feel free to ask. Tutorial for Importing Devious Devices Poses onto your animation options with (a) = vanilla skeleton (b )= pornphile's controller rig 1. Open your animation scene 2. Import the desired pose .fbx file 3. Use -these- settings for the import (see Import Settings picture) 4. Might need to unhide/hide certain layers again 5(a). If using vanilla skeleton merge seperated arms layer with layer including the rest of the bones again 5(b ). Make sure arms are set to FK controls and load the included .cps file for the recommended poses for fingers and apply them (or use your own) 6. Done. You can keep animating as usual or if you're ready just export the finished animation Information for scenes with multiple actors In case you have multiple controller rigs/skeletons in your scene take note of the following: For pornphile's controller rig the poses will import onto the standard controllers ending with _F If you want to import the poses onto the male controller rig, you can use the "Rename Objects..." option under "Tools". To do this correctly you should select all male controllers and then remove the last letter "M". After that just do the same thing, but add "F" as suffix instead. Similarly you can rename the female controller rig to stop the imported poses to affect her. For an import of poses directly on the skeleton you can use the same renaming method to change which actor will be affected by the pose. It will always affect the skeleton with the standard Skyrim Bone names. If you have two skeletons with the same names it affects the one that was loaded first in the scene. Supplied Poses: -Armbinder -Elbowbinder -Regular Yoke -Breastbondage Yoke -Front Cuffs (3 variations) ... More poses will be added to the resource as they are added to the Devious Devices mods. Hopefully this will motivate some of the great Sexlab animators to supply some of their cool animations with versions that work with Devious Devices. Credits to Pornphile for his controller rigs. Best way to create animations for Skyrim! ;P Submitter Supertin Submitted 04/15/2017 Category Modders Resources Requires Special Edition Compatible
 -
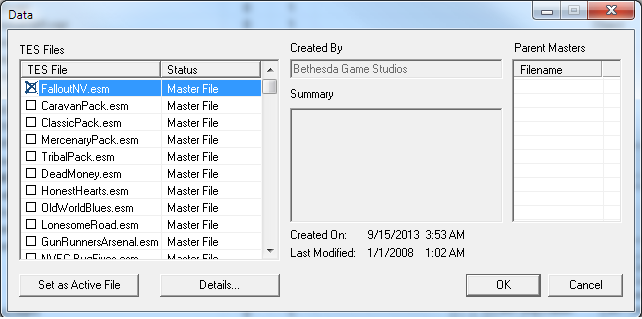
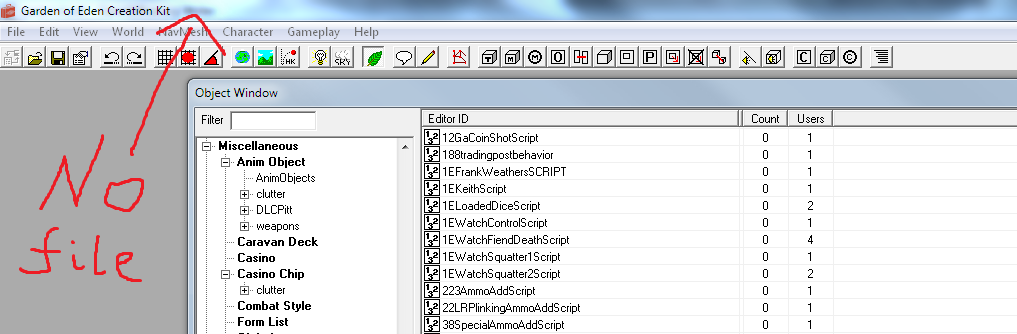
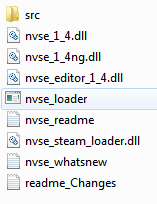
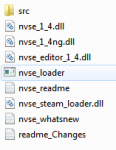
This tutorial will get you started making your first scripted mod for FNV/TTW. No prior experience of modding, scripting or programming is required. This is practical tutorial, so you will be scripting your first working mod by the end of part 2, and after that we slowly evolve into more advanced stuff. Don't expect everything you read to make sense immediately, it didn't for anyone. Just read it once, and then carry on with the examples. You can always re-read it later if need be. The tutorial focuses on scripting, but touches on general mod making when required as well. If you already have experience scripting/programming I highly recommend that you still start at the beginning, although you'll probably be able to skim through the middle chapters. To keep things easy to follow, occasionally things have been simplified slightly. This tutorial focuses an general fallout scripting, but since this is loverslab, there are optional sections on sexout included, including how to make you own sex key after part 5, and orgies later on. Contents: Setting Up The GECK Your First Script GECK overview (references, base forms and functions and where to find them) Conditions Variables 1 (Optional: SexoutEZ and creating a sex key) Part 1 - Setting up the GECK Make sure you have the lastest version of NVSE installed, which you can get here. Download the GECK from Bethesda here and install. Download the GECK Power Up from here and install (this gives you some helpful extra features) Go to your FNV folder in windows explorer ('.../STEAM/SteamApps/Common/Fallout New Vegas'). Find this file nvse_loader.exe, right click and create shortcut. Right click on that shortcut you just made, and click 'properties'. Under 'Target' which is probably highlighted already, add -editor at the end. So, it will look something like: "E:\STEAM\SteamApps\common\Fallout New Vegas\nvse_loader.exe" -editor Click okay. Done, you have now setup the GECK correctly, whenever you want to run it, double click this shortcut. Do not run “GECK.exe”, because this won't work for non-vanilla features. Double click the short cut to start the GECK. Now you've got the GECK setup, just wait for it load (note: whenever the GECK is busy loading, do not click the mouse or press any keys, be patient and wait for it to finish. Sometimes it crashes otherwise). At the moment, there are no files loaded in the GECK, so you can't see anything interesting. Click 'file' at the top left, then 'Data...'. This will show you a list of all the .ESM and .ESP files in your data folder, with a tick box beside them, anything ticked will load when you press 'OK'. There is also a button 'Set As Active File', if you want to edit an existing mod, you click this, but to create something new, you just press 'OK' with nothing set to active. NEVER set a vanilla file (eg “FalloutNV.esm”) as active. Now, make sure “FalloutNV.esm” is selected, but nothing else. If you have DLC, they might default to selected, if so then double click them to unselect them. It should look like this: (fig1: ), if so then press 'OK' and wait for the GECK to load. Now, the GECK top left should look like this: (fig2: ), if instead you see a file name, like “FalloutNV.esm”, you accidentally set an active file, so click 'file' → 'Data..' and fix that. Click 'File' → 'Save', then type in a name for your mod, such as “MyFirstMod” and press enter. Congratulations, you just created your first mod. Granted it does nothing at all yet, but still. If you close the GECK and then want to re-open your mod, this is when you select it from that list and click 'Set Active File', before pressing OK. This will still load any files selected in the list, but your 'active' mod will be the one that is saved to.
-
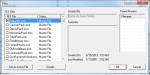
 Moderators, please feel free to move this to a better location if needed. The attached file is a downloadable PDF with photos and a more detailed instruction for those that need added guidance. The Mod Tutorial – Installation of SKSE Scope of tutorial: Cover the basic installation of SKSE from download to installation as well as load order configuration in MO. This tutorial only covers the installation into MO if you wish MO to control the conflicts with scripts that SKSE installs. ( advised) Still needs to have the correct files installed into the Skyrim folder manually. (everything but the data folder.) Drag and drop into the same folder where you see TESV and "Data" folder. Drag and drop into the same folder where you see TESV and "Data" folder. Requirements: Steam Skyrim Mod Manager SKSE It is assumed for this tutorial that you have a functional installation of Skyrim and Mod Manager ( MO ). Step one: Download Download SKSE. Current version as this tutorial is 1.7.1. Select the 7z archive version For this tutorial I am saving it to the desktop. You can save it anywhere just remember where you downloaded it. Step two: Installation Open MO. Click on the top left icon that looks like a CD. Select that and then click “Open”. You should see the program name to the left of the “Open button”. Now a new windows opens and is giving a warning “No game data on top level”. This indicates that the structure of the install folder is wrong and MO doesn’t know what to do with it. If it is installed like this SKSE won’t work. We need to make some changes. This is because there are files in the SKSE download that you don't need. One thing I like to do is go to the top drop down menu where you see SKSE and rename it to a name that is easy to remember and manage For this tutorial I am using Skyrim Script Extender (SKSE v 1.07) as the name. Click on the file and expand. Right click on the “Data” folder and “Set Data Directory” Now you have a comment on the bottom of that window “Looks good”. Select “OK” button to the right of that and the mod will be installed. Step three: Fixing the Load order. Drag that file up to where you want it or change the "Priority" number to where you want it in the order.Step four: Use SKSE You are now ready to use that tool that you just installed. Make sure you use the “SKSE” option left of the “Run” button.Step five: Praise MO Yea MO!!!!
 -
Object of this brief Tutorial is a basic explanation of why animations likely won't happen. A first step to solving your animation problems. Support will only be given related to the areas mentioned here. Having problems with animations working? Most likely issues r/t animation in order of most likely causes. Requirements: NVSE 4.2b4 or most current version NVSE extender (current version of course) The LL version of FOMM (A must) SexoutNG (again current version.. see a trend? ) Reason for failure of animations NVSE (Current version link above), Not installed or wrong version NVSE extender, again not installed properly, or wrong version. Keep in mind you should load all your FNV mods using FOMM found here SexoutNG, improper version or not current version (for the most part the most current stable, unless stated otherwise is the one to use for all mods here on LL.) Notice any trends? Other animations mods. Body by Race, Umpa Dance etc. (unless fixed using the trick found on the second post of Bruce's tutorial) Issue with mod.. This is rare. Most modders are "calling" the action from the bullets mentioned above. This usually works well. The reason is the mod creator has "tested" the mod. During "Testing" the mod shown animations. Animations in Sexout mods are seldom if ever located in the modders mod and almost always located in either Zaz or SexoutNG. Exceptions to the rule are Arma's animations require a "patch" or the penis drops (according to reports) and that isn't good.. The other is any skeleton that has "bounce" for women can sometimes cause strange animation issues. Solution: Updated and verify the installation of all the above. Fresh downloads just in case. Make sure you check the latest comments on the SexoutNG, Sexout tutorial or even the SCR Resources thread etc. Many of the tutorials are updated quickly if there are any changes. I have had many times animation issues and it has always ended up being the first 3 of the list above. Added Info: NVSE and the extender are "script extenders". In order to understand that you need to understand that the game runs on an "engine". The "engine" is basically set of scripts that give the rules and regulations on how the game is going to run and what will run. These "script extenders" allow added features to be added so that Sexout can run. SexoutNG is a base "framework" that holds the animations and other key resources that are needed for other mods to access. Without this mod being current, mods are trying to access resources that may not be currently available in the version you are using, or accessed using different instructions than the current version has therefore it fails to work properly. How to check your installation: NVSE Installation Check for FNV Make sure you are using the listed version of NVSE Open the folder in Steam. There you will see a "Data" folder and a "FalloutLauncher.exe" If you see these files in the same folder as "Data" and "FalloutLauncher.exe" then you have installed NVSE correctly. There is an excellent example in BruceWaynes Tutorial (Link found on bottom of Tutorial). NVSE Extender, AKA, NX Extender. Check, After you have finished making sure that the NVSE is installed correctly ( again using the FOMM version mentioned above) open that Data folder you see in the Fallout:New Vegas folder. Now you will see a nvse folder. Open that You will now see a plugins folder. Path for those that understand this... Fallout New Vegas/data/nvse/plugins/ Inside that folder you might see other files but these are what you need to see for the extender to be correctly installed. If the files are found during the check above, and you have a current version you have the extender installed correctly. Now to move to the mods. Mods: At this point it is rare for any animations to be caused by any mods. In order to "test" you really need to remove all the mods except for the one that you expect is causing the issue and Sexout. (SCR if needed for the mod) nothing else. No other animation mods etc. Nothing but the base game mods, (TTW should be OK unless the individuals that are supporting state otherwise. ) Added Help: There is an excellent tutorial found here, from BruceWayne. It is kept up to date with all the base requirements and links needed to get Sexout working properly. You should review this just to be sure that other aspects of your installation related to Sexout mods have been covered. Otherwise you might end up with Infinity Titts. Might sound good however in reality, not so much.

-
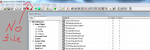
How to make boobies react to body collision. Thanks Eu4orick Thanks ledo4ek for the research in this field and for the attached hdt.xml and hdtm.xml You'll need: nifscope: http://niftools.sour...t/wiki/NifSkope from downloads section get the attachment (contains both hdt.xml & hdtm.xml): HDTxml.rar Choose an Idle pack:http://www.loverslab...is-vi/?p=570201 sexy idle Animation by red3113@3dm Backup your existing mt_idle.hkx Choose an idle from one of the packs above. Rename it to mt_idle.hkx then put into the correct directory: Data\meshes\actors\character\animations\female. Using nifscope picture tutorial via s666: http://www.loverslab...-body/?p=566933 Another way shorted explained here from ballsy: Right click NiStringExtraData on the block list, copy branch, right click on NiNode on select paste branch. Delete the original NiStringExtraData by right clicking > block > remove. Click on the new NiStringExtraData and use ctrl + up to shift it to the first line right after 0 NiNode. Go to block details after clicking on NiStringExtraData and click on the txt icon of Name. Type in HDT Havok Path. Now go to block details line 4, String Data and click the txt icon. Enter the path where you installed ledo's xml. (eg Data\SKSE\Plugins\hdt.xml) Click Save As... in nifskope and replace the original femalebody nif file. Same stuff goes for armors.
-
Please do not ask for support in this thread, if you require support making any of this work please post here. Getting Started with SexLab A guide to installing and setting up SexLab ----- Introduction ------------------------------------------- Sometimes setting up SexLab can be tough, especially if you are new to modding. This guide has been created by a user for users. This guide will show you how to install SexLab and its requirements as well as show you how to configure SexLab to get animations working both with NPCs and creatures. ----- Important information to note before continuing ------------------------------------------- LoversLab does not support piracy in anyway, shape or form. Users wanting help install SexLab with pirated copies should not ask or expect support. Support is only given for Skyrim version 1.9.32 ----- Frequently Asked Questions ------------------------------------------- Ashal has created a nice FAQ answering some of the most asked question about SexLab, you can access it here. Questions about this guide can be found here. ----- What you will need ------------------------------------------- You will need to download the following files and mods before you begin. Download them to a folder located on your desktop and unpack them all into separate folders. Skyrim Script Extender (The guide will be referring to this as SKSE) Fore's New Idles in Skyrim (The files you need are listed below, this is a Nexus link) FNIS Behaviuor v4.1.1 - ALWAYS necessary FNIS Idle Spells v4.0.2 - ADD ON for the spells (Optional, not needed but the guide will cover its installation) FNIS Creature Pack version 4.1 or newer is required only if you want creature animation support in SexLab, otherwise it is not required. SexLab Framework 1.35 SkyUI ----- Manual install procedure for SexLab, FNIS and SKSE ------------------------------------------- Tip for Windows 7 and 8 users: Open the folder containing the unpacked mods and Skyrim directory side by side using the Snap feature. This will make installing SexLab and it's requirements easier. Copy the contents of the SKSE folder to the main Skyrim directory, this is the folder which contains the Data folder. Copy the contents of the FNIS Behaviuor v4.1.1 - ALWAYS necessary folder to the Skyrim Data folder, this is the folder which contains the meshes and texture folders. (Optional) Copy the contents of the FNIS Idle Spells v4.0.2 - ADD ON for the spells folder to the Skyrim Data folder. (Optional) Copy the contents of the FNIS Creature Pack 4.1 folder to the Skyrim Data folder. When asked overwrite files. Copy the contents of the SexLab Framework 1.39 folder to the Skyrim Data folder. Overwrite existing files if it asks. Copy the contents of the SkyUI folder to the Skyrim Data folder. Go to the Skyrim Data folder and find the folder called "Tools", open this folder. If you cannot find this folder do steps 2 to 4 again. In there you should see two folders, one called GenerateFNIS_for_Modders and another called GenerateFNIS_for_Users. Open the folder called GenerateFNIS_for_Users. Run GenerateFNIS_for_Users.exe. You should now see the FNIS window open up. If you are using xp32 skeleton then make sure you select "SKELETON Arm Fix" from the menu at the bottom of the window. Select "Update FNIS Behaviours" Note: If you have the creature pack installed it will set these animations up as well. You should see something like the following appear in the window, this is FNIS reading and configuring mods. Go to the Skyrim root folder and create a new shortcut for Skyrim by right clicking on SKSE_Loader.exe and select "Send to" and then "Desktop" Launch Skyrim using the shortcut you just created. If you followed everything exactly your game should now have FNIS and SexLab installed and in working order. Please note using just using the SexLab Framework by itself does nothing, you need a plugin like SexLab Romance installed in order to make use of the framework. In order to find SexLab based mods you should head towards the SexLab section of the download area or go to the thread here which LaEspada has created indexing all SexLab mods. Simply download the mod you want to install, install it to the Skyrim Data folder using the instructions located within the readme or mod description page and load the plugin AFTER SexLab.esm. ----- Configuring SexLab in game using Mod Configuration Menu ------------------------------------------- - Currently in development - ----- Credits ------------------------------------------- Getting Started with SexLab: Ark of Truth Mailamea SexLab Project Owner, Thread layout: Ashal A full credits for SexLab based work list can be found here.
-
Installation of Sexout Common Resources (SCR): Questions related to use of this tutorial: This tutorial covers the how to create the Resource folder and install it. Support will only cover any issues related to these two issues. Any questions related to issues downloading, extracting or obtaining these files should be directed to the threads host the resources. Please refrain to posting missing requirements here unless they have been added to Halstroms SCR thread. This tutorial is based off of his thread and any new or missing requirements need to be posted there first before being added to this tutorial. FYI: This is the brief tutorial, general instructions and such. For the full step by step instructions download the PDF. It is very large and complete with pictures. Do not PM me with questions on the tutorial. These PMs will be ignored. If it is valuable enough for you to take time to send a PM then it is valuable enough to actually post in the forum. There are others here that can answer many of the common questions I get in PMs. Installation of Sexout Common Resources (SCR): This tutorial is for those individuals that can use tools such as FOMM and 7zip. A Downloadable PDF for convenience. Step 1: Prerequirements Make sure you have all the SCR pre-requirements installed and setup properly. 7zip installed and configured. Required for this tutorial and useful for modding in general. FOMM installed. Preferably the version hosted here on LL. Fallout New Vegas Astymma’s BnB Body Extender FAFF NVG compatibility skeleton. New Vegas Script Extender (NVSE) Most current version available. NVSE Extender (Most current available) SexoutNG Sexout Common Resources (SCR) by Halstrom An Account with both Loverslab.com and Nexus.com to access the mods needed. Create a SCR Resources folder on the desktop or where you want to work. Create an SCR Archive folder to keep you from having to re-download the requirements again. There is an excellent tutorial by BruceWayne on Sexout installation and its requirements found here. Still have problems go here, here and here. Step 2: Installation Prep These requirements installed in this step aren't available in game without some mod accessing them. If you desire to access these outside of mods and gameplay my advice is to install SexoutStore so that you can access these armors and other items when you desire. Provided you have the caps. Keep in mind in order for SexoutStore or Halstrom’s Pregnancy mod to work properly you need all the resources installed. General Concept: Download all the requirements to the SCR Archive folder. Extract the requirements to a convenient location then drag the textures, meshes and sound to the SCR Resources folder. Finally delete the extracted folder and move on to the next requirement. It is advised to follow the list of requirements in order. Remove all esp's from these resources. There will be special instructions to rename files. This must be done in order to get a functional SCR Resource. If you do not follow the instructions properly many issues may occur. In some cases there will be two sets of records (clothes, toys etc) in the game which only one is controlled by SCR. Other cases the items won’t be available and giant red exclamation marks, pink skin, or floating head and hands will be the result. The worst effect of not following the instructions would be your game will crash when you start it. You have been warned! Base Non-SexoutStore/Pregnancy Requirements: [sCR] Spectrums Toy Pack by Spectrum Warrior. Refugee Outfits for Type 3 by Exter (Delete the esp(s) T6M CH Raider Armor by Izumiko Raider Chains Armor T6m – T6BB – TN – BerryK2 .2 by nagothm (Delete the esp(s) Sexout Clothing System by Evilrunner (Sexout Clothing Damage Updated with Combat Armour! Only) (Delete the esp(s) Nordlands Mesh & Texture pack for the Fertility Drugs by Norland GSB’s BDSM Files 20130227 by GSBmodder You now have all the base and specific resources installed. If you desire to have SexoutStore, or Halstrom’s Pregnancy installed continue with the tutorial. If not you can skip to Step 3. The Following are required if using SexoutStore, Halstrom’s Pregnancy, and/or Tryouts mod. The following are mod specific resources and are only required if using specific mods, SexoutStore, or Pregnancy. Sexout Tryout's Data Pack by Loogie: Sexout Maternity Clothes – Old by Evilrunner Mantis Zero Suit Samus and More - Type 3 for NV by Primantis. (Delete the esp(s) Reflex Armor S-07 for TYPE 3 a Mantis Retexture by static07 and Primantis (Delete the esp(s) Bunny Suit for Dimonized Type3 by Backsteppo (Delete the esp(s) Ghost Armor Conversion FNV Revamp by Ken1945 - Bunsaki – Rikai (Delete the esp(s) Vegas Chokers by adriant1978 (Delete the esp(s) You have to rename the BSA to SexoutCommonResources – VegasChokers Bouncing Breasts Type 3 Armors by revang. (Delete the esp(s) Requires Pack 1, 2, and BB Sexy Sleepwear. The Dragon Girl Dresses Do not use the one on this page. Use this one instead. Julia Chang Set by GSBmodder (Delete the esp(s) Ghost Variants by Brokencrash. (Delete the esp(s) Extravagant Half Masks FNV by t3589. T6M Competition Swimsuit NV by Shimaneko (Delete the esp(s) The following are mods that have been removed by the author. They are no longer publicly available for download. A Collection of Sexy Attire by Shadowtroop (Delete the esp) Step 3: Verification of Installation Check the SCR Resources folder and you should only have the following: Meshes Textures Sound SexoutCommonResources - VegasChokers If you have anything else you did something wrong go back and figure out where you went wrong. If your folder has only the files I mention above and you are completely satisfied that you have everything ready move to Step 4. If you think you made mistake go back and repeat any or all the individual steps for the requirements. Step 4: Installation Instructions Create an FMOD that can be used when installing SCR. Open FOMM and select Fallout New Vegas. Click on Package manager. Click on the arrow pointing down on the “Add FOMod” button. Select Create from Folder. A window opens up select the SCR Resources Folder and click OK. Wait until done. This will take quite some time. When done you will see SCR Resources entry in the Package Manager. Select that and click the Activate button and wait some more. When done you can close the package manager and move on to Step 5 if you desire to add some of the available options from the mods mentioned above, if not move to Step 6. Step 5: Optional Patches (Optional) SCR Resources Patch Used in case there are some options that are desired from the SCR Resources Tutorial above or files added in the future to SCR and SCR’s family of mods. You can also create a patch if you are concerned there might be a mistake or problem with your SCR Resources folder. Patches can be installed separately ( after the base SCR Resources folder of course) and the installation will prompt you for overwrite. After verification that it is what you desire you can later merge this into the SCR Resources folder and overwrite those files. Benefits to creating a patch: Flexibility and expandability without risking the core base folder created by the above instructions. Ability to make multiple patches and numbering them or giving them a brief name at the end. For example SCR Resources Patch – Ghost Armor. This can make it easier to figure out which patch is which in the future. This also allows you to make smaller changes. My suggestion is make a patch for each mod or resource used or added. Patches can be added, removed, altered, and tested until just right. When finalized and determined as “perfect” the folder then can be merged with the SCR Resources folder created in the tutorial above. More info further down under “Merging SCR Resources Patch with SCR Resources folder”. How to create the SCR Resources Patch: Create a folder named SCR Resources Patch Open up the mod desired and look for the Textures, Meshes, or Sounds desired. Might have to dig down onto the folders and move specific files over. Make sure you follow the instructions of the author on how to place these extra folders as some options means manually creating a file, placing a single file into a folder in a specific location etc. When finished return to Step 5 and import the new patch into the game and test. When reinstalling your mods remember that the SCR Resources folder needs to be installed before an SCR Resources Patches. Merging SCR Resources Patch with SCR Resources folder You have determined that the patches you have created are perfect and what you want to use going forward. You would desire to merge these together to easy the management of your mods in your manager. Grab the SCR Resources folder you created earlier. Make a copy. Might take a bit of time. Rename the old copy “SCR Resources Original” This is to designate it is what was started with. You might change your mind later and decide to go back and rework the files. It is always a good idea to have the same base files to start from that everybody else will have. Grab the files out of the SCR Resources Patch and drag and drop or copy paste depending on your preference over to the SCR Resources folder and click yes to all the prompts for overwrite. Return to Step 5 and re-import the SCR Resources folder into FOMM. Click yes to any prompts to overwrite. Step 6: Backup the folders SCR Archive, SCR Resources, and SCR Resources Original (if Step 5 was used) Installation of Sexout Common Resources (SCR)(PhotoPDF) 2017.08.06.pdf Credits: Halstrom DoctaSax BruceWayne
-
 PURPOSE: This thread is geared towards providing guides/tutorials and support for beginners to the wonderful world of HDT physics modding. This guide will be broken up into two posts, the first main post will be geared towards end users, contain FAQ, Resource links and support tips. The second post will contain tutorials/guides and other miscellaneous resources and info for modders. CREDITS: HydrogensaysHDT - Creator of HDT plugins Monsto Brukes - Creator/Moderator of HDT Subforums Canderes - Contributor to HDT physics, click on name for his guides & resources Yoo - Contributor to HDT physics modding, click on name for his latest project Groovtama - Resident Skeleton Wizard and provider of HDT Rig Map Fix. Enskyment - For Making a kick-ass guide for newbie end users! Special thanks to: Vioxsis, b00marrows, jacques00, Daiemonic, Stevierage, clp2011 and others for contributing to the HDT physics scene RESOURCES: HDT Download 14-28 Havok Physics SDK Feature Guide TERMINOLOGY: Read this section if you are new or unfamiliar with some of the terms in the guides and/or feedback from other users GUIDE 0: For Absolutely New to HDT: Click the above link for an awesome guide made by Enskyment meant to quickly get you up to speed with all of this stuff! GUIDE 1: Basic HDT Physics Installation (No Pics Yet): GUIDE 2: Adding Collision to your HDT PE Installation (Manually) (On Hold): FAQ: Q: I heard deleting the skeleton_female.hkx (Rig Map) file helps fix things with HDT Physics? A: NO, stop it. That piece of information is old and even then it was a horrible 'workaround'. DO NOT DELETE THIS FILE. Instead use the attached Groovtama's Rig Map file for maximum HDT Compatibility. Q: I do use my own custom skeleton and use HDT Physics, anything further I need to do? A: Yes, Download and install Groovtama's custom Rig Map, be warned though that if you are using a custom skeleton that has a new non-standard bone used for animation that is not already included in the XPMS skeleton, that this Rig Map will not contain the animation data for that new bone and you will need to add it yourself. Permissions: Feel free to copy/paste or link this guide Feel free to translate the guide. Feel free to make your own guide , I've attached the images to help you! (They'll be updated for revisions/changes) Groovtama HDT Rig Map.rar
 -
Here is the instructions for installing FNIS manually for Skyrim, for those of you who are wanting to install FNIS for SexLab please look here. This guide requires that you have some common knowledge of modding Skyrim. This guide assumes you are using an account with administrator privileges. 1. Download SKSE from here 2. Go to the FNIS download page on the Nexus. 3. Download the file called FNIS Behavior v5_3 -- ALWAYS necessary 4. Download the file called FNIS Idle Spells v5_0_1 -- ADD-ON for the spells 5. Download the file called FNIS Behavior V5_3 Fix 1-11811 (Optional Step) - Download the file called FNIS Creature Pack 5_3 Beta1-11811-5-3-Beta1 6. Unpack both FNIS files to the desktop. 7. Unpack SKSE to the Desktop. 8. Copy the contents for the SKSE folder to the main Skyrim folder (The one which contains the Data folder) 9. Copy the entire contents of FNIS Behavior v5_3 -- ALWAYS necessary to the Skyrim Data folder. 10. Copy the entire contents of FNIS Idle Spells v5_0_1 -- ADD-ON for the spells to the Skyrim Data folder. 11. Copy the entire contents of FNIS Behavior V5_3 Fix 1-11811 to the Skyrim Data folder. (Optional Step) - If you are installing mods for creatures, copy the entire contents of FNIS Creature Pack 5_3 Beta1-11811-5-3-Beta1 to the Skyrim Data folder. 12. In the Skyrim Data folder go open the folder called "Tools". (If it's not there you have not followed the instructions, start again from the beginning) 13. In there you should see two folders, one called GenerateFNIS_for_Modders and another called GenerateFNIS_for_Users 14. Open the folder called GenerateFNIS_for_Users 15. Run GenerateFNISforUsers.exe 16. You should now see the FNIS window open up. 17. If you are using xp32 skeleton then make sure you select "SKELETON Arm Fix" from the menu at the bottom of the window. 18. Select "Update FNIS Behaviours" 19. You should see something like the following appear in the window, this is FNIS reading and configuring mods. Note: My screen will look slightly different as I have FNIS Zoo installed -Picture needs updating- 20. Go to the Skyrim root folder and create a new shortcut for Skyrim by right clicking on SKSE_Loader.exe and select "Send to" and then "Desktop" 21. Launch Skyrim using the shortcut you just created. 22. If you followed everything exactly your game should now have FNIS and SexLab installed and in working order. If all the NPCs and your character are walking around completely still with their arms out then you have done something wrong. Go back and start again from step 1.
-
View File Downloadable PDF version of the thread found here. I have uploaded it to the download area as everyone seems to keep missing the thread with it in. The links will still work even as a PDF. Submitter Ark of Truth Submitted 09/14/2013 Category Framework & Resources Requires Special Edition Compatible
-
 Greetings fellow Simmers, for some time now I am using Kickers Animated Woohoo mod for The Sims 3 and was quite amazed of how it breathed new life into my Sims3 game. However as for every Mod you'll reach it's frontiers quite soon, as you've seen every single aspect of it a couple of times. This is the usual moment where you start looking for MORE... ...which is also the moment you run into the certain problem that the amount of new content for this amazing mod is somewhat limited due the lack of contributors that actively tender their animation addons. I've seen some people now begging/requesting more content but the creators are also only humans that can't do the work in time of what an entire community demands of them. After seeing the dire need of animators I decided to get myself involved and start doing animations myself! Which wouldn't be a big deal if it was the animations I came up with only. It was what the actual process of actually becoming a capable contributor for this mod made me think of a certain truth: THERE IS NO SPECIALIZED TUTORIAL FOR THIS PARTICULAR MOD TO CREATE ANIMATIONS WITH All I had were the posing tutorials and rigs suited for that but no centralized information about how to tie everything up and make it working, well this was... UNTIL NOW! The last three days i haven't just spend gathering information, try things out, fail and start again until i finally reached full and complete success in every extent. NO, i've also took all my experience i've gained over that time,took all my testing and petrifyfied it into ONE PACKAGE. I proudly present you the first complete Animated Woohoo Step-For-Step Picture-Guided Tutorial Starter Pack, that has EVERYTHING you need in order to get your most wicked Animation Ideas in-game! This Starter Pack contains, every External Modding Programm, Plug-Ins and the precise description on how to use them to your advantage in one single archive file! Search no more for missing programs! Search no more for missing informations as this pack has it ALL! The best of it is that the Tutorial comes in a solid .PDF file that has all important Pictures, Informations and Material Links you'll need without the necessary requirement of having Internet! Take this .PDF anywhere, plus the Tools archive along with Blender (Which you still have to download manually once) and start doing Animations wherever you find a suitable creative environment! ENOUGH TALK NOW! It's time to get you guys all the Toys you ever wanted with the endless possibilities of this mod combined with the frontiers only set by your own creativity and skills in Blender. Stop begging for new content and start enriching the community, TODAY! I'd be very glad to hear from you folks if that guide finally got you into making animations for Sims3 and how helpful it was to you. Any suggestion and Ideas to improve the Tutorial or even the overall Starter Pack is appreciated. I also want to thank everybody who made these awesome tools, tutorials i've learned from and all other pretty materials already present! Since all I did was just completing the already pretty picture ^^. Happy Simming and animating! ------------------------------------------------------------------------------------------------- Here are some examples of what can be done by using this Tutorial: Animated Woohoo starter pack v1.0.7z -MEDIAFIRE DOWNLOAD MIRROR- These animation will be soon available in my very own animation compilation, so stay tuned as more is about to follow!