Search the Community
Showing results for tags 'Guide'.
Found 10 results
-
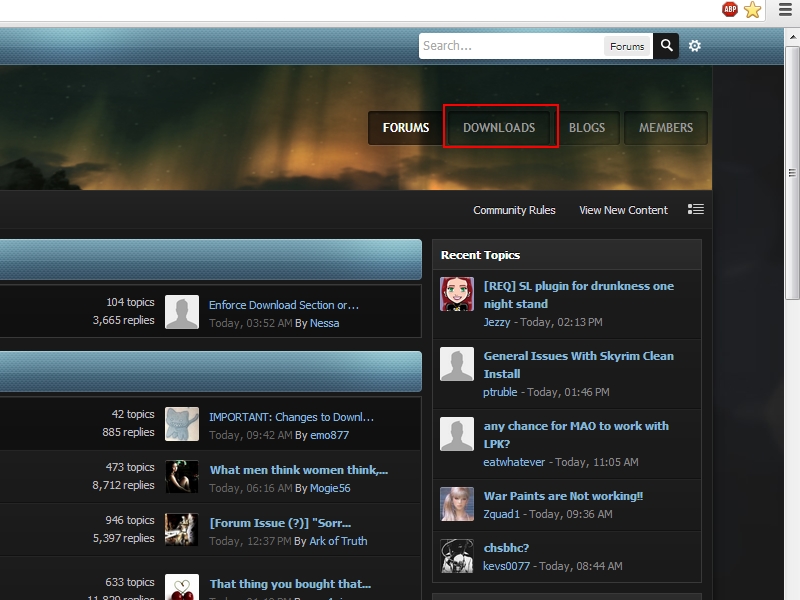
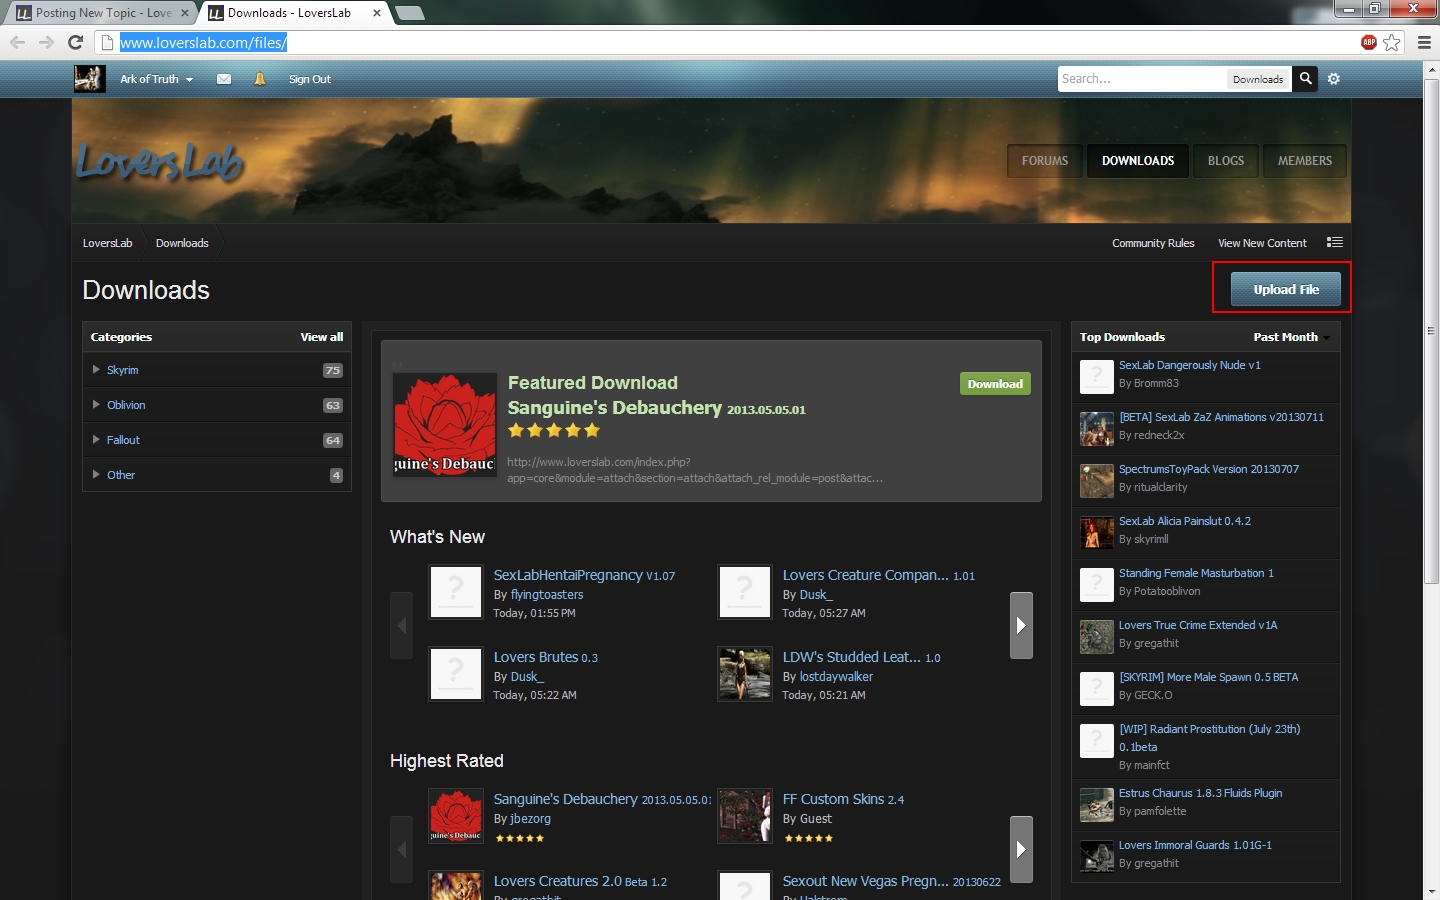
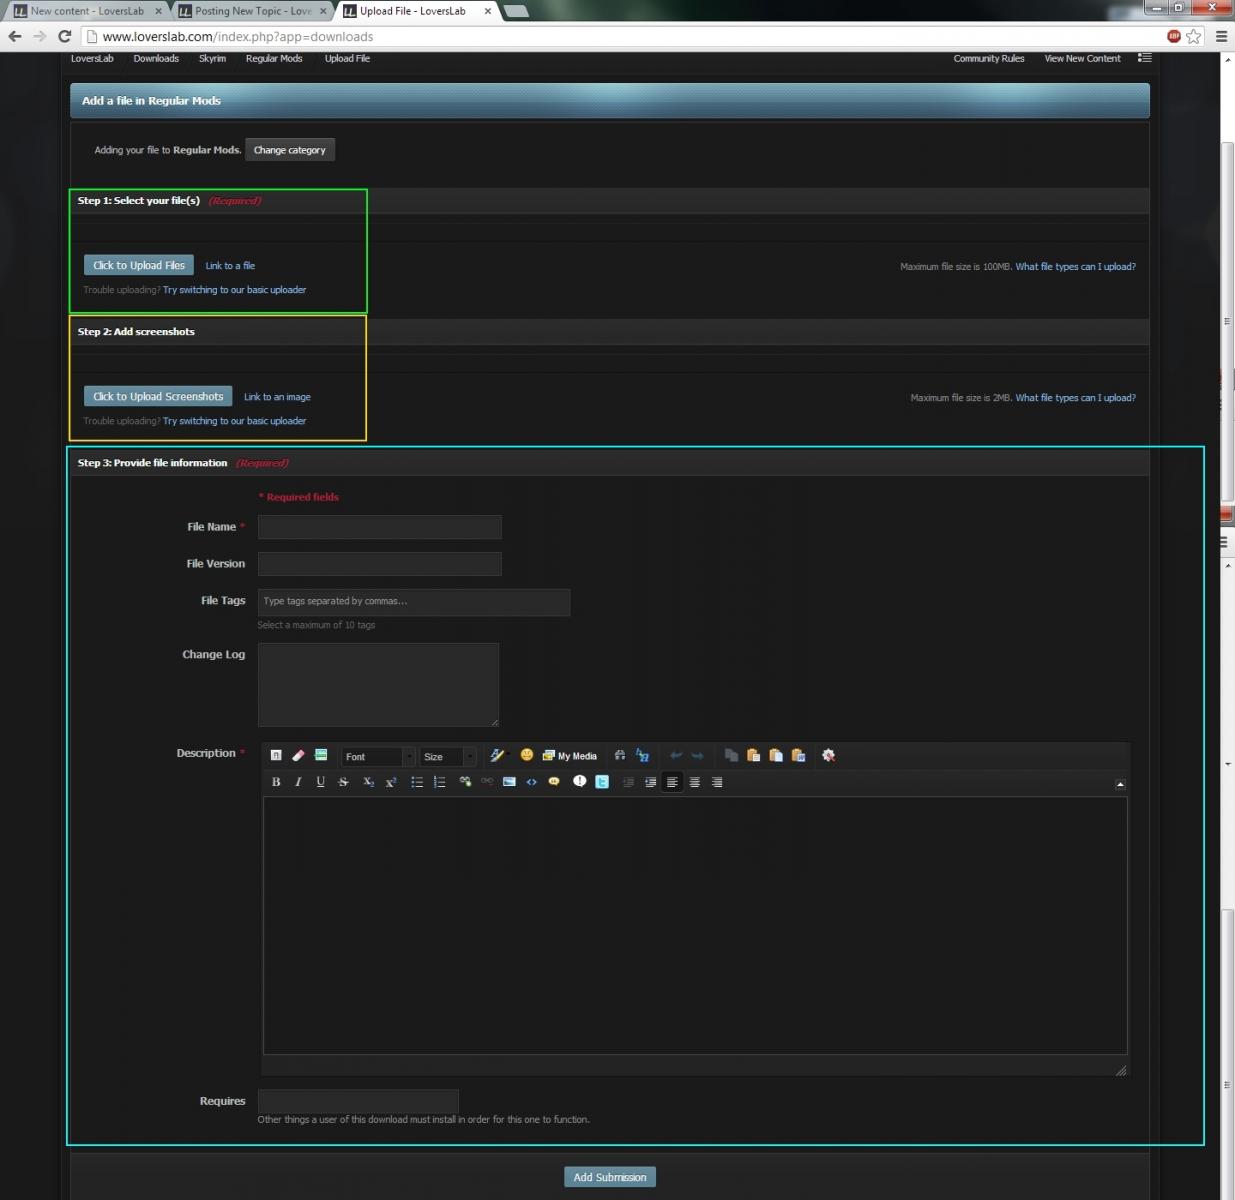
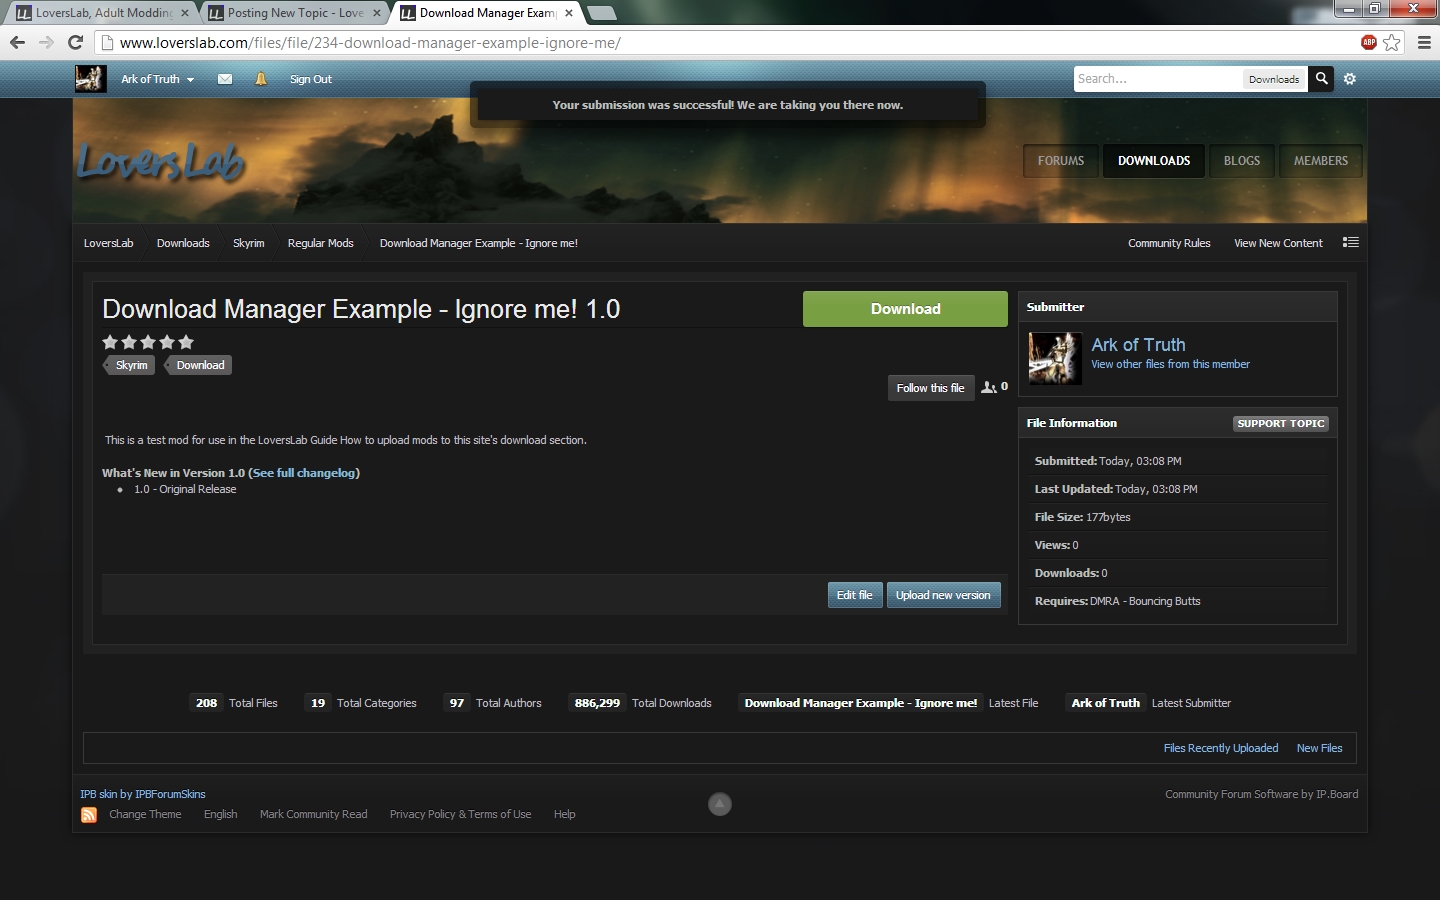
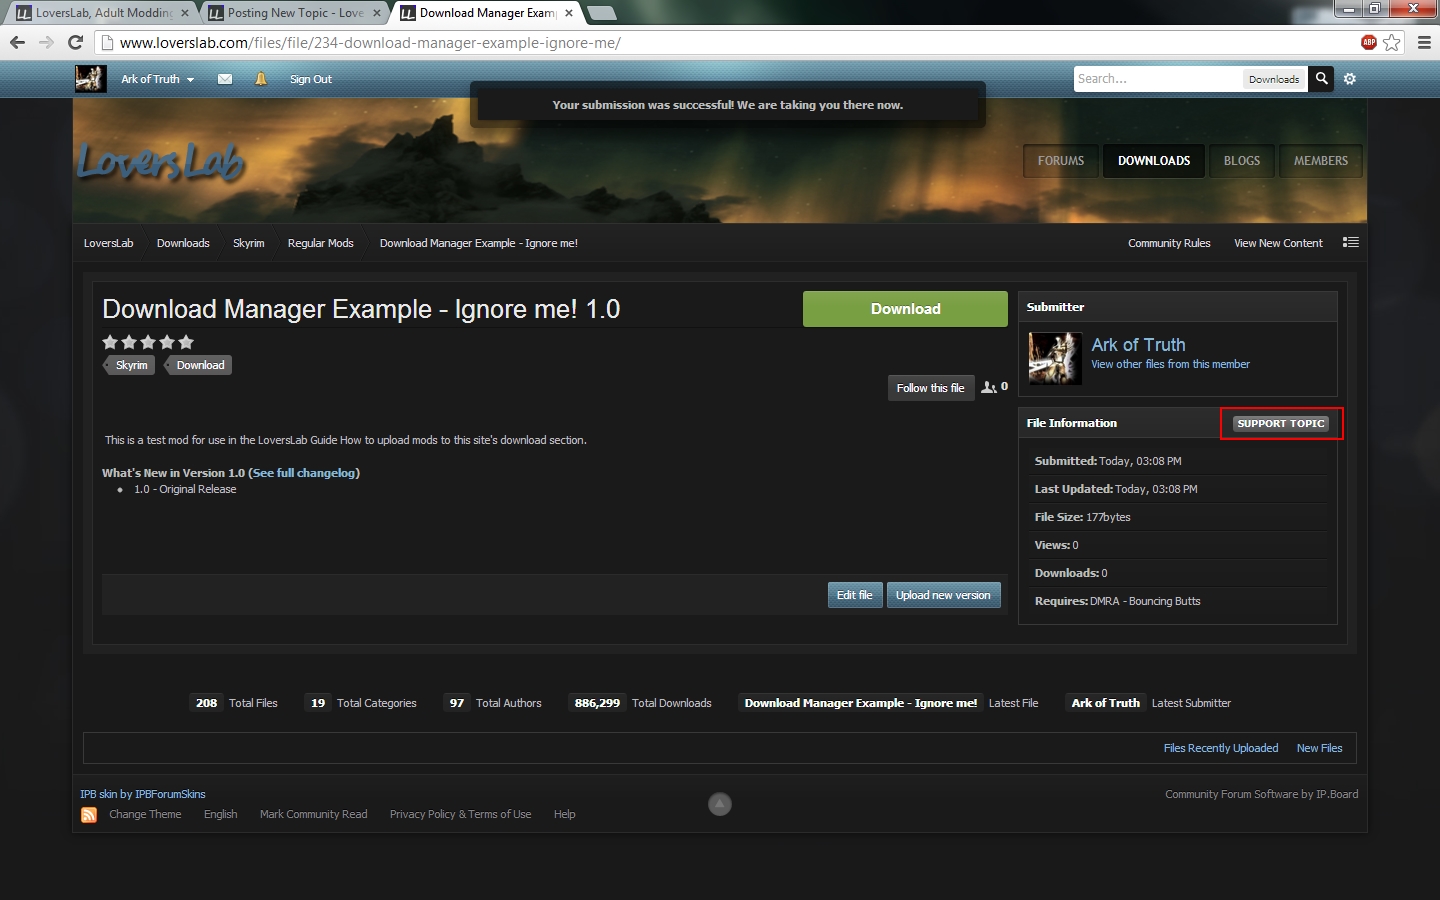
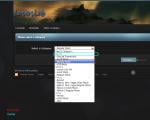
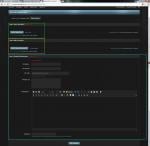
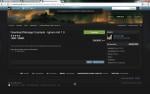
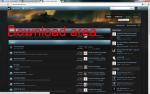
 Due to the new site policy of enforcing the download section of LoversLab the site will be under going a major change. All mod downloads regardless of size are to now be placed in the downloads section. This guide will teach users how to add mods to the download section as well as tell them how to make changes for future version releases. What this guide assumes: That you know how to package mods into archive formats such as Rar, ZIp and 7z. Assumes that you know how to select mods for upload. 1. First thing you will need to do is access the site's download manager, this can be done by going to the top right hand corner and selecting "Downloads" 2. You will now be greeted with the following screen. To upload a mod select the "Upload File" button. 3. Now it is important that you get this next bit correct as it will determine why your download is placed. For this example will be uploading a mod to the Skyrim section under regular mods. In order to do this open the "Select a Category" drop down list and select "Regular Mods" under the Skyrim heading. After selecting it press "Continue" 4. You will now be asked to enter information about your mod as well as upload the mod itself. You will need to do this in "steps". I will now take you through each step. Step 1 - Select your file(s) This step will ask you to select the file or files you wish to upload. Simple click the "Click to Upload Files" button and then select the file or files you wish to upload. In this case we are going to upload the file "Download Manager Example - Ignore me!". You can upload multiple files by holding the ctrl key and selecting the files you wish to upload. Note you can queue 10 for upload and upload a unlimited amount to a page, Supported File Types are: 000, 001, 002, 003, 004, 005, 006, 007, 7z, 008, 009, aiff, bmp, css, doc, esm, esp, fomod, gif, gz, hqx, htm, html, ico, jpeg, jpg, mov, mp3, mpg, nif, omod, pdf, php, png, ppt, ps, ram, rar, rtf, swf, tar, tiff, txt, viv, wav, wmv, xml, zip As well as upload files to the site you can link external site files to your download page. Do to this simple click the "Link to a file" button next to the "Click to Upload Files" button. Please note that when you link a file you can set what type of link it is. The current types are: Mirrors Contributed Files Required Software Similar Files Other Versions A external file which is linked to the download page will be given a random alphanumeric string attached to it, currently these strings cannot be renamed so it is important to use the type list to correctly label the link. Step 2 - Add Screenshots This is the same step as uploading files but it is for uploading screenshots instead. When you upload a screenshot the first one upload will become the mods "Cover image". All other screenshots will be placed at the bottom of the download page. Supported File Types are: gif, jpeg, jpg, mpg, png Step 3 - Add Screenshots 1. (Required) The first thing you need to do is add a name, my advice is to keep it clear and simple. If it is a Work In Process make sure to add a [WIP] tag at the front of the name. 2. (Optional) If you are planning on updating your mod in the future you might want to add a version. Simply just type mod version in the box. 3. (Optional) You can add up to 10 tags for a file. Tags are used to narrow down file searches when using the search function. 4. (Optional) You can use the change log to list changes with in your mod, this requires that you have entered a number in the "File Version" box. 5. (Required) This is the main body of your mod's download page. This will be visible when your mod's download page is opened by a user. 6. (Optional) This is for listing which mods are needed to make your mod work, right now it seems only capable of listing one mod. 5. When you have finished entering all this information simply place "Add Submission". 6. After selecting "Add Submission" your mod will be uploaded and you should get a page looking like the following. 7. After your mod has been uploaded a "Support Topic" will be automatically generated for you. You can access this topic by selecting the "Support Topic" button on the downloads page. Alternatively you can search for the topic using the search function as it shares the same name as your mod's download page. Congratulations you have successfully just uploaded your mod to the Download Manager!


-
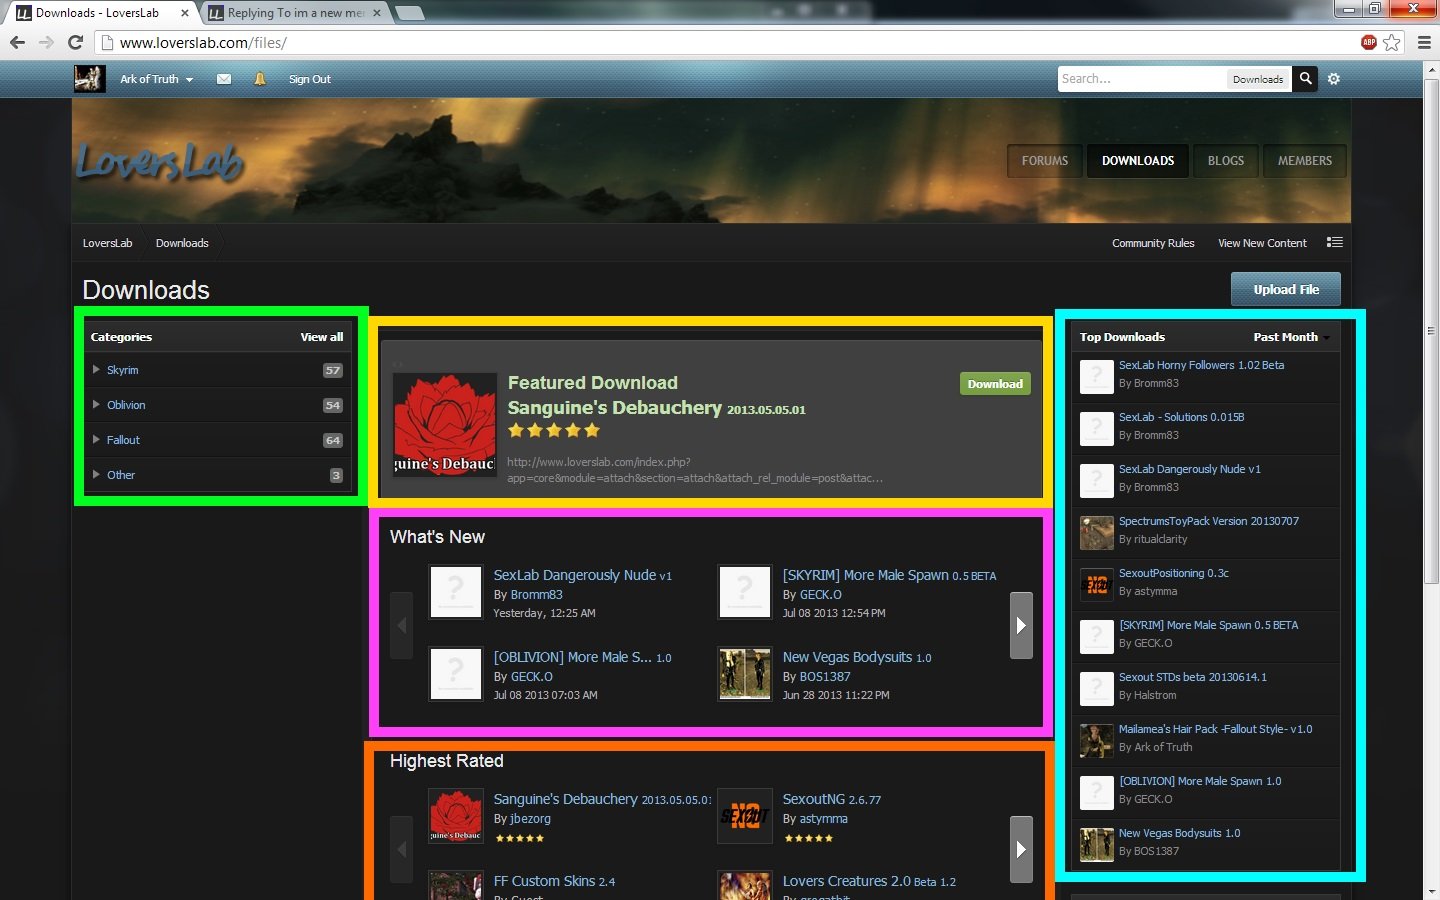
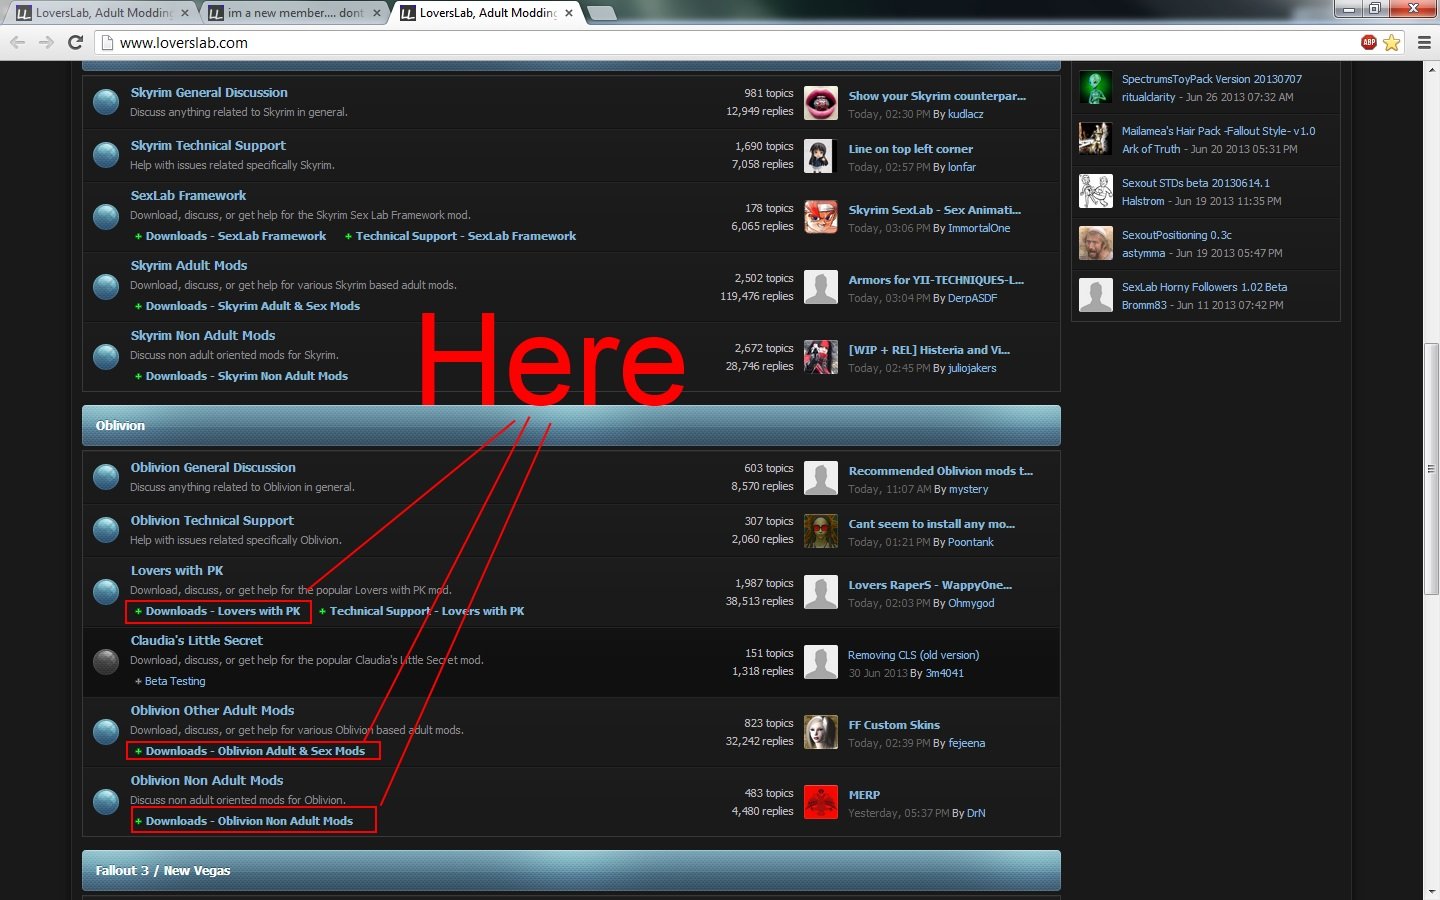
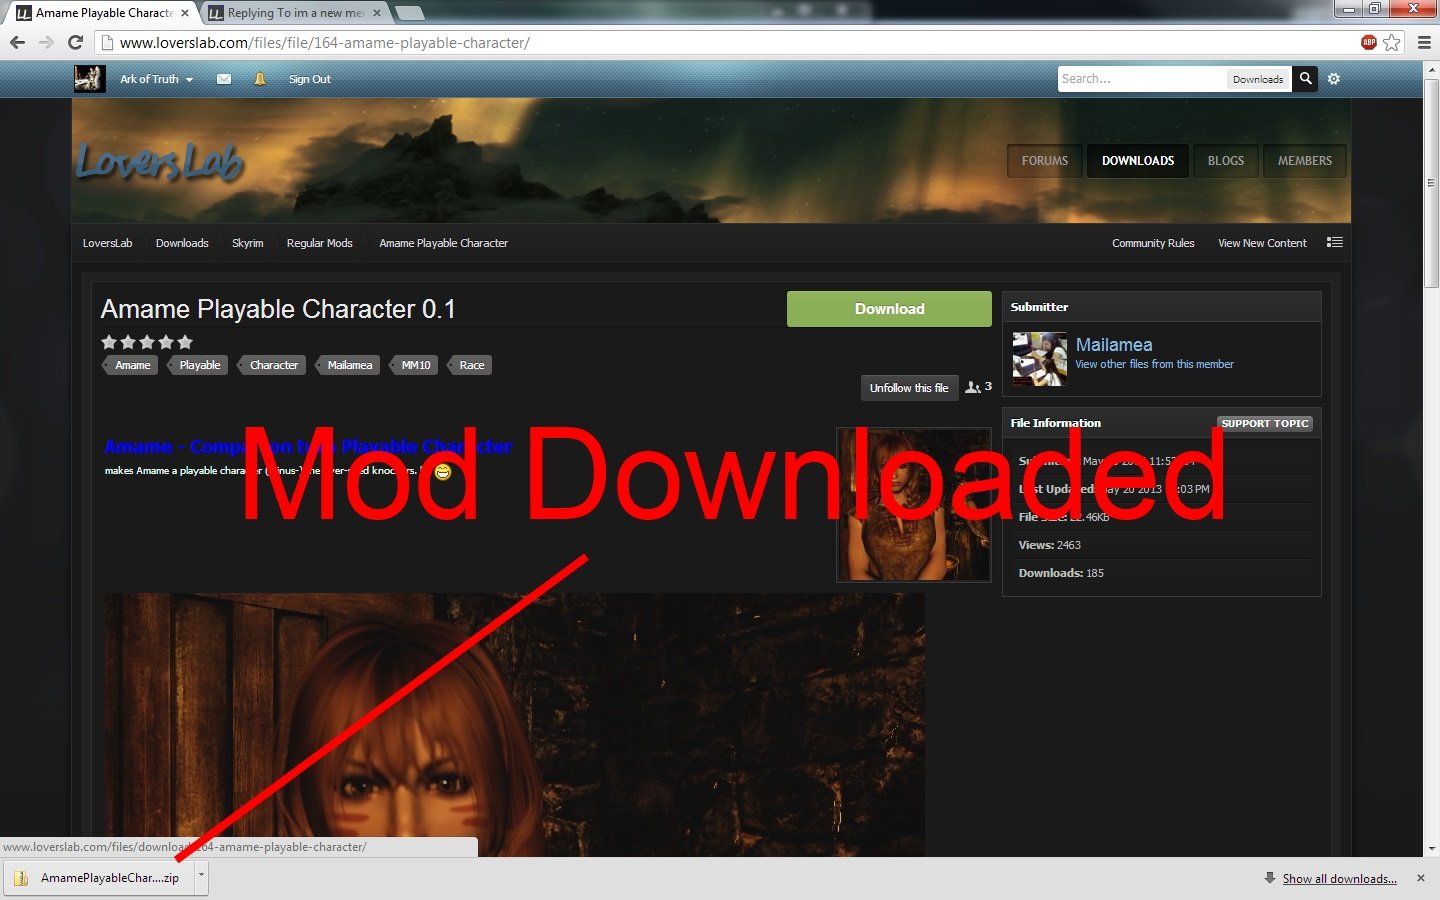
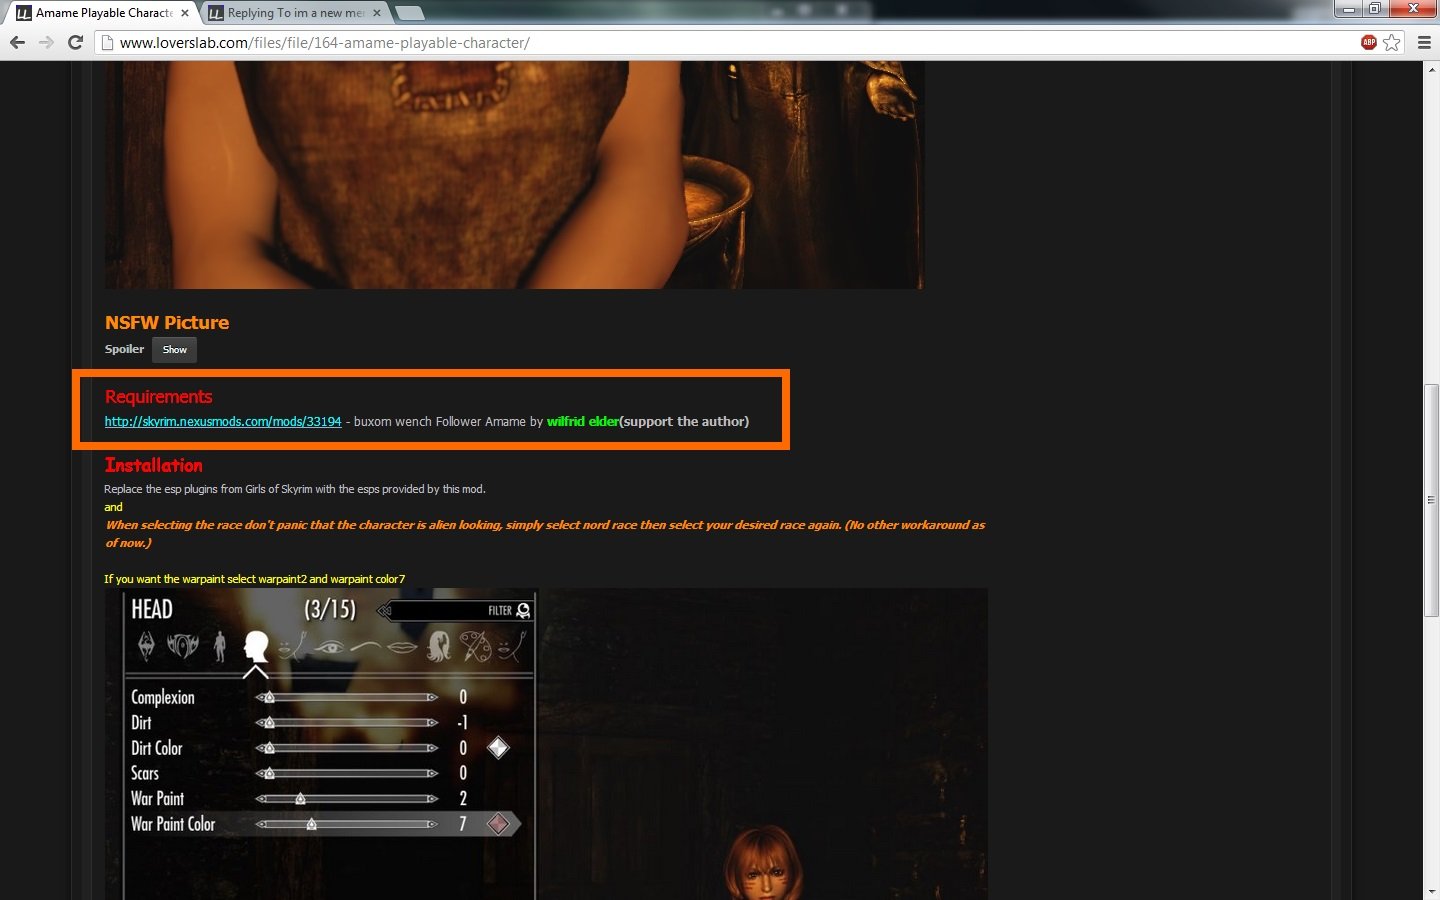
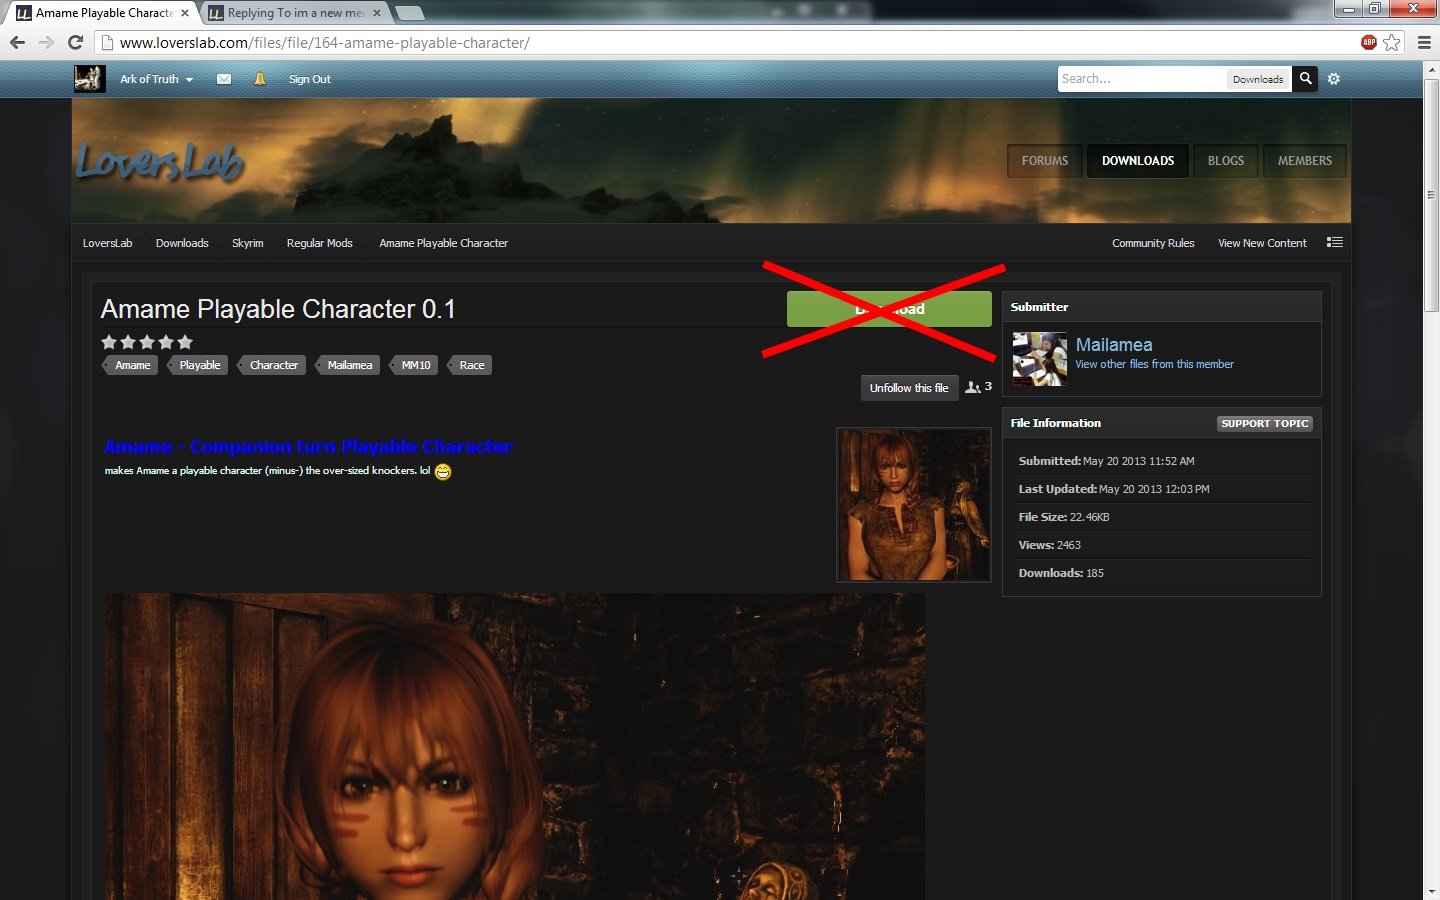
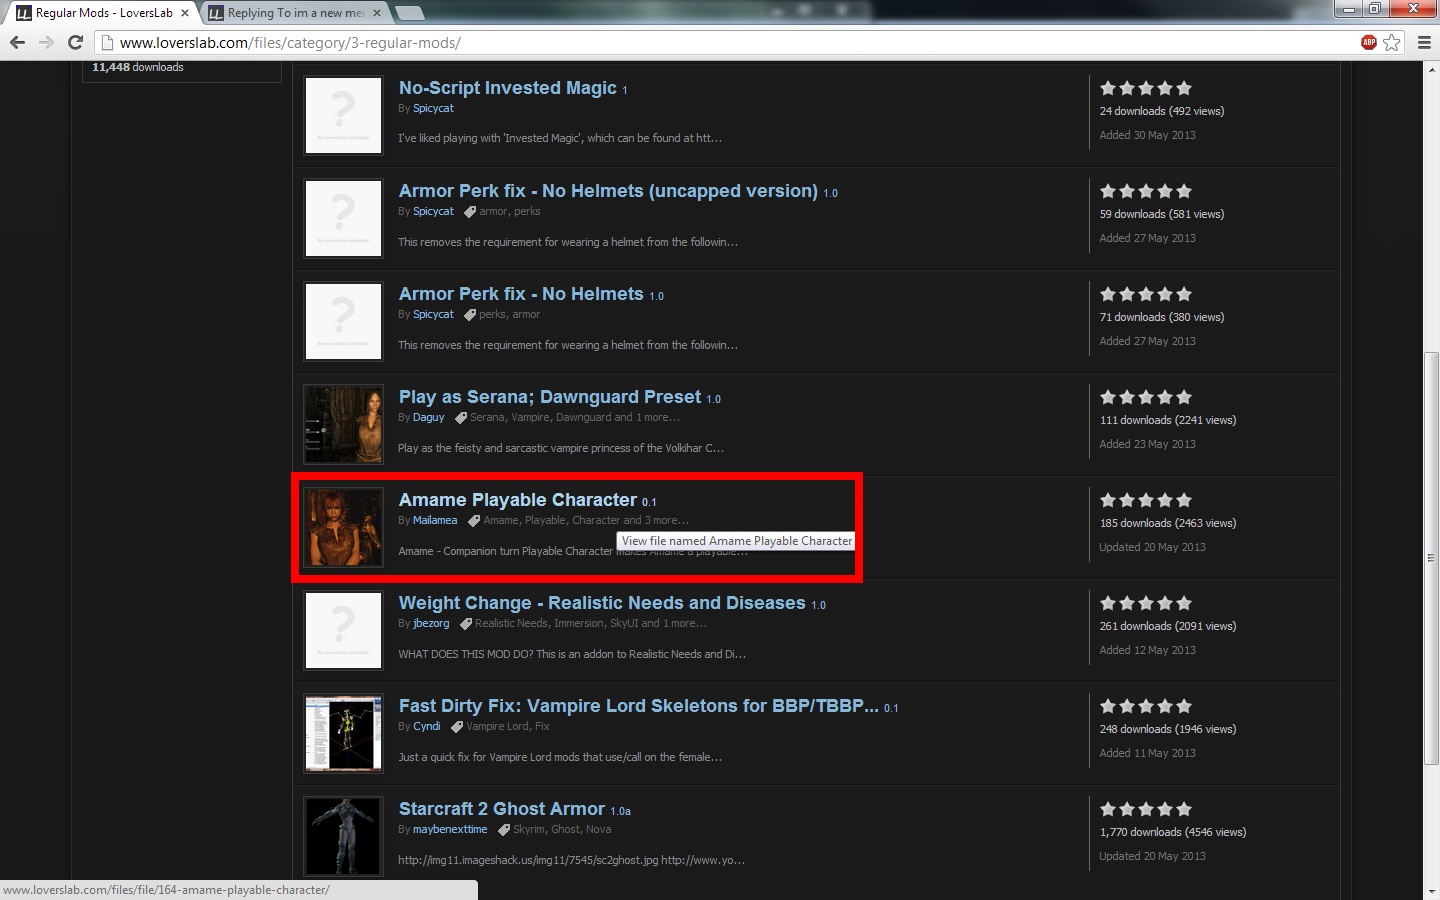
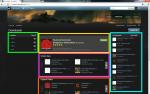
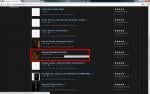
OK this is a tutorial on how to download mods from this site using the following methods. Downloading from the site downloads manager Downloading a mod from a thread in a downloads subforum. Site Download Subforums Threads which have downloads in them can be found in the Downloads subsection of the forums, Downloads - Oblivion Adult & Sex Mods is one example. To download the files from these threads just click on the download links, which should be marked. Inside there will be threads which contain mods for download. You can also find some more mods to download in the site's download area located in the top right of the screen. Site Download Area When you access this area you will be greeted with the following screen. On the left you will have the categories list, this is for what game you want to download mods for. In the centre of the screen you will see a preview of new mods which can be search through using the arrows, above that will be featured downloads and below it will be the highest rated. On the right will be the top downloads section. Below the Highest rated is the Most Watched downloads which can't be seen in the screenshot. Select the game you want from the categories list, we are going to use Skyrim in this case. The screen will now change and the follow will be displayed. The mods can be broken down into categories using the new list on the left and all the mods for that section will be displayed in the centre of the screen. We are going to use the categories list to get the screen to only display mods in the "Regular Mods" section. So we click it in the left box. Now we need to find a mod. I have scrolled down the screen and selected the mod Amame Playable Character 0.1 Now you will be greeted with the following screen. BEFORE you even touch that download button! Make sure that you go down the page and make sure that you have the requirements for the mod. After you have made sure you have the requirements you can hit the download button. If you don't have the requirements you can click on the links under the requirements section and you will be taken to the place you can download them from. Installing mods No pictures for this section. To install a mod simply unpack it to a temporary location. Most mods have a readme which tells you how to install the mod. READ THE THING AND FOLLOW IT FROM WORD TO WORD. Nothing rubs a modder the wrong way then someone being unable to read the readme or refusing to read it. Personally I find it easier to copy and paste the mods directly in the area they need to be without using mod managers. Mod managers which can be used for games are: Oblivion Mod Manager: Oblivion Fallout Mod Manager: Fallout 3 and Fallout New Vegas For Skyrim it most likely best to use the drag and drop method. In order to figure out how to install a mod using a mod manager follow the instructions in that mods readme or the instructions which came with the mod manager.

-
I moved The Sims 3 Complete Adult Guide as a new topic. So it will be easy to find rather than lucky notice it in my signature. [The Sims 3] ==Complete Adult Guide== Woohoo Mods: OnikiKay's KinkyMod (WIP): For this... no need explanation, just read the features : Non-rabbithole woohoo like Animated Woohoo... and also autonomous threesome, rape, bestiality, menstruation cycle, arousal+lust motive, naked/woohoo awareness, condom, etc. And more features in the future. But it still WIP, for stable gaming, use Kicker's Animated Woohoo. WIP Advises: - I highly recommend to try KinkyMod by start a new game and separate it with your main savegame. Error and corrupt can happen. - KinkyMod can't be run together with Animated Wohoo as there are some conflicts on certain features. - Don't use Nraas ErrorTrap. - For Nraas Overwatch, turn off delete cloth feature, as it will delete cloth sections created by KinkyMod. - Can run on the base game without expansion packs like Pets, Late Night, Into the Future. But the certain features tied with EPs will be turned off automatically if you don't have it. - Rape and Bestiality are optional. And must be turned on manually in the setting if you want that features. Alfiechan's Animated Woohoo +: AW+ is the successor of discontinued Kicker's Animated Woohoo. Basically it's the same as Kicker's Animated Woohoo, but with more features like Pregnancy, Risky Woohoo, Libido System, STD, Prostitution, many fixes and improvements. Kicker's Animated Woohoo: Was the best sex mod in TS3 before it get replaced by AnimatedWoohoo+ and KinkyWorld. No more rabbithole woohoo. Sims will have sex wherever they want: bed, sofa, chair, table, counter, window, hottub, etc, in life action! But still in development. Read carefully the link above, since it has many module and animation links, you won't miss even one. For the installation guide, check ModFrenzy's Guide. Nraas Woohooer: The best sex mod for EA style rabbithole woohoo, with tons of features to support it, from romance change, woohoo change, risky pregnancy, woohoo skill, to pay for sex. You can use it together with Animated Woohoo for the romance change and pay for sex features. Turn off all the autonomous woohoo change, since we don't need rabbithole woohoo anymore. PS: Read post #55 at page 3 for more detail about Animated Woohoo + Woohooer Graphical XTC Sexual Daydreams: Just like Kicker's Animated Woohoo but independent mod. Not as famous and big as Animated Woohoo. Additional Adult Mods: Nraas Decensor: Download this decensor mod, because it doesn't remove fish in the tank and others as the side effect. Nraas Shooless: No more shooing from peeing and take a bath. Pregnancy Mods: Cmar's Pregnancy Progress Controller: A complete pregnancy control, from instant pregnancy, set pregnancy progress, terminate pregnancy, set baby gender, pregnancy info, to even pause the pregnancy progress and stay pregnant forever. SimsMX's Hospital Overhaul: Add additional interaction to hospital: abortion, surrogate mother, sperm or egg donor, blood donor, helping suicide, etc. Additional Maternity Clothing: When you saw EA list of maternity clothes, you know that you need MOAR! Non-Adult Must Have Mods: Nraas MasterController: Control every aspect in the game. From setting sims skills, traits, family member, social relationship, career, education degree, to reedit your sims appearance again in CAS. Nraas Overwatch: A must have mod, to clean up the mess in the background. Make the game run smoother and out of problems. Body Mesh: Cmar's Morphing Penis (Male): You can change the size of the penis of each sims, from length, thickness, testicle size. Cmar's Morphing Penis (Female): The same as for male above, but for female. Cmar's Morphing Nipple (Female): 3D nipple for female, where you can change the size of the aureola and nipple length. There's also Natural Breast shape + Breast Fix version under GECK.O's Natural Breast Nude Top link below. Better Male Muscle Mesh: Bulged Male Pants and Undies: It's hugely frustrating to see how flat male bottom part in TS3, and this is the fix. Master Suite Stuff Pack version is here. Breast Fix for Sliders (Female): EA forget to add bone assignment to the bottom of the breast, bra and bikini mesh, it makes the breast shape look ugly when using breast slider to make it big. This is the fix. There's also default replacement for the nude top mesh inside and will conflict with Cmar's and GECK.O's breast mod. To fix it open the package file using S3PE and delete the afTopNude_LOD1. GECK.O's Natural Breast Nude Top (Female): Original EA nude mesh, especially the breast shape have the same breast shape as bra and bikini mesh. And this is the fix, to give natural breast shape for nude mesh that influenced by gravity. As it a default replacement, so use between this and Cmar's Morphing Nipple (3D). Update: Added Cmar's 3D Morphing Nipple for Natural Breast shape. GECK.O's Detailed Vagina and Reworked Butts: A simple reworked Female Nude Bottom, by giving a simple 3D camel toe vagina line and shape. And also reworked butts to make it more detail and rounder especially at the butt crack. Skin Texture: Skin Texture: Choose the skin textures based on your taste. Most of the latest skins already support Cmar's Morphing Penis above and correct nipple position for Buhudain's Normal Map Revision below, make sure you recheck it. If you feel lost, I can recommend some of them: --> Cmar's EA default texture with adult details. Some people like to keep their game in default style and pure. There are some variety of non-Barbie EA default skin in internet, but this is the best. It support Cmar himself made Morphing Penis above and correct nipple position for Buhudain's Normal Map Revision below. --> Ephemera's Eskin(s). For custom skin, Ephemera's Eskin(s) are the best. If you take notice, most of "skin blend" varieties are based on Ephemera's Eskin. --> Navetsea's skins. Navetsea's skin for Skyrim is one of the most popular. He also made a lot of skin for TS3, something that you should not missed. Face Overlay Fix: Default face overlay has a bit of "makeup effect" on the face, and the fix remove it. Good for custom skin texture above. There are also another varieties you can find and download from internet. Buhudain's Normal Map Revision: Keratin effect, hand detail, bumped nipple, veins on muscle, penis detail, vagina detail, camel toe, etc. Male and Female Pubic Hair Accessories: Adult sims is not complete without it. There are many textures, but for the most realistic pubic hair, Cmar's is the best, just extract and use the latest update: Real One, Real Two and Heavy, for both gender. Sliders: Shock&Shame's Complete Slider Download List: You can find all custom face and body slider links here. Breast sliders and Cmar's Sims Height slider are a must to have! Consort's Project Landslide: It's a batch command for the slider above. You can set sims height for example, to make all male sims taller and female sims shorter in entire world by just using two commands. Helping a lot. Sexy Clothes: Well, Happy Hunting at Download Site links below and elsewhere! Adult Objects: Well, Happy Hunting at Download Site links below and elsewhere! Gameplay Scenario Tips - BROTHEL OFB: http://www.loverslab.com/topic/20608-simlab/page-18?do=findComment&comment=843535 (Draft tutorial for now...) Major Download Sites: TheSims3.com Exchange: Make sure to check the forum as well, Creative Corner. ModTheSims.info: The main modding community and download site, both mods and cc. Most hardcore sims modders are hanging here. SexySims.info: Adult version of ModTheSims. TheSimsResource.com: TheSimsResource is the biggest cc download site. Hosting TSR Workshop, the major tool to create cc for TS3. SimAsylum.com: Check Simsrod and Twoftmama mods! SimLogical.com: A lot of interesting scripted objects and other mods. CC Find Sites: My Sims 3 Blog: One of the most popular, but it stopped updating their database since 31 December 2013. They are focusing on TS4 now. If you want to find specific stuff, use their search feature. As well as using tag/label to browse particular stuff, like world or skintone. Sims 3 Updates: Another most popular, they also post interesting stuffs from TheSimsResource.com. But since TS4, the site is being updated once a week. CC Caboodle: Equally interesting as two above, but still active and being updated everyday. Sunny CC Finds: Sunny CC Finds just focus on what being posted on Tumblr.com, or stuff outsite the Tumblr.com but being mentioned there. Updated everyday. Lana CC Finds: Just like Sunny CC FInds above, it's complementing each other. You will find some stuffs that doesn't posted in Sunny CC Finds and vice versa. They mixed with TS4 stuffs in standard page, but I give TS3 cc tag on the link, so it just show TS3 stuffs only. AwesomeSims: Same as Sunny CC Finds. Graphics Mods: SweetFX: It works perfectly on The Sims 3. There's some presets people made for it. Reshade: A universal-ENB-like, that can run on most games. It can run on TS3, but I heard the framerate drop from 50 fps down to 10 fps. You can try it, but I can't guarantee. Buhudain's Lighting Mods: Buhudain's lighting mod characteristic is tropical bright-strong daylight, spectacular sunset and sunrise, and aurora at dark night. There's a lot of customization to choose. BrntWaffles's Lighting Mods: BrntWaffle has a lot of Lighting Mod to choose, from Dystopian, Frozen Inspired, Perfect Day, Midnight Dream, Alien Sky, etc. I highly recommended to check another The Sims 3 Adult Guide below at post #3.
-
-
INTRO: I made this thread to sort of neatly compile all the data/information over in the BodySlide Conversion Thread into a neat little guide to encourage more of you to use BodySlide and Outfit Studio correctly! The following link is all you need for most of these tutorials, it also contains official tutorials and FAQ on the main page. BodySlide 2 and Outfit Studio Fun Fact: CREDITS: Caliente - Creator of BodySlide and CBBE body cell (ousnius) - Contributor to BodySlide. You can ask him for assistance/bug reports on his thread here or the Nexus mod page stuffed_bunny - Contributor to BodySlide. Advanced users click his link for some resources and BSD slider data tools! ChronoTrigger77 - Contributor to BodySlide and creator of Remodeled Armor. Click the link for his work. Malystraza - Immortalizing this post by turning it into a professional looking PDF! Ashal - For pinning this thread so it can be used as a resource for users and modders alike. TERMINOLOGY: Read this section if you are unfamiliar with some terms in the guides. More advanced users can skip. GUIDE 0: Preparing meshes for Outfit Studio: (Not needed for newest version of Bodyslide) GUIDE 1: Any Outfit -> BodySlide (Custom Body): GUIDE 2: Loading a BodySlide Preset into Outfit Studio: GUIDE 3: Convert/Edit any outfit mesh (any body type): Guide 4: Tweak BodySlide/Outfit Studio: GUIDE 5: Outfit Studio's "Set Textures" feature: GUIDE 6: Setting up BodySlide presets to show up on your outfit: DISCLAIMER: This method should only be used for testing your own preset with the conversion, for a QUALITY release, please see guide 9. Guide 7: Creating your own sliders for an outfit: Guide 8: Adding options to your BodySlide outfits (e.g. Zaps): Guide 9: Packaging your BodySlide conversion for release (outfit groups): Guide 10: HDT/TBBP Nipple Piercing BodySlide Conversions (Video Only for Now): Guide 11: Transferring sliders via XML editing (WIP): FAQ: Q: I think I found a bug in BodySlide/Outfit Studio. A: Well, first check the official GitHub issues list to see if it's already been identified, and if it isn't, PM cell here (or ousnius on Nexus) with a description of it. Q: When I load up my conversion in-game I have these black squares or irregular textures? A: In Outfit Studio, hit "Shape" and uncheck "Smooth Seam Normals". Q: I get animation clipping issues on my conversions? (Body clipping through outfit in-game) Multiple fixes: 1. Go back in OS and create more 'space' between the mesh and the body using the brushes (hint: view in wireframe mode to double check the areas). 2. Create a zap slider and mask the belly area, invert the mask and click "Slider -> New Zap". This will 'hide' the belly underneath the armor so you will not see clipping issues. 3. Re-adjust bone weighting. Number 1 is fairly easy, number 2 is sort of a hack in my mind, but many armors and such have done this to circumvent weight clipping. Number 3 is by far the hardest, but could also potentially give the most 'quality' result (or it may not xD). Q: When I load boots/gloves the feet/hands/mesh is completely off from the body A: This is a known bug, you can try fixing this in Outfit Studio by hitting "Shape -> Move Shape" to move the ENTIRE shape back onto the body. Test if it worked by exporting to *.nif and opening in NifSkope and see if it shows up correctly. If not, then you're out of luck and should seek further assistance. Q: Help! No textures load in Outfit Studio or I have completely black textures! A: Well, check to make sure your textures are 'loose' and not packed inside a .bsa, this isn't a feature supported yet. If the textures are loose and you're still not getting any textures or black textures in Outfit Studio, then it's just a bug that others have reported. See guide 5 for quick fix.[/color] Q: I loaded my outfit into BodySlide, but I don't see my preset? A: You have to manually add your outfit to the (super) group the preset was saved in, or edit your created preset so that it links to your outfit. You can still create the outfit with your BodySlide preset, you just need to navigate to the body that you made the preset for, select the preset, then type your outfit's slider set name into the "Outfit Filter" and hit batch build. Q: When I add weights to my outfit mesh and try opening it up in NifSkope, I get a bunch of errors. A: Please see guide 0, and also make sure that all vertices of it are weighted! Q: What's that sexy text editor you use? (Okay not really asked but still...) A: Sublime Text 3 PERMISSIONS: Feel free to copy/paste or link this guide. Feel free to translate this guide. Feel free to make your own guide I've attached the images to help you! (They'll be updated for revisions/changes) If this guide helps any of you, then the best way to say thanks is to make more conversions and share with the community! Guide 1 Pics.rar Guide 2 Pics.rar Guide 3 Pics.rar Config.xml Guide 4 Pics.rar Guide 5 Pics.rar Guide 6 Pics.rar Guide 7 Pics.rar Guide 8.rar Guide 9 Pics.rar BodySlide for Dummies.pdf Guide 0 Pics.rar
-
GUIDES FRANÇAIS Salutations à toutes et à tous, Vous trouverez ici deux guides. Le premier guide vous apprendra à installer proprement vos mods et à installer correctement les mods de LoversLab. Le second guide vous aidera à régler ou à signaler les éventuels problèmes que vous pourrez rencontrer avec ces derniers. Bonne lecture et bon jeu ! Guide de l'installation : http://www.loverslab.com/topic/45372-fr-guide-installation-et-support/?do=findComment&comment=1135468 Quoi de neuf dans le guide ? Guide du support : http://www.loverslab.com/topic/45372-fr-guide-installation-et-support/?do=findComment&comment=1135499 Quoi de neuf dans le guide ? Vous pouvez directement participer à la réalisation de ces guides en répondant à ce sujet ou en m'envoyant un message. CONSEILS GÉNÉRAUX FOIRE AUX QUESTIONS
-
Please do not ask for support in this thread, if you require support making any of this work please post here. Getting Started with SexLab A guide to installing and setting up SexLab ----- Introduction ------------------------------------------- Sometimes setting up SexLab can be tough, especially if you are new to modding. This guide has been created by a user for users. This guide will show you how to install SexLab and its requirements as well as show you how to configure SexLab to get animations working both with NPCs and creatures. ----- Important information to note before continuing ------------------------------------------- LoversLab does not support piracy in anyway, shape or form. Users wanting help install SexLab with pirated copies should not ask or expect support. Support is only given for Skyrim version 1.9.32 ----- Frequently Asked Questions ------------------------------------------- Ashal has created a nice FAQ answering some of the most asked question about SexLab, you can access it here. Questions about this guide can be found here. ----- What you will need ------------------------------------------- You will need to download the following files and mods before you begin. Download them to a folder located on your desktop and unpack them all into separate folders. Skyrim Script Extender (The guide will be referring to this as SKSE) Fore's New Idles in Skyrim (The files you need are listed below, this is a Nexus link) FNIS Behaviuor v4.1.1 - ALWAYS necessary FNIS Idle Spells v4.0.2 - ADD ON for the spells (Optional, not needed but the guide will cover its installation) FNIS Creature Pack version 4.1 or newer is required only if you want creature animation support in SexLab, otherwise it is not required. SexLab Framework 1.35 SkyUI ----- Manual install procedure for SexLab, FNIS and SKSE ------------------------------------------- Tip for Windows 7 and 8 users: Open the folder containing the unpacked mods and Skyrim directory side by side using the Snap feature. This will make installing SexLab and it's requirements easier. Copy the contents of the SKSE folder to the main Skyrim directory, this is the folder which contains the Data folder. Copy the contents of the FNIS Behaviuor v4.1.1 - ALWAYS necessary folder to the Skyrim Data folder, this is the folder which contains the meshes and texture folders. (Optional) Copy the contents of the FNIS Idle Spells v4.0.2 - ADD ON for the spells folder to the Skyrim Data folder. (Optional) Copy the contents of the FNIS Creature Pack 4.1 folder to the Skyrim Data folder. When asked overwrite files. Copy the contents of the SexLab Framework 1.39 folder to the Skyrim Data folder. Overwrite existing files if it asks. Copy the contents of the SkyUI folder to the Skyrim Data folder. Go to the Skyrim Data folder and find the folder called "Tools", open this folder. If you cannot find this folder do steps 2 to 4 again. In there you should see two folders, one called GenerateFNIS_for_Modders and another called GenerateFNIS_for_Users. Open the folder called GenerateFNIS_for_Users. Run GenerateFNIS_for_Users.exe. You should now see the FNIS window open up. If you are using xp32 skeleton then make sure you select "SKELETON Arm Fix" from the menu at the bottom of the window. Select "Update FNIS Behaviours" Note: If you have the creature pack installed it will set these animations up as well. You should see something like the following appear in the window, this is FNIS reading and configuring mods. Go to the Skyrim root folder and create a new shortcut for Skyrim by right clicking on SKSE_Loader.exe and select "Send to" and then "Desktop" Launch Skyrim using the shortcut you just created. If you followed everything exactly your game should now have FNIS and SexLab installed and in working order. Please note using just using the SexLab Framework by itself does nothing, you need a plugin like SexLab Romance installed in order to make use of the framework. In order to find SexLab based mods you should head towards the SexLab section of the download area or go to the thread here which LaEspada has created indexing all SexLab mods. Simply download the mod you want to install, install it to the Skyrim Data folder using the instructions located within the readme or mod description page and load the plugin AFTER SexLab.esm. ----- Configuring SexLab in game using Mod Configuration Menu ------------------------------------------- - Currently in development - ----- Credits ------------------------------------------- Getting Started with SexLab: Ark of Truth Mailamea SexLab Project Owner, Thread layout: Ashal A full credits for SexLab based work list can be found here.
-
 PURPOSE: This thread is geared towards providing guides/tutorials and support for beginners to the wonderful world of HDT physics modding. This guide will be broken up into two posts, the first main post will be geared towards end users, contain FAQ, Resource links and support tips. The second post will contain tutorials/guides and other miscellaneous resources and info for modders. CREDITS: HydrogensaysHDT - Creator of HDT plugins Monsto Brukes - Creator/Moderator of HDT Subforums Canderes - Contributor to HDT physics, click on name for his guides & resources Yoo - Contributor to HDT physics modding, click on name for his latest project Groovtama - Resident Skeleton Wizard and provider of HDT Rig Map Fix. Enskyment - For Making a kick-ass guide for newbie end users! Special thanks to: Vioxsis, b00marrows, jacques00, Daiemonic, Stevierage, clp2011 and others for contributing to the HDT physics scene RESOURCES: HDT Download 14-28 Havok Physics SDK Feature Guide TERMINOLOGY: Read this section if you are new or unfamiliar with some of the terms in the guides and/or feedback from other users GUIDE 0: For Absolutely New to HDT: Click the above link for an awesome guide made by Enskyment meant to quickly get you up to speed with all of this stuff! GUIDE 1: Basic HDT Physics Installation (No Pics Yet): GUIDE 2: Adding Collision to your HDT PE Installation (Manually) (On Hold): FAQ: Q: I heard deleting the skeleton_female.hkx (Rig Map) file helps fix things with HDT Physics? A: NO, stop it. That piece of information is old and even then it was a horrible 'workaround'. DO NOT DELETE THIS FILE. Instead use the attached Groovtama's Rig Map file for maximum HDT Compatibility. Q: I do use my own custom skeleton and use HDT Physics, anything further I need to do? A: Yes, Download and install Groovtama's custom Rig Map, be warned though that if you are using a custom skeleton that has a new non-standard bone used for animation that is not already included in the XPMS skeleton, that this Rig Map will not contain the animation data for that new bone and you will need to add it yourself. Permissions: Feel free to copy/paste or link this guide Feel free to translate the guide. Feel free to make your own guide , I've attached the images to help you! (They'll be updated for revisions/changes) Groovtama HDT Rig Map.rar
 -
Here is the instructions for installing FNIS manually for Skyrim, for those of you who are wanting to install FNIS for SexLab please look here. This guide requires that you have some common knowledge of modding Skyrim. This guide assumes you are using an account with administrator privileges. 1. Download SKSE from here 2. Go to the FNIS download page on the Nexus. 3. Download the file called FNIS Behavior v5_3 -- ALWAYS necessary 4. Download the file called FNIS Idle Spells v5_0_1 -- ADD-ON for the spells 5. Download the file called FNIS Behavior V5_3 Fix 1-11811 (Optional Step) - Download the file called FNIS Creature Pack 5_3 Beta1-11811-5-3-Beta1 6. Unpack both FNIS files to the desktop. 7. Unpack SKSE to the Desktop. 8. Copy the contents for the SKSE folder to the main Skyrim folder (The one which contains the Data folder) 9. Copy the entire contents of FNIS Behavior v5_3 -- ALWAYS necessary to the Skyrim Data folder. 10. Copy the entire contents of FNIS Idle Spells v5_0_1 -- ADD-ON for the spells to the Skyrim Data folder. 11. Copy the entire contents of FNIS Behavior V5_3 Fix 1-11811 to the Skyrim Data folder. (Optional Step) - If you are installing mods for creatures, copy the entire contents of FNIS Creature Pack 5_3 Beta1-11811-5-3-Beta1 to the Skyrim Data folder. 12. In the Skyrim Data folder go open the folder called "Tools". (If it's not there you have not followed the instructions, start again from the beginning) 13. In there you should see two folders, one called GenerateFNIS_for_Modders and another called GenerateFNIS_for_Users 14. Open the folder called GenerateFNIS_for_Users 15. Run GenerateFNISforUsers.exe 16. You should now see the FNIS window open up. 17. If you are using xp32 skeleton then make sure you select "SKELETON Arm Fix" from the menu at the bottom of the window. 18. Select "Update FNIS Behaviours" 19. You should see something like the following appear in the window, this is FNIS reading and configuring mods. Note: My screen will look slightly different as I have FNIS Zoo installed -Picture needs updating- 20. Go to the Skyrim root folder and create a new shortcut for Skyrim by right clicking on SKSE_Loader.exe and select "Send to" and then "Desktop" 21. Launch Skyrim using the shortcut you just created. 22. If you followed everything exactly your game should now have FNIS and SexLab installed and in working order. If all the NPCs and your character are walking around completely still with their arms out then you have done something wrong. Go back and start again from step 1.
-
View File Downloadable PDF version of the thread found here. I have uploaded it to the download area as everyone seems to keep missing the thread with it in. The links will still work even as a PDF. Submitter Ark of Truth Submitted 09/14/2013 Category Framework & Resources Requires Special Edition Compatible